Page 86 of 509

85 Controls in detail
Seats
�Seats
Seat adjustment
Warning!G
All seat, head restraint adjustments, as well
as fastening of seat belts, must be done be-
fore the vehicle is put into motion.
Warning!G
Do not adjust the driver’s seat while driving.
Adjusting the seat while driving could cause
the driver to lose control of the vehicle.
Never ride in a moving vehicle with the seat
back in an excessively reclined position as
this can be dangerous. You could slide un-
der the seat belt in a collision. If you slide
under it, the seat belt would apply force at
the abdomen or neck. That could cause se-
rious or fatal injuries. The seat backrest and
seat belts provide the best restraint when
the wearer is in a position that is as upright
as possible and seat belts are properly posi-
tioned on the body.
Your seat must be adjusted so that you can
correctly fasten your seat belt.
Observe the following points:
�Adjust the seat backrest until your arms
are slightly angled when holding the
steering wheel.
�Adjust the seat to a comfortable seating
position that still allows you to reach the
accelerator/brake pedal safely. The po-
sition should be as far back as possible
with the driver still able to properly oper-
ate controls.
�Adjust the head restraint so that it is as
close to the head as possible and the
center of the head restraint supports
the back of the head at eye level.
�Never place hands under the seat or
near any moving parts while a seat is be-
ing adjusted.
Failure to do so could result in an accident
and/or serious personal injury.
Warning!G
When leaving the vehicle, always remove the
SmartKey or SmartKey with KEYLESS-GO*
from the starter switch, take it with you, and
lock the vehicle.
Even with the SmartKey or SmartKey with
KEYLESS-GO* (Canada only) removed from
the starter switch or the SmartKey with
KEYLESS-GO* (Canada only) removed from
the vehicle, the power seats can be
operated.
Therefore, do not leave children unattended
in the vehicle, or with access to an unlocked
vehicle. A child’s unsupervised access to a
vehicle could result in an accident and/or
serious personal injury.
Page 87 of 509
.Power seat adjustment
The seat adjustment switch is located on
th")
86 Controls in detail
Seats
For additional information about children
in the vehicle, see “Children in the vehicle”
(
�page 51).Power seat adjustment
The seat adjustment switch is located on
the entry side of each front seat base.
The seat adjustment switch for Canada ve-
hicles with memory function* are located
on the front doors.
1Seat cushion tilt
2Seat height
3Seat fore and aft
4Seat backrest tilt
�Vehicles without memory function*:
Adjust the head restraint height manu-
ally (
�page 87).
Driver’s door (Canada only)
1Seat cushion tilt
2Seat height
3Seat fore and aft
4Seat backrest tilt
5Head restraint height (
�page 87)
Warning!G
According to accident statistics, children
are safer when properly restrained in the
rear seating positions than in the front seat-
ing position. Thus, we strongly recommend
that children be placed in the rear seats
whenever possible. Regardless of seating
position, children 12 years old and under
must be seated and properly secured in an
appropriately sized infant restraint, toddler
restraint, or booster seat recommended for
the size and weight of the child.
A child’s risk of serious or fatal injuries is
significantly increased if the child restraints
are not properly secured in the vehicle and
the child is not properly secured in the child
restraint.
iAfter unlocking the vehicle or turning off the
engine, the seat adjustment can be operated for
up to approximately 3 minutes with the
SmartKey or KEYLESS-GO* (Canada only) in
starter switch position0 or removed from the
starter switch.
Vehicles with memory function* (Canada only):
The memory function* is operational at any time.
Seat and steering wheel adjustment is always
possible.
Page 88 of 509
 into the starter switch")
87 Controls in detail
Seats
If it is not possible to adjust the seat with
the seat adjustment switch:
�Insert the SmartKey or the
KEYLESS-GO start/stop button*
(Canada only) into the starter switch.
or
�With SmartKey or KEYLESS-GO*
(Canada only) in starter switch
position0. Turn the SmartKey in
starter switch to position1 or press
the KEYLESS-GO start/stop button*
(Canada only) once.
or
�Open the driver’s or front passenger
door.
�Seat cushion tilt: Press the switch up
or down in the direction of
arrow1until your upper legs are
lightly supported.
�Seat height: Press the switch up or
down in the direction of arrow2.
�Seat fore and aft: Press the switch for-
ward or backward in the direction of
arrow3.
�Seat backrest tilt: Press the switch
forward or backward in the direction of
arrow4.Adjusting front seat head restraints
You cannot remove the active head re-
straint on the driver’s and front passen-
ger’s seat.
For removal contact an authorized
Mercedes-Benz Center.
For information on active head restraints,
see “Active head restraints” (
�page 50).
iCanada only:
The memory function* (
�page 102) lets you
store the settings for the seat positions together
with the settings for the steering wheel and the
exterior rear view mirrors.
!When moving the seat, make sure there are
no items in the footwell or behind the seats. Oth-
erwise you could damage the seats.
Warning!G
For your protection, drive only with properly
positioned head restraints.
Adjust the head restraint so that it is as
close to the head as possible and the center
of the head restraint supports the back of
the head at eye level. This will reduce the po-
tential for injury to the head and neck in the
event of an accident or similar situation.
Do not drive the vehicle without the seat
head restraints. Head restraints are intend-
ed to help reduce injuries during an acci-
dent.
Page 89 of 509
88 Controls in detail
Seats
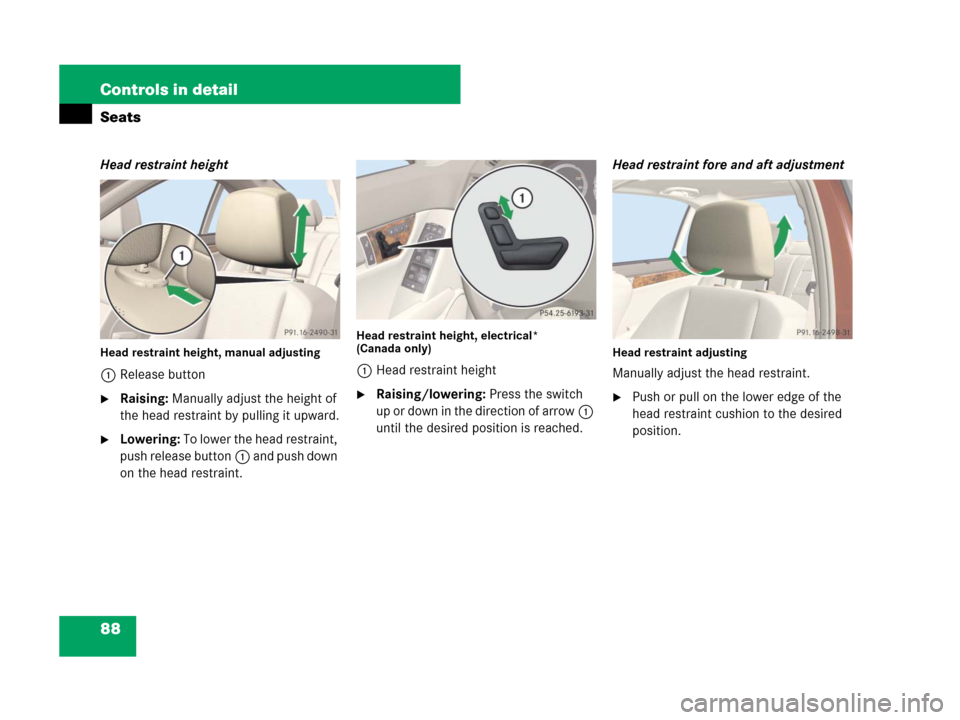
Head restraint height
Head restraint height, manual adjusting
1Release button
�Raising: Manually adjust the height of
the head restraint by pulling it upward.
�Lowering: To lower the head restraint,
push release button1 and push down
on the head restraint.
Head restraint height, electrical*
(Canada only)
1Head restraint height
�Raising/lowering: Press the switch
up or down in the direction of arrow1
until the desired position is reached.Head restraint fore and aft adjustment
Head restraint adjusting
Manually adjust the head restraint.
�Push or pull on the lower edge of the
head restraint cushion to the desired
position.
Page 90 of 509

89 Controls in detail
Seats
Adjusting rear head restraintsRear head restraint height
Head restraint height
1Release button
�Raising: Manually adjust the height of
the head restraint by pulling it upward.
�Lowering: To lower the head restraint,
push release button1 and push down
on the head restraint.Rear head restraint fore and aft
adjustment
Head restraint adjusting
You can adjust the angle of the two outer
head restraints.
Manually adjust the head restraint.
�Push or pull on the lower edge of the
head restraint cushion to the desired
position.
Warning!G
For your protection, drive only with properly
positioned head restraints.
Adjust the head restraint so that it is as
close to the head as possible and the center
of the head restraint supports the back of
the head at eye level. This will reduce the
potential for injury to the head and neck in
the event of an accident or similar situation.
Do not drive the vehicle without the seat
head restraints. Head restraints are
intended to help reduce injuries during an
accident.
Page 92 of 509
91 Controls in detail
Seats
Lumbar support
The curvature of the front seats can be ad-
justed to help enhance lower back support
and seating comfort.
1Adjustment lever
�Move adjustment lever1 in direction
of arrows until you have reached a
comfortable seating position.
Seat heating*
The buttons for the front seats are located
in the center console. The red indicator
lamps on the button come on to show the
selected heating level.
1Seat heating buttonLevel
3Three indicator lamps on
(highest level)
The seat heating automatically
switches to level2 after approxi-
mately 5 minutes.
2Two indicator lamps on
The seat heating automatically
switches to level1 after approxi-
mately 10 minutes.
1One indicator lamp on
(lowest level)
The seat heating automatically
switches off after approximately
20 minutes.
offNo indicator lamp on
Page 95 of 509

94 Controls in detail
Steering wheel
�To lock the steering wheel, push
handle1 all the way up until it
engages.
The steering wheel is locked into posi-
tion again.
�Make sure the steering wheel is
securely locked by trying to move it up
and down, and in and out before driving
off.Steering wheel adjustment, electrical*
(Canada only)
1Adjusting steering wheel, up or down
2Adjusting steering wheel, in or out
�Adjusting steering wheel in or out:
Move stalk forward or back in the direc-
tion of arrow2 until a comfortable
steering wheel position is reached with
your arms slightly bent at the elbow.
�Adjusting steering wheel up or
down: Move stalk up or down in the di-
rection of arrow1.
!Do not drive the vehicle until you have
properly locked the steering wheel.
iThe memory function* is operational at any
time. Seat and steering wheel adjustment is al-
ways possible.
The memory function* (
�page 102) lets you
store settings for the steering wheel together
with the settings for the seat position and the
exterior rear view mirrors.
��
Page 99 of 509

98 Controls in detail
Mirrors
Power folding exterior rear view
mirrors*
Folding exterior rear view mirrors in
and out manually
The exterior rear view mirrors can vibrate if
they are not folded out completely.
1Folds the exterior mirrors in and out
�Switch on the ignition.
�Folding in: Press button1.
�Folding out: Press button1 again.
!If an exterior rear view mirror housing is
forcibly pushed forward (hit from the rear) or
forcibly pushed rearward (hit from the front), re-
position it by applying firm pressure until it snaps
back into place. The mirror housing is then prop-
erly positioned and you can adjust the mirror in
the usual manner.
iAt low ambient temperatures, the exterior
rear view mirrors will be heated automatically.
iCanada only:
The memory function* (
�page 102) lets you
store the setting for the exterior rear view mir-
rors together with the setting for the steering
wheel and the seat positions.
!Before driving the vehicle through an auto-
matic car wash, fold the exterior mirrors in. Oth-
erwise they may get damaged.
!If an exterior rear view mirror housing is
forcibly pushed forward (hit from the rear), repo-
sition it manually by applying firm pressure until
it snaps back into place.
If an exterior rear view mirror housing is forcibly
pushed rearward (hit from the front), press
button1 to fold mirrors in, then press
button1 again to fold mirrors out. Do not force
mirrors by hand as this may damage the
adjustment mechanism.
The mirror housing is then properly positioned
and you can adjust the mirror in the usual
manner.
��