2008 MERCEDES-BENZ A-CLASS HATCHBACK roof
[x] Cancel search: roofPage 146 of 305

Roof
143
!
Only open the panorama louvred sliding
sunroof if it is free of snow and ice. Other-
wise, malfunctions may occur.
Do not allow anything to protrude from the
panorama louvred sliding sunroof. The
seals could otherwise be damaged.
i You can also set the panorama louvred
sliding sunroof to the ventilation position
from the outside by using the "Convenience
opening" feature (Y page 86).
The switch is in the overhead control panel. 1
To open
2 To close
X Turn the key to position 2in the ignition
lock. Ventilation position To ventilate the vehicle, you can lift the rear
edge of the first pane on the panorama
louvred sliding sunroof.
X
Press the switch in the direction of
arrow 1and hold.
The panorama louvred sliding sunroof
stops in the ventilation position.
Opening X
Press the switch in the direction of
arrow 1and hold.
The panorama louvred sliding sunroof
stops in the ventilation position.
X Press the switch in the direction of
arrow 1again and hold until the desired
position has been reached.
Closing X
Press the switch in the direction of
arrow 2and hold until the desired position
has been reached or the panorama louvred
sliding sunroof is closed. Opening and closing the cover*
Cover
1for the panorama louvred sliding
sunroof and the panorama roof shields the
vehicle interior from sunlight.
It is possible to open and close the cover by
hand regardless of the position of the pano-
rama louvred sliding sunroof. Controls
* optional
169_AKB; 2; 4, en-GB
wdomann,
Version: 2.10.6 2008-07-16T08:52:06+02:00 - Seite 143 ZDateiname: 6515_0315_02_buchblock.pdf; preflight
Page 147 of 305
Loading and stowing
144 Loading and stowing
Cup holder
The stowage compartments in the doors con-
tain mouldings designed to hold bottles. G
Risk of injury
Keep the cup holder closed while the vehi-
cle is in motion. Otherwise, vehicle occu-
pants could be injured by objects being
thrown around if you:
R brake sharply
R change direction suddenly
R are involved in an accident
Only use the cup holders for containers of
a suitable size and which have lids. Other-
wise, the drinks could spill.
Cup holders should not be used for hot
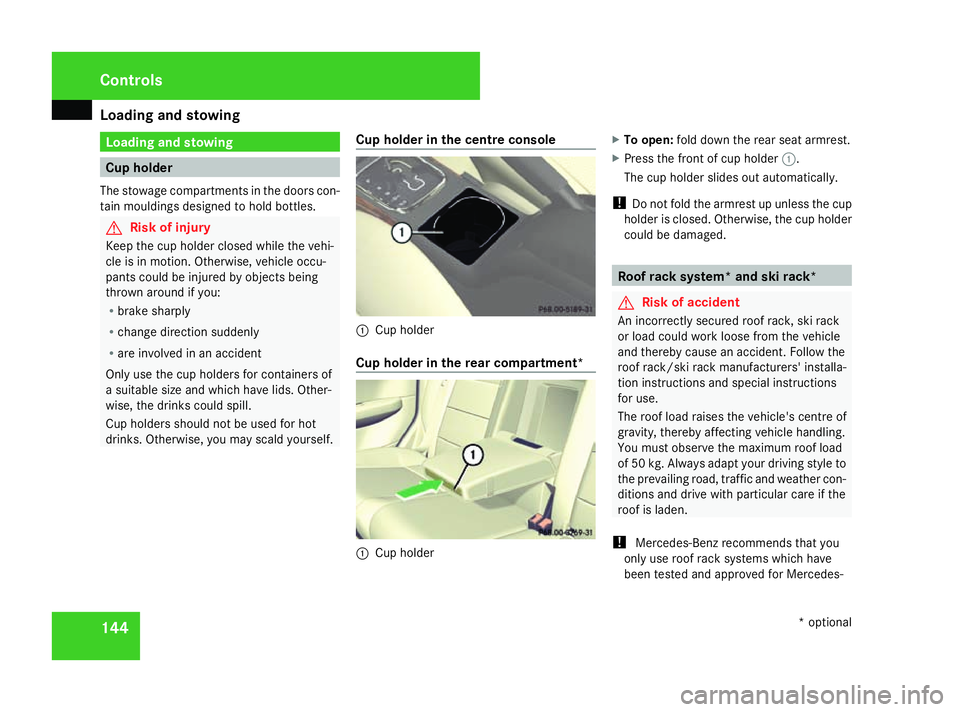
drinks. Otherwise, you may scald yourself. Cup holder in the centre console 1
Cup holder
Cup holder in the rear compartment* 1
Cup holder X
To open: fold down the rear seat armrest.
X Press the front of cup holder 1.
The cup holder slides out automatically.
! Do not fold the armrest up unless the cup
holder is closed. Otherwise, the cup holder
could be damaged. Roof rack system* and ski rack*
G
Risk of accident
An incorrectly secured roof rack, ski rack
or load could work loose from the vehicle
and thereby cause an accident. Follow the
roof rack/ski rack manufacturers' installa-
tion instructions and special instructions
for use.
The roof load raises the vehicle's centre of
gravity, thereby affecting vehicle handling.
You must observe the maximum roof load
of 50 kg. Always adapt your driving style to
the prevailing road, traffic and weather con-
ditions and drive with particular care if the
roof is laden.
! Mercedes-Benz recommends that you
only use roof rack systems which have
been tested and approved for Mercedes- Controls
* optional
169_AKB; 2; 4, en-GB
wdomann,
Version: 2.10.6
2008-07-16T08:52:06+02:00 - Seite 144 Dateiname: 6515_0315_02_buchblock.pdf; preflight
Page 148 of 305
Loading and stowing
145
Benz vehicles. This helps to prevent dam-
age to the vehicle.
Position the load on the roof rack in such a
way that the vehicle will not sustain dam-
age even when it is in motion.
Depending on the vehicle's equipment,
make sure that you can:
R open the panorama louvred sliding sun-
roof* fully
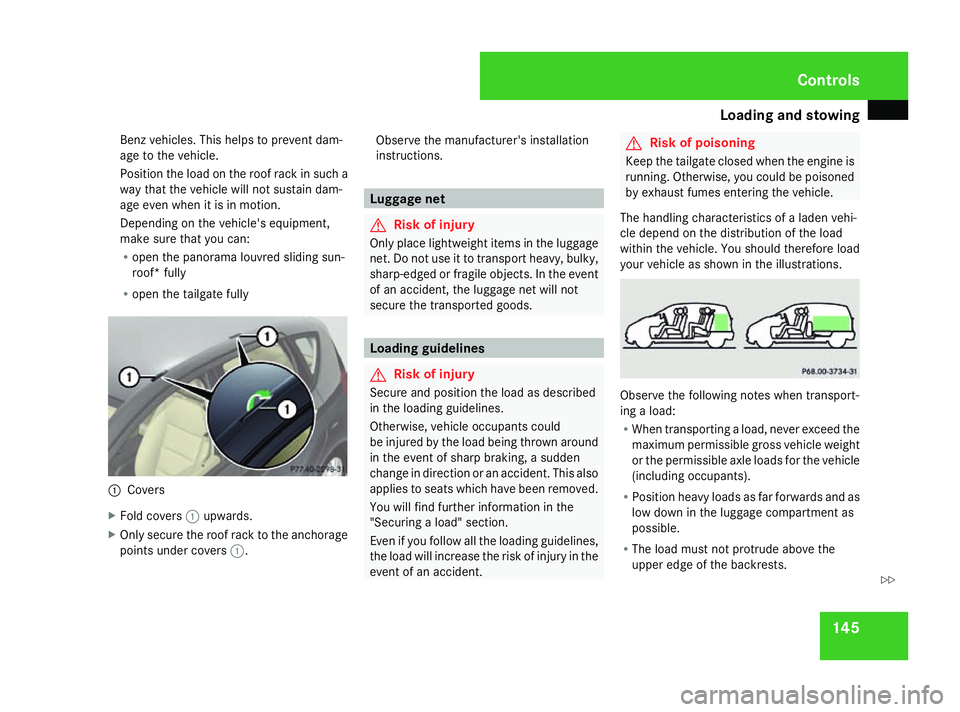
R open the tailgate fully 1
Covers
X Fold covers 1upwards.
X Only secure the roof rack to the anchorage
points under covers 1. Observe the manufacturer's installation
instructions. Luggage net
G
Risk of injury
Only place lightweight items in the luggage
net. Do not use it to transport heavy, bulky,
sharp-edged or fragile objects. In the event
of an accident, the luggage net will not
secure the transported goods. Loading guidelines
G
Risk of injury
Secure and position the load as described
in the loading guidelines.
Otherwise, vehicle occupants could
be injured by the load being thrown around
in the event of sharp braking, a sudden
change in direction or an accident. This also
applies to seats which have been removed.
You will find further information in the
"Securing a load" section.
Even if you follow all the loading guidelines,
the load will increase the risk of injury in the
event of an accident. G
Risk of poisoning
Keep the tailgate closed when the engine is
running. Otherwise, you could be poisoned
by exhaust fumes entering the vehicle.
The handling characteristics of a laden vehi-
cle depend on the distribution of the load
within the vehicle. You should therefore load
your vehicle as shown in the illustrations. Observe the following notes when transport-
ing a load:
R
When transporting a load, never exceed the
maximum permissible gross vehicle weight
or the permissible axle loads for the vehicle
(including occupants).
R Position heavy loads as far forwards and as
low down in the luggage compartment as
possible.
R The load must not protrude above the
upper edge of the backrests. Controls
169_AKB; 2; 4, en-GB
wdomann
, Version: 2.10.6
2008-07-16T08:52:06+02:00 - Seite 145 ZDateiname: 6515_0315_02_buchblock.pdf; preflight
Page 183 of 305

Tyres and wheels
180 fully. Do not make any sudden steering
movements when doing so.
The function of the tyre pressure loss warning
system is limited or delayed if:
R snow chains are fitted to your vehicle's
tyres.
R road conditions are wintry.
R you are driving on sand or gravel.
R you adopt a very sporty driving style (cor-
nering at high speeds or driving with high
rates of acceleration).
R you are towing a very heavy or large trailer.
R you are driving with a heavy load (in the
vehicle or on the roof).
Restarting the tyre pressure loss warn-
ing system Restart the tyre pressure loss warning system
if you have:
R changed the tyre pressure
R changed the wheels or tyres
R fitted new wheels or tyres
X Before restarting, consult the table of tyre
pressures on the inside of the fuel filler flap
to ensure that the tyre pressure in all four tyres is set correctly for the operating con-
ditions concerned.
X Also observe the notes in the section on
tyre pressures ( Ypage 178). G
Risk of accident
The tyre pressure loss warning system can
only give reliable warnings if you have set
the correct tyre pressure.
If an incorrect tyre pressure is set, these
incorrect values will be monitored.
A tyre with insufficient pressure results in
vehicle instability when driving, thus
increasing the risk of an accident.
X Make sure that the key is in position
2(Y page 62) in the ignition lock.
You will see the following message on the
standard screen of the multi-function dis-
play (Y page 100)
X Press korj to select the tyre pres-
sure function:
Run Flat Indicator active
Menu: R-Button
X Press the reset button on the left of the
instrument cluster.
The following message appears in the
multi-function display: Restart Run Flat Indicat.? Yes Can-
cel
If you wish to confirm the restart:
X Press the æbutton.
The following message appears in the
multi-function display:
Run Flat Indicator restarted
After a teach-in period, the tyre pressure
loss warning system will monitor the set
tyre pressures of all four tyres.
If you wish to cancel the restart:
X Press the çbutton.
or
X Wait until the message
Restart Run Flat Indicator?
Yes Cancel disappears.
The tyre pressure values stored at the last
restart will continue to be monitored. Operation
169_AKB; 2; 4, en-GB
wdomann,
Version: 2.10.6
2008-07-16T08:52:06+02:00 - Seite 180 Dateiname: 6515_0315_02_buchblock.pdf; preflight
Page 184 of 305
Winter driving
181Interchanging the wheels
G
Risk of accident
Interchange the front and rear wheels only
if they have the same dimensions: for exam-
ple size, offset, etc.
After every wheel interchange/change,
have the tightening torque checked at a
qualified specialist workshop that has the
necessary specialist knowledge and tools
to carry out the work required. Mercedes-
Benz recommends that you use a
Mercedes-Benz Service Centre for this pur-
pose. In particular, work relevant to safety
or on safety-related systems must be car-
ried out at a qualified specialist workshop.
The wheels could work loose if they are not
tightened to a torque of 130 Nm.
For safety reasons, Mercedes-Benz recom-
mends that you only use wheel bolts of the
correct size which have been approved for
Mercedes-Benz vehicles.
The wear patterns on the front and rear tyres
differ, depending on the operating conditions.
Interchange the wheels before a clear wear
pattern has formed on the tyres. Front tyres
typically wear more on the shoulders and the
rear tyres in the centre. Interchange the wheels every 5,000 km to
10,000 km depending on the degree of tyre
wear, provided that the vehicle has the same
size front and rear tyres. Do not reverse the
direction of tyre rotation.
Clean the contact surfaces of the wheel and
the brake disc thoroughly every time a wheel
is changed. Check the tyre pressure and, if
necessary, restart the tyre pressure loss
warning system. Winter driving
Points to remember
Have your vehicle winterproofed at a qualified
specialist workshop, e.g. at a Mercedes-Benz
Service Centre, at the onset of winter. Winter tyres
Use winter tyres at temperatures below +7 °C
and on snow or ice-covered roads. Only then
can the effect of the ABS and ESP ®
driving
systems be ensured in winter too.
Use winter tyres of the same make and tread
on all wheels to maintain safe handling char-
acteristics. G
Risk of accident
Winter tyres with a tread depth of less than
4 mm must be replaced immediately. They
are no longer suitable for winter use and
can no longer provide sufficient grip. This
could cause you to lose control of your
vehicle and cause an accident.
Always observe the maximum permitted
speed specified for the winter tyres you have
fitted. If you fit winter tyres which have a
lower maximum permitted speed than that of
the vehicle, affix an appropriate warning sign Operation
169_AKB; 2; 4, en-GB
wdomann,
Version: 2.10.6 2008-07-16T08:52:06+02:00 - Seite 181 ZDateiname: 6515_0315_02_buchblock.pdf; preflight
Page 291 of 305
Vehicle weights
288 A 150 A 150
BlueEFFICIENCY A 170 A 170
BlueEFFICIENCY A 200
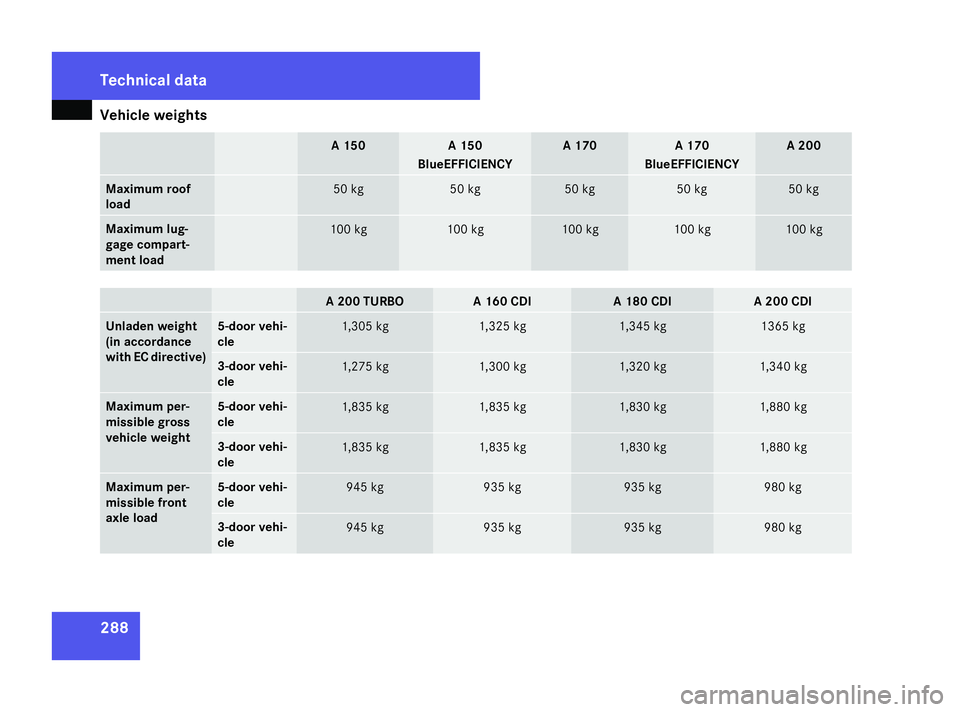
Maximum roof
load 50 kg 50 kg 50 kg 50 kg 50 kg
Maximum lug-
gage compart-
ment load 100 kg 100 kg 100 kg 100 kg 100 kg
A 200 TURBO A 160 CDI A 180 CDI A 200 CDI
Unladen weight
(in accordance
with EC directive) 5-door vehi-
cle
1,305 kg 1,325 kg 1,345 kg 1365 kg
3-door vehi-
cle
1,275 kg 1,300 kg 1,320 kg 1,340 kg
Maximum per-
missible gross
vehicle weight 5-door vehi-
cle
1,835 kg 1,835 kg 1,830 kg 1,880 kg
3-door vehi-
cle
1,835 kg 1,835 kg 1,830 kg 1,880 kg
Maximum per-
missible front
axle load 5-door vehi-
cle
945 kg 935 kg 935 kg 980 kg
3-door vehi-
cle
945 kg 935 kg 935 kg 980 kgTe
chnical da ta
169_AKB; 2; 4, en-GB
wdomann,
Version: 2.10.6
2008-07-16T08:52:06+02:00 - Seite 288 Dateiname: 6515_0315_02_buchblock.pdf; preflight
Page 292 of 305
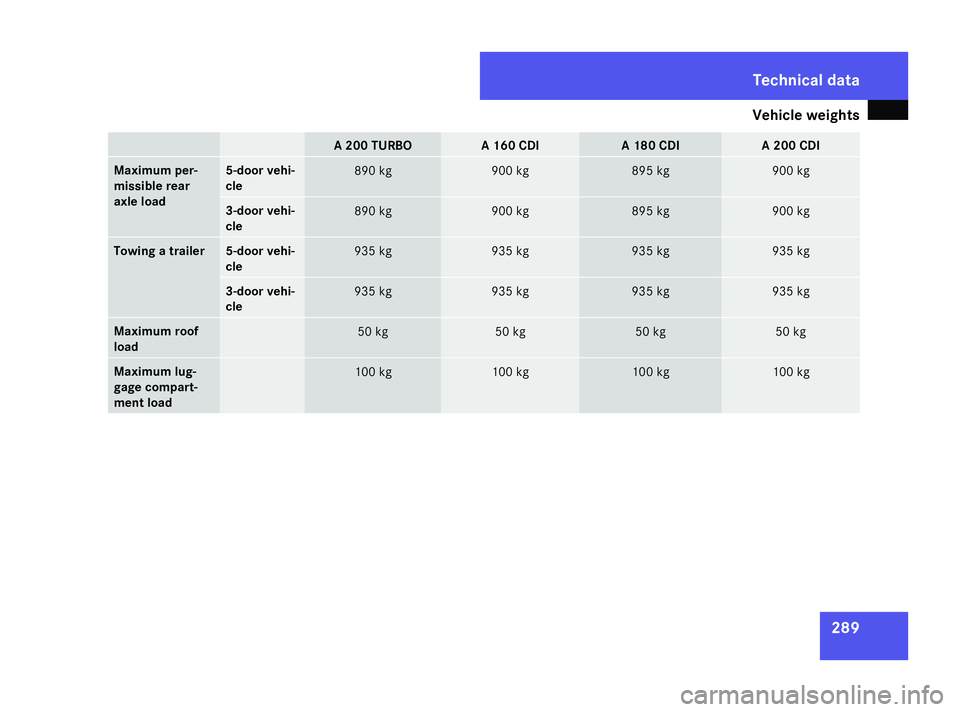
Vehicle weights
289A 200 TURBO A 160 CDI A 180 CDI A 200 CDI
Maximum per-
missible rear
axle load 5-door vehi-
cle
890 kg 900 kg 895 kg 900 kg
3-door vehi-
cle
890 kg 900 kg 895 kg 900 kg
To
wing a trailer 5-door vehi-
cle
935 kg 935 kg 935 kg 935 kg
3-door vehi-
cle
935 kg 935 kg 935 kg 935 kg
Maximum roof
load
50 kg 50 kg 50 kg 50 kg
Maximum lug-
gage compart-
ment load
100 kg 100 kg 100 kg 100 kgTechnical data
169_AKB; 2; 4, en-GB
wdomann
,V ersion: 2.10.6
2008-07-16T08:52:06+02:00 - Seite 289 ZDateiname: 6515_0315_02_buchblock.pdf; preflight