2008 Lexus IS250 light
[x] Cancel search: lightPage 302 of 464

302
4-3. Do-it-yourself maintenance
BatteryCheck the battery as follows.
■ Battery exterior
Make sure that the battery terminals are not corroded and that there
are no loose connections, cracks, or loose clamps.
Terminals
Hold-down clamp
CAUTION
■When filling the reservoir
Take care because brake fluid can harm your hands or eyes and damage painted
surfaces.
If fluid gets in your eyes, flush your eyes with clean water immediately.
If you still experience discomfort, see a doctor.
NOTICE
■If the fluid level is low or high
It is normal for the brake fluid level to go down slightly as the brake pads wear or
when the fluid level in the accumulator is high.
If the reservoir needs frequent refilli ng, it may indicate a serious problem.
Page 304 of 464

304
4-3. Do-it-yourself maintenance
CAUTION
■Chemicals in the battery:
A battery contains poisonous and corrosive sulfuric acid and may produce hydro-
gen gas which is flammable and explosive. To reduce the risk of death or serious
injury, take the following precautions while working on or near battery:
●Do not cause sparks by touching the battery terminals with tools.
●Do not smoke or light a match near the battery.
●Avoid contact with eyes, skin and clothes.
●Never inhale or swallow electrolyte.
●Wear protective safety glasses when working near the battery.
●Keep children away from the battery.
■Where to safety charge the battery
Always charge the battery in an open area. Do not charge the battery in a garage or
closed room where there is not sufficient ventilation.
■How to recharge the battery
Only perform a slow charge (5 A or less). The battery may explode if charged at a
quicker rate.
■Emergency measures regarding electrolyte
●If electrolyte gets in your eyes
Flush your eyes with clean water for at least 15 minutes and get immediate medi-
cal attention. If possible, continue to apply water with a sponge or cloth while
traveling to the nearest medical facility.
●If electrolyte gets on your skin
Wash the affected area thoroughly. If you feel pain or burning, get medical atten-
tion immediately.
●If electrolyte gets on your clothes
It can soak through clothing on to your skin. Immediately take off the clothing and
follow the procedure above if necessary.
●If you accidentally swallow electrolyte
Drink a large quantity of water or milk. Fo llow with milk of magnesia, beaten raw
egg or vegetable oil. Get emerge ncy medical attention immediately.
Page 309 of 464

309
4-3. Do-it-yourself maintenance
4
Maintenance and care
■How to initialize the tire pressure warning system
To initialize the system, use the satellite switch. ( P. 245)
Park the vehicle in safe plac e and turn the “ENGINE START
STOP” switch OFF.
While the vehicle is moving, initialization is not performed.
Adjust the tire inflation pressure to the specified cold tire inflation
pressure level. ( P. 415)
Make sure to adjust the tire pressure to the specified cold tire inflation
pressure level. The tire pressure warning system will operate based on
this pressure level.
Turn the “ENGINE START STOP” switch to IGNITION ON
mode.
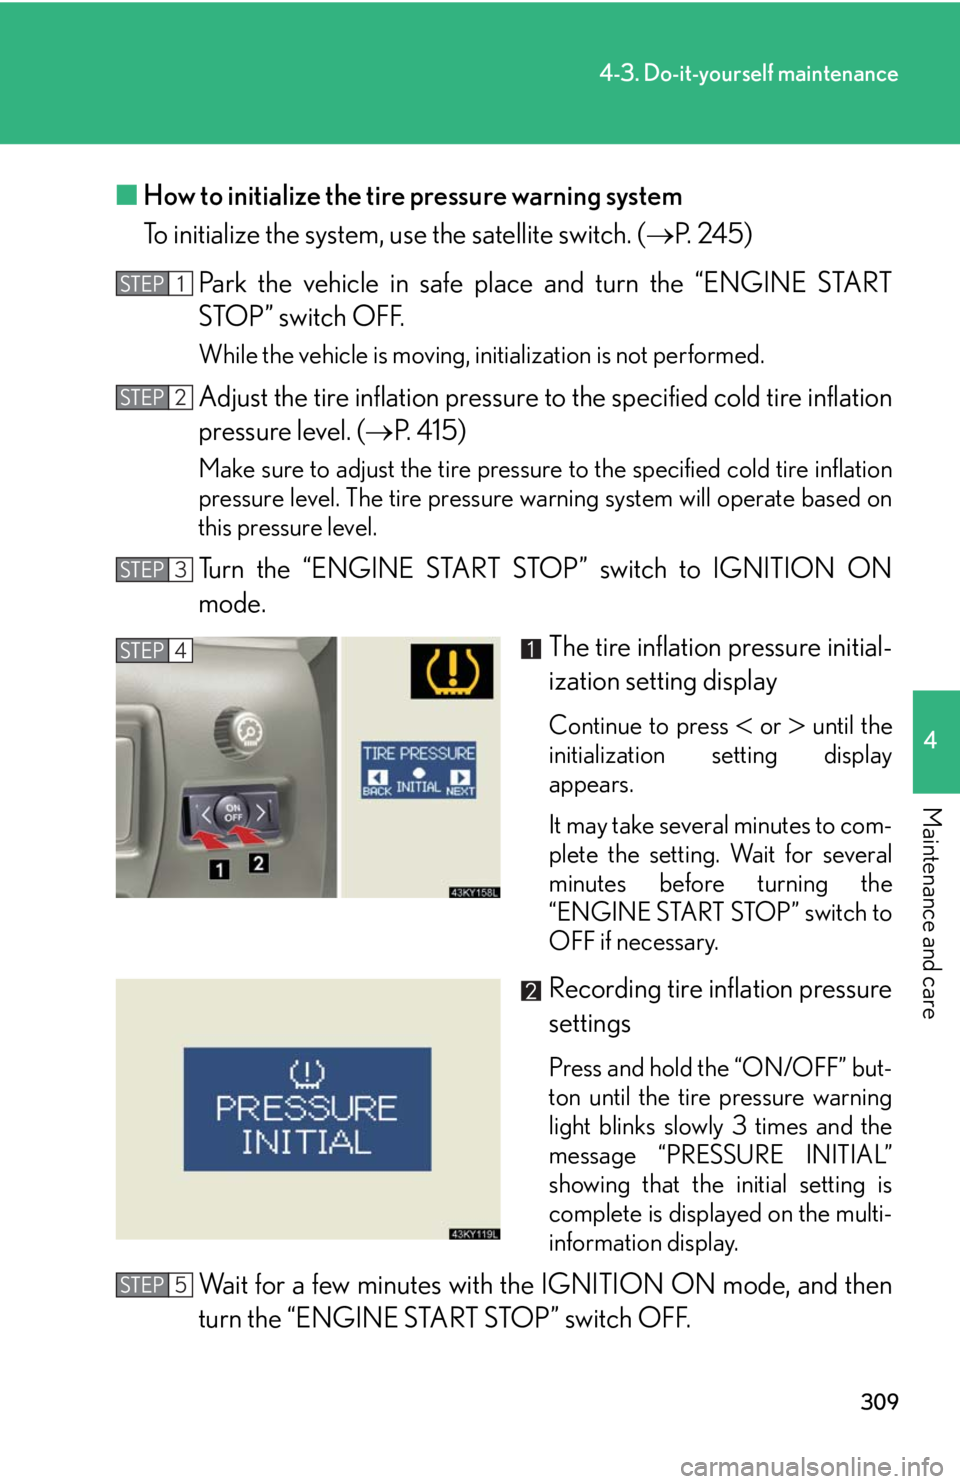
The tire inflation pressure initial-
ization setting display
Continue to press or until the
initialization setting display
appears.
It may take several minutes to com-
plete the setting. Wait for several
minutes before turning the
“ENGINE START STOP” switch to
OFF if necessary.
Recording tire inflation pressure
settings
Press and hold the “ON/OFF” but-
ton until the tire pressure warning
light blinks slowly 3 times and the
message “PRESSURE INITIAL”
showing that the initial setting is
complete is displayed on the multi-
information display.
Wait for a few minutes with the IGNITION ON mode, and then
turn the “ENGINE START STOP” switch OFF.
STEP1
STEP2
STEP3
STEP4
STEP5
Page 310 of 464

310
4-3. Do-it-yourself maintenance
Registering and selecting ID codesTo select tire pressure warning valve and transmitter ID codes, use the
satellite switch. ( P. 245)
■ Registering ID codes
2 sets of tire pressure warning valve and transmitter ID codes can be
registered. Once a second set of ti res is registered at “2ND”, you can
switch between tire set settings simply by pressing the tire pressure
warning select switch.
There are 2 settings:
“MAIN” position: The ID code of the tire pressure warning valve and
transmitter on the tires originally inst alled on the vehicle is registered.
“2ND” position:The ID code is not registered. When you replace a
new set of tires, purchase tire pres sure warning valves and transmitters
from your Lexus dealer and have th e new ID code registered by your
Lexus dealer.
■ Selecting ID codes
When replacing tires, make sure to select the ID code set that matches
the new tire set. If the tire pressure select switch is set to the wrong tire
setting, the tire pressure warnin g system will not operate properly.
After driving for about 20 minutes, the tire pressure warning light
comes on after blinking for 1 minu te to indicate a system malfunction.
Tire pressure warning valve and
transmitter ID code settings dis-
play
Press or repeatedly until the
setting display appears.
Switching ID codes
Press the “ON/OFF” button to
switch between “MAIN” and
“2ND” ID codes.
Page 311 of 464

311
4-3. Do-it-yourself maintenance
4
Maintenance and care
■When to replace your vehicle’s tires
Tires should be replaced if:
●You have tire damage such as cuts, splits, cracks deep enough to expose the
fabric or bulges indicating internal damage
●A tire goes flat repeatedly or cannot be properly repaired due to the size or
location of a cut or other damage
If you are not sure, consult with your Lexus dealer.
■Replacing tires and wheels
If the ID code of the tire pressure warn ing valve and transmitter is not registered,
the tire pressure warning system will not work properly. After driving for about 20
minutes, the tire pressure warning light comes on after blinking for 1 minute to indi-
cate a system malfunction.
■Tire life
Any tire over 6 years old must be checked by a qualified technician even if they
have seldom or never been used or damage is not obvious.
■If the tread wears down below 0.16 in. (4 mm) on snow tires
The effectiveness of snow tires is lost.
■Low profile tires (models not equipped with 16-inch tires)
Generally, low profile tires will wear more rapidly and tire grip performance will be
reduced on snowy and/or icy roads when co mpared to standard tires. Be sure to
use snow tires or tire chains
* on snowy and/or icy roads and drive carefully at a
speed appropriate for road and weather conditions.
*: Tire chains cannot be mounted on 18-inch tires.
■Maximum load of tire
Check that the maximum load of the replaced tire is greater than 1 /2 of the Gross
Axle Weight Ratings (GAWR) of either the front axle or the rear axle, whichever is
greater.
As for the maximum load of the tire, see the load limit at maximum cold tire inflation
pressure mentioned on the sidewall of the tire, and as for the Gross Axle Weight
Ratings (GAWR), see the Certification Label. (
P. 3 1 6 , 4 2 4 ) .
Page 312 of 464

312
4-3. Do-it-yourself maintenance
■Tire types
1 Summer tiresSummer tires are high-speed performance tires best suited to highway driving
under dry conditions. Since summer tires do not have the same traction perfor-
mance as snow tires, summer tires are inadequate for driving on snow-covered
or icy roads. For driving on snow-covered roads or icy roads, the use of snow tires
is recommended. When installing snow tires, be sure to replace all four tires.
2 All season tires All season tires are designed to provide better traction in snow and to be ade-
quate for driving in most winter conditions , as well as for use year round. All sea-
son tires, however, do not have adequa te traction performance compared with
snow tires in heavy or loos e snow. Also, all season tires fall short in acceleration
and handling performance compared with summer tires in highway driving.
3Snow tires For driving on snow-covered roads or ic y roads, we recommend using snow tires.
If you need snow tires, select tires of the same size, construction and load capac-
ity as the originally installed tires. Since your vehicle has radial tires as original
equipment, make sure your snow tires also have radial construction. Do not install
studded tires without first checking loca l regulations for possible restriction.
Snow tires should be installed on all wheels. ( P. 1 8 3 )
■Initializing the tire pressure warning system
Initialize the tires with the tire inflatio n pressure adjusted to the specified level.
■When the initialization of the tire pressure warning system has failed
Initialization can be completed in a few minutes. However, in the following cases,
the settings have not been recorded and the system will not operate properly. If
repeated attempts to record tire inflation pressure settings are unsuccessful, have
the vehicle inspected by your Lexus dealer.
●When operating the tire pressure warnin g reset switch, the tire pressure warn-
ing light does not flash 3 times and the setting message does not appear on the
multi-information display.
●After carrying out the initialization proc edure, the tire pressure warning light
blinks for 1 minute then stays on after driving for about 20 minutes.
Page 314 of 464

314
4-3. Do-it-yourself maintenance
CAUTION
■When inspecting or replacing tires
Observe the following precautions to prevent accidents. Failure to do so may cause
damage to parts of the drive train, as well as dangerous handling characteristics,
which may lead to fatal or injury accidents.
●Do not mix tires of different makes, models, tread patterns or treadwear.
●Do not use tire sizes other than those recommended by Lexus.
●Do not mix radial, bias-belted, or bias-ply tires.
●Do not mix summer, all season and winter tires.
■When initializing the tire pressure warning system
Do not press the satellite switch without first adjusting the tire inflation pressure to
the specified level. Otherwise, the tire pressure warning light may not come on
even if the tire inflation pressure is low, or it may come on when the tire inflation
pressure is actually normal.
NOTICE
■Repairing or replacing tires, wheels and tire pressure warning valves and trans-
mitters
When removing or fitting the wheels, tire s or the tire pressure warning valve and
transmitter, contact your Lexus dealer as the tire pressure warning valve and trans-
mitter may be damaged if not handled correctly.
■To avoid damaging the tire pressu re warning valves and transmitters
Do not use liquid sealants on flat tires.
Page 331 of 464

331
4-3. Do-it-yourself maintenance
4
Maintenance and care
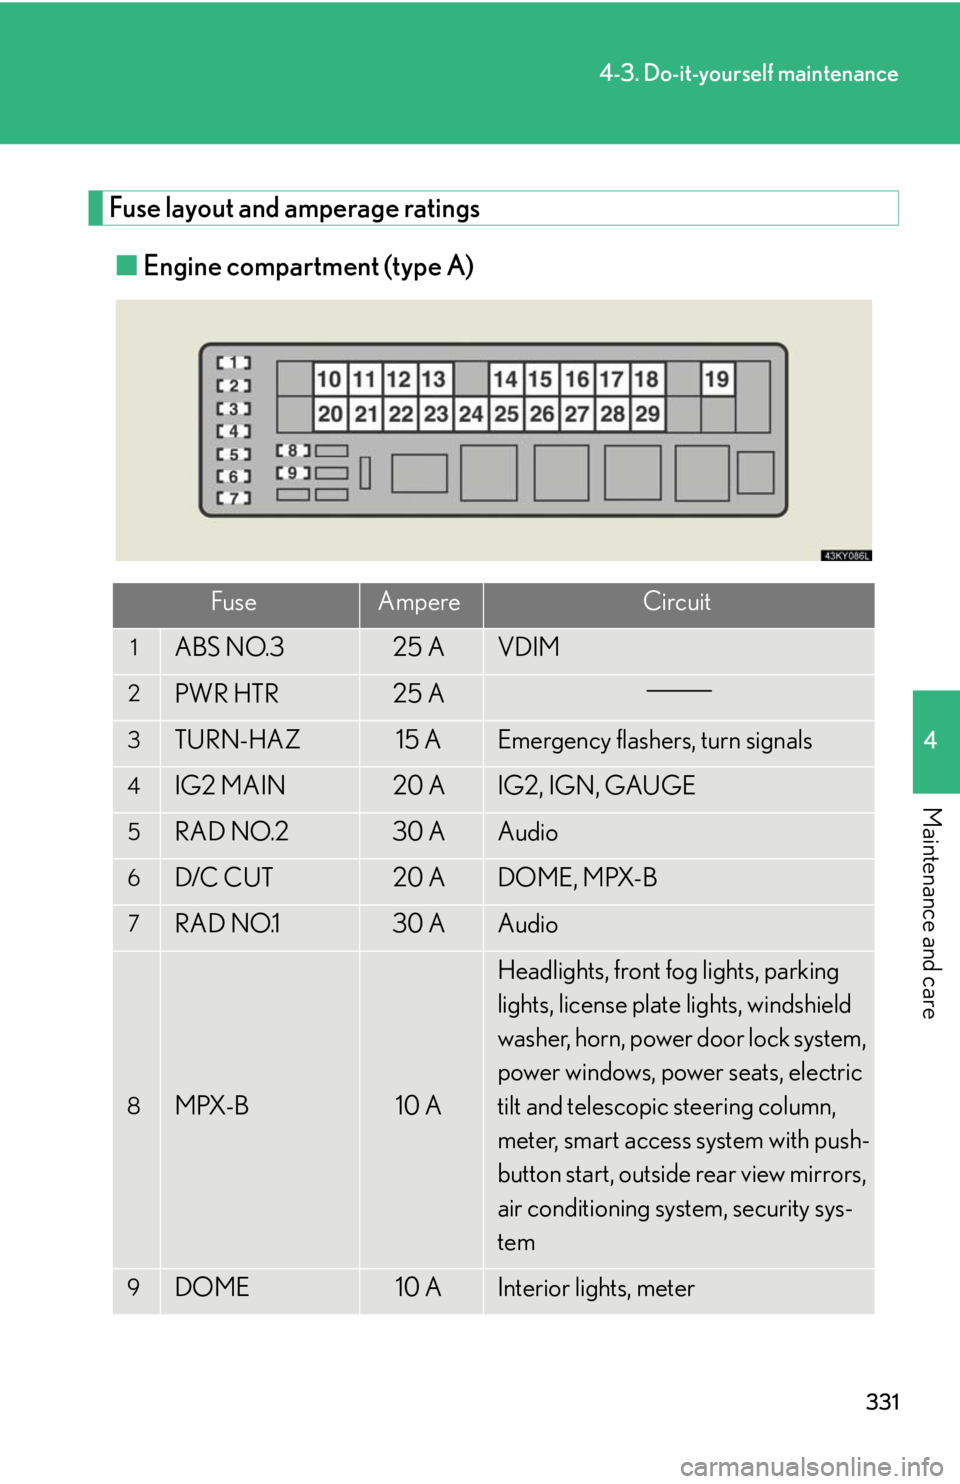
Fuse layout and amperage ratings■ Engine compartment (type A)
FuseAmpereCircuit
1ABS NO.325 AVDIM
2PWR HTR25 A
3TURN-HAZ15 AEmergency flashers, turn signals
4IG2 MAIN20 AIG2, IGN, GAUGE
5RAD NO.230 AAudio
6D/C CUT20 ADOME, MPX-B
7RAD NO.130 AAudio
8MPX-B10 A
Headlights, front fog lights, parking
lights, license plate lights, windshield
washer, horn, power door lock system,
power windows, power seats, electric
tilt and telescopic steering column,
meter, smart access system with push-
button start, outside rear view mirrors,
air conditioning system, security sys-
tem
9DOME10 AInterior lights, meter