Page 226 of 596
226
3-1. Using the touch screen
GS_HV_U
December 12, 2007 3:50 pm
The initial screenIf the “POWER” switch is set to
ACCESSORY or ON mode, the
initializing screen will be displayed
for a few seconds as the system
starts up.
■To avoid damaging the touch screen
●Touch the screen lightly with your finger. If there is no response, remove your fin-
ger from the screen and try again.
●Remove any dirt on the screen by wiping with a soft cloth. Do not use detergent.
■When using the touch screen
●If the screen is cold, the display may be dark, or the system may seem to be
operating slightly sl ower than normal.
●The screen may seem dark and hard to see when viewed through sunglasses.
Change your angle of viewing, adjust the display on the “Display” screen or
remove your sunglasses.
Page 240 of 596
240
3-2. Using the air conditioning system and defogger
GS_HV_U
December 12, 2007 3:30 pm
Rear window and outside re ar view mirror defoggers
■Operating conditions
The “POWER” switch must be in the ON mode.
CAUTION
■When the outside rear view mirror defoggers are on
Do not touch the rear view mirror surfaces , as they can become very hot and burn
you.
NOTICE
■To prevent 12 volt battery discharge
Turn the defoggers off when the hybrid system is off.
These features are used to defog the rear window, and to remove rain-
drops, dew and frost from the outside rear view mirrors.
Press the button.
Press the button to turn on the
rear window and outside rear
view mirror defoggers. The
defoggers will automatically
turn off after approximately 15
minutes. Pressing the button
again also turns the defoggers
off.
Page 267 of 596
267
3-3. Using the audio system
3
Interior features
GS_HV_U
December 13, 2007 10:50 am
Loading a discs■ Loading a single disc
Push .
When the indicator changes from flashing amber to green, insert
a disc after the DVD player door opens.
■ Loading multiple discs
Press and hold until you hear a beep.
When the indicator changes from flashing amber to green, insert
a disc after the DVD player door opens.
After inserting a disc, wait until the indicator changes from flash-
ing amber to green, then insert the next disc after the DVD player
door has opened.
Repeat steps 2 and 3 until you have inserted all discs.
To cancel the operation, press the or button. If you do not
insert a disc within 15 seconds, loading will be canceled automatically.
■DVD hint screen
This screen appears when a DVD
video, DVD audio or video CD is
first selected with the “POWER”
switch in ACCESSORY or ON
mode.
Touch once you have
read the message.
STEP1
STEP2
STEP1
STEP2
STEP3
STEP4
Page 290 of 596

290
3-3. Using the audio system
GS_HV_U
December 13, 2007 10:50 am
■MP3 and WMA files
MP3 (MPEG Audio LAYER 3) is a standard audio compression format.
Files can be compressed to approximately 1 /10 of their original size by using MP3
compression.
WMA (Windows Media
TMAudio) is a Microsoft audio compression format.
This format compresses audio data to a size smaller than that of the MP3 format.
There is a limit to the MP3 and WMA file standards and to the media/formats
recorded by them that can be used.
●MP3 file compatibility
• Compatible standards
MP3 (MPEG1 LAYER3, MPEG2 LSF LAYER3)
• Compatible sampling frequencies
MPEG1 LAYER3: 32, 44.1, 48 (kHz)
MPEG2 LSF LAYER3: 16, 22.05, 24 (kHz)
• Compatible bit rates
MPEG1 LAYER3: 64, 80, 96, 112, 128, 160, 192, 224, 256, 320 (kbps)
• MPEG2 LSF LAYER3: 64, 80, 96 , 112, 128, 144, 160 (kbps)
*: Compatible with VBR
• Compatible channel modes: stereo, joint stereo, dual channel and monaural
●WMA file compatibility
• Compatible standards
WMA Ver. 7, 8, 9
• Compatible sampling frequencies
32, 44.1, 48 (kHz)
• Compatible bit rates
Ver. 7, 8: CBR 48, 64, 80, 96, 128, 160, 192 (kbps)
Ver. 9: CBR 48, 64, 80, 96, 128, 160, 192, 256, 320 (kbps)
*: Only compatible with 2-channel playback
Page 291 of 596

291
3-3. Using the audio system
3
Interior features
GS_HV_U
December 13, 2007 10:50 am
●Compatible media
Media that can be used for MP3 and WMA playback are CD-Rs and CD-RWs.
Playback in some instances may not be possible, depending on the status of the
CD-R or CD-RW. Playback may not be poss ible or the audio may jump if the disc
is scratched or marked with fingerprints.
●Compatible disc formats
The following disc formats can be used.
• Disc formats: CD-ROM Mode 1 and Mode 2
CD-ROM XA Mode 2, Form 1 and Form 2
• File formats: ISO9660 level 1, level 2, (Romeo, Joliet)
MP3 and WMA files written in any format other than those listed above may
not play correctly, and their file names and folder names may not be displayed
correctly.
Items related to standards and limitations are as follows:
• Maximum directory hierarchy: 8 levels
• Maximum length of folder names/file names: 32 characters
• Maximum number of folders: 192 (including the root)
• Maximum number of files per disc: 255
●File names
The only files that can be recognized as MP3/WMA and played are those with
the extension .mp3 or .wma.
Page 303 of 596
303
3-3. Using the audio system
3
Interior features
GS_HV_U
December 13, 2007 10:50 am
Using the steering switches
Turning on the powerPress when the audio system is off.
The audio system can be turned off by holding the switch down for 1 second
or more.
Changing the audio sourcePress when the audio system is on. The audio source changes as fol-
lows each time the button is pressed. If a cassette tape or discs is not
inserted, that mode will be skipped.
FM1 FM2 cassette player CD/DVD player
AUX AM SAT1 SAT2 SAT3
Some audio features can be controlled using the steering switches.
Power on, select audio
source
Vo l u m e
Radio: Select radio stations
Cassette: Fast forward,
rewind and select-
ing tracks
CD: Select tracks, discs and file
DVD: Select tracks, discs and chapter
Page 313 of 596

313
3-4. Using the hands-free system (for cellular phone)
3
Interior features
GS_HV_U
December 13, 2007 10:51 am
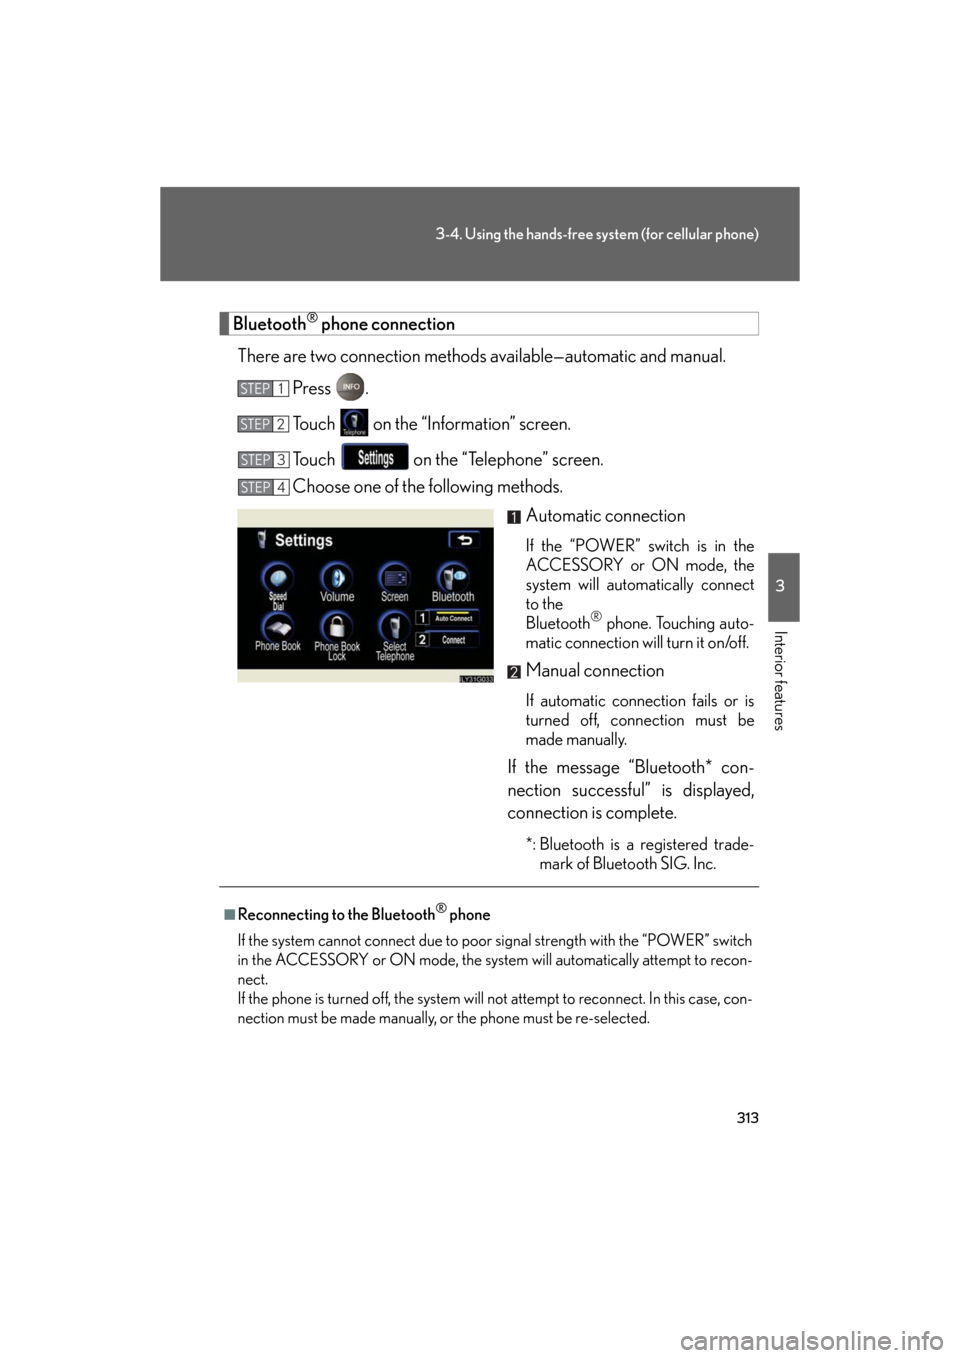
Bluetooth® phone connection
There are two connection methods av ailable—automatic and manual.
Press .
Touch on the “Information” screen.
Touch on the “Telephone” screen.
Choose one of the following methods. Automatic connection
If the “POWER” switch is in the
ACCESSORY or ON mode, the
system will automatically connect
to the
Bluetooth
® phone. Touching auto-
matic connection will turn it on/off.
Manual connection
If automatic connection fails or is
turned off, connection must be
made manually.
If the message “Bluetooth* con-
nection successful” is displayed,
connection is complete.
*: Bluetooth is a registered trade- mark of Bluetooth SIG. Inc.
STEP1
STEP2
STEP3
STEP4
■Reconnecting to the Bluetooth® phone
If the system cannot connect due to poor signal strength with the “POWER” switch
in the ACCESSORY or ON mode, the system will automatically attempt to recon-
nect.
If the phone is turned off, the system will not attempt to reconnect. In this case, con-
nection must be made manually, or the phone must be re-selected.
Page 369 of 596
369
3-7. Other interior features
3
Interior features
GS_HV_U
December 13, 2007 10:51 am
Seat heaters/ventilators (if equipped)
■The seat heaters/ventilators can be used when
The “POWER” switch is in ON mode.
■When not in use
Set the dial to “0”. The indicator light turns off.
The temperature of the seats can be adjusted individually.
■Seat heaters
Heats the seats
The indicator light comes on.
The higher the number, the
warmer the seats become.
■ Seat heaters/ventilators
Heats the seats
The indicator light (red) comes
on.
The higher the number, the
warmer the seats become.
Blows air from the seats
The indicator light (green)
comes on.
The higher the number, the
stronger the airflow becomes.