Page 11 of 298
1
2
3
4
5
6
7
8
9Keys / 3-2
Remote keyless entry / 3-3
Immobilizer system / 3-6
Door locks / 3-8
Windows / 3-13
Seat / 3-16
Safety belts / 3-27
Air bag - Advanced supplemental restraint
system / 3-50
Trunk / 3-76
Hood / 3-78
Fuel filler lid / 3-80
Mirrors / 3-83
Interior lights / 3-87
Storage compartment / 3-88
Interior features / 3-90
Sunroof / 3-94
Luggage net / 3-97
Antenna / 3-98
Audio system / 3-99
Knowing your vehicle
Page 73 of 298

363
1
2
3
4
5
6
7
8
9
Knowing your vehicle
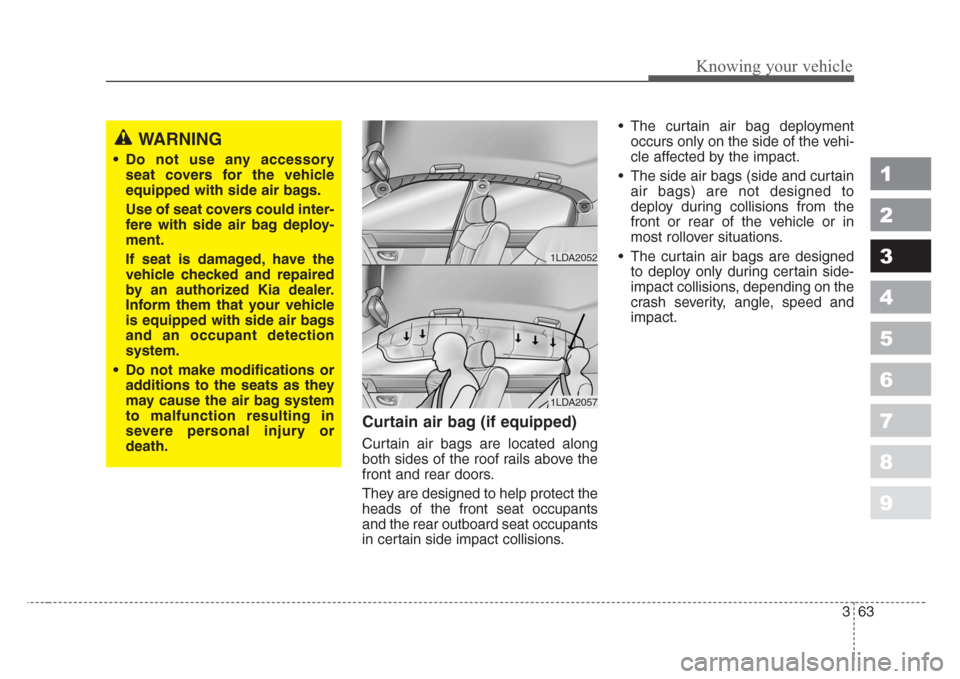
Curtain air bag (if equipped)
Curtain air bags are located along
both sides of the roof rails above the
front and rear doors.
They are designed to help protect the
heads of the front seat occupants
and the rear outboard seat occupants
in certain side impact collisions.• The curtain air bag deployment
occurs only on the side of the vehi-
cle affected by the impact.
• The side air bags (side and curtain
air bags) are not designed to
deploy during collisions from the
front or rear of the vehicle or in
most rollover situations.
• The curtain air bags are designed
to deploy only during certain side-
impact collisions, depending on the
crash severity, angle, speed and
impact.
WARNING
• Do not use any accessory
seat covers for the vehicle
equipped with side air bags.
Use of seat covers could inter-
fere with side air bag deploy-
ment.
If seat is damaged, have the
vehicle checked and repaired
by an authorized Kia dealer.
Inform them that your vehicle
is equipped with side air bags
and an occupant detection
system.
• Do not make modifications or
additions to the seats as they
may cause the air bag system
to malfunction resulting in
severe personal injury or
death.
1LDA2052
1LDA2057
Page 82 of 298

Knowing your vehicle
72 3
1
2
3
4
5
6
7
8
9
Installing a child restraint on a
front passenger seat is
extremely dangerous and
should never be done.
Never place a rear-facing child
restraint in the front passenger seat.
If the air bag deploys, it would impact
the rear-facing child restraint, caus-
ing severe or fatal injury.
In addition, do not place front-facing
child restraint in the front passen-
ger’s seat either. If the front passen-
ger air bag inflates, it would cause
serious or fatal injuries to the improp-
erly positioned or improperly
restrained child.
WARNING
• Extreme Hazard! Do not use a
rearward facing child restraint
on a seat protected by an air
bag in front of it!
• Never put child restraint in the
front passenger’s seat. If the
front passenger air bag
inflates, it would cause seri-
ous or fatal injuries.
• When children are seated in
the rear outboard seats in
which curtain air bags are
equipped, be sure to put the
child restraint system as far
away from the door side as
possible, and secure the child
restraint system to be locked
in position.
Inflation of curtain air bag (if
equipped) could cause severe
injury or death due to the
expansion impact.
WARNING
When the air bags deploy, the
air bag related parts in steering
wheel and/or instrument panel
and/or in both sides of the roof
rails above the front and rear
doors are very hot. To prevent
injury, do not touch the air bag
storage areas internal compo-
nents immediately after an air
bag has inflated.
1JBH3051
Page 84 of 298

Knowing your vehicle
74 3
1
2
3
4
5
6
7
8
9
Repairing or scrapping the vehi-
cles
• Repairing steering wheel, instru-
ment panel, center console or
roofs, or installing car audio around
center console or painting front
metal sheet could disable the air
bag system. Have them checked
by an authorized Kia dealer.
• When leaving the vehicle at an
authorized Kia dealer, inform the
facility that the vehicle is equipped
with air bag system, and leave the
owner’s manual in the vehicle.
• Since air bag system contains
explosive chemical substances,
contact an authorized Kia dealer
when scrapping the vehicle.
CAUTION
Do not modify any part of the
Supplemental Restraint System.
Modification could make the air
bag system ineffective or could
cause unnecessary deploy-
ment.
WARNING
• Do not modify your steering
wheel,seat or any other part
of the Supplemental Restraint
System. Modification could
make the system inoperable.
• Do not work on the system’s
components or wiring. This
could cause the air bags to
inflate inadvertently, possibly
seriously injuring someone.
Working on the system could
also disable the system so
that the air bags would not
deploy in a collision.
• Any work on the SRS system,
such as removing, installing,
repairing, or any work on the
steering wheel must be per-
formed by a qualified Kia tech-
nician. Improper handling of
the air bag system may result
in serious personal injury or
death.
Page 104 of 298

Knowing your vehicle
94 3
1
2
3
4
5
6
7
8
9
If your vehicle is equipped with this
feature, you can slide or tilt your sun-
roof with the sunroof control buttons
located on the overhead console.
(1) Slide button
(2) Tilt button
(3) Close button
The sunroof can only be opened,
closed, or tilted when the ignition
switch is in the “ON” position.
Sliding the sunroof
Autoslide open
To use the autoslide feature,
momentarily (less than 0.4 second)
press the SLIDE OPEN ( ) button
on the overhead console. The sun-
roof will slide all the way open. To
stop the sunroof sliding at any point,
press any sunroof control button.
Manual slide open
Press the SLIDE OPEN ( ) button
on the overhead console for more
than 0.4 second.
Close
To close the sunroof, press the
CLOSE ( ) button on the over-
head console and hold it until the
sunroof is closed.
SUNROOF (IF EQUIPPED)
OLD028022
CAUTION
• Do not continue to press the
sunroof control button(s) after
the sunroof is in the fully
open, closed, or tilt
position(s). Damage to the
motor or system components
could occur.
• The sunroof cannot slide
when it is in the tilt position
nor can it be tilted while in an
open or slide position.
Page 105 of 298

395
1
2
3
4
5
6
7
8
9
Knowing your vehicle
Tilting the sunroof
Autotilt open
To use the autotilt feature, momen-
tarily (less than 0.4 second) press
the TILT UP ( ) button on the
overhead console. The sunroof will
tilt all the way open. To stop the sun-
roof tilting at any point, press any
sunroof control button.
Manual tilt open
Press the TILT UP ( ) button on
the overhead console for more than
0.4 second.
Close
To close the sunroof, press the
CLOSE ( ) button on the over-
head console and hold it until the
sunroof is closed.
Sunshade
The sunshade will be opened with
the glass panel automatically when
the glass panel is slid. You will have
to close it manually if you want it
closed.
E2BLA361
CAUTION
• Do not press any sunroof con-
trol button longer than neces-
sary. Damage to the motor or
system components could
occur.
• Periodically remove any dirt
that may accumulate on the
guide rail.
• If you try to open the sunroof
when the temperature is
below freezing or when the
sunroof is covered with snow
or ice, the glass or the motor
could be damaged.
• The sunroof is made to slide
together with sunshade. Do
not leave the sunshade closed
while the sunroof is open.
WARNING
• Do not extend face or arms
outside through the sunroof
opening while driving.
• Make sure hand and face are
safely out of the way before
closing a sunroof.
Page 106 of 298

Knowing your vehicle
96 3
1
2
3
4
5
6
7
8
9
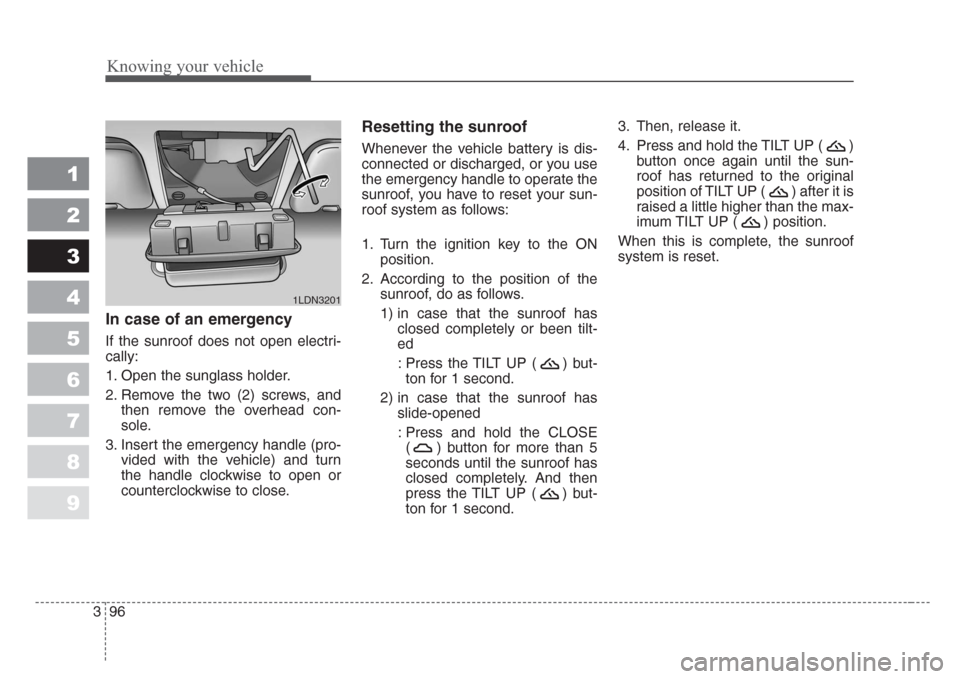
In case of an emergency
If the sunroof does not open electri-
cally:
1. Open the sunglass holder.
2. Remove the two (2) screws, and
then remove the overhead con-
sole.
3. Insert the emergency handle (pro-
vided with the vehicle) and turn
the handle clockwise to open or
counterclockwise to close.
Resetting the sunroof
Whenever the vehicle battery is dis-
connected or discharged, or you use
the emergency handle to operate the
sunroof, you have to reset your sun-
roof system as follows:
1. Turn the ignition key to the ON
position.
2. According to the position of the
sunroof, do as follows.
1) in case that the sunroof has
closed completely or been tilt-
ed
: Press the TILT UP ( ) but-
ton for 1 second.
2) in case that the sunroof has
slide-opened
: Press and hold the CLOSE
( ) button for more than 5
seconds until the sunroof has
closed completely. And then
press the TILT UP ( ) but-
ton for 1 second.3. Then, release it.
4. Press and hold the TILT UP ( )
button once again until the sun-
roof has returned to the original
position of TILT UP ( ) after it is
raised a little higher than the max-
imum TILT UP ( ) position.
When this is complete, the sunroof
system is reset.
1LDN3201
Page 108 of 298

Knowing your vehicle
98 3
1
2
3
4
5
6
7
8
9
Fixed rod antenna
(if equipped)
Your car uses a fixed rod antenna to
receive both AM and FM broadcast
signals.
This antenna is removable. To
remove the antenna, turn it counter-
clockwise. To install the antenna, turn
it clockwise.
Roof type antenna (if equipped)
If your vehicle has an audio system,
an amplifying antenna is installed in
your vehicle.
This antenna is removable. To remove
the antenna, turn it counterclockwise.
To install the antenna, turn it clockwise.
Aux outlet
You can use an aux outlet to connect
an audio device.
✽
NOTICE
When using a portable audio device
connected to the power outlet, noise
may occur during playback. If this
happens, use the power source of the
portable audio device.
ANTENNA
1LDN32046LDN3001A
CAUTION
• Be sure to remove the antenna
before washing the car in an
automatic car wash or it may
be damaged.
• When reinstalling your anten-
na, it is important that it is
fully tightened to ensure prop-
er reception.
OLD026157