2008 KIA Sephia reset
[x] Cancel search: resetPage 127 of 298

3 117
Knowing your vehicle
1
2
3
4
5
6
7
8
9
✽
NOTICE
• To assure proper operation of the
unit, keep the vehicle interior tem-
perature within a normal range by
using the vehicle's air conditioning
or heating system.
• When replacing the fuse, replace it
with a fuse having the correct
capacity.
• All stored bookmarks are all
erased when the car battery is dis-
connected or power to the vehicle
is lost. If this occurs, the book-
marks will have to be reset.
• This equipment is designed to be
used only in a 12 volt DC battery
system with negative ground.
• This unit is made of precision
parts. Do not attempt to disassem-
ble or adjust any parts.
• Do not expose this equipment
(including the speakers and tape)
to water or excessive moisture.CAUTION
• Do not insert warped or poor
quality discs into the CD play-
er as damage to the unit may
occur.
• Do not insert anything like
coins into the player slot as
damage to the unit may occur.
• Do not place beverages close
to the audio system. The play-
back mechanism may be dam-
aged if you spill them.
• Do not strike or allow anything
to impact the audio system,
damage to the system mecha-
nisms could occur.
• Off-road or rough surface
driving may cause the com-
pact disc to skip. Do not use
the compact disc when driv-
ing in such conditions as
damage to the compact disc
face could occur.
(Continued)
(Continued)
• Do not attempt to grab or pull
the compact disc out while the
disc is being pulled into the
audio unit by the self-loading
mechanism. Damage to the
audio unit and compact disc
could occur.
• Avoid using recorded com-
pact discs in your audio unit.
Original compact discs are
recommended for best
results.
WARNING
When driving your vehicle, be
sure to keep the volume of the
unit set low enough to allow you
to hear sounds coming from the
outside.
Page 155 of 298

Driving your vehicle
22 4
1
2
3
4
5
6
7
8
9
3. Push down the SET/COAST switch,
and release it at the speed you
want. The “SET” indicator light in the
instrument cluster will illuminate.
Release the accelerator at the
same time. The desired speed will
automatically be maintained.
The SET function cannot be activated
until approximately 2 seconds after the
CRUISE ON-OFF button has been
engaged.
On a steep grade, the vehicle may
momentarily slow down while going
downhill.
To cancel cruise control, do
one of the following:
• Press the brake pedal.
• Shift into N (Neutral).
• Pull the CANCEL switch.
Each of these actions will cancel
cruise control operation (the “SET”
indicator light in the instrument clus-
ter will go OFF), but it will not turn the
system off. If you wish to resume
cruise control operation, push up the
RES/ACC switch located on your
steering wheel. You will return to your
previously preset speed.
To turn cruise control off, do
one of the following:
• Push the CRUISE ON-OFF button
(the CRUISE indicator light in the
instrument cluster will go OFF).
• Turn the ignition off.
Both of these actions cancel cruise
control operation. If you want to
resume cruise control operation,
repeat the steps provided in “To Set
Cruise Control Speed” on the previ-
ous page.
1LDN40251LDN4025A
Page 156 of 298

423
1
2
3
4
5
6
7
8
9
Driving your vehicle
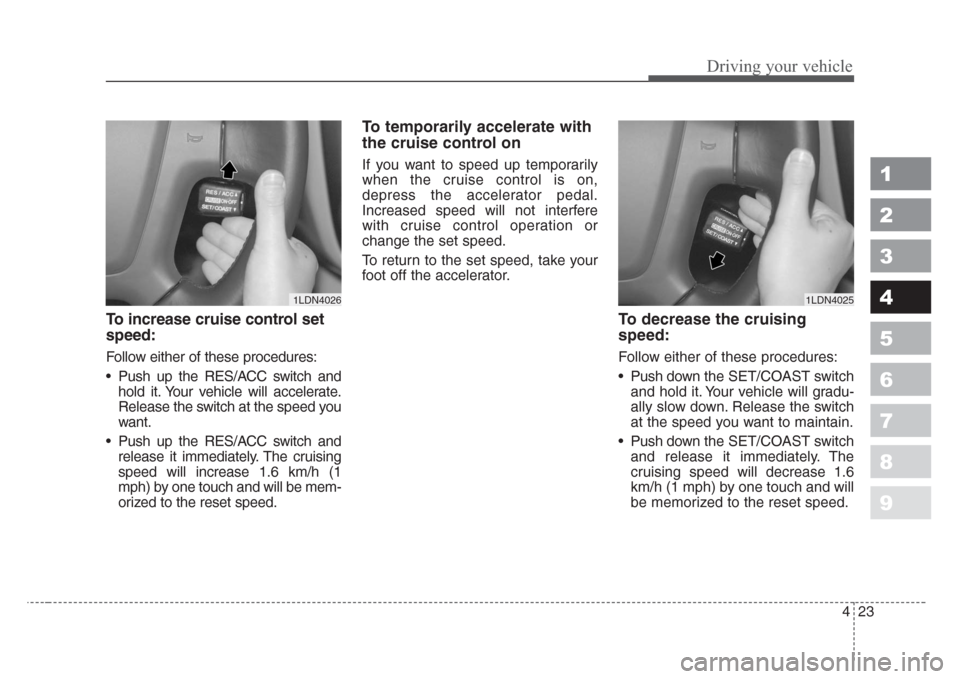
To increase cruise control set
speed:
Follow either of these procedures:
• Push up the RES/ACC switch and
hold it. Your vehicle will accelerate.
Release the switch at the speed you
want.
• Push up the RES/ACC switch and
release it immediately. The cruising
speed will increase 1.6 km/h (1
mph) by one touch and will be mem-
orized to the reset speed.
To temporarily accelerate with
the cruise control on
If you want to speed up temporarily
when the cruise control is on,
depress the accelerator pedal.
Increased speed will not interfere
with cruise control operation or
change the set speed.
To return to the set speed, take your
foot off the accelerator.
To decrease the cruising
speed:
Follow either of these procedures:
• Push downthe SET/COAST switch
and hold it. Your vehicle will gradu-
ally slow down. Release the switch
at the speed you want to maintain.
• Push downthe SET/COAST switch
and release it immediately. The
cruising speed will decrease 1.6
km/h (1 mph) by one touch and will
be memorized to the reset speed.
1LDN40261LDN4025
Page 162 of 298

429
1
2
3
4
5
6
7
8
9
Driving your vehicle
Speedometer
The speedometer indicates the for-
ward speed of the vehicle.
Odometer/Tripmeter
You can choose the odometer, trip-
meter A or tripmeter B by pressing
the TRIP button.
Odometer
The odometer indicates the total dis-
tance the vehicle has been driven.
Tripmeter
TRIP A: Tripmeter A
TRIP B: Tripmeter B
The tripmeter indicates the distance
of individual trips selected by the
driver. Tripmeter A and B can be
reset to 0 by pressing the TRIP but-
ton for 1 second or more, and then
releasing.
Tachometer
The tachometer indicates the
approximate number of engine revo-
lutions per minute (rpm).
Use the tachometer to select the cor-
rect shift points and to prevent lug-
ging and/or over-revving the engine.
The tachometer pointer may move
slightly when the ignition switch is in
ACC or ON position with the engine
OFF. This movement is normal and
will not affect the accuracy of the
tachometer once the engine is run-
ning.
GAUGES
OLD026200L
CAUTION
Do not operate the engine with-
in the tachometer's RED ZONE.
This may cause severe engine
damage.
Page 190 of 298

457
1
2
3
4
5
6
7
8
9
Driving your vehicle
• For maximum defrosting, set the
temperature control to the extreme
right/hot position and the fan speed
control to the highest speed.
• If warm air to the floor is desired
while defrosting or defogging, set
the mode to the floor- defrost posi-
tion.
• Before driving, clear all snow and
ice from the windshield, rear win-
dow, outside rear view mirrors, and
all side windows.
• Clear all snow and ice from the
hood and air inlet in the cowl grill to
improve heater and defroster effi-
ciency and to reduce the probabili-
ty of fogging up inside of the wind-
shield.Defogging logic
To reduce the probability of fogging
up the inside of the windshield, the
air intake is controlled automatically
according to certain conditions such
as or position. To cancel or
return the defogging logic, do the fol-
lowing.
Manual climate control system
1. Turn the ignition switch to the ON
position.
2. Turn the mode selection knob to
the defrost position ( ).
3. Push the air intake control button
( ) at least 5 times within 3 sec-
onds.
The indicator light in the air intake
control button will blink 3 times with
0.5 second of interval. It indicates
that the defogging logic is canceled
or returned to the programmed sta-
tus.
If the battery has been discharged or
disconnected, it resets to the defog
logic status.
OLD026143N
Page 234 of 298

In case of an emergency
18 6
1
2
3
4
5
6
7
8
9
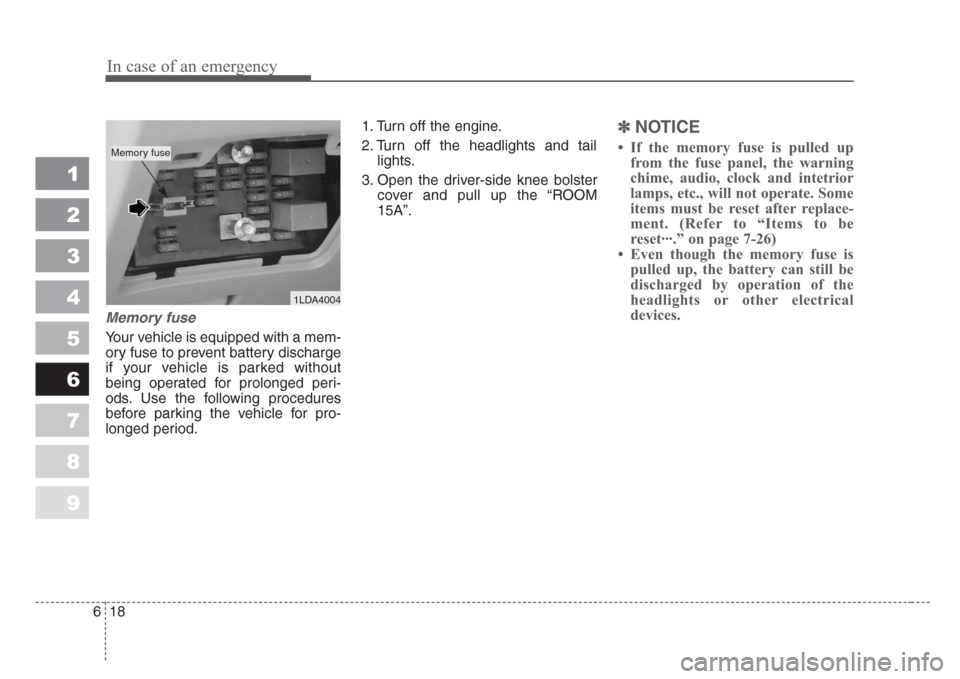
Memory fuse
Your vehicle is equipped with a mem-
ory fuse to prevent battery discharge
if your vehicle is parked without
being operated for prolonged peri-
ods. Use the following procedures
before parking the vehicle for pro-
longed period.1. Turn off the engine.
2. Turn off the headlights and tail
lights.
3. Open the driver-side knee bolster
cover and pull up the “ROOM
15A”.
✽
NOTICE
• If the memory fuse is pulled up
from the fuse panel, the warning
chime, audio, clock and intetrior
lamps, etc., will not operate. Some
items must be reset after replace-
ment. (Refer to “Items to be
reset···.” on page 7-26)
• Even though the memory fuse is
pulled up, the battery can still be
discharged by operation of the
headlights or other electrical
devices.
1LDA4004
Memory fuse
Page 271 of 298

Maintenance
26 7
1
2
3
4
5
6
7
8
9
For best battery service :
• Keep the battery securely mount-
ed.
• Keep the battery top clean and dry.
• Keep the terminals and connec-
tions clean, tight, and coated with
petroleum jelly or terminal grease.
• Rinse any spilled electrolyte from
the battery immediately with a
solution of water and baking soda.
• If the vehicle is not going to be
used for an extended time, discon-
nect the battery cables.
Battery recharging
Your vehicle has a maintenance-free,
calcium-based battery.
• If the battery becomes discharged
in a short time (because, for exam-
ple, the headlights or interior lights
were left on while the vehicle was
not in use), recharge it by slow
charging (trickle) for 10 hours.
• If the battery gradually discharges
because of high electric load while
the vehicle is being used, recharge
it at 20-30A for two hours.
Items to be reset after the battery
has been discharged or the bat-
tery has been disconnected.
• Clock (See section 3)
• Climate control system
(See section 4)
• Audio (See section 3)
• Sunroof (See section 3)
1LDE5028
Page 277 of 298

Maintenance
32 7
1
2
3
4
5
6
7
8
9
Compact spare tire replace-
ment (if equipped)
A compact spare tire has a shorter
tread life than a regular size tire.
Replace it when you can see the
tread wear indicator bars on the tire.
The replacement compact spare tire
should be the same size and design
tire as the one provided with your
new Kia and should be mounted on
the same compact spare tire wheel.
The compact spare tire is not
designed to be mounted on a regular
size wheel, and the compact spare
tire wheel is not designed for mount-
ing a regular size tire.
Wheel alignment and tire
balance
The wheels on your vehicle were
aligned and balanced carefully at the
factory to give you the longest tire life
and best overall performance.
In most cases, you will not need to
have your wheels aligned again.
However, if you notice unusual tire
wear or your vehicle pulling one way
or the other, the alignment may need
to be reset.
If you notice your vehicle vibrating
when driving on a smooth road, your
wheels may need to be rebalanced.
Wheel replacement
When replacing the metal wheels for
any reason, make sure the new
wheels are equivalent to the original
factory units in diameter, rim width
and offset.
WARNING
A wheel that is not the correct
size may adversely affect wheel
and bearing life, braking and
stopping abilities, handling char-
acteristics, ground clearance,
body-to-tire clearance,snow
chain clearance,speedometer
calibration, headlight aim and
bumper height.
CAUTION
Improper wheel weights can
damage your vehicle's alu-
minum wheels.Use only
approved wheel weights.