2008 KIA Sedona warning light
[x] Cancel search: warning lightPage 129 of 339
Features of your vehicle
120 3
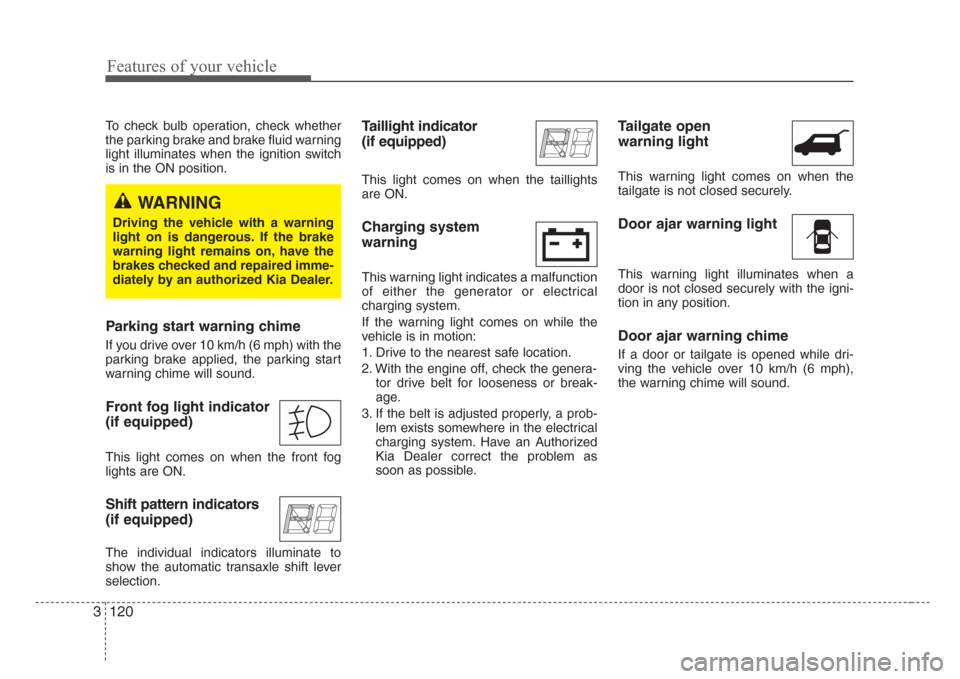
To check bulb operation, check whether
the parking brake and brake fluid warning
light illuminates when the ignition switch
is in the ON position.
Parking start warning chime
If you drive over 10 km/h (6 mph) with the
parking brake applied, the parking start
warning chime will sound.
Front fog light indicator
(if equipped)
This light comes on when the front fog
lights are ON.
Shift pattern indicators
(if equipped)
The individual indicators illuminate to
show the automatic transaxle shift lever
selection.
Taillight indicator
(if equipped)
This light comes on when the taillights
are ON.
Charging system
warning
This warning light indicates a malfunction
of either the generator or electrical
charging system.
If the warning light comes on while the
vehicle is in motion:
1. Drive to the nearest safe location.
2. With the engine off, check the genera-
tor drive belt for looseness or break-
age.
3. If the belt is adjusted properly, a prob-
lem exists somewhere in the electrical
charging system. Have an Authorized
Kia Dealer correct the problem as
soon as possible.
Tailgate open
warning light
This warning light comes on when the
tailgate is not closed securely.
Door ajar warning light
This warning light illuminates when a
door is not closed securely with the igni-
tion in any position.
Door ajar warning chime
If a door or tailgate is opened while dri-
ving the vehicle over 10 km/h (6 mph),
the warning chime will sound.
WARNING
Driving the vehicle with a warning
light on is dangerous. If the brake
warning light remains on, have the
brakes checked and repaired imme-
diately by an authorized Kia Dealer.
Page 130 of 339
3 121
Features of your vehicle
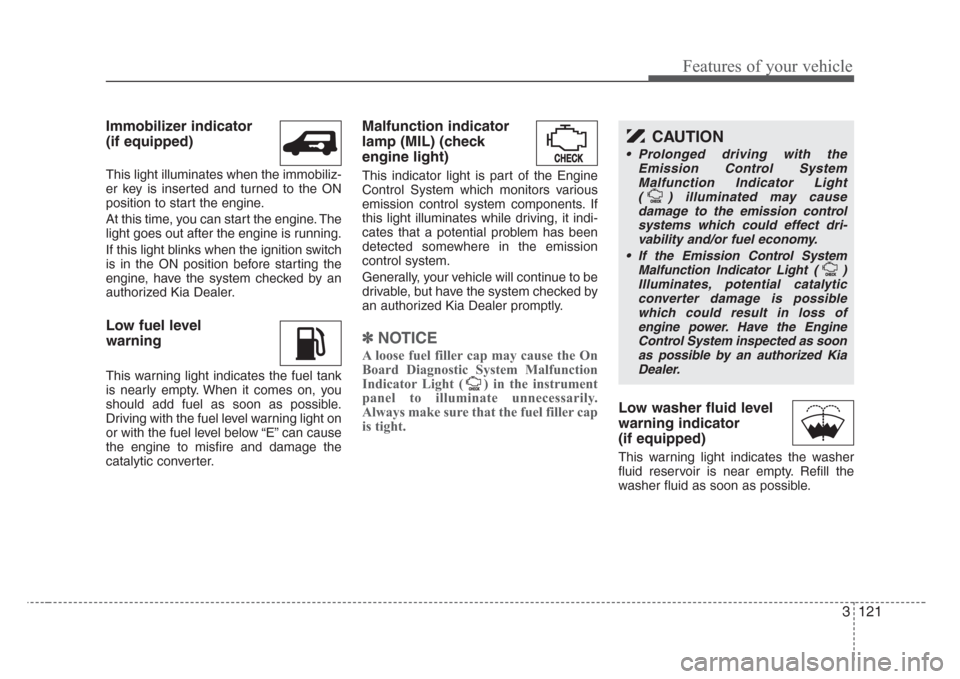
Immobilizer indicator
(if equipped)
This light illuminates when the immobiliz-
er key is inserted and turned to the ON
position to start the engine.
At this time, you can start the engine. The
light goes out after the engine is running.
If this light blinks when the ignition switch
is in the ON position before starting the
engine, have the system checked by an
authorized Kia Dealer.
Low fuel level
warning
This warning light indicates the fuel tank
is nearly empty. When it comes on, you
should add fuel as soon as possible.
Driving with the fuel level warning light on
or with the fuel level below “E” can cause
the engine to misfire and damage the
catalytic converter.
Malfunction indicator
lamp (MIL) (check
engine light)
This indicator light is part of the Engine
Control System which monitors various
emission control system components. If
this light illuminates while driving, it indi-
cates that a potential problem has been
detected somewhere in the emission
control system.
Generally, your vehicle will continue to be
drivable, but have the system checked by
an authorized Kia Dealer promptly.
✽
NOTICE
A loose fuel filler cap may cause the On
Board Diagnostic System Malfunction
Indicator Light ( ) in the instrument
panel to illuminate unnecessarily.
Always make sure that the fuel filler cap
is tight.
Low washer fluid level
warning indicator
(if equipped)
This warning light indicates the washer
fluid reservoir is near empty. Refill the
washer fluid as soon as possible.
CAUTION
• Prolonged driving with the
Emission Control System
Malfunction Indicator Light
( ) illuminated may cause
damage to the emission control
systems which could effect dri-
vability and/or fuel economy.
•
If the EmissionControl System
Malfunction Indicator Light ( )
Illuminates, potential catalytic
converter damage is possible
which could result in loss of
engine power. Have the Engine
Control System inspected as soon
as possible by an authorized Kia
Dealer.
Page 131 of 339
Features of your vehicle
122 3
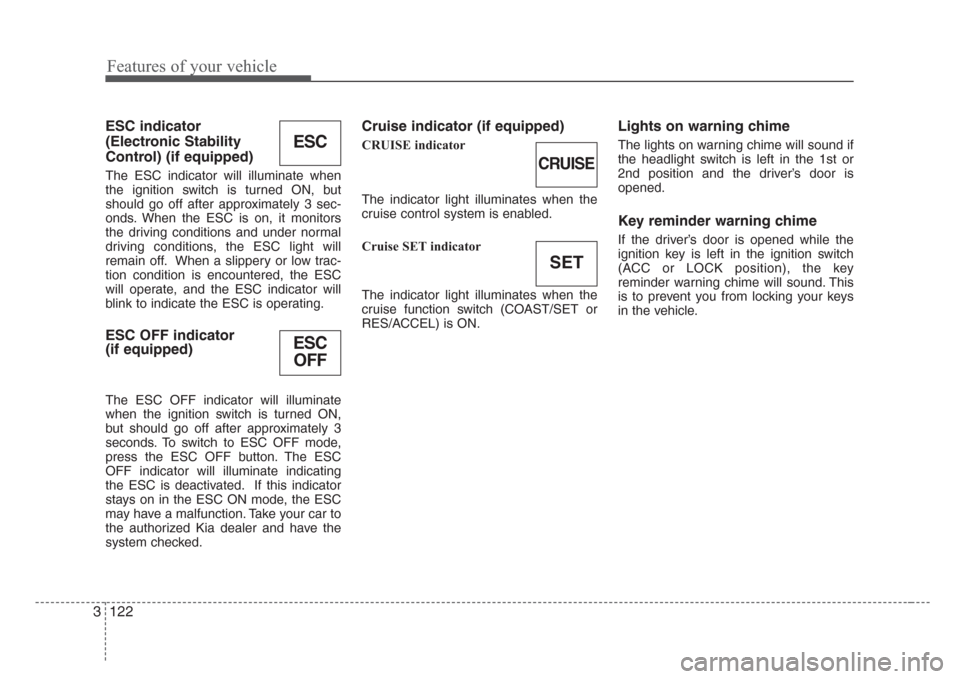
ESC indicator
(Electronic Stability
Control) (if equipped)
The ESC indicator will illuminate when
the ignition switch is turned ON, but
should go off after approximately 3 sec-
onds. When the ESC is on, it monitors
the driving conditions and under normal
driving conditions, the ESC light will
remain off. When a slippery or low trac-
tion condition is encountered, the ESC
will operate, and the ESC indicator will
blink to indicate the ESC is operating.
ESC OFF indicator
(if equipped)
The ESC OFF indicator will illuminate
when the ignition switch is turned ON,
but should go off after approximately 3
seconds. To switch to ESC OFF mode,
press the ESC OFF button. The ESC
OFF indicator will illuminate indicating
the ESC is deactivated. If this indicator
stays on in the ESC ON mode, the ESC
may have a malfunction. Take your car to
the authorized Kia dealer and have the
system checked.
Cruise indicator (if equipped)
CRUISE indicator
The indicator light illuminates when the
cruise control system is enabled.
Cruise SET indicator
The indicator light illuminates when the
cruise function switch (COAST/SET or
RES/ACCEL) is ON.
Lights on warning chime
The lights on warning chime will sound if
the headlight switch is left in the 1st or
2nd position and the driver’s door is
opened.
Key reminder warning chime
If the driver’s door is opened while the
ignition key is left in the ignition switch
(ACC or LOCK position), the key
reminder warning chime will sound. This
is to prevent you from locking your keys
in the vehicle.
ESC
ESC
OFF
CRUISE
SET
Page 135 of 339
Features of your vehicle
126 3
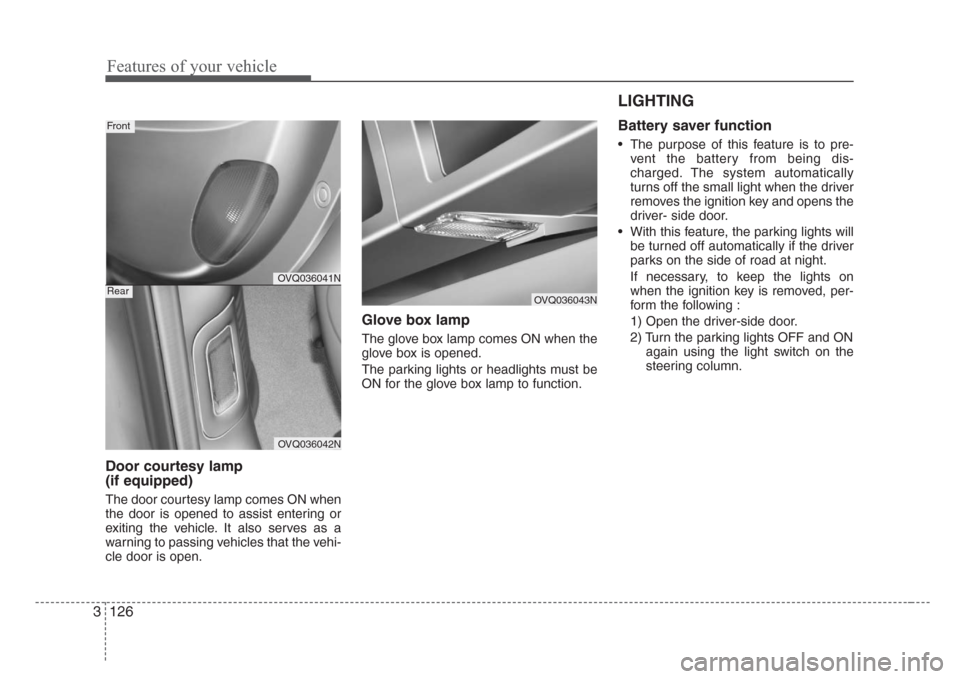
Door courtesy lamp
(if equipped)
The door courtesy lamp comes ON when
the door is opened to assist entering or
exiting the vehicle. It also serves as a
warning to passing vehicles that the vehi-
cle door is open.
Glove box lamp
The glove box lamp comes ON when the
glove box is opened.
The parking lights or headlights must be
ON for the glove box lamp to function.
LIGHTING
Battery saver function
• The purpose of this feature is to pre-
vent the battery from being dis-
charged. The system automatically
turns off the small light when the driver
removes the ignition key and opens the
driver- side door.
• With this feature, the parking lights will
be turned off automatically if the driver
parks on the side of road at night.
If necessary, to keep the lights on
when the ignition key is removed, per-
form the following :
1) Open the driver-side door.
2) Turn the parking lights OFF and ON
again using the light switch on the
steering column.
OVQ036041N
OVQ036042N
Front
RearOVQ036043N
Page 145 of 339
Features of your vehicle
136 3
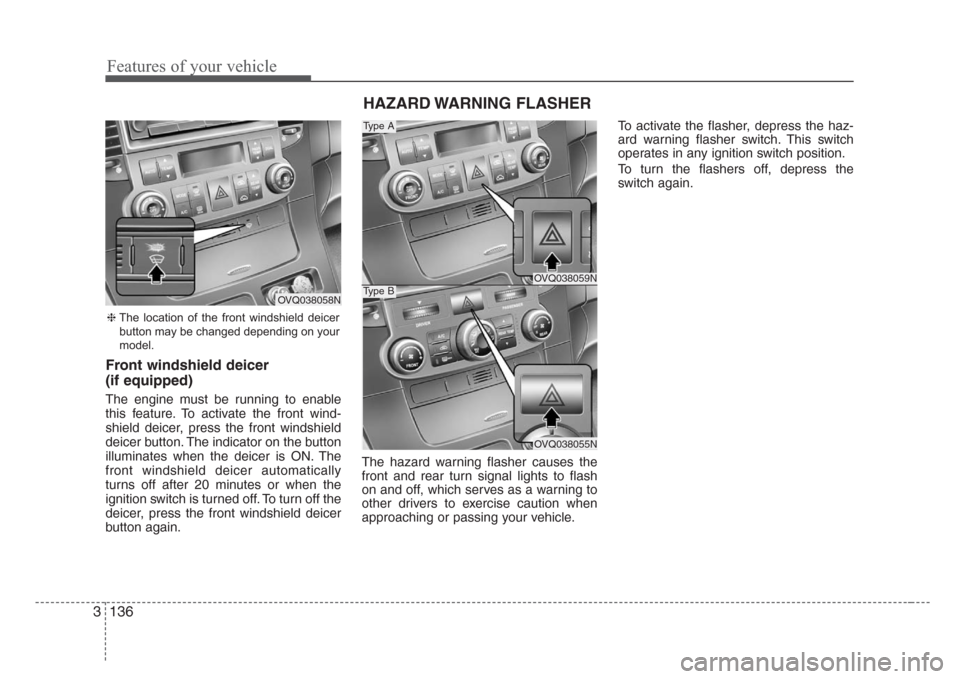
Front windshield deicer
(if equipped)
The engine must be running to enable
this feature. To activate the front wind-
shield deicer, press the front windshield
deicer button. The indicator on the button
illuminates when the deicer is ON. The
front windshield deicer automatically
turns off after 20 minutes or when the
ignition switch is turned off. To turn off the
deicer, press the front windshield deicer
button again.The hazard warning flasher causes the
front and rear turn signal lights to flash
on and off, which serves as a warning to
other drivers to exercise caution when
approaching or passing your vehicle.To activate the flasher, depress the haz-
ard warning flasher switch. This switch
operates in any ignition switch position.
To turn the flashers off, depress the
switch again.
HAZARD WARNING FLASHER
OVQ038059N
OVQ038055N
Type A
Type B
❈The location of the front windshield deicer
button may be changed depending on your
model.
OVQ038058N
Page 160 of 339
3 151
Features of your vehicle
Recirculated air position
The indicator light on the but-
ton is illuminated when the
recirculated air position is
selected.
With the recirculated air posi-
tion selected, air from pas-
senger compartment will be
drawn through the heating
system and heated or cooled
according to the function
selected.
Outside (fresh) air position
The indicator light on the but-
ton is illumimated when the
outside (fresh) air position is
selected.
With the outside (fresh) air
position selected, air enters
the vehicle from outside and
is heated or cooled according
to the function selected.
✽
NOTICE
It should be noted that prolonged oper-
ation of the heating in recirculated air
position will cause fogging of the wind-
shield and side windows and the air
within the passenger compartment will
become stale.
In addition, prolonged use of the air
conditioning with the “recirculated air
position” selected, will result in exces-
sively dry air in the passenger compart-
ment.
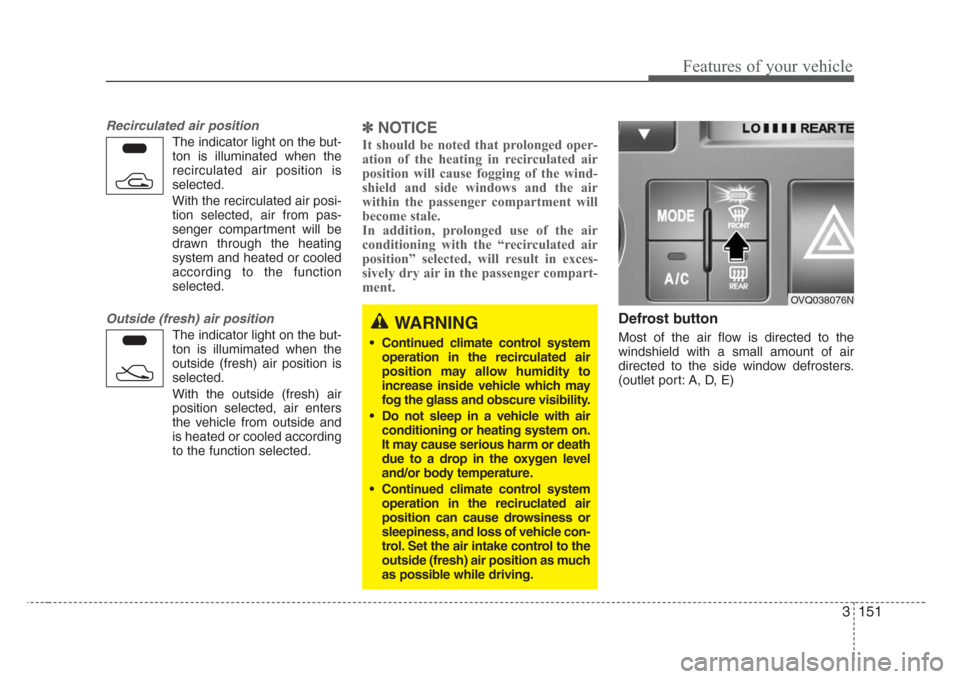
Defrost button
Most of the air flow is directed to the
windshield with a small amount of air
directed to the side window defrosters.
(outlet port: A, D, E)
WARNING
• Continued climate control system
operation in the recirculated air
position may allow humidity to
increase inside vehicle which may
fog the glass and obscure visibility.
• Do not sleep in a vehicle with air
conditioning or heating system on.
It may cause serious harm or death
due to a drop in the oxygen level
and/or body temperature.
• Continued climate control system
operation in the reciruclated air
position can cause drowsiness or
sleepiness, and loss of vehicle con-
trol. Set the air intake control to the
outside (fresh) air position as much
as possible while driving.
OVQ038076N
Page 174 of 339

3 165
Features of your vehicle
Your new mirror comes with an integrat-
ed HomeLink Universal Transceiver,
which allows you to program the mirror to
activate your garage door(s), estate gate,
home lighting, etc. The mirror actually
learns the codes from your various exist-
ing transmitters.
Programming
Your vehicle may require the ignition
switch to be turned to the ACC position
for programming and/or operation of
HomeLink. It is also recommended that a
new battery be replaced in the hand-held
transmitter of the device being pro-
grammed to HomeLink for quicker train-
ing and accurate transmission of the
radio-frequency.
Follow these steps to train your
HomeLink mirror:
HOMELINK® WIRELESS CONTROL SYSTEM (IF EQUIPPED)
WARNING
• When programming the
HomeLink® Wireless Control
System, you may be operating a
garage door or gate operator.
Make sure that people and objects
are out of the way of the moving
door or gate to prevent potential
harm or damage.
(Continued)
(Continued)
• Do not use HomeLink with any
garage door opener that lacks the
safety stop and reverse feature as
required by federal safety stan-
dards. (This includes any garage
door opener model manufactured
before April 1, 1982.) A garage
door opener which cannot detect
an object, signaling the door to
stop and reverse, does not meet
current federal safety standards.
Using a garage door opener with-
out these features increases risk
of serious injury or death. For
more information, call 1-800-355-
3515 or on the internet at
www.homelink.com.
• Retain the original transmitter for
future programming procedures
(i.e., new vehicle purchase). It is
also suggested that upon the sale
of the vehicle, the programmed
HomeLink buttons be erased for
security purposes (follow step 1
in the “Programming” portion of
this text).
OVQ036305N Glare detection sensor
Indicator light
Homelink buttons
Page 177 of 339
Features of your vehicle
168 3
Reprogramming a single
HomeLink button
To program a device to HomeLink using
a HomeLink button previously trained,
follow these steps:
1. Press and hold the desired HomeLink
button. Do NOT release until step 4
has been completed.
2. When the indicator light begins to flash
slowly (after 20 seconds), position the
hand-held transmitter 1 to 3 inches
away from the HomeLink surface.
3. Press and hold the hand-held trans-
mitter button (or press and “cycle” - as
described in “Canadian Programming”
above).
4. The HomeLink indicator light will flash,
first slowly and then rapidly. When the
indicator light begins to flash rapidly,
release both buttons.
The previous device has now been
erased and the new device can be acti-
vated by pushing the HomeLink button
that has just been programmed. This pro-
cedure will not affect any other pro-
grammed HomeLink buttons.
Gate operator programming &
canadian programming
During programming, your hand-held
transmitter may automatically stop trans-
mitting. Continue to press and hold the
HomeLink button (note steps 2 through 4
in the “Programming” portion of this text)
while you press and re-press (“cycle”)
your handheld transmitter every two sec-
onds until the frequency signal has been
learned. The indicator light will flash
slowly and then rapidly after several sec-
onds upon successful training.
Accessories
If you would like additional information on
the HomeLink Wireless Control System,
HomeLink compatible products, or to
purchase other accessories such as the
HomeLink® Lighting Package, please
contact HomeLink at 1-800-355-3515 or
on the internet at www.homelink.com.
This device complies with Industry
Canada Standard RSS-210.Operation
is subject to the following two conditions:
1. This device may not cause interfer-
ence, and
2. This device must accept any interfer-
ence, including interference that may
cause undesired operation of the
device.
CAUTION
If programming a garage door
opener or gate, it is advised to
unplug the device during the
“cycling” process to prevent possi-
ble motor burn-up.
WARNING
Changes or modifications not
expressly approved by the party
responsible for compliance could
void the user’s authority to operate
the equipment.
IC: 4112104541A Gentex
MODEL/FCC ID: NZLSTDHL3