2008 KIA Sedona engine
[x] Cancel search: enginePage 91 of 339
Features of your vehicle
82 3
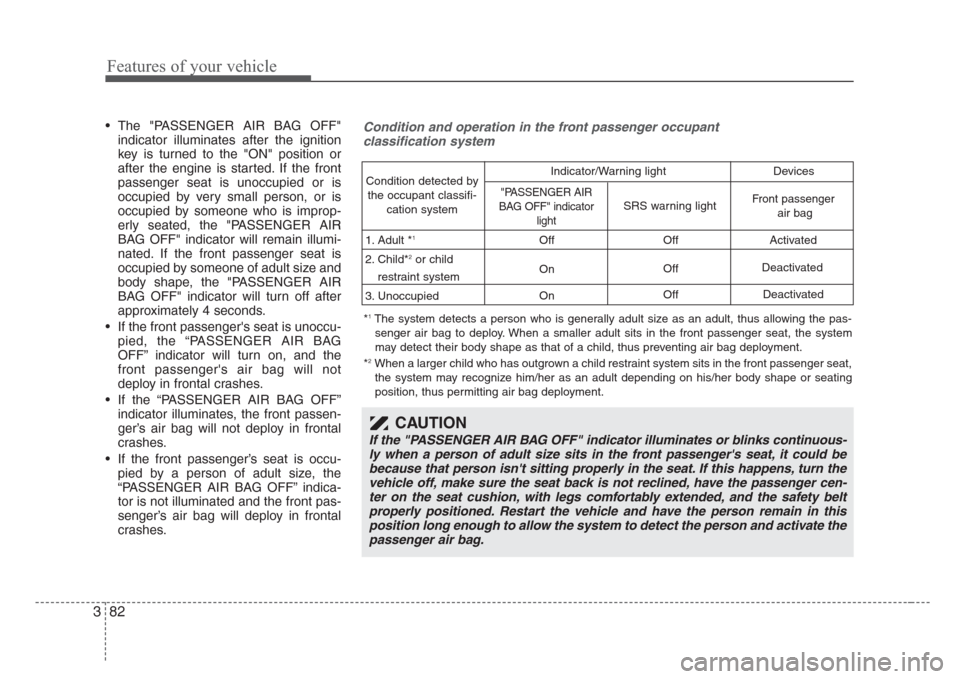
• The "PASSENGER AIR BAG OFF"
indicator illuminates after the ignition
key is turned to the "ON" position or
after the engine is started. If the front
passenger seat is unoccupied or is
occupied by very small person, or is
occupied by someone who is improp-
erly seated, the "PASSENGER AIR
BAG OFF" indicator will remain illumi-
nated. If the front passenger seat is
occupied by someone of adult size and
body shape, the "PASSENGER AIR
BAG OFF" indicator will turn off after
approximately 4 seconds.
• If the front passenger's seat is unoccu-
pied, the “PASSENGER AIR BAG
OFF” indicator will turn on, and the
front passenger's air bag will not
deploy in frontal crashes.
• If the “PASSENGER AIR BAG OFF”
indicator illuminates, the front passen-
ger’s air bag will not deploy in frontal
crashes.
• If the front passenger’s seat is occu-
pied by a person of adult size, the
“PASSENGER AIR BAG OFF” indica-
tor is not illuminated and the front pas-
senger’s air bag will deploy in frontal
crashes.Condition and operation in the front passenger occupant
classification system
Condition detected by
the occupant classifi-
cation system
1. Adult *
1
2. Child*2or child
restraint system
3. Unoccupied Off
On
OnOff
Off
OffActivated
Deactivated
"PASSENGER AIR
BAG OFF" indicator
light
SRS warning lightFront passenger
air bag
Deactivated Indicator/Warning light Devices
*1The system detects a person who is generally adult size as an adult, thus allowing the pas-
senger air bag to deploy. When a smaller adult sits in the front passenger seat, the system
may detect their body shape as that of a child, thus preventing air bag deployment.
*
2When a larger child who has outgrown a child restraint system sits in the front passenger seat,
the system may recognize him/her as an adult depending on his/her body shape or seating
position, thus permitting air bag deployment.
CAUTION
If the "PASSENGER AIR BAG OFF" indicator illuminates or blinks continuous-
ly when a person of adult size sits in the front passenger's seat, it could be
because that person isn't sitting properly in the seat. If this happens, turn the
vehicle off, make sure the seat back is not reclined, have the passenger cen-
ter on the seat cushion, with legs comfortably extended, and the safety belt
properly positioned. Restart the vehicle and have the person remain in this
position long enough to allow the system to detect the person and activate the
passenger air bag.
Page 107 of 339
Features of your vehicle
98 3
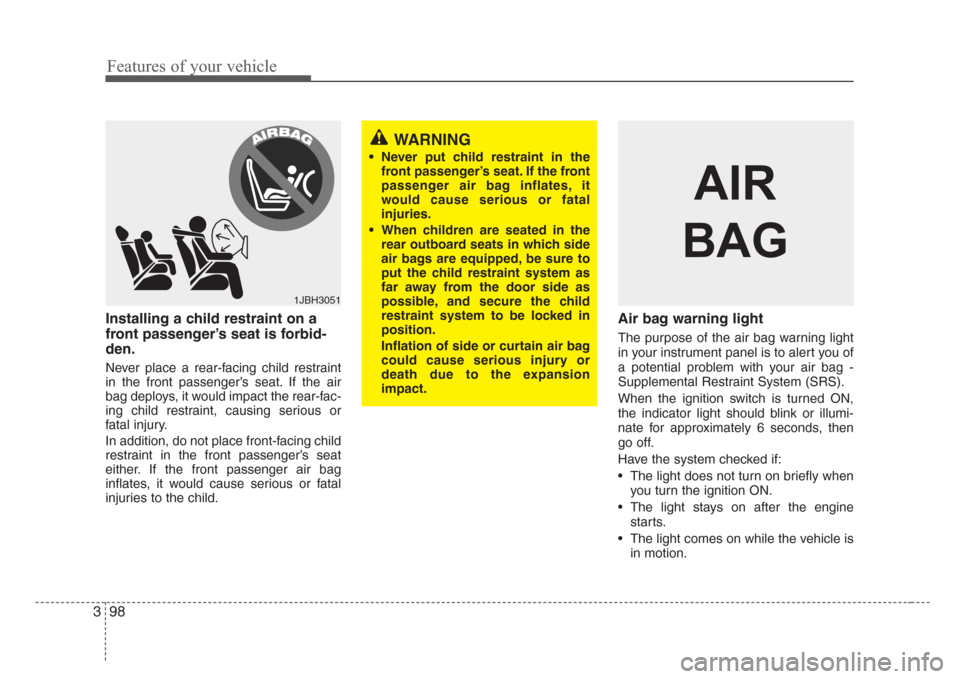
Installing a child restraint on a
front passenger’s seat is forbid-
den.
Never place a rear-facing child restraint
in the front passenger’s seat. If the air
bag deploys, it would impact the rear-fac-
ing child restraint, causing serious or
fatal injury.
In addition, do not place front-facing child
restraint in the front passenger’s seat
either. If the front passenger air bag
inflates, it would cause serious or fatal
injuries to the child.
Air bag warning light
The purpose of the air bag warning light
in your instrument panel is to alert you of
a potential problem with your air bag -
Supplemental Restraint System (SRS).
When the ignition switch is turned ON,
the indicator light should blink or illumi-
nate for approximately 6 seconds, then
go off.
Have the system checked if:
• The light does not turn on briefly when
you turn the ignition ON.
• The light stays on after the engine
starts.
• The light comes on while the vehicle is
in motion.
1JBH3051
WARNING
• Never put child restraint in the
front passenger’s seat. If the front
passenger air bag inflates, it
would cause serious or fatal
injuries.
• When children are seated in the
rear outboard seats in which side
air bags are equipped, be sure to
put the child restraint system as
far away from the door side as
possible, and secure the child
restraint system to be locked in
position.
Inflation of side or curtain air bag
could cause serious injury or
death due to the expansion
impact.
AIR
BAG
Page 110 of 339
3 101
Features of your vehicle
Power steering
Power steering uses energy from the
engine to assist you in steering the vehi-
cle. If the engine is off or if the power
steering system becomes inoperative,
the vehicle may still be steered, but it will
require increased steering effort.
Should you notice any change in the
effort required to steer during normal
vehicle operation, have the power steer-
ing checked by an Authorized Kia Dealer.
✽
NOTICE
If the vehicle is parked for extended
periods outside in cold weather (below -
10 °C/14 °F), the power steering may
require increased effort when the engine
is first started. This is caused by
increased fluid viscosity due to the cold
weather and does not indicate a mal-
function.
When this happens, increase the engine
RPM by depressing accelerator until the
RPM reaches 1,500 rpm then release or
let the engine idle for two or three min-
utes to warm up the fluid.
STEERING WHEEL
CAUTION
• Never hold the steering wheel
against a stop (extreme right or
left turn) for more than 5 seconds
with the engine running. Holding
the steering wheel for more than
5 seconds in either position may
cause damage to the power steer-
ing pump.
• If the power steering drive belt
breaks or if the power steering
pump malfunctions, the steering
effort will greatly increase.
Page 113 of 339

Features of your vehicle
104 3
Outside rearview mirror heater
(if equipped)
The outside rearview mirror heater is
actuated in connection with the rear win-
dow defroster. To heat the outside
rearview mirror glass, push the button for
the rear window defroster.
The rearview mirror heater (and rear win-
dow defroster) will not operate unless the
engine is running.
The outside rearview mirror glass will be
heated for defrosting or defogging and
will give you improved rear vision in
inclement weather conditions. Push the
button again to turn the heater off. The
outside rearview mirror heater automati-
cally turns off after 20 minutes.
Electric remote control
The electric remote control mirror switch
allows you to adjust the position of the
left and right outside rearview mirrors. To
adjust the position of either mirror, move
the lever (1) to R or L to select the right
side mirror or the left side mirror, then
press a corresponding point ( ) on the
mirror adjustment control to position the
selected mirror up, down, left or right.
After adjustment, put the lever into neu-
tral position to prevent the inadvertent
adjustment.
CAUTION
• The mirrors stop moving when
they reach the maximum adjust-
ing angles, but the motor contin-
ues to operate while the switch is
depressed. Do not depress the
switch longer than necessary, the
motor may be damaged.
• Do not attempt to adjust the out-
side rearview mirror by hand.
Doing so may damage the parts.
1VQA2108
Page 115 of 339

Features of your vehicle
106 3
Rearview mirror
Adjust the rearview mirror to center on
the view through the rear window. Make
this adjustment before you start driving.
Manual type (if equipped)
Make this adjustment before you start
driving and while the day/night lever is in
the day position.
Pull the day/night lever toward you to
reduce glare from the headlights of vehi-
cles behind you during night driving.
Remember that you lose some rearview
clarity in the night position.Electric type (if equipped)
The electric rearview mirror automatical-
ly controls the glare from the headlights
of the car behind you in nighttime or low
light driving conditions. The sensor
mounted in the mirror senses the light
level around the vehicle, and through a
chemical reaction, automatically controls
the headlight glare from vehicles behind
you.
When the engine is running, the glare is
automatically controlled by the sensor
mounted in the rearview mirror.
Whenever the shift lever is shifted into
reverse (R), the mirror will automatically
go to the brightest setting in order to
improve the drivers view behind the vehi-
cle.
WARNING - Rear visibility
Do not place objects in the rear seat
or cargo area which would interfere
with your vision out the rear win-
dow.
1VQA2105OLD028078Day
Night
Day/Night lever
CAUTION
When cleaning the mirror, use a
paper towel or similar material
dampened with glass cleaner. Do
not spray glass cleaner directly on
the mirror as that may cause the liq-
uid cleaner to enter the mirror hous-
ing.
Page 117 of 339
Features of your vehicle
108 3
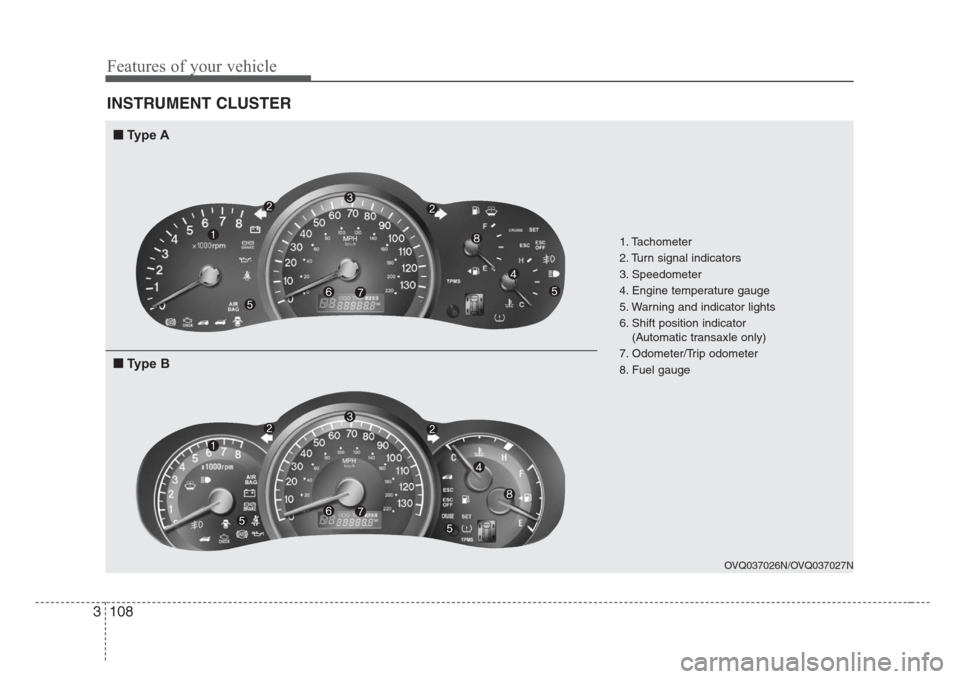
INSTRUMENT CLUSTER
1. Tachometer
2. Turn signal indicators
3. Speedometer
4. Engine temperature gauge
5. Warning and indicator lights
6. Shift position indicator
(Automatic transaxle only)
7. Odometer/Trip odometer
8. Fuel gauge
OVQ037026N/OVQ037027N
■
Type A
■
Type B
Page 119 of 339

Features of your vehicle
110 3
Trip odometer
TRIP A: Trip odometer A
TRIP B: Trip odometer B
The trip odometer indicates the distance
of individual trips selected by the driver.
Trip odometer A and B can be reset to 0
by pressing the reset button for 1 second
or more, and then releasing.
Tachometer
The tachometer indicates the approxi-
mate number of engine revolutions per
minute (rpm).
Use the tachometer to select the correct
shift points and to prevent lugging and/or
over-revving the engine.
The tachometer pointer may move slight-
ly when the ignition switch is in ACC or
ON position with the engine OFF. This
movement is normal and will not affect
the accuracy of the tachometer once the
engine is running.
Engine temperature gauge
This gauge shows the temperature of the
engine coolant when the ignition switch
is ON.
Do not continue driving with an overheat-
ed engine. If your vehicle overheats, refer
to “Overheating” in the Index.
CAUTION
Do not operate the engine within
the tachometer's RED ZONE.
This may cause severe engine dam-
age.
CAUTION
If the gauge pointer moves beyond
the normal range area toward the
“H” position, it indicates overheat-
ing that may damage the engine.
OVQ036031NOVQ036406N1VQA2125
Page 125 of 339
Features of your vehicle
116 3
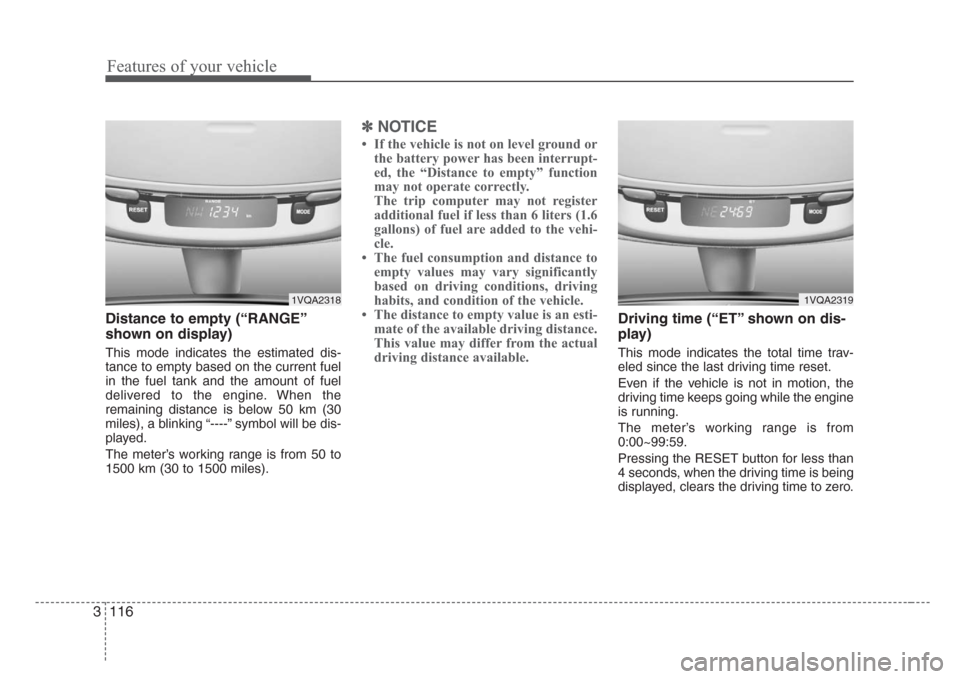
Distance to empty (“RANGE”
shown on display)
This mode indicates the estimated dis-
tance to empty based on the current fuel
in the fuel tank and the amount of fuel
delivered to the engine. When the
remaining distance is below 50 km (30
miles), a blinking “----” symbol will be dis-
played.
The meter’s working range is from 50 to
1500 km (30 to 1500 miles).
✽
NOTICE
• If the vehicle is not on level ground or
the battery power has been interrupt-
ed, the “Distance to empty” function
may not operate correctly.
The trip computer may not register
additional fuel if less than 6 liters (1.6
gallons) of fuel are added to the vehi-
cle.
• The fuel consumption and distance to
empty values may vary significantly
based on driving conditions, driving
habits, and condition of the vehicle.
• The distance to empty value is an esti-
mate of the available driving distance.
This value may differ from the actual
driving distance available.
Driving time (“ET” shown on dis-
play)
This mode indicates the total time trav-
eled since the last driving time reset.
Even if the vehicle is not in motion, the
driving time keeps going while the engine
is running.
The meter’s working range is from
0:00~99:59.
Pressing the RESET button for less than
4 seconds, when the driving time is being
displayed, clears the driving time to zero.
1VQA23191VQA2318