2008 KIA Sedona roof
[x] Cancel search: roofPage 106 of 339
397
Features of your vehicle
Noise and smoke
When the air bags inflate, they make a
loud noise and they leave smoke and
powder in the air inside of the vehicle.
This is normal and is a result of the igni-
tion of the air bag inflator. After the air
bag inflates, you may feel substantial dis-
comfort in breathing due to the contact of
your chest to both the safety belt and the
air bag, as well as from breathing the
smoke and powder.We strongly urge
you to open your doors and/or win-
dows as soon as possible after impact
in order to reduce discomfort and pre-
vent prolonged exposure to the
smoke and powder.
Though smoke and powder are non-
toxic, it may cause irritation to the skin
(eyes, nose and throat etc). If this is the
case, wash and rinse with the cold water
immediately and consult the doctor if the
symptom persists.WARNING - Seated
positioning
• Driver should sit as far back (at
least 250 mm (10 inches) away)
from the steering wheel air bag as
possible to reduce the risk of
injury or death in a collision. The
front passenger should always
move their seat as far back as
possible and sit back in their
seat.
• Air bag inflates instantly in an
event of collision, passengers
may be injured by the air bag
expansion force if they are not in
proper position.
• Air bag inflation may cause
injuries which normally include
facial or bodily abrasions, injuries
by the broken glasses or burns by
the explosives.
WARNING
When the air bags deploy, the air
bag related parts in steering wheel
and/or instrument panel and/or in
both sides of the roof rails above
the front and rear doors are very
hot. To prevent injury, do not touch
the air bag storage areas internal
components immediately after an
air bag has inflated.
Page 108 of 339
399
Features of your vehicle
SRS care
Your Supplemental Restraint System is
virtually maintenance-free. There are no
parts which you can service.
You must have the system serviced
under the following circumstances:
• If an air bag ever inflates, the air bag
must be replaced. Do not try to remove
or discard the air bag by yourself. This
must be done by an authorized Kia
dealer.
• If the air bag warning indicator light
alerts you to a problem, have the air
bag system checked as soon as possi-
ble. Otherwise, your air bag system
may be ineffective.
When repairing or scrapping the
vehicles
• Repairing steering wheel, instrument
panel, center console or roofs, or
installing car audio around center con-
sole or painting front metal sheet could
disable the air bag system. Have them
checked by an authorized Kia dealer.
• When leaving the vehicle at an autho-
rized Kia dealer, inform the facility that
the vehicle is equipped with air bag
system, and leave the owner’s manual
in the vehicle.
• Since air bag system contains explo-
sive chemical substances, contact an
authorized Kia dealer when scrapping
the vehicle.
WARNING- No mainte-
nance or repair
• Do not modify your steering
wheel, seat or any other part of
the Supplemental Restraint
System. Modification could make
the system inoperable.
• Do not work on the system’s com-
ponents or wiring. This could
cause the air bags to inflate inad-
vertently, possibly seriously injur-
ing someone. Working on the sys-
tem could also disable the sys-
tem so that the air bags would not
deploy in a collision.
• Any work on the SRS system,
such as removing, installing,
repairing, or any work on the
steering wheel must be per-
formed by a qualified Kia techni-
cian. Improper handling of the air
bag system may result in serious
personal injury or death.
WARNING- No modifica-
tion
Do not modify any part of the air
bag system. Modification could
make the air bag system ineffective
or could cause unnecessary
deployment.
Page 123 of 339
Features of your vehicle
114 3
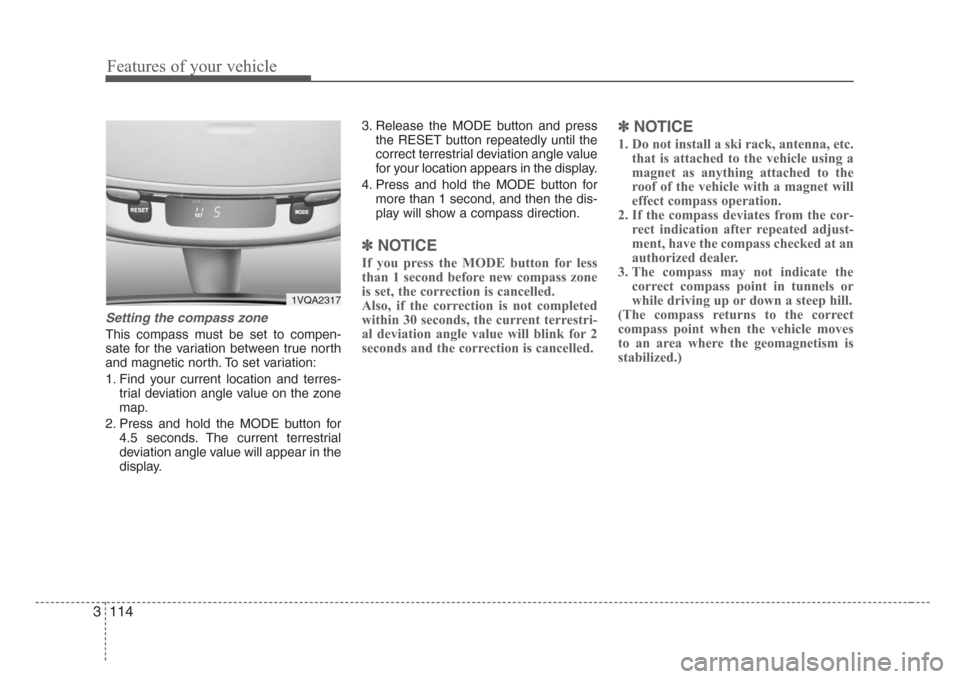
Setting the compass zone
This compass must be set to compen-
sate for the variation between true north
and magnetic north. To set variation:
1. Find your current location and terres-
trial deviation angle value on the zone
map.
2. Press and hold the MODE button for
4.5 seconds. The current terrestrial
deviation angle value will appear in the
display.3. Release the MODE button and press
the RESET button repeatedly until the
correct terrestrial deviation angle value
for your location appears in the display.
4. Press and hold the MODE button for
more than 1 second, and then the dis-
play will show a compass direction.
✽
NOTICE
If you press the MODE button for less
than 1 second before new compass zone
is set, the correction is cancelled.
Also, if the correction is not completed
within 30 seconds, the current terrestri-
al deviation angle value will blink for 2
seconds and the correction is cancelled.
✽
NOTICE
1. Do not install a ski rack, antenna, etc.
that is attached to the vehicle using a
magnet as anything attached to the
roof of the vehicle with a magnet will
effect compass operation.
2. If the compass deviates from the cor-
rect indication after repeated adjust-
ment, have the compass checked at an
authorized dealer.
3. The compass may not indicate the
correct compass point in tunnels or
while driving up or down a steep hill.
(The compass returns to the correct
compass point when the vehicle moves
to an area where the geomagnetism is
stabilized.)
1VQA2317
Page 173 of 339
Features of your vehicle
164 3
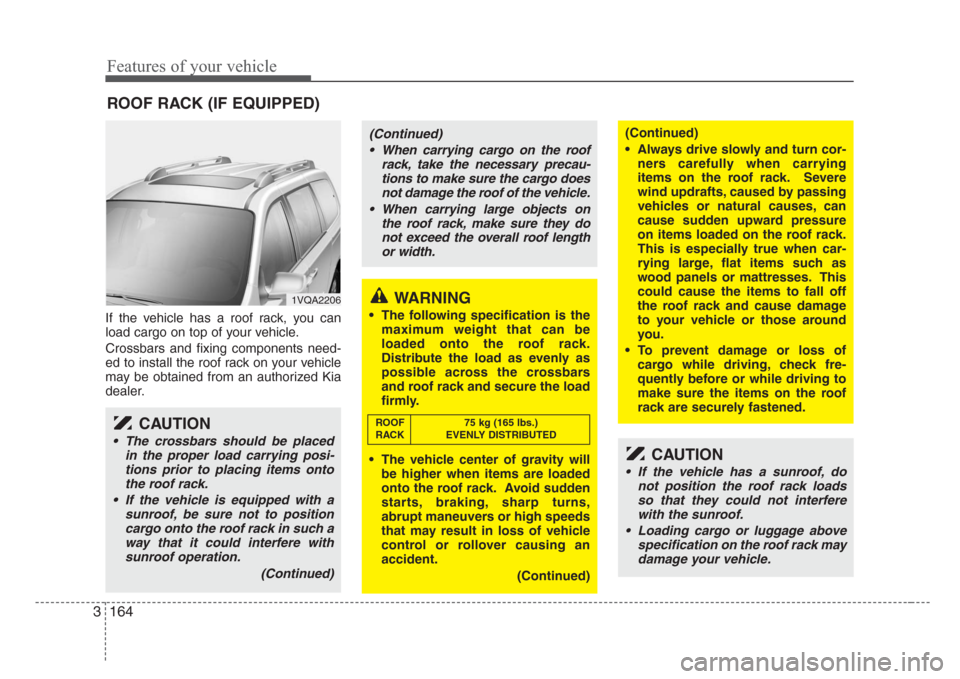
If the vehicle has a roof rack, you can
load cargo on top of your vehicle.
Crossbars and fixing components need-
ed to install the roof rack on your vehicle
may be obtained from an authorized Kia
dealer.
ROOF RACK (IF EQUIPPED)
1VQA2206
CAUTION
• The crossbars should be placed
in the proper load carrying posi-
tions prior to placing items onto
the roof rack.
• If the vehicle is equipped with a
sunroof, be sure not to position
cargo onto the roof rack in such a
way that it could interfere with
sunroof operation.
(Continued)
WARNING
• The following specification is the
maximum weight that can be
loaded onto the roof rack.
Distribute the load as evenly as
possible across the crossbars
and roof rack and secure the load
firmly.
• The vehicle center of gravity will
be higher when items are loaded
onto the roof rack. Avoid sudden
starts, braking, sharp turns,
abrupt maneuvers or high speeds
that may result in loss of vehicle
control or rollover causing an
accident.
(Continued)
(Continued)
• Always drive slowly and turn cor-
ners carefully when carrying
items on the roof rack. Severe
wind updrafts, caused by passing
vehicles or natural causes, can
cause sudden upward pressure
on items loaded on the roof rack.
This is especially true when car-
rying large, flat items such as
wood panels or mattresses. This
could cause the items to fall off
the roof rack and cause damage
to your vehicle or those around
you.
• To prevent damage or loss of
cargo while driving, check fre-
quently before or while driving to
make sure the items on the roof
rack are securely fastened.
CAUTION
• If the vehicle has a sunroof, do
not position the roof rack loads
so that they could not interfere
with the sunroof.
• Loading cargo or luggage above
specification on the roof rack may
damage your vehicle.
(Continued)
• When carrying cargo on the roof
rack, take the necessary precau-
tions to make sure the cargo does
not damage the roof of the vehicle.
• When carrying large objects on
the roof rack, make sure they do
not exceed the overall roof length
or width.
ROOF 75 kg (165 lbs.)
RACK EVENLY DISTRIBUTED
Page 186 of 339
3 177
Features of your vehicle
•HOUR:
Pressing the “H” button with your fin-
ger, a pencil or similar object will
advance the time displayed by one
hour.
• MINUTE:
Pressing the “M” button with your fin-
ger, a pencil or similar object will
advance the time displayed by one
minute.
To change the 12 hour format to the 24
hour format, press the “H” and “M” but-
tons for more than 3 seconds.
For example, if the “H” and “M” buttons is
pressed for more than 3 seconds while
the time is 10:15 p.m., the display will be
changed to 22:15.
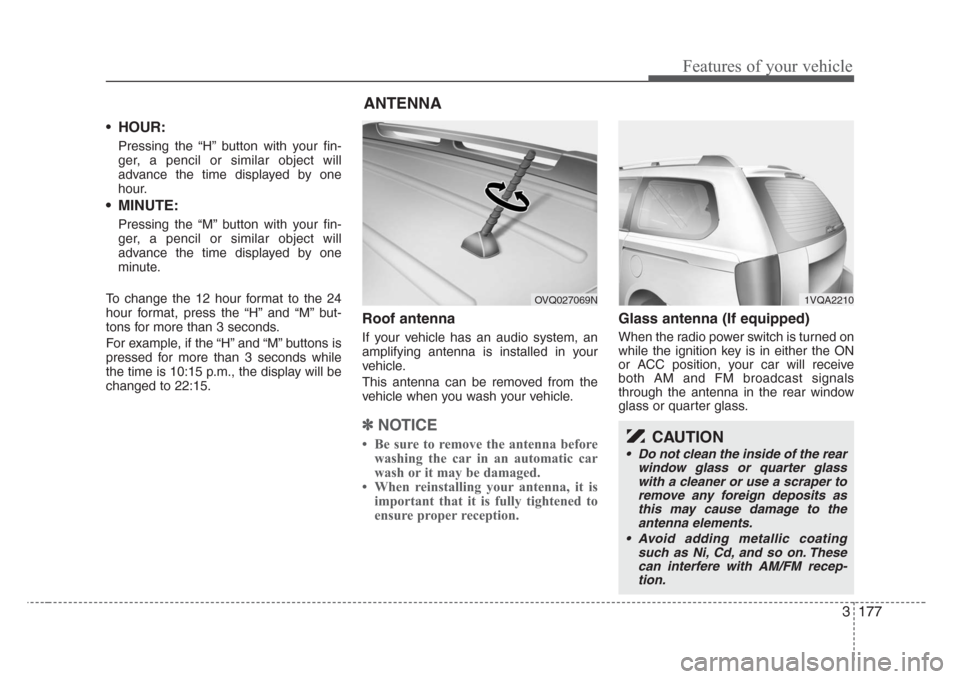
Roof antenna
If your vehicle has an audio system, an
amplifying antenna is installed in your
vehicle.
This antenna can be removed from the
vehicle when you wash your vehicle.
✽
NOTICE
• Be sure to remove the antenna before
washing the car in an automatic car
wash or it may be damaged.
• When reinstalling your antenna, it is
important that it is fully tightened to
ensure proper reception.
Glass antenna (If equipped)
When the radio power switch is turned on
while the ignition key is in either the ON
or ACC position, your car will receive
both AM and FM broadcast signals
through the antenna in the rear window
glass or quarter glass.
ANTENNA
OVQ027069N1VQA2210
CAUTION
• Do not clean the inside of the rear
window glass or quarter glass
with a cleaner or use a scraper to
remove any foreign deposits as
this may cause damage to the
antenna elements.
• Avoid adding metallic coating
such as Ni, Cd, and so on. These
can interfere with AM/FM recep-
tion.
Page 309 of 339

Maintenance
24 6
Driver's side fuse panel
Description Fuse rating Protected component
AUDIO 15A Audio, Step lamp
MEMORY 7.5A Climate control module, Clock, Cluster, Trip computer, Front area module, Power sliding door module, Power
tailgate module, Driver's door module, Front passenger door module, Driver's power seat module,
Driver position memory system unit
VRS 10A Variable rack stroke system module, Variable rack stroke system control button
IG2-1 7.5A Air conditioner control module, Multi function switch, Inside relay box, ECM mirror, Rain sensor, Seat Warmer
IG2-2 7.5A Rear climate control button, Front area module, Power sliding door module, Power tailgate module, Driver's door
module, Front passenger door module, Driver's power seat module, Driver position memory system unit
OBD-II 7.5A OBD-II, Diagonosis connector
ROOM 7.5A Vanity mirror, Map lamp, Overhead console, Room lamp switch, Climate control module, Homelink
K/LOCK 7.5A Key interlock solenoid
ILLUMI 7.5A Instrument panel illumination
AMP 25A Amplifier
SEAT WARMER 20A Inside relay box(Seat warmer)
SUNROOF 25A Sunroof module
DDM 30A Driver's door module
TPMS 7.5A Tire pressure monitoring system
PEDAL 15A Power adjustable pedal relay(None-driver position memory system only)
P/OUTLET 1 15A Power outlet(Front)
ASS P/SEAT 20A Front passenger's power seat module
DRV P/SEAT 30A Driver's power seat module
ADM 30A Front passenger door module
ACC 7.5A Audio, Clock, Outside rearview mirror control and folding switch
P/OUTLET 2 15A Cigar lighter, Power outlet
START 7.5A Start relay
AIRBAG IND 7.5A Cluster
Page 315 of 339
Maintenance
30 6
Items to be reset after the battery
has been discharged or the bat-
tery has been disconnected.
• Clock (See Chapter 3)
• Sunroof (See Chapter 3)
• Trip computer (See Chapter 3)
• Climate control system (See Chapter
3)
• Audio (See Chapter 3)
• Power sliding door and power tailgate
(See Chapter 3)
Tire care
For proper maintenance, safety, and
maximum fuel economy, you must
always maintain recommended tire
inflation pressures and stay within
the load limits and weight distribution
recommended for your vehicle.
Recommended cold tire infla-
tion pressures
All tire pressures (including the
spare) should be checked every day
when the tires are cold. “Cold Tires”
means the vehicle has not been driv-
en for at least three hours or driven
less than 1.6 km (one mile).
Recommended pressures must be
maintained for the best ride, top vehi-
cle handling, and minimum tire wear.
CAUTION
• Before performing maintenance
or recharging the battery, turn off
all accessories and stop the
engine.
• The negative battery cable must
be removed first and installed last
when the battery is disconnected.
WARNING- Recharging
battery
When recharging the battery,
observe the following precautions:
• The battery must be removed
from the vehicle and placed in an
area with good ventilation.
• Do not allow cigarettes, sparks, or
flame near the battery.
• Watch the battery during charg-
ing, and stop or reduce the charg-
ing rate if the battery cells begin
gassing (boiling) violently or if
the temperature of the electrolyte
of any cell exceeds 49°C (120°F).
(Continued)
(Continued)
• Wear eye protection when check-
ing the battery during charging.
• Disconnect the battery charger in
the following order.
1. Turn off the battery charger main
switch.
2. Unhook the negative clamp from
the negative battery terminal.
3. Unhook the positive clamp from
the positive battery terminal.
TIRES AND WHEELS
Page 334 of 339
Specifications
2 7
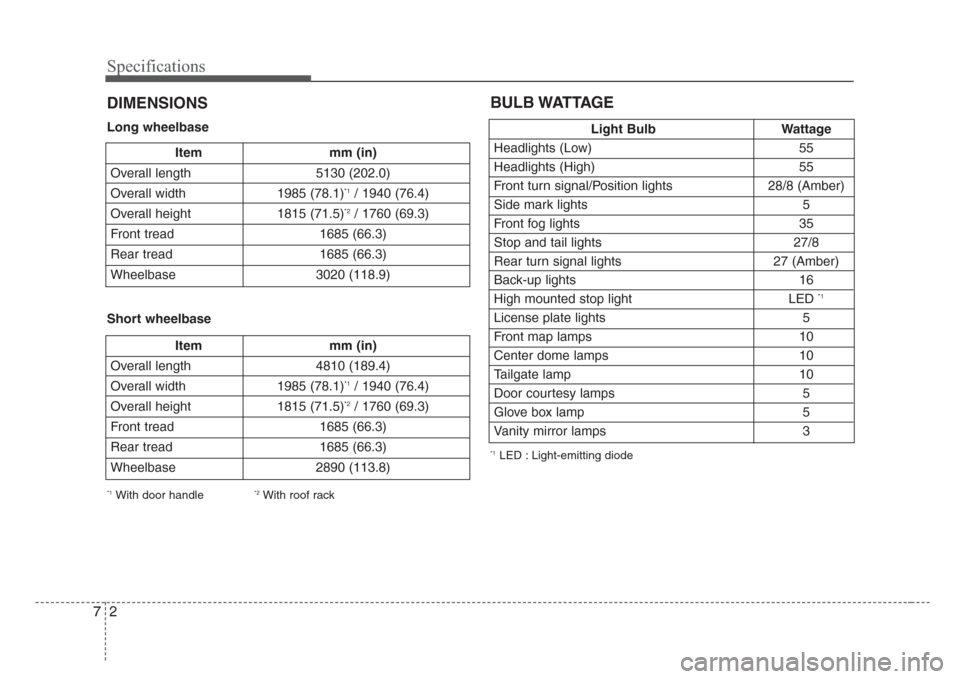
Item mm (in)
Overall length 5130 (202.0)
Overall width 1985 (78.1)
*1/ 1940 (76.4)
Overall height 1815 (71.5)
*2/ 1760 (69.3)
Front tread 1685 (66.3)
Rear tread 1685 (66.3)
Wheelbase 3020 (118.9)
Item mm (in)
Overall length 4810 (189.4)
Overall width 1985 (78.1)
*1/ 1940 (76.4)
Overall height 1815 (71.5)
*2/ 1760 (69.3)
Front tread 1685 (66.3)
Rear tread 1685 (66.3)
Wheelbase 2890 (113.8)
DIMENSIONS
Light Bulb Wattage
Headlights (Low) 55
Headlights (High) 55
Front turn signal/Position lights 28/8 (Amber)
Side mark lights 5
Front fog lights 35
Stop and tail lights 27/8
Rear turn signal lights 27 (Amber)
Back-up lights 16
High mounted stop light LED
*1
License plate lights 5
Front map lamps 10
Center dome lamps 10
Tailgate lamp 10
Door courtesy lamps 5
Glove box lamp 5
Vanity mirror lamps 3
BULB WATTAGE
*1LED : Light-emitting diode
*1With door handle*2With roof rack
Long wheelbase
Short wheelbase