2008 KIA Sedona mirror
[x] Cancel search: mirrorPage 114 of 339
3 105
Features of your vehicle
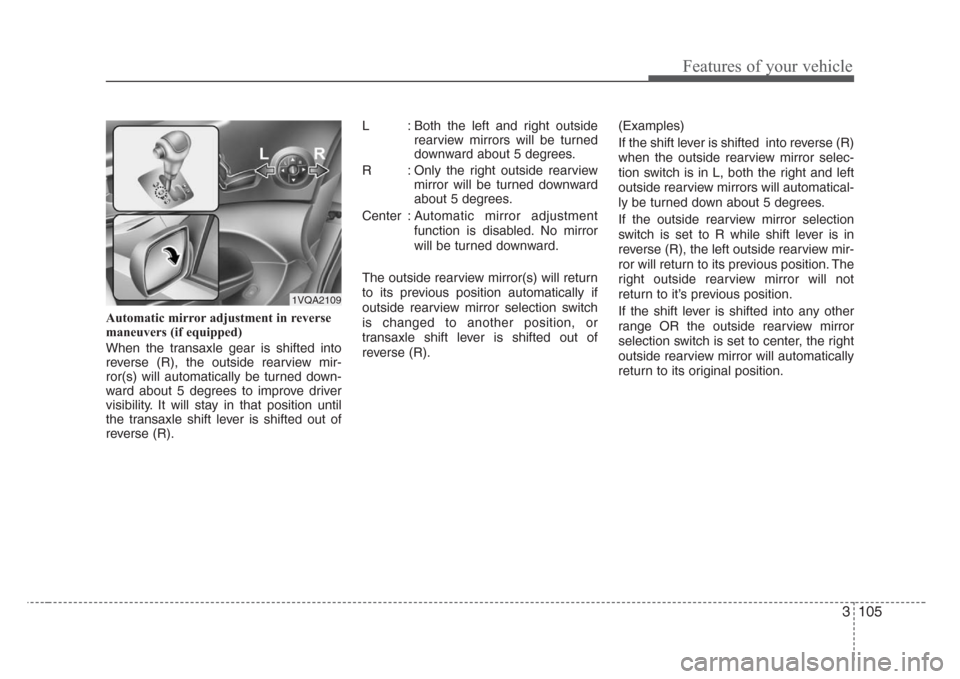
Automatic mirror adjustment in reverse
maneuvers (if equipped)
When the transaxle gear is shifted into
reverse (R), the outside rearview mir-
ror(s) will automatically be turned down-
ward about 5 degrees to improve driver
visibility. It will stay in that position until
the transaxle shift lever is shifted out of
reverse (R).L : Both the left and right outside
rearview mirrors will be turned
downward about 5 degrees.
R : Only the right outside rearview
mirror will be turned downward
about 5 degrees.
Center : Automatic mirror adjustment
function is disabled. No mirror
will be turned downward.
The outside rearview mirror(s) will return
to its previous position automatically if
outside rearview mirror selection switch
is changed to another position, or
transaxle shift lever is shifted out of
reverse (R).(Examples)
If the shift lever is shifted into reverse (R)
when the outside rearview mirror selec-
tion switch is in L, both the right and left
outside rearview mirrors will automatical-
ly be turned down about 5 degrees.
If the outside rearview mirror selection
switch is set to R while shift lever is in
reverse (R), the left outside rearview mir-
ror will return to its previous position. The
right outside rearview mirror will not
return to it’s previous position.
If the shift lever is shifted into any other
range OR the outside rearview mirror
selection switch is set to center, the right
outside rearview mirror will automatically
return to its original position.
1VQA2109
Page 115 of 339

Features of your vehicle
106 3
Rearview mirror
Adjust the rearview mirror to center on
the view through the rear window. Make
this adjustment before you start driving.
Manual type (if equipped)
Make this adjustment before you start
driving and while the day/night lever is in
the day position.
Pull the day/night lever toward you to
reduce glare from the headlights of vehi-
cles behind you during night driving.
Remember that you lose some rearview
clarity in the night position.Electric type (if equipped)
The electric rearview mirror automatical-
ly controls the glare from the headlights
of the car behind you in nighttime or low
light driving conditions. The sensor
mounted in the mirror senses the light
level around the vehicle, and through a
chemical reaction, automatically controls
the headlight glare from vehicles behind
you.
When the engine is running, the glare is
automatically controlled by the sensor
mounted in the rearview mirror.
Whenever the shift lever is shifted into
reverse (R), the mirror will automatically
go to the brightest setting in order to
improve the drivers view behind the vehi-
cle.
WARNING - Rear visibility
Do not place objects in the rear seat
or cargo area which would interfere
with your vision out the rear win-
dow.
1VQA2105OLD028078Day
Night
Day/Night lever
CAUTION
When cleaning the mirror, use a
paper towel or similar material
dampened with glass cleaner. Do
not spray glass cleaner directly on
the mirror as that may cause the liq-
uid cleaner to enter the mirror hous-
ing.
Page 116 of 339
3 107
Features of your vehicle
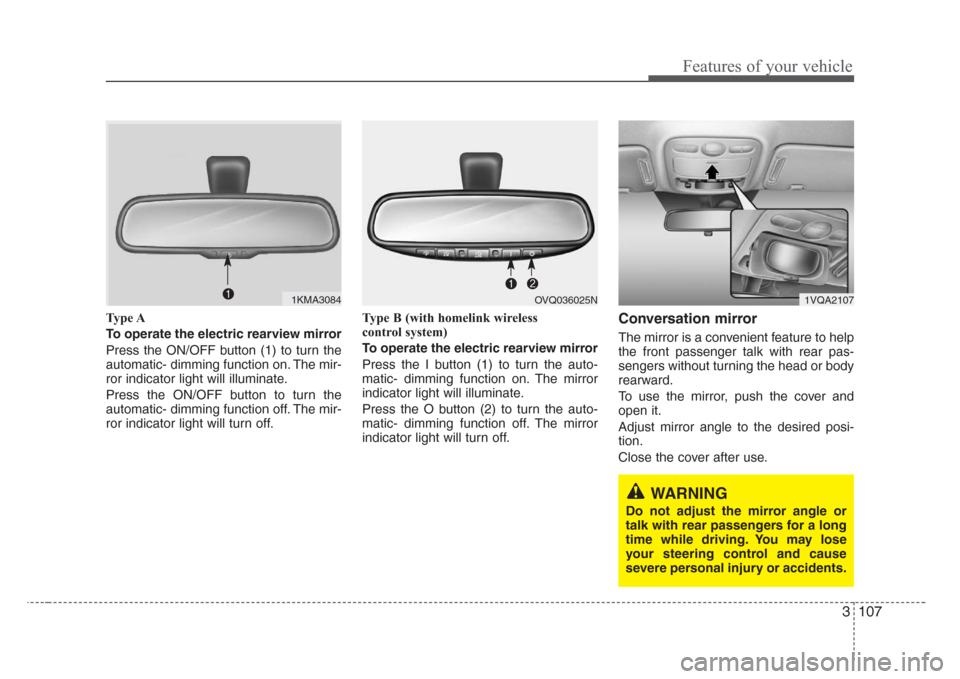
Type A
To operate the electric rearview mirror
Press the ON/OFF button (1) to turn the
automatic- dimming function on. The mir-
ror indicator light will illuminate.
Press the ON/OFF button to turn the
automatic- dimming function off. The mir-
ror indicator light will turn off.Type B (with homelink wireless
control system)
To operate the electric rearview mirror
Press the I button (1) to turn the auto-
matic- dimming function on. The mirror
indicator light will illuminate.
Press the O button (2) to turn the auto-
matic- dimming function off. The mirror
indicator light will turn off.Conversation mirror
The mirror is a convenient feature to help
the front passenger talk with rear pas-
sengers without turning the head or body
rearward.
To use the mirror, push the cover and
open it.
Adjust mirror angle to the desired posi-
tion.
Close the cover after use.
1VQA2107
WARNING
Do not adjust the mirror angle or
talk with rear passengers for a long
time while driving. You may lose
your steering control and cause
severe personal injury or accidents.
1KMA3084OVQ036025N
Page 144 of 339

3 135
Features of your vehicle
The defroster heats the window to
remove frost, fog and thin ice from the
interior and exterior of the rear window,
while engine is running.To activate the rear window defroster,
press the rear window defroster button
located in the center console switch
panel. The indicator on the rear window
defroster button illuminates when the
defroster is ON.
If there is heavy accumulation of snow on
the rear window, brush it off before oper-
ating the rear defroster.
The rear window defroster automatically
turns off after 20 minutes or when the
ignition switch is turned off. To turn off the
defroster, press the rear window
defroster button again.
Outside mirror defroster
(if equipped)
If your vehicle is equipped with the out-
side mirror defroster, it will be operating
at the same time when you operate the
rear window defroster.
DEFROSTER
OVQ038056N
OVQ038057N
Type A
Type B
CAUTION
• To prevent damage to the con-
ductors bonded to the inside sur-
face of the rear window, never use
sharp instruments or window
cleaners containing abrasives to
clean the window.
• If you want to defrost and defog
on the front windshield, refer to
“Windshield Defrosting and
Defogging” in this section.
Page 170 of 339
3 161
Features of your vehicle
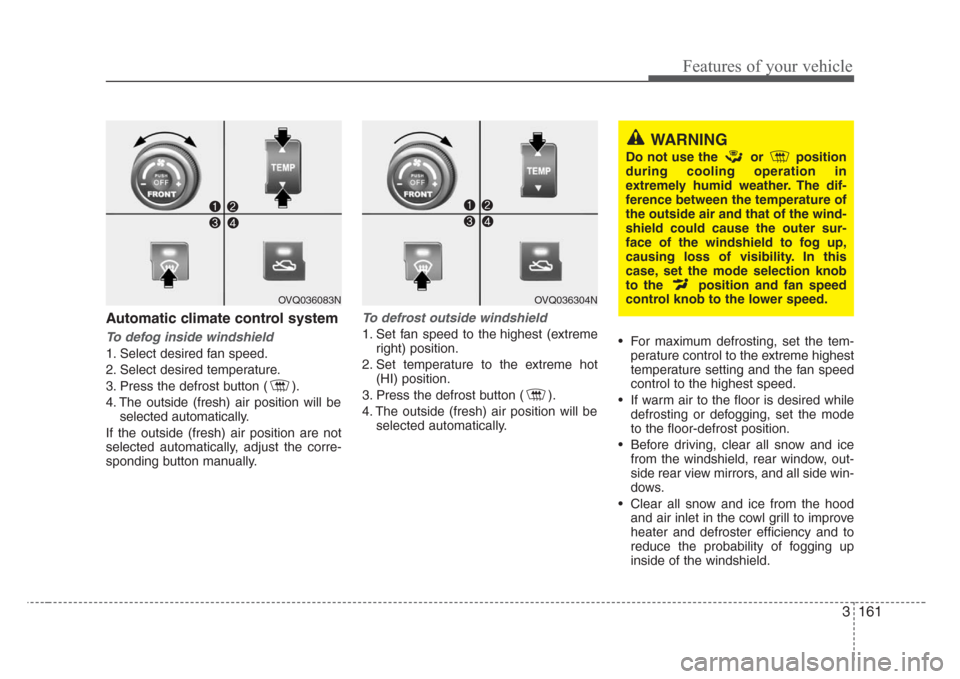
Automatic climate control system
To defog inside windshield
1. Select desired fan speed.
2. Select desired temperature.
3. Press the defrost button ( ).
4. The outside (fresh) air position will be
selected automatically.
If the outside (fresh) air position are not
selected automatically, adjust the corre-
sponding button manually.
To defrost outside windshield
1. Set fan speed to the highest (extreme
right) position.
2. Set temperature to the extreme hot
(HI) position.
3. Press the defrost button ( ).
4. The outside (fresh) air position will be
selected automatically.• For maximum defrosting, set the tem-
perature control to the extreme highest
temperature setting and the fan speed
control to the highest speed.
• If warm air to the floor is desired while
defrosting or defogging, set the mode
to the floor-defrost position.
• Before driving, clear all snow and ice
from the windshield, rear window, out-
side rear view mirrors, and all side win-
dows.
• Clear all snow and ice from the hood
and air inlet in the cowl grill to improve
heater and defroster efficiency and to
reduce the probability of fogging up
inside of the windshield.
OVQ036304N
WARNING
Do not use the or position
during cooling operation in
extremely humid weather. The dif-
ference between the temperature of
the outside air and that of the wind-
shield could cause the outer sur-
face of the windshield to fog up,
causing loss of visibility. In this
case, set the mode selection knob
to the position and fan speed
control knob to the lower speed.
OVQ036083N
Page 174 of 339

3 165
Features of your vehicle
Your new mirror comes with an integrat-
ed HomeLink Universal Transceiver,
which allows you to program the mirror to
activate your garage door(s), estate gate,
home lighting, etc. The mirror actually
learns the codes from your various exist-
ing transmitters.
Programming
Your vehicle may require the ignition
switch to be turned to the ACC position
for programming and/or operation of
HomeLink. It is also recommended that a
new battery be replaced in the hand-held
transmitter of the device being pro-
grammed to HomeLink for quicker train-
ing and accurate transmission of the
radio-frequency.
Follow these steps to train your
HomeLink mirror:
HOMELINK® WIRELESS CONTROL SYSTEM (IF EQUIPPED)
WARNING
• When programming the
HomeLink® Wireless Control
System, you may be operating a
garage door or gate operator.
Make sure that people and objects
are out of the way of the moving
door or gate to prevent potential
harm or damage.
(Continued)
(Continued)
• Do not use HomeLink with any
garage door opener that lacks the
safety stop and reverse feature as
required by federal safety stan-
dards. (This includes any garage
door opener model manufactured
before April 1, 1982.) A garage
door opener which cannot detect
an object, signaling the door to
stop and reverse, does not meet
current federal safety standards.
Using a garage door opener with-
out these features increases risk
of serious injury or death. For
more information, call 1-800-355-
3515 or on the internet at
www.homelink.com.
• Retain the original transmitter for
future programming procedures
(i.e., new vehicle purchase). It is
also suggested that upon the sale
of the vehicle, the programmed
HomeLink buttons be erased for
security purposes (follow step 1
in the “Programming” portion of
this text).
OVQ036305N Glare detection sensor
Indicator light
Homelink buttons
Page 175 of 339
Features of your vehicle
166 3
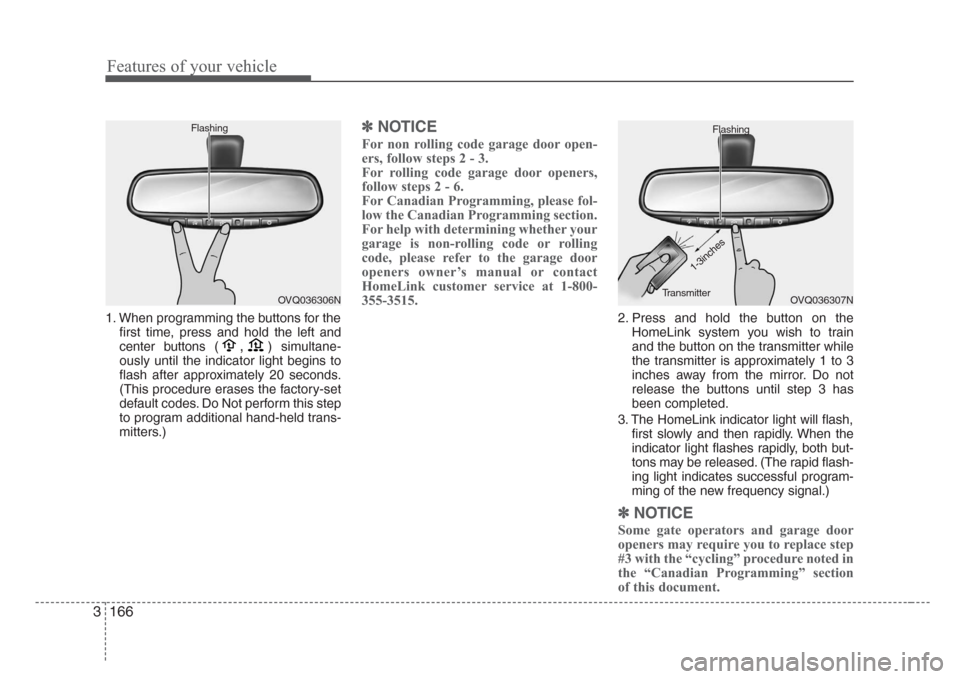
1. When programming the buttons for the
first time, press and hold
the left and
center buttons (
,)simultane-
ously until the indicator light begins to
flash after approximately 20 seconds.
(This procedure erases the factory-set
default codes. Do Not perform this step
to program additional hand-held trans-
mitters.)
✽
NOTICE
For non rolling code garage door open-
ers, follow steps 2 - 3.
For rolling code garage door openers,
follow steps 2 - 6.
For Canadian Programming, please fol-
low the Canadian Programming section.
For help with determining whether your
garage is non-rolling code or rolling
code, please refer to the garage door
openers owner’s manual or contact
HomeLink customer service at 1-800-
355-3515.
2. Press and hold the button on the
HomeLink system you wish to train
and the button on the transmitter while
the transmitter is approximately 1 to 3
inches away from the mirror. Do not
release the buttons until step 3 has
been completed.
3. The HomeLink indicator light will flash,
first slowly and then rapidly. When the
indicator light flashes rapidly, both but-
tons may be released. (The rapid flash-
ing light indicates successful program-
ming of the new frequency signal.)
✽
NOTICE
Some gate operators and garage door
openers may require you to replace step
#3 with the “cycling” procedure noted in
the “Canadian Programming” section
of this document.
OVQ036306N FlashingOVQ036307N Flashing
1-3inches
Transmitter
Page 184 of 339
3 175
Features of your vehicle
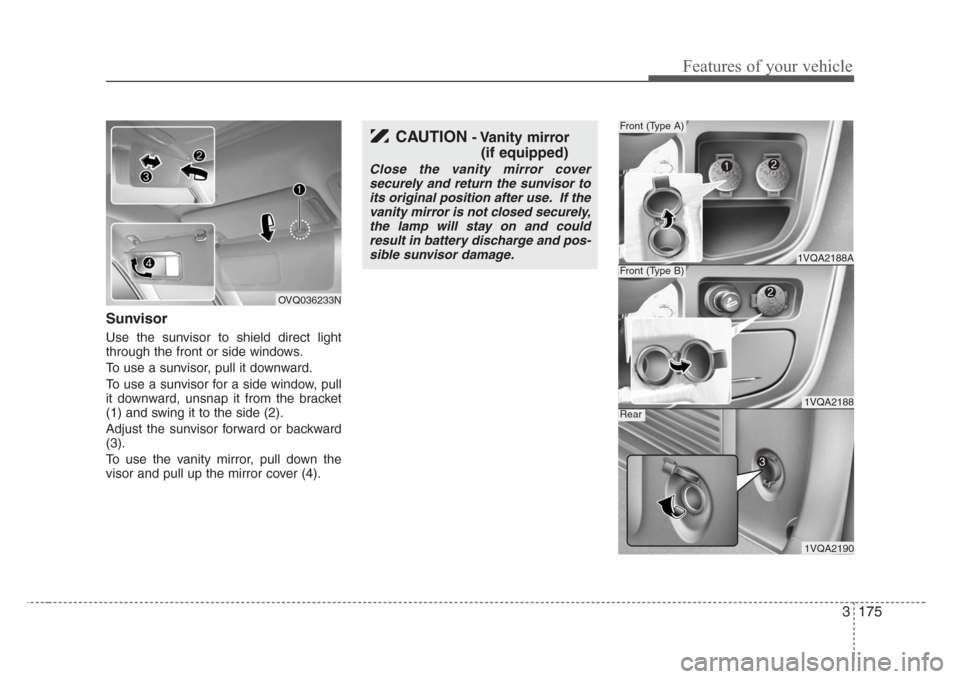
Sunvisor
Use the sunvisor to shield direct light
through the front or side windows.
To use a sunvisor, pull it downward.
To use a sunvisor for a side window, pull
it downward, unsnap it from the bracket
(1) and swing it to the side (2).
Adjust the sunvisor forward or backward
(3).
To use the vanity mirror, pull down the
visor and pull up the mirror cover (4).
OVQ036233N
CAUTION- Vanity mirror
(if equipped)
Close the vanity mirror cover
securely and return the sunvisor to
its original position after use. If the
vanity mirror is not closed securely,
the lamp will stay on and could
result in battery discharge and pos-
sible sunvisor damage.
1VQA2188A
Front (Type A)
1VQA2188
Front (Type B)
1VQA2190
Rear