2008 KIA Rio seat adjustment
[x] Cancel search: seat adjustmentPage 26 of 219
317
Knowing your vehicle
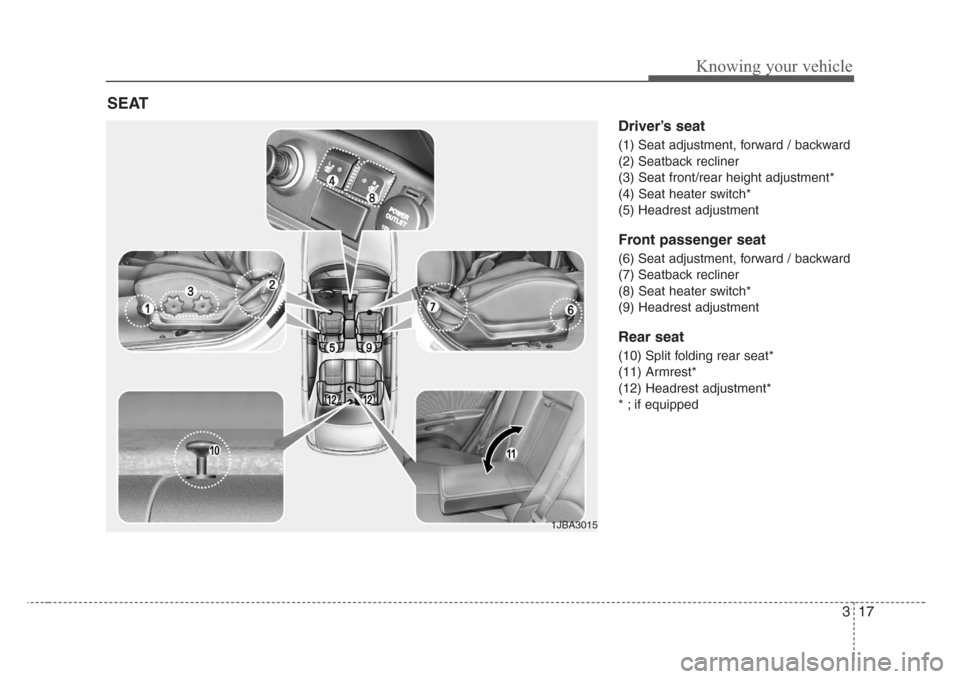
Driver’s seat
(1) Seat adjustment, forward / backward
(2) Seatback recliner
(3) Seat front/rear height adjustment*
(4) Seat heater switch*
(5) Headrest adjustment
Front passenger seat
(6) Seat adjustment, forward / backward
(7) Seatback recliner
(8) Seat heater switch*
(9) Headrest adjustment
Rear seat
(10) Split folding rear seat*
(11) Armrest*
(12) Headrest adjustment*
* ; if equipped
SEAT
1JBA3015
Page 27 of 219
Knowing your vehicle
18 3
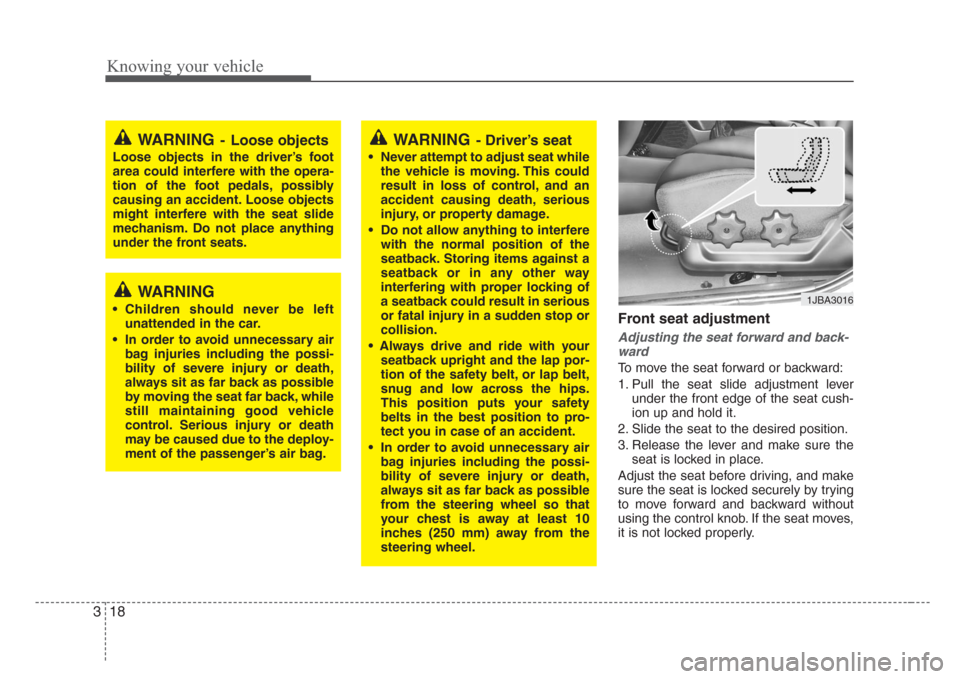
Front seat adjustment
Adjusting the seat forward and back-
ward
To move the seat forward or backward:
1. Pull the seat slide adjustment lever
under the front edge of the seat cush-
ion up and hold it.
2. Slide the seat to the desired position.
3. Release the lever and make sure the
seat is locked in place.
Adjust the seat before driving, and make
sure the seat is locked securely by trying
to move forward and backward without
using the control knob. If the seat moves,
it is not locked properly.
WARNING- Loose objects
Loose objects in the driver’s foot
area could interfere with the opera-
tion of the foot pedals,possibly
causing an accident. Loose objects
might interfere with the seat slide
mechanism. Do not place anything
under the front seats.
WARNING
• Children should never be left
unattended in the car.
• In order to avoid unnecessary air
bag injuries including the possi-
bility of severe injury or death,
always sit as far back as possible
by moving the seat far back, while
still maintaining good vehicle
control. Serious injury or death
may be caused due to the deploy-
ment of the passenger’s air bag.
WARNING- Driver’s seat
• Never attempt to adjust seat while
the vehicle is moving. This could
result in loss of control, and an
accident causing death,serious
injury, or property damage.
• Do not allow anything to interfere
with the normal position of the
seatback. Storing items against a
seatback or in any other way
interfering with proper locking of
a seatback could result in serious
or fatal injury in a sudden stop or
collision.
• Always drive and ride with your
seatback upright and the lap por-
tion of the safety belt, or lap belt,
snug and low across the hips.
This position puts your safety
belts in the best position to pro-
tect you in case of an accident.
• In order to avoid unnecessary air
bag injuries including the possi-
bility of severe injury or death,
always sit as far back a
s possible
from the steering wheel so that
your chest is away at least 10
inches (250 mm) away from the
steering wheel.
1JBA3016
Page 30 of 219
321
Knowing your vehicle
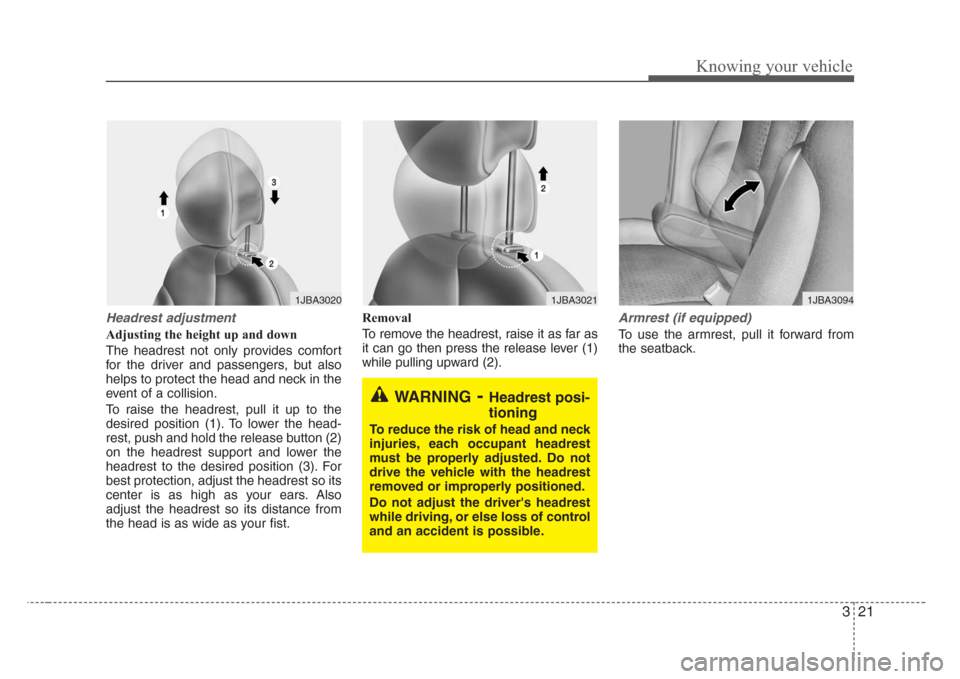
Headrest adjustment
Adjusting the height up and down
The headrest not only provides comfort
for the driver and passengers, but also
helps to protect the head and neck in the
event of a collision.
To raise the headrest, pull it up to the
desired position (1). To lower the head-
rest, push and hold the release button (2)
on the headrest support and lower the
headrest to the desired position (3). For
best protection, adjust the headrest so its
center is as high as your ears. Also
adjust the headrest so its distance from
the head is as wide as your fist.Removal
To remove the headrest, raise it as far as
it can go then press the release lever (1)
while pulling upward (2).
Armrest (if equipped)
To use the armrest, pull it forward from
the seatback.
1JBA30201JBA30211JBA3094
WARNING-Headrest posi-
tioning
To reduce the risk of head and neck
injuries, each occupant headrest
must be properly adjusted. Do not
drive the vehicle with the headrest
removed or improperly positioned.
Do not adjust the driver's headrest
while driving, or else loss of control
and an accident is possible.
Page 35 of 219
Knowing your vehicle
26 3
Armrest (if equipped)
The armrest is located in the center of
the rear seat. Pull the armrest down from
the seatback.
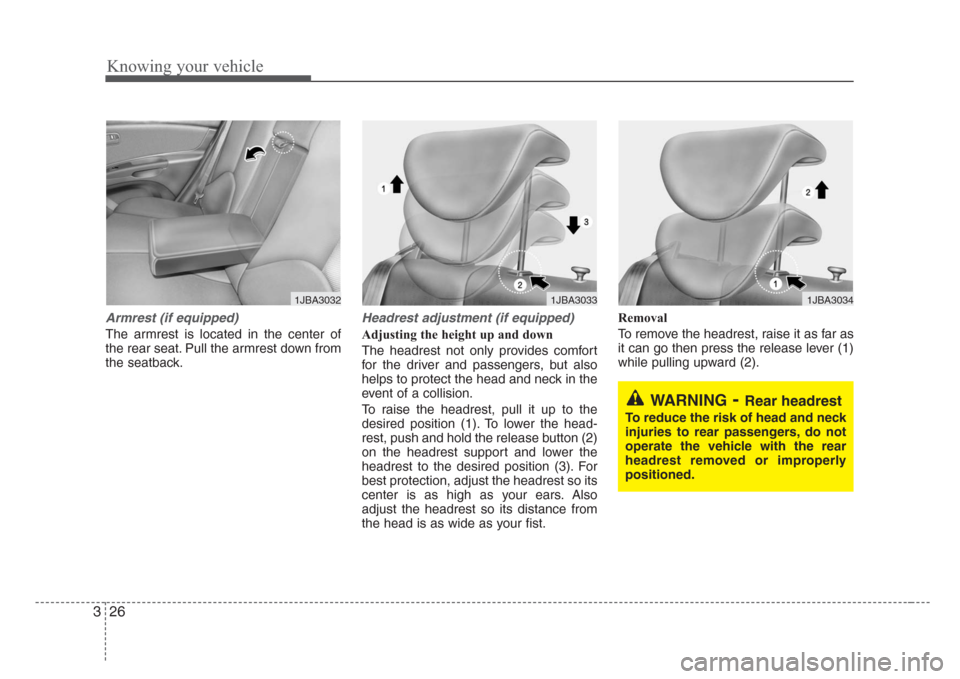
Headrest adjustment (if equipped)
Adjusting the height up and down
The headrest not only provides comfort
for the driver and passengers, but also
helps to protect the head and neck in the
event of a collision.
To raise the headrest, pull it up to the
desired position (1). To lower the head-
rest, push and hold the release button (2)
on the headrest support and lower the
headrest to the desired position (3). For
best protection, adjust the headrest so its
center is as high as your ears. Also
adjust the headrest so its distance from
the head is as wide as your fist.Removal
To remove the headrest, raise it as far as
it can go then press the release lever (1)
while pulling upward (2).
1JBA30321JBA30331JBA3034
WARNING-Rear headrest
To reduce the risk of head and neck
injuries to rear passengers, do not
operate the vehicle with the rear
headrest removed or improperly
positioned.
Page 37 of 219
Knowing your vehicle
28 3
CAUTION - Air bag/Pre-
tensioner dust
When the air bags and pre-tension-
ers are activated, a loud noise may
be heard and fine dust, which may
appear to be smoke, may be visible
in the passenger compartment. This
dust is not toxic. The dust may
cause skin irritation and should not
be breathed for prolonged periods.
Ventilate the vehicle after impact
and wash your hands and face thor-
oughly after an accident.
WARNING- Air bag/pre-
tensioner warning light
If the SRS air bag warning light
does not illuminate when the igni-
tion key is turned to “ON” , or if it
remains illuminated after approxi-
mately 6 seconds, or if it illuminates
while the vehicle is being driven,
please have an authorized Kia deal-
er inspect the pre-tensioner and air
bag system as soon as possible.
WARNING- Safety belt
adjustment
To obtain maximum benefit from a
pre-tensioner seat belt:
• The safety belt must be worn cor-
rectly.
• The safety belt must be adjusted
to the correct position.
WARNING- Replacing
used pre-tensioners
• Pre-tensioners are designed to
operate once. After activation,
pre-tensioner seat belts must be
replaced. All seat belts, of any
type,should always be replaced
after they have been worn during
a collision.
• Do not attempt to replace the pre-
tensioners yourself. This must be
done by an authorized Kia dealer.
CAUTION - Hot parts
The pre-tensioner assembly mecha-
nism becomes hot during activa-
tion. Do not touch the pre-tensioner
seat belt assembly for several min-
utes after they have been activated.WARNING-Damaging the
pre-tensioners
• Do not hit or strike the pre-ten-
sioner assemblies,especially
with a tool or heavy object.
• Do not attempt to service or
repair the pre-tensioners.
Page 42 of 219
333
Knowing your vehicle
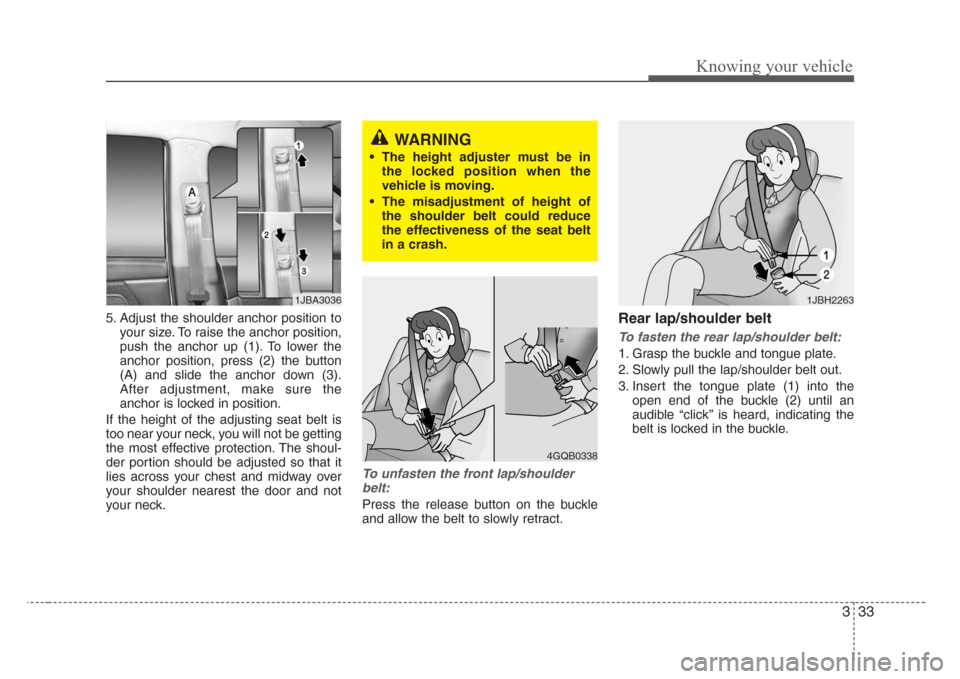
5. Adjust the shoulder anchor position to
your size. To raise the anchor position,
push the anchor up (1). To lower the
anchor position, press (2) the button
(A) and slide the anchor down (3).
After adjustment, make sure the
anchor is locked in position.
If the height of the adjusting seat belt is
too near your neck, you will not be getting
the most effective protection. The shoul-
der portion should be adjusted so that it
lies across your chest and midway over
your shoulder nearest the door and not
your neck.
To unfasten the front lap/shoulder
belt:
Press the release button on the buckle
and allow the belt to slowly retract.
Rear lap/shoulder belt
To f asten the rear lap/shoulder belt:
1. Grasp the buckle and tongue plate.
2. Slowly pull the lap/shoulder belt out.
3. Insert the tongue plate (1) into the
open end of the buckle (2) until an
audible “click’’ is heard, indicating the
belt is locked in the buckle.
4GQB0338
1JBA30361JBH2263
WARNING
• The height adjuster must be in
the locked position when the
vehicle is moving.
• The misadjustment of height of
the shoulder belt could reduce
the effectiveness of the seat belt
in a crash.
Page 79 of 219
Knowing your vehicle
70 3
Outside rearview mirror heater
(if equipped)
The outside rearview mirror heater is
automatically turned on when the rear
window defroster is turned on. To heat
the outside rearview mirror glass, push
the button for the rear window defroster.
The rearview mirror heater (and rear win-
dow defroster) will not operate unless the
engine is running.
The outside rearview mirror glass will be
heated for defrosting or defogging and
will give you improved rear vision in
inclement weather conditions. Push the
button again to turn the heater off. The
outside rearview mirror heater automati-
cally turns off after 20 minutes.
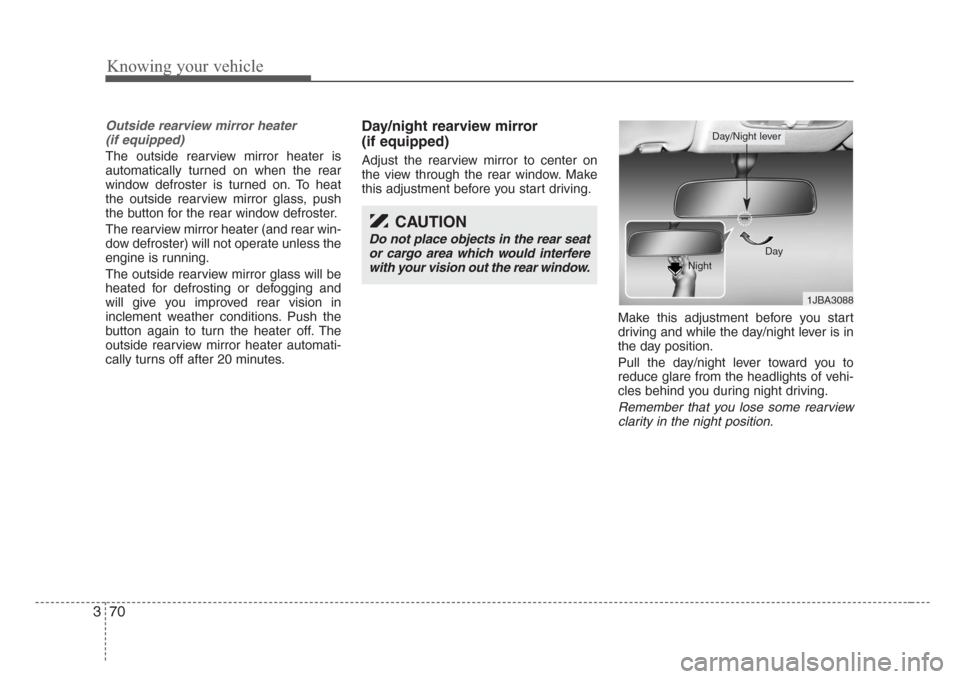
Day/night rearview mirror
(if equipped)
Adjust the rearview mirror to center on
the view through the rear window. Make
this adjustment before you start driving.
Make this adjustment before you start
driving and while the day/night lever is in
the day position.
Pull the day/night lever toward you to
reduce glare from the headlights of vehi-
cles behind you during night driving.
Remember that you lose some rearview
clarity in the night position.
CAUTION
Do not place objects in the rear seat
or cargo area which would interfere
with your vision out the rear window.
1JBA3088 Day
Night
Day/Night lever