2008 KIA Rio headlights
[x] Cancel search: headlightsPage 79 of 219

Knowing your vehicle
70 3
Outside rearview mirror heater
(if equipped)
The outside rearview mirror heater is
automatically turned on when the rear
window defroster is turned on. To heat
the outside rearview mirror glass, push
the button for the rear window defroster.
The rearview mirror heater (and rear win-
dow defroster) will not operate unless the
engine is running.
The outside rearview mirror glass will be
heated for defrosting or defogging and
will give you improved rear vision in
inclement weather conditions. Push the
button again to turn the heater off. The
outside rearview mirror heater automati-
cally turns off after 20 minutes.
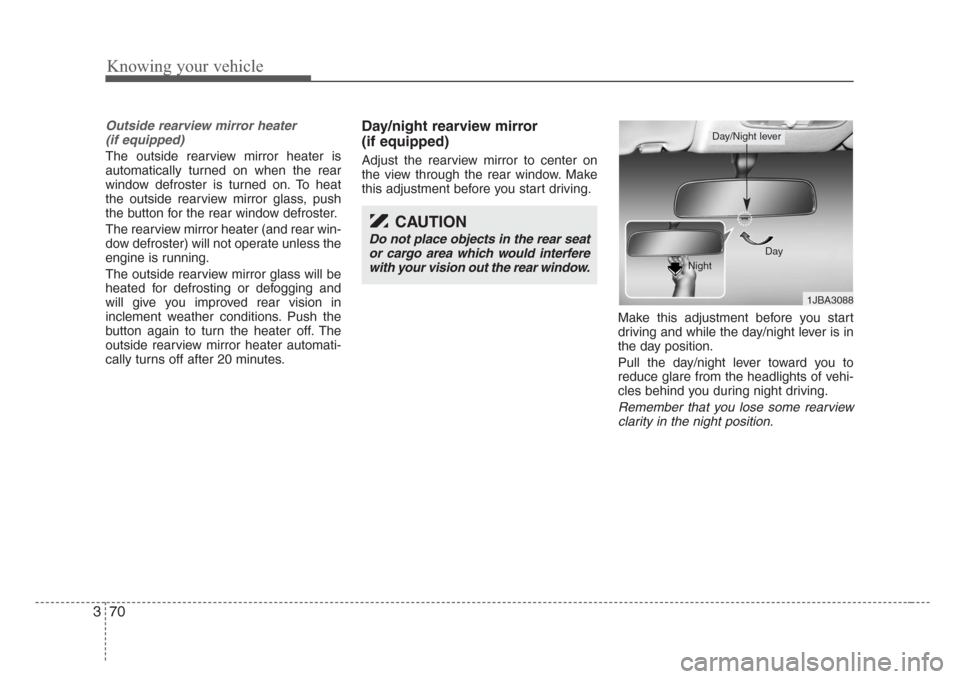
Day/night rearview mirror
(if equipped)
Adjust the rearview mirror to center on
the view through the rear window. Make
this adjustment before you start driving.
Make this adjustment before you start
driving and while the day/night lever is in
the day position.
Pull the day/night lever toward you to
reduce glare from the headlights of vehi-
cles behind you during night driving.
Remember that you lose some rearview
clarity in the night position.
CAUTION
Do not place objects in the rear seat
or cargo area which would interfere
with your vision out the rear window.
1JBA3088 Day
Night
Day/Night lever
Page 129 of 219

423
Driving your vehicle
Battery saver function
(if equipped)
• The purpose of this feature is to pre-
vent the battery from being dis-
charged. The system automatically
turns off the headlights and parking
lights when the driver removes the igni-
tion key and opens the driver- side
door.
• With this feature, the parklight will be
turned off automatically if the driver
parks on the side of road at night.
If necessary, to keep the lights on when
the ignition key is removed, perform the
following :
1) Open the driver-side door.
2) Turn the parking lights OFF and ON
again using the light switch on the
steering column.
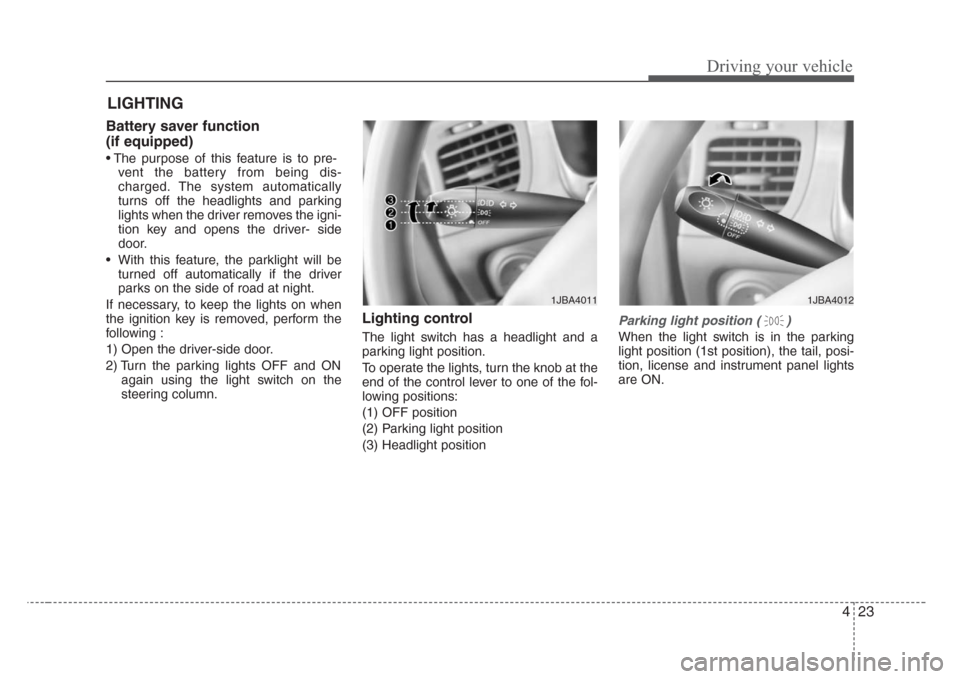
Lighting control
The light switch has a headlight and a
parking light position.
To operate the lights, turn the knob at the
end of the control lever to one of the fol-
lowing positions:
(1) OFF position
(2) Parking light position
(3) Headlight position
Parking light position ( )
When the light switch is in the parking
light position (1st position), the tail, posi-
tion, license and instrument panel lights
are ON.
LIGHTING
1JBA40121JBA4011
Page 130 of 219

Driving your vehicle
24 4
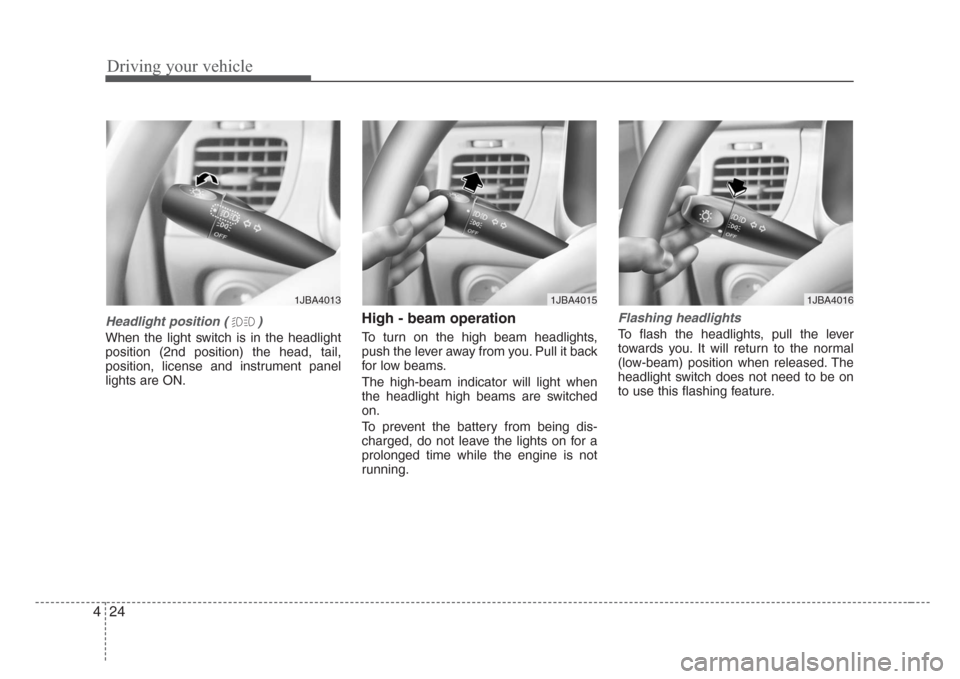
Headlight position ( )
When the light switch is in the headlight
position (2nd position) the head, tail,
position, license and instrument panel
lights are ON.
High - beam operation
To turn on the high beam headlights,
push the lever away from you. Pull it back
for low beams.
The high-beam indicator will light when
the headlight high beams are switched
on.
To prevent the battery from being dis-
charged, do not leave the lights on for a
prolonged time while the engine is not
running.
Flashing headlights
To flash the headlights, pull the lever
towards you. It will return to the normal
(low-beam) position when released. The
headlight switch does not need to be on
to use this flashing feature.
1JBA40161JBA40131JBA4015
Page 132 of 219

Driving your vehicle
26 4
Daytime running light
(if equipped)
Daytime Running Lights (DRL) can
make it easier for others to see the front
of your vehicle during the day. DRL can
be helpful in many different driving condi-
tions, and it is especially helpful after
dawn and before sunset.
The DRL system will make your high-
beam headlights turn OFF when:
1. The head light switch is ON.
2. The parking brake engaged.
3. Engine stops.
Windshield wipers
Operates as follows when the ignition
switch is turned ON.
OFF : Wiper is not in operation
INT : Wiper operates intermittently at
the same wiping intervals. Use
this mode in a light rain or mist. To
vary the speed setting, turn the
speed control knob (
1).
LO : Normal wiper speed
HI : Fast wiper speed
MIST : For a single wiping cycle, push
the lever upward and release it
with the lever in the OFF position.
The wipers will operate continu-
ously if the lever is pushed
upward and held.
✽
NOTICE
Before using the windshield wipers
when there is a heavy accumulation of
snow or ice on the windshield, defrost
the windshield for about 10 minutes, or
until the snow or ice is removed. This
will help ensure proper windshield
wiper operation and will prevent dam-
age to the wiper blades, wiper linkage,
and wiper motor.
WIPERS AND WASHERS
7JBN4018A
Page 150 of 219

57
Driving tips
Driving at night
Because night driving presents more
hazards than driving in the daylight, here
are some important tips to remember:
• Slow down and keep more distance
between you and other vehicles, as it
may be more difficult to see at night,
especially in areas where there may
not be any street lights.
• Adjust your mirrors to reduce the glare
from other driver's headlights.
• Keep your headlights clean and prop-
erly aimed on vehicles not equipped
with the automatic headlight aiming
feature. Dirty or improperly aimed
headlights will make it much more diffi-
cult to see at night.
• Avoid staring directly at the headlights
of oncoming vehicles. You could be
temporarily blinded, and it will take
several seconds for your eyes to read-
just to the darkness.
Driving in the rain
Rain and wet roads can make driving
dangerous, especially if you’re not pre-
pared for the slick pavement. Here are a
few things to consider when driving in the
rain:
• A heavy rainfall will make it harder to
see and will increase the distance
needed to stop your vehicle, so slow
down.
• Keep your windshield wiping equip-
ment in good shape. Replace your
windshield wiper blades when they
show signs of streaking or missing
areas on the windshield.
• If your tires are not in good condition,
making a quick stop on wet pavement
can cause a skid and possibly lead to
an accident. Be sure your tires are in
good shape.
• Turn on your headlights to make it eas-
ier for others to see you.
• Driving too fast through large puddles
can affect your brakes. If you must go
through puddles, try to drive through
them slowly.
• If you believe you may have gotten
your brakes wet, apply them lightly
while driving until normal braking oper-
ation returns.
Winter driving
• We recommend that you carry emer-
gency equipment, including tire chains,
a window scraper, windshield de-icer,
a bag of sand or salt, flares, a small
shovel and jumper cables.
• Make sure you have sufficient ethyl-
ene-glycol coolant in the radiator.
• Check the battery condition and
cables. Cold temperatures reduce the
output capability of any battery, so it
must be in excellent condition to pro-
vide enough winter starting power.
• Make sure the engine oil viscosity is
suitable for cold weather.
• Check the ignition system for loose
connections and damage.
• Use antifreeze-formulated windshield
washer fluid. (Do not use engine
coolant antifreeze.)
• Do not use the parking brake if it might
freeze. When parking, shift to 1 (First)
or R (Reverse) with a manual transaxle
or P (Park) with an automatic transaxle
and block the rear wheels.
Page 161 of 219

67
In case of an emergency
Driver-side panel bolster
1. Turn the ignition switch and all other
switches off.
2. Open the cover.4. Pull the suspected fuse straight out.
Use the removal tool (1) provided in
the engine compartment fuse/relay
box.
5. Check the removed fuse; replace it if it
is blown.
Spare fuses are provided in the fuse
panel in engine compartment.
6. Push in a new fuse of the same rating,
and make sure it fits tightly in the clips.
If it fits loosely, consult an authorized Kia
dealer.
If you do not have a spare, use a fuse of
the same rating from a circuit you may
not need for operating the vehicle, such
as the audio fuse.
If the headlights or other electrical com-
ponents do not work and the fuses are
OK, check the fuse block in the engine
compartment. If a fuse is blown, it must
be replaced.
1JBA6004
1
6JBN6003
Page 166 of 219

In case of an emergency
12 6
Memory fuse
Your vehicle is equipped with a memory
fuse to prevent battery discharge if your
vehicle is parked without being operated
for prolonged periods. Use the following
procedures before parking the vehicle for
prolonged period.
1. Turn off the engine.
2. Turn off the headlights and tail lights.
3. Open the driver-side knee bolster
cover and pull up the “MULT B/UP 10A
/ AUDIO 15A”.
✽
NOTICE
• If the memory fuse is pulled up from
the fuse panel, the warning chime,
audio, clock and interior lamps, etc.,
will not operate. Some items must be
reset after replacement.
• Even though the memory fuse is
pulled up, the battery can still be dis-
charged by operation of the head-
lights or other electrical devices.
If emergency towing is necessary, we
recommend having it done by an author-
ized Kia dealer or a commercial tow-truck
service. Proper lifting and towing proce-
dures are necessary to prevent damage
to the vehicle. The use of wheel dollies or
flatbed equipment is recommended.
For trailer towing guidelines information,
refer to section 5 “Driving Tips”.
1JBA6010
TOWING
1JBA6501
Page 198 of 219

Maintenance
22 7
For best battery service :
• Keep the battery securely mounted.
• Keep the top of the battery clean and
dry.
• Keep the terminals and connections
clean, tight, and coated with petroleum
jelly or terminal grease.
• Rinse any spilled electrolyte from the
battery immediately with a solution of
water and baking soda.
• If the vehicle is not going to be used for
an extended time, disconnect the bat-
tery cables.
Battery recharging
Your vehicle has a maintenance-free,
calcium-based battery.
• If the battery becomes discharged in a
short time (because, for example, the
headlights or interior lights were left on
while the vehicle was not in use),
recharge it by slow charging (trickle)
for 10 hours.
• If the battery gradually discharges
because of high electric load while the
vehicle is being used, recharge it at 20-
30A for two hours.
Items to be reset after the battery has
been discharged or the battery has
been disconnected.
• Clock (See Chapter 3)
• Audio (See Chapter 3)
• Sunroof (See Chapter 3)
✽
NOTICE
• Before performing maintenance or
recharging the battery, turn off all
accessories and stop the engine.
• The negative battery cable must be
removed first and installed last when
the battery is disconnected.
1JBA7017
WARNING- Recharging
battery
When recharging the battery,
observe the following precautions:
• The battery must be removed
from the vehicle and placed in an
area with good ventilation.
(Continued)
(Continued)
• Do not allow cigarettes,sparks,or
flame near the battery.
• Watch the battery during charg-
ing, and stop or reduce the charg-
ing rate if the battery cells begin
gassing (boiling) violently or if
the temperature of the electrolyte
of any cell exceeds 49°C (120°F).
• Wear eye protection when check-
ing the battery during charging.
•Disconnect the battery charger in
the following order.
1. Turn off the battery charger main
switch.
2. Unhook the negative clamp from
the negative battery terminal.
3. Unhook the positive clamp from
the positive battery terminal.