2008 KIA Rio Negative battery
[x] Cancel search: Negative batteryPage 9 of 219

Your vehicle at a glance
4 2
ENGINE COMPARTMENT
OJB058004
1. Engine coolant reservoir ...................7-11
2. Engine oil filler cap............................7-10
3. Brake fluid reservoir ..........................7-13
4. Air cleaner .........................................7-17
5. Fuse box ...........................................6- 6
6. Negative battery terminal ...........6-4/7-21
7. Positive battery terminal .............6-4/7-21
8. Auto transaxle oil dipstick* ................7-15
9. Radiator cap......................................7-12
10. Engine oil dipstick ...........................7-10
11. Power steering fluid reservoir* ........7-14
12. Windshield washer fluid reservoir ...7-16
* : if equipped
Page 97 of 219

Knowing your vehicle
88 3
2. TRACK UP/DOWN Button
• The desired track on the disc currently
being played can be selected using the
track number.
• Press button once to skip forward
to the beginning of the next track.
Press within a second after play-
back begins to quickly move backward
through a CD.
If you press after more than a sec-
ond, it will take you to the beginning of
the track you are now listening to.
3. FF/REW Button
If you want to fast forward or reverse
through the compact disc track, push and
hold the FF or REW button.
When you release the button, the com-
pact disc player will resume playing.
4. REPEAT (RPT) Button
• To repeat the track you are currently
listening to, press the RPT button. To
cancel, press it again.
• If you do not release RPT operation
when the track ends, it will automati-
cally be replayed.
This process will be continued until you
push the button again or turn the radio
OFF then ON.
5. SCAN Button
• To playback the first 10 seconds of
each track, press the SCAN button.
• Press the SCAN button again within 10
sec. when you have reached the
desired track.
6. CD EJECT Button
When the button is pressed with a CD
loaded, the CD will eject.
Forcing to eject : To force to eject a
CD, press this button for more than 3
seconds.
(Do this only when a CD is jammed and
you can not eject it in the normal way -
e.g.) in case that you have inserted 2
CDs by mistake)
7. RANDOM(RDM)
Press the RDM button to listen the tracks
in random, rather than sequential, order.
Press it again to cancel random play.
✽
NOTICE
• To assure proper operation of the unit,
keep the vehicle interior temperature
within a normal range by using the
vehicle's air conditioning or heating
system.
• When replacing the fuse, replace it
with a fuse having the correct capaci-
ty.
• All stored bookmarks are all erased
when the car battery is disconnected
or power to the vehicle is lost. If this
occurs, the bookmarks will have to be
reset.
• This equipment is designed to be used
only in a 12 volt DC battery system
with negative ground.
• This unit is made of precision parts.
Do not attempt to disassemble or
adjust any parts.
(Continued)
Page 106 of 219

397
Knowing your vehicle
✽
NOTICE
• To assure proper operation of the unit,
keep the vehicle interior temperature
within a normal range by using the
vehicle's air conditioning or heating
system.
• When replacing the fuse, replace it
with a fuse having the correct capacity.
• All stored bookmarks are all erased
when the car battery is disconnected
or power to the vehicle is lost. If this
occurs, the bookmarks will have to be
reset.
• This equipment is designed to be used
only in a 12 volt DC battery system
with negative ground.
• This unit is made of precision parts.
Do not attempt to disassemble or
adjust any parts.
• When driving your vehicle, be sure to
keep the volume of the unit set low
enough to allow you to hear sounds
coming from the outside.
• Do not expose this equipment (includ-
ing the speakers and tape) to water or
excessive moisture.
✽
NOTICE
• Do not insert warped or poor quality
discs into the CD player as damage to
the unit may occur.
• Do not insert anything like coins into
the player slot as damage to the unit
may occur.
• Do not place beverages close to the
audio system. The playback mecha-
nism may be damaged if you spill
them.
• Do not strike or allow anything to
impact the audio system, damage to
the system mechanisms could occur.
• Off-road or rough surface driving
may cause the compact disc to skip.
Do not use the compact disc when
driving in such conditions as damage
to the compact disc face could occur.
• Do not attempt to grab or pull the
compact disc out while the disc is
being pulled into the audio unit by the
self-loading mechanism. Damage to
the audio unit and compact disc could
occur.
• Avoid using recorded compact discs in
your audio unit. Original compact
discs are recommended.
Page 158 of 219

In case of an emergency
4 6
Connecting jumper cables Jump starting procedure
1. Make sure the booster battery is 12-
volt and that its negative terminal is
grounded.
2. If the booster battery is in another
vehicle, do not allow the vehicles to
touch.
3. Turn off all unnecessary electrical
loads.
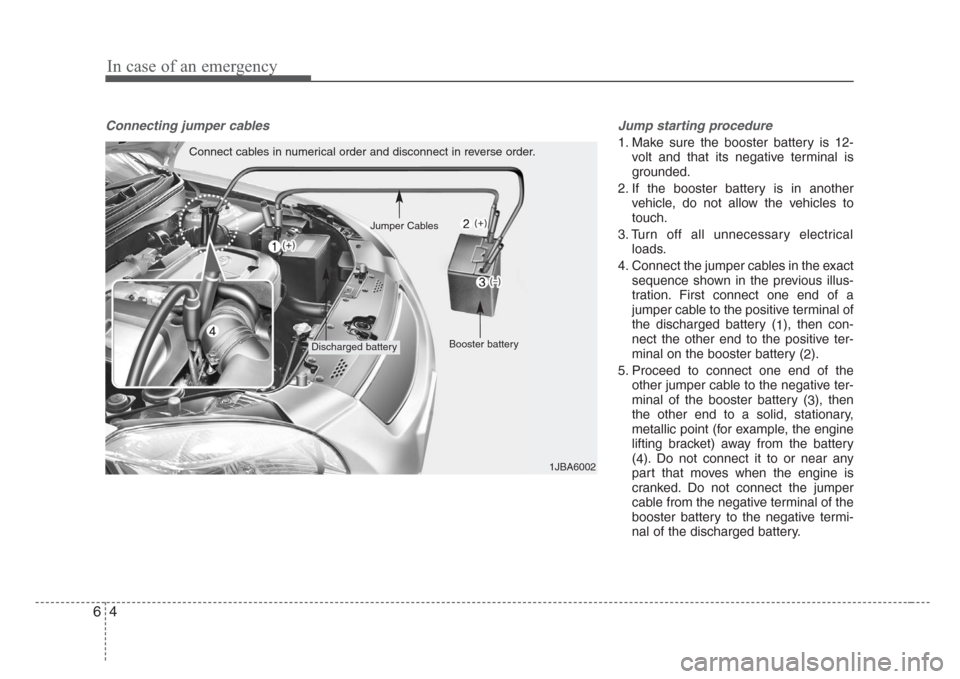
4. Connect the jumper cables in the exact
sequence shown in the previous illus-
tration. First connect one end of a
jumper cable to the positive terminal of
the discharged battery (
1), then con-
nect the other end to the positive ter-
minal on the booster battery (
2).
5. Proceed to connect one end of the
other jumper cable to the negative ter-
minal of the booster battery (
3), then
the other end to a solid, stationary,
metallic point (for example, the engine
lifting bracket) away from the battery
(
4). Do not connect it to or near any
part that moves when the engine is
cranked. Do not connect the jumper
cable from the negative terminal of the
booster battery to the negative termi-
nal of the discharged battery.Connect cables in numerical order and disconnect in reverse order.
Discharged batteryBooster battery
1JBA6002 Jumper Cables
Page 159 of 219

65
In case of an emergency
Do not allow the jumper cables to con-
tact anything except the correct bat-
tery terminals or the correct ground.
Do not lean over the battery when
making connections.
6. Start the engine of the vehicle with the
booster battery and let it run at 2,000
rpm, then start the engine of the vehi-
cle with the discharged battery.
If the cause of your battery discharging is
not apparent, you should have your vehi-
cle checked by an authorized Kia dealer.
Push-starting
Your manual transaxle-equipped vehicle
should not be push-started because it
might damage the emission control sys-
tem.
Vehicles equipped with automatic
transaxle cannot be push-started.
Follow the directions in this section for
jump-starting.
CAUTION
Never tow a vehicle to start it
because the sudden surge forward
when the engine starts could cause
a collision with the tow vehicle.
CAUTION - Battery cables
Do not connect the jumper cable
from the negative terminal of the
booster battery to the negative ter-
minal of the discharged battery.
This can cause the discharged bat-
tery to overheat and crack, releas-
ing battery acid.
Page 162 of 219

In case of an emergency
8 6
Engine compartment
1. Turn the ignition switch and all other
switches off.
2. Remove the fuse box cover by press-
ing the taps and pulling up.
3. Check the removed fuse; replace it if it
is blown.
4. Push in a new fuse of the same rating,
and make sure it fits tightly in the clips.
If it fits loosely, consult an authorized Kia
dealer.
✽
NOTICE
After checking the fuse box in the engine
compartment, securely install the fuse
box cover. If not, electrical failures may
occur from water leaking in.
Main fuse
If the MAIN fuse is blown, it must be
removed as follows:
1. Disconnect the negative battery cable.
2. Remove the screws shown in the pic-
ture above.
3. Replace the fuse with a new one of the
same rating.
4. Reinstall in the reverse order of
removal.
✽
NOTICE
If the MAIN fuse is blown, consult an
authorized Kia dealer.
1JBA60051JBA6007
Page 185 of 219

79
Maintenance
ENGINE COMPARTMENT
OJB058004
1. Engine coolant reservoir
2. Engine oil filler cap
3. Brake fluid reservoir
4. Air cleaner
5. Fuse box
6. Negative battery terminal
7. Positive battery terminal
8. Auto transaxle oil dipstick
(if equipped)
9. Radiator cap
10. Engine oil dipstick
11. Power steering fluid reservoir
(if equipped)
12. Windshield washer fluid
reservoir
Page 198 of 219

Maintenance
22 7
For best battery service :
• Keep the battery securely mounted.
• Keep the top of the battery clean and
dry.
• Keep the terminals and connections
clean, tight, and coated with petroleum
jelly or terminal grease.
• Rinse any spilled electrolyte from the
battery immediately with a solution of
water and baking soda.
• If the vehicle is not going to be used for
an extended time, disconnect the bat-
tery cables.
Battery recharging
Your vehicle has a maintenance-free,
calcium-based battery.
• If the battery becomes discharged in a
short time (because, for example, the
headlights or interior lights were left on
while the vehicle was not in use),
recharge it by slow charging (trickle)
for 10 hours.
• If the battery gradually discharges
because of high electric load while the
vehicle is being used, recharge it at 20-
30A for two hours.
Items to be reset after the battery has
been discharged or the battery has
been disconnected.
• Clock (See Chapter 3)
• Audio (See Chapter 3)
• Sunroof (See Chapter 3)
✽
NOTICE
• Before performing maintenance or
recharging the battery, turn off all
accessories and stop the engine.
• The negative battery cable must be
removed first and installed last when
the battery is disconnected.
1JBA7017
WARNING- Recharging
battery
When recharging the battery,
observe the following precautions:
• The battery must be removed
from the vehicle and placed in an
area with good ventilation.
(Continued)
(Continued)
• Do not allow cigarettes,sparks,or
flame near the battery.
• Watch the battery during charg-
ing, and stop or reduce the charg-
ing rate if the battery cells begin
gassing (boiling) violently or if
the temperature of the electrolyte
of any cell exceeds 49°C (120°F).
• Wear eye protection when check-
ing the battery during charging.
•Disconnect the battery charger in
the following order.
1. Turn off the battery charger main
switch.
2. Unhook the negative clamp from
the negative battery terminal.
3. Unhook the positive clamp from
the positive battery terminal.