Page 224 of 335
6
Road warning / 6-2 In case of an emergency while driving / 6-2If the engine will not start / 6-3Emergency starting / 6-4If the engine overheats / 6-6
If you have a flat tire (with spare tire) / 6-7
If you have a flat tire (with TireMobilityKit) / 6-15
Towing / 6-24Emergency commodity / 6-28
What to do in an emergency
Page 227 of 335

What to do in an emergency
4
6
EMERGENCY STARTING
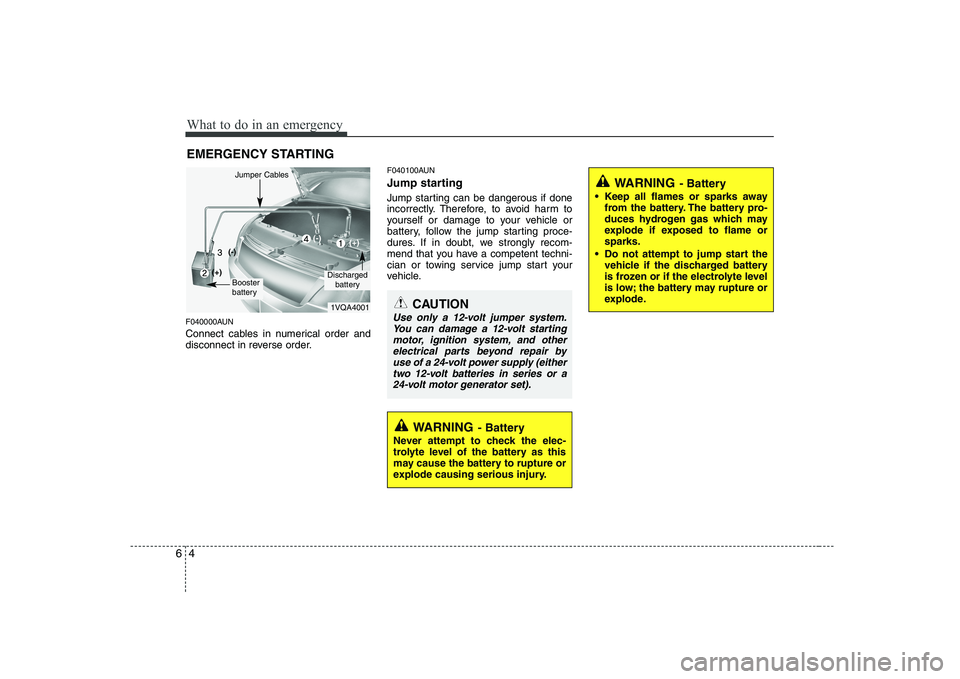
F040000AUN
Connect cables in numerical order and
disconnect in reverse order. F040100AUN
Jump starting
Jump starting can be dangerous if done
incorrectly. Therefore, to avoid harm to
yourself or damage to your vehicle or
battery, follow the jump starting proce-
dures. If in doubt, we strongly recom-
mend that you have a competent techni-
cian or towing service jump start your
vehicle.
CAUTION
Use only a 12-volt jumper system.
You can damage a 12-volt startingmotor, ignition system, and other electrical parts beyond repair byuse of a 24-volt power supply (either
two 12-volt batteries in series or a24-volt motor generator set).
WARNING - Battery
• Keep all flames or sparks away from the battery. The battery pro-
duces hydrogen gas which may
explode if exposed to flame orsparks.
Do not attempt to jump start the vehicle if the discharged battery
is frozen or if the electrolyte level
is low; the battery may rupture or
explode.
WARNING - Battery
Never attempt to check the elec-
trolyte level of the battery as this
may cause the battery to rupture or
explode causing serious injury.
1VQA4001
Discharged battery
Jumper Cables
Booster
battery
(-)
(+)
(+)(-)
Page 230 of 335
67
What to do in an emergency
IF YOU HAVE A FLAT TIRE (WITH SPARE TIRE, IF EQUIPPED)
F070100ASA
Jack and tools
The jack, jack handle, wheel lug nut wrench are stored in the luggage
compartment.
Pull up the luggage box cover to reach this equipment. (1) Jack handle
(2) Jack
(3) Wheel lug nut wrench
F070101ASA
Jacking instructions
The jack is provided for emergency
tire changing only.
To prevent the jack from “rattling”
while the vehicle is in motion, store it
properly.
Follow jacking instructions to reduce
the possibility of personal injury.
WARNING
- Changing tires
Never attempt vehicle repairs in the traffic lanes of a public
road or highway.
Always move the vehicle com- pletely off the road and onto
the shoulder before trying to
change a tire. The jack should
be used on a firm level
ground. If you cannot find a
firm level place off the road,
call a towing service company
for assistance.
(Continued)OSA067020
Page 241 of 335

What to do in an emergency
18
6
10. Switch the On/Off switch (8) to
the "I"-position.
Please note: When the sealing compound is added through the
tire valve the pressure gauge
could increase from approxi-
mately 4-6 bar (60-90 psi), but itwill drop again after about 30
seconds. 11. Inflate the tire to at least 1.8 bar
(26 psi) and at most 3.5 bar (51
psi) within 7 minutes. Switch off
the compressor briefly by press-
ing "O" so you are be able to readthe actual tire inflation pressure
on the gauge.
CAUTION
During the tire inflation opera-
tion do not stand next to thedamaged tire. Check the side-wall of the tire for unusual bulges or deformations.Discontinue the inflation opera-tion and deflate the tire by using the pressure release (10), if anyunusual appearance is noticed.
CAUTION
If a tire inflation pressure of 1.8 bar (26 psi) is not achievablewithin 7 minutes, the tire is tooseverely damaged and you must not drive on the tire. Call forroad side service or towing.
OUN066103L
Page 242 of 335

619
What to do in an emergency
12. If a tire inflation pressure of 1.8bar (26 psi) is reached, turn the
On/Off switch to the "O"-position,
quickly unscrew the hose from
the tire. Unplug the cable from
the cigarette lighter. Do not
unscrew the bottle. Stow theTireMobilityKit, the bottle cap and
the bottle holder cap safely in the
vehicle in an easily accessible
place, as it will be needed again
to check tire pressure.
13. Drive immediately and cautiously for about 3 km (2 miles) so thatthe sealing compound can seal
the puncture. Do not exceed 80
km/h (50 mph). While driving, if
you experience any unusual
vibration, ride disturbance or
noise, reduce your speed and
drive with caution until you can
safely pull off to the side of the
road. Call for road side service or
towing. F120202ASA
2nd Stage: Check tire pressure
14. Stop after driving for about 3 km
(2 miles) and check the pressure
of the punctured tire as follows:
a) Ensure that the On/Off switch (8) of the compressor is in the"O"-position.
b) Screw the hose onto the valve of the punctured tire.
c) Plug the power cable into the cigarette lighter (12 volt socket).
d) Read the inflation pressure on the gauge of the TireMobilityKit.
CAUTION
If the inflation pressure is below
1.3 bar (19 psi), do not continueto drive. Call for road side serv- ice or towing.
OUN066103L
Page 243 of 335

What to do in an emergency
20
6
15. If the inflation pressure is 1.3 bar
(19 psi) or more, turn the On/Off
switch to the "I"-position andadjust the inflation pressure tothe recommended inflation pres-
sure (Refer to “Tires and wheels”
in section 9). Reduce any exces-
sive pressure by using the pres-
sure release valve (10).
16. Turn the kit off by pressing "O". Unscrew the hose from the tire
valve and unplug the electric plug
from the socket. 17. Do not unscrew the bottle. Stow
the TireMobilityKit safely in the
vehicle. 18. Drive to the next vehicle or tire
dealer to replace the tire.
19. After using the TireMobilityKit to seal your tire, replace the hose,the sealing compound and con-
nected parts. See the last page
of this instruction. When replac-
ing the damaged tire inform thetire mechanic that a sealing com-
pound was used before the tire isdemounted!
WARNING
After the sealing compound has
been used, the max. permissiblespeed is 80 km/h (50 mph) and
the damaged tire is to be
replaced promptly, at least with-in a distance of 200 km (120
miles). While driving, if you
experience any unusual vibra-
tion, ride disturbance or noise,
reduce your speed and drive
with caution until you can safe-
ly pull off to the side of the road.
Call for road side service or
towing.WARNING
After a long period without driv-
ing, the inflation pressure must
be checked before driving.
OUN066103L
Page 247 of 335

What to do in an emergency
24
6
TOWING
F080100AUN
Towing service
If emergency towing is necessary, we
recommend having it done by an author-
ized KIA dealer or a commercial tow-
truck service. Proper lifting and towing
procedures are necessary to prevent
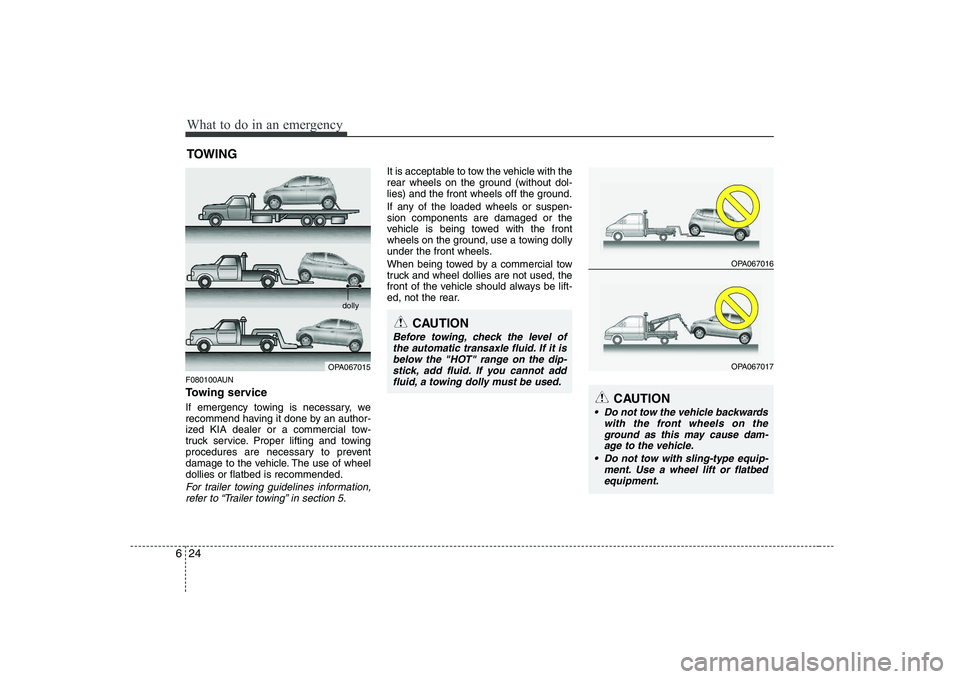
damage to the vehicle. The use of wheeldollies or flatbed is recommended.
For trailer towing guidelines information, refer to “Trailer towing” in section 5.
It is acceptable to tow the vehicle with the
rear wheels on the ground (without dol-
lies) and the front wheels off the ground.
If any of the loaded wheels or suspen- sion components are damaged or the
vehicle is being towed with the front
wheels on the ground, use a towing dolly
under the front wheels.
When being towed by a commercial tow
truck and wheel dollies are not used, the
front of the vehicle should always be lift-
ed, not the rear.
OPA067015
CAUTION
Before towing, check the level ofthe automatic transaxle fluid. If it is below the "HOT" range on the dip-
stick, add fluid. If you cannot add fluid, a towing dolly must be used.
dolly
OPA067016
OPA067017
CAUTION
Do not tow the vehicle backwards with the front wheels on the
ground as this may cause dam-age to the vehicle.
Do not tow with sling-type equip- ment. Use a wheel lift or flatbedequipment.
Page 248 of 335

625
What to do in an emergency
When towing your vehicle in an emer- gency without wheel dollies :
1. Set the ignition switch in the ACC posi-tion.
2. Place the transaxle shift lever in N (Neutral).
3. Release the parking brake.
F080400AUN
Tie-down hook
(for flatbed towing) (if equipped)F080200APA
Removable towing hook (front) (if equipped)
1. Open the tailgate, and remove the tow-
ing hook from the tool case.
2. Remove the hole cover pressing the lower part of the cover on the front
bumper (1).
3. Install the towing hook by turning it clockwise into the hole until it is fullysecured (2).
4. Remove the towing hook and install the cover after use.
CAUTION
Failure to place the transaxle shift
lever in N (Neutral) may cause inter-nal damage to the transaxle.
CAUTION
Do not use the hooks under thefront and rear of the vehicle for tow-
ing purposes. These hooks are designed ONLY for transport tie-down. If the tie-down hooks are used for towing, the tie-down hooks
will be damaged and this could leadto serious injury.
OSA067031OSA067029
OSA067028OSA067030