Page 162 of 283

431
Driving your vehicle
Trunk lid open
warning
This warning light activates when the
trunk is not closed securely.
Low fuel level
warning
This warning light indicates the fuel tank
is nearly empty. The warning light will
come on when the fuel level has dropped
to about 9 liters. Refuel as soon as pos-
sible.
Door open
display
This warning light illuminates when a
door is not closed securely with the igni-
tion in any position. And the door open
display will illuminate the corresponding
position light which door is not closed
securely.
Immobilizer indicator
(if equipped)
This light illuminates when the immobiliz-
er key is inserted and turned to the ON
position to start the engine.
If this light turns off or blinks when the
ignition switch is in the ON position
before starting the engine, have the sys-
tem checked by an authorized Kia
Dealer.
Headlight high beam
indicator
This indicator illuminates when the head-
lights are on and in the high beam posi-
tion or when the turn signal lever is pulled
into the Flash-to-Pass position.
Malfunction indicator
(if equipped)
This indicator light is part of the Engine
Control System which monitors various
emission control system components. If
this light illuminates while driving, it indi-
cates that a potential problem has been
detected somewhere in the emission
control system.
Generally, your vehicle will continue to be
drivable and will not need towing, but
have the system checked by an
Authorized Kia Dealer as soon as possi-
ble.
✽NOTICE
A loose fuel filler cap may cause the On
Board Diagnostic System Malfunction
Indicator Light ( ) in the instrument
panel to illuminate unnecessarily.
Always make sure that the fuel filler cap
is tight.
TRUNK
OPEN!
LOW
FUEL
DOOR
OPEN!
Page 166 of 283
435
Driving your vehicle
Headlight position ( )
When the light switch is in the headlight
position (2nd position) the head, tail,
position, license and instrument panel
lights are ON.
High - beam operation
To turn on the high beam headlights,
push the lever away from you. Pull it back
for low beams.
The high-beam indicator will light when
the headlight high beams are switched
on.
To prevent the battery from being dis-
charged, do not leave the lights on for a
prolonged time while the engine is not
running.
Flashing headlights
To flash the headlights, pull the lever
towards you. It will return to the normal
(low-beam) position when released. The
headlight switch does not need to be on
to use this flashing feature.
2GHN2053A2GHN2211A2GHN2210A
Page 167 of 283

Driving your vehicle
364
CAUTION
If the automatic headlight aimingsystem does not operate when thevehicle is loaded with pa ssengers
and the front portion of the vehicle is at an elevated angle, or it i s not
adjusting correctly, have the vehicle checked and repaired by an author-ized Kia dealer. Do not attempt toadjus t the headlights manually,
damage to the automatic headlight aiming system could occur.
Turn signals
The ignition switch must be on for the
turn signals to function. To turn on the
turn signals, move the lever up or down.
Green arrow indicators on the instrument
panel indicate which turn signal is oper-
ating. They will self-cancel after a turn is
completed. If the indicator continues to
flash after a turn, manually return the
lever to the OFF position.
Lane change signals
To signal a lane change, move the turn
signal lever slightly and hold it in position.
The lever will return to the OFF position
when released.
If an indicator stays on and does not
flash or if it flashes abnormally, one of the
turn signal bulbs may be burned out and
will require replacement.
✽
NOTICE
If an indicator flash is abnormally quick
or slow, bulb may be burned out or have
a poor electrical connection in the cir-
cuit.
Automatic headlight aiming
(if equipped)
To provide better driver visibility and
reduce eye fatigue, the headlight aiming
(direction) is automatically controlled
depending on vehicle load and vehicle
angle (when vehicle is loaded with pas-
sengers, cargo or used for towing, the
additional load can alter the headlight
aiming point on the road surface). This
system provides constant automatic
headlight aiming under various vehicle
conditions and angles to ensure the
headlights are always pointed in the right
direction.
2GHN2055
Right turn
Left turn
Left lane
change
Right lane
change
Page 171 of 283
Driving your vehicle
404
One - touch wiper
For a single wiping cycle, push the lever
upward and release it with the lever in the
OFF position.
The wipers will operate continuously if
the lever is pushed upward and held.
Windshield washers
In the OFF position, pull the lever gently
toward you to spray washer fluid on the
windshield and to run the wipers 2-3
cycles.
Use this function when the windshield is
dirty.
The spray and wiper operation will con-
tinue until you release the lever.
7GHA2056A
CAUTION
• To prevent possible damage to
the wiper s or windshield, do not
operate the wiper s when the
windshield is dry.
• To prevent damage to the wiper blades , do not us e gasoline,
kerosene, paint thinner, or other solvents on or near them.
• To prevent damage to the wiper arms and other components,donot attempt to move the wiper s
manually.
7GHN2210
Page 180 of 283

449
Driving your vehicle
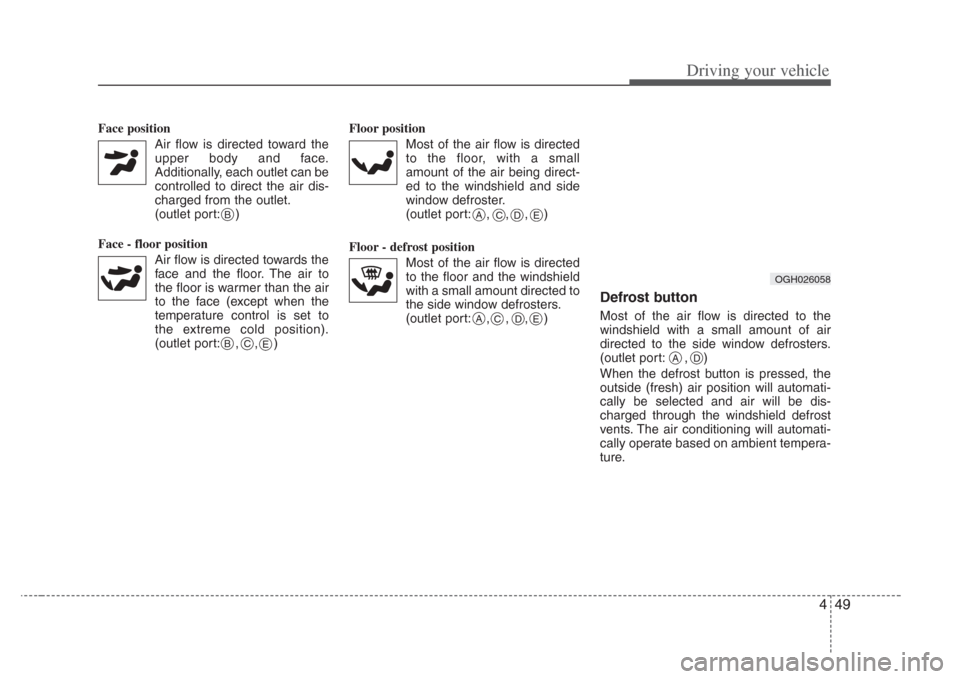
Face position Air flow is directed toward theupper body and face.
Additionally, each outlet can be controlled to direct the air dis-
charged from the outlet.
(outlet port: )
Face - floor position Air flow is directed towards theface and the floor. The air to
the floor is warmer than the air
to the face (except when the
temperature control is set to
the extreme cold position).
(outlet port: , , ) Floor position
Most of the air flow is directedto the floor, with a small
amount of the air being direct-
ed to the windshield and side
window defroster.
(outlet port: , , , )
Floor - defrost position Most of the air flow is directedto the floor and the windshield
with a small amount directed to
the side window defrosters.
(outlet port: , , , )
Defrost button
Most of the air flow is directed to the
windshield with a small amount of air
directed to the side window defrosters.
(outlet port: , )
When the defrost button is pressed, the
outside (fresh) air position will automati-
cally be selected and air will be dis-
charged through the windshield defrost
vents. The air conditioning will automati-
cally operate based on ambient tempera-
ture.
B
BC
A
E
E
CDE
ACD
OGH026058
AD
Page 185 of 283
5
Fuel requirements / 5-2
Emission control system / 5-3
Before driving / 5-5
Suggestions for economical operation / 5-6
Special driving conditions / 5-7
Vehicle load limit / 5-11
Weight of the vehicle / 5-15
Trailer towing / 5-16
Label information / 5-23
Homelink
®wireless control system / 5-25
Driving tips
Page 191 of 283

57
Driving tips
SPECIAL DRIVING CONDITIONS
Hazardous driving conditions
When hazardous driving conditions are
encountered such as water, snow, ice,
mud, sand, or similar hazards, follow
these suggestions:
• Drive cautiously and allow extra dis-
tance for braking.
• Avoid sudden movements in braking or steering.
• When braking, pump the brake pedal with a light up-and-down motion until
the vehicle is stopped.
✽ NOTICE
Do not pump the brake pedal on a vehi-
cle equipped with ABS.
• If stalled in snow, mud, or sand, use
second gear. Accelerate slowly to
avoid spinning the drive wheels.
• Use sand, rock salt, tire chains, or other non-slip material under the drive
wheels to provide traction when stalled
in ice, snow, or mud.Rocking the vehicle
If it is necessary to rock the vehicle to
free it from snow, sand, or mud, first turn
the steering wheel right and left to clear
the area around your front wheels. Then,
shift back and forth between R (Reverse)
and any forward gear in vehicles
equipped with an automatic transaxle. Do
not race the engine, and spin the wheels
as little as possible. If you are still stuck
after a few tries, have the vehicle pulled
out by a tow vehicle to avoid engine
overheating and possible damage to the
transaxle.
WARNING - Downshifting
Downs hifting with an automatic
transaxle, while driving on slippery
surfaces can cause an accident.
The sudden change in tire speed
could cause the tires to skid. Be
careful when downshifting on slip-
pery surfaces.
Page 195 of 283

511
Driving tips
VEHICLE LOAD LIMIT
Vehicle capacity weight:
390 kg (860 lbs)
Vehicle capacity weight is the maxi-
mum combined weight of occupants
and cargo. If your vehicle is equipped
with a trailer, the combined weight
includes the tongue load.
Seating capacity:
Total : 5 persons (Front seat : 2 persons, Rear seat : 3 persons)
Seating capacity is the maximum
number of occupants including a
driver, your vehicle may carry.
However the seating capacity may
be reduced based upon the weight of
all of the occupants, and the weight
of the cargo being carried or towed.
Do not overload the vehicle as there
is a limit to the total weight, or load
limit including occupants and cargo,
the vehicle can carry.
P235/55R17
P235/55R17
P235/55R17
390860 860
390
OGH056900N
P235/55R17210kPa, 30psi
210kPa, 30psi
420kPa, 60psiP235/55R17
T125/80D16
390860
860
390
OGH056910N
Type A
Type B
P225/60R16
P225/60R16
P235/55R17
390860
860
390
OGH056912N
210kPa, 30psi
210kPa, 30psi
420kPa, 60psi
T125/80D16
390860
860
390
P225/60R16
P225/60R16
OGH056913N
Type C
Type D
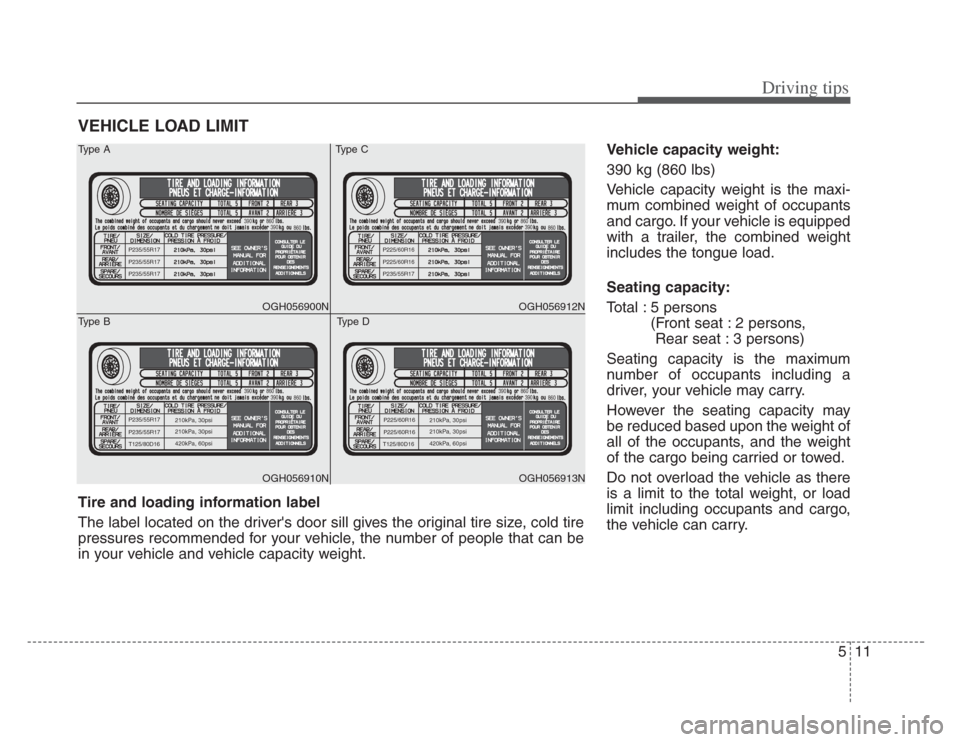
Tire and loading information label
The label located on the driver's door sill gives the original tire size, cold tire
pressures recommended for your vehicle, the number of people that can be
in your vehicle and vehicle capacity weight.