Page 210 of 283

Driving tips
265
Programming
Your vehicle may require the ignition
switch to be turned to the ACC position
for programming and/or operation of
HomeLink. It is also recommended that a
new battery be replaced in the hand-held
transmitter of the device being pro-
grammed to HomeLink for quicker train-
ing and accurate transmission of the
radio-frequency.
Follow these steps to train your
HomeLink mirror:1. When programming the buttons for the
first time, press and hold the left and
center buttons ( , ) simultan-
iously until the indicator light begins to
flash after approximately 20 seconds.
(This procedure erases the factory-set
default codes. Do Not perform this step
to program additional hand-held trans-
mitters.)
✽NOTICE
For non rolling code garage door open-
ers, follow steps 2 - 3.
For rolling code garage door openers,
follow steps 2 - 6.
For Canadian Programming, please fol-
low the Canadian Programming section.
For help with determining whether your
garage is non-rolling code or rolling
code, please refer to the garage door
openers owner’s manual or contact
HomeLink customer service at 1-800-
355-3515.
MMSA5005
Flashing
Page 211 of 283

527
Driving tips
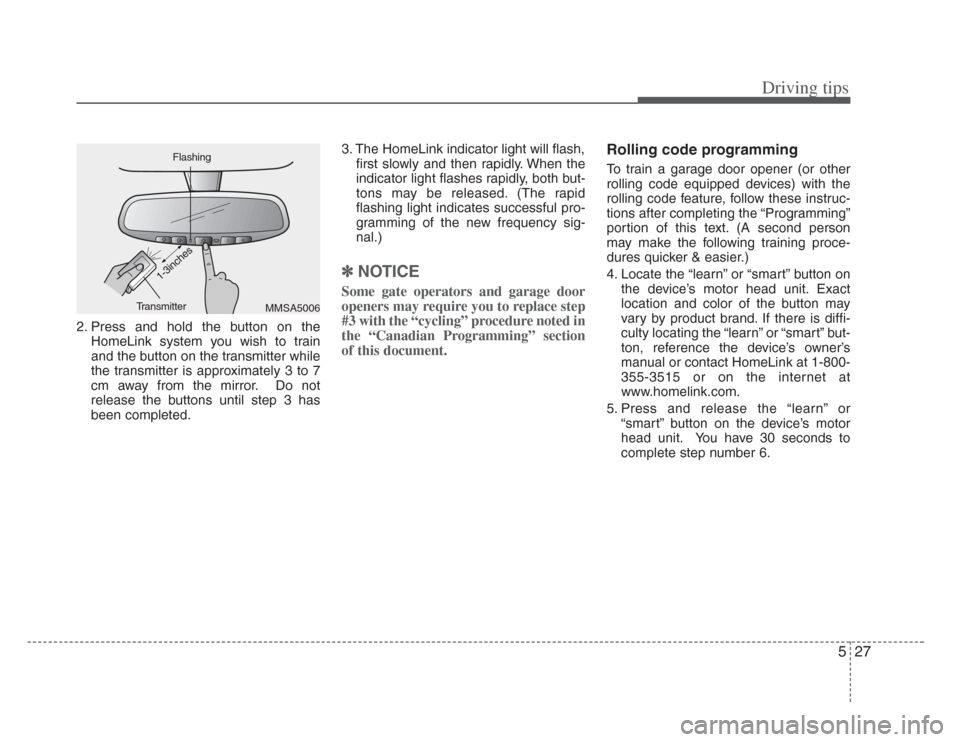
2. Press and hold the button on theHomeLink system you wish to train
and the button on the transmitter while
the transmitter is approximately 3 to 7
cm away from the mirror. Do not
release the buttons until step 3 has
been completed. 3. The HomeLink indicator light will flash,
first slowly and then rapidly. When the
indicator light flashes rapidly, both but-
tons may be released. (The rapid
flashing light indicates successful pro-
gramming of the new frequency sig-
nal.)
✽NOTICE
Some gate operators and garage door
openers may require you to replace step
#3 with the “cycling” procedure noted in
the “Canadian Programming” section
of this document.
Rolling code programming
To train a garage door opener (or other
rolling code equipped devices) with the
rolling code feature, follow these instruc-
tions after completing the “Programming”
portion of this text. (A second person
may make the following training proce-
dures quicker & easier.)
4. Locate the “learn” or “smart” button on
the device’s motor head unit. Exact
location and color of the button may
vary by product brand. If there is diffi-
culty locating the “learn” or “smart” but-
ton, reference the device’s owner’s
manual or contact HomeLink at 1-800-
355-3515 or on the internet at
www.homelink.com.
5. Press and release the “learn” or “smart” button on the device’s motor
head unit. You have 30 seconds to
complete step number 6.
MMSA5006
FlashingTransmitter
1-3inches
Page 224 of 283

611
In case of an emergency
Power connector
Your vehicle is equipped with a power connector to prevent bat-
tery discharge if your vehicle is parked without being operated
for prolonged periods. Use the following procedures before
parking the vehicle for prolonged period.
1. Turn off the engine.
2. Turn off the headlights and tail lights.
3. Open the driver-side knee bolster cover and pull up the“POWER/CONN”.
✽NOTICE
If the power connector is pulled up from the fuse panel, the
warning chime, AV system, clock and intetrior lamps, etc.,
will not operate. Some items must be reset after replace-
ment.
Even though the power connector is pulled up, the battery can still be discharged by operation of the headlights or
other electrical devices.
Des cription Fus e rating Protected component
A/CON 10A Air-conditioning system
P/WDW(LH) 20A Power window (left)
TAIL LP(RH) 10A Taillight (right)
BACK WARN’G 10A Back warning system
DR LP 10A Door courtesy lamp
MIRROR HTD 15A Outside review mirror defroster
ENG SNSR 10A
Power train control system sensors
T/REDUCER10A Seat belt tension reducer
CLOCK 10A Clock
WIPER(FR) 25A Wiper (front)
EPS 10A Electronic power steering
TAIL LP(LH) 10A Tail light (left)
ROOM LP 10A Room lamp
AV, CLOCK 15A Audio, Clock
LAN UNIT 10A Lan unit
TPMS 15A -
H/LP WASHER 20A Headlight washer
SHUNT CONN - Switch illumination
POWER/CONN - Power connector
1GHA403
Power
connector
Page 278 of 283

Specifications
28
DimensionsLight Bulbs
1)HID(High Intensity Discharge) type
Itemmm (in)
Overall length 5,000 (196.9)
Overall width 1,850 (72.8)
Overall height 1,485 (58.5)
Front tread 1,585 (62.4)
Rear tread 1,590 (62.6)
Wheelbase 2,800 (110.2)
SPECIFICATIONS
The specifications given here are for general information only. Although this information was accurate at the time of printing, Kia
reserves the right to change its vehicles or their specifications without notice. Please check with an authorized Kia dealer for more
precise and more up-to-date information.
Light Bulb Wattage
Headlight (High) 55
Headlight (Low) 55 or 35
1)
Front turn signal lights (LED type) 14.5
Position lights 5
Side mark lights 5
Front fog lights (if equipped) 55
Stop and tail lights 27/8
Rear turn signal lights 28
Back-up lights 18
High mounted stop light (LED type) 2.5
License plate lights 5
Front map lamp 5
Center dome lamp 10
Door courtesy lamps 5
Vanity mirror lamps 1.5
Trunk room lamp 5
Foot lamp 5
Glove box lamp 5
Page 282 of 283

93
Index
Ignition switch ··················\
··················\
··················\
··········4-2
Immobilizer system ··················\
··················\
··················\
··3-7
Instrument cluster ··················\
··················\
··················\
·4-25
Instrument panel overview ··················\
··················\
·······2-3
Interior care··················\
··················\
··················\
············7-41
Interior features ··················\
··················\
··················\
·····3-91
Interior lights ··················\
··················\
··················\
·········3-88
Interior overview················\
··················\
··················\
········2-2
Keys ··················\
··················\
··················\
··················\
·········3-2
Label information ··················\
··················\
··················\
··5-23
Lighting ··················\
··················\
··················\
··················\
·4-34
Lubricant specifications ··················\
··················\
··········7-36
Lubricants and fluids ··················\
··················\
··············7-18
Maintenance schedule ··················\
··················\
···············7-3
Maintenance services ··················\
··················\
·················7-2
Mirrors ··················\
··················\
··················\
··················\
··3-84
Overheating ··················\
··················\
··················\
··············6-2
Owner maintenance ··················\
··················\
··················\
·7-7Power steering ··················\
··················\
··················\
········7-15
Remote keyless entry ··················\
··················\
·················3-4
Road warning ··················\
··················\
··················\
···········6-2
Safety belts··················\
··················\
··················\
··············3-30
Seats··················\
··················\
··················\
··················\
·······3-17
Special driving conditions ··················\
··················\
·········5-7
Specifications ··················\
··················\
··················\
············8-2
Starting the engine ··················\
··················\
··················\
···4-4
Steering wheel···············\
··················\
··················\
············4-17
Storage compartments ··················\
··················\
·············3-89
Suggestions for economical operation··················\
········5-6
Sunroof ··················\
··················\
··················\
··················\
··3-96
Tires and wheels··················\
··················\
··················\
·····7-25
Towing ··················\
··················\
··················\
··················\
···6-12
Trailer towing ··················\
··················\
··················\
·········5-16
Trunk··················\
··················\
··················\
··················\
·····3-76
K
L
M
P
R
T
S
O
Page:
< prev 1-8 9-16 17-24