2008 KIA Opirus buttons
[x] Cancel search: buttonsPage 122 of 283

Knowing your vehicle
1123
6. Pre-set button
Press one of 6 buttons (1~6) briefly for
less than 1.5 seconds to listen to the sta-
tion memorized to each button. If you are
listening to the station you found with
TUNE or SEEK function other than the
station memorized to the preset button
indicated on LCD and want to memorize
the current station to the corresponding
preset button, press and hold the button
for more than 1.5 seconds then the
channel will be memorized to the button
with a beep.
7. EQ mode selection button(Equalizer)
This audio system lets you choose the
equalizer setting to your taste for each
genre of music with the one-touch [EQ]
button. Each time you press this button
the sound equalizer setting will switch
from CLASSIC
➟JAZZ ➟ROCK ➟
DEFEAT (not displayed) ➟CLASSIC
8. Audio mode selection button
Push this button to select audio mode. It
changes in BAS
➟MID➟TRE➟FA D➟BAL
➟Current mode➟BAS ····· order. After
selecting mode to change and use vol-
ume control button to change value. The
value will be indicated on LCD screen.
• On Bass sound (BAS) mode, rotate the volume button clockwise to increase
Bass sound and anti-clockwise to
decrease Bass sound.
• On mid sound (MID) mode, rotate the volume button clockwise to increase
mid sound and anti-clockwise to
decrease Mid sound.
• On high sound (TRE) mode, rotate the volume button clockwise to increase
high sound and anti-clockwise to
decrease high sound.
• On high sound (TRE) mode, rotate the volume button clockwise to increase
high sound and anti-clockwise to
decrease high sound.
• On front and back sound control (FAD) mode, rotate the volume button clock-
wise to enable back speakers and anti-
clockwise to enable front speakers. • On left and right sound control (BAL)
mode, rotate the volume button clock-
wise to enable right speakers and anti-
clockwise to enable left speakers. 5
seconds after adjusting, display screen
goes back to previous display.
9. Mute button
Push [Mute] button to disable sound.
Push again or other button to enable
sound again.
Page 126 of 283
![KIA Opirus 2008 1.G Owners Manual Knowing your vehicle
1163
1. CD loading slot
Push [LOAD] button to open CD slot.
Please face printed side upward and
gently push in. This CDC supports 12 cm
CDs only. But if VCD, Data CD, MP3 CD
are l KIA Opirus 2008 1.G Owners Manual Knowing your vehicle
1163
1. CD loading slot
Push [LOAD] button to open CD slot.
Please face printed side upward and
gently push in. This CDC supports 12 cm
CDs only. But if VCD, Data CD, MP3 CD
are l](/manual-img/2/2898/w960_2898-125.png)
Knowing your vehicle
1163
1. CD loading slot
Push [LOAD] button to open CD slot.
Please face printed side upward and
gently push in. This CDC supports 12 cm
CDs only. But if VCD, Data CD, MP3 CD
are loaded, "Er-6" message will appear.
✽
NOTICE
8cm CDs cannot be used
2. Disc indicator lamp
Corresponding CD indicator light turns
orange when the CD is currently playing
or it is on the process of loading or eject-
ing. It remains green light when no action
is taken on loaded CDs.
3. CD Load button
Push [LOAD] button to load CDs to avail-
able CDC deck (from 1~6). Push [LOAD]
button for more than 2 seconds to load
into all available decks.
The last CD will play. 10 seconds idle sta-
tus will disable loading process.
4. CD eject button
Push button to eject the currently
playing CD. Push this button for more
than 2 seconds to eject all the CDs in
CDC. If CD 3 is playing CDs will be eject-
ed in 3,4,5,6,1,2 order.
5. CD changer selection button
When power is off or to listen to CD,
push [CD] button. If there is no CD, 'no
disk' message will be indicated for 5
seconds.
6. CD change button
Use preset buttons (1~6) to select
desired CD. If there is no CD in the slot
it will not change.
7. Fast Backward button
During CD playback, push [seek ] but-
ton for more than 1.5 seconds (a beep) to
fast backward. For first 5 seconds 5X and
15X after 5 seconds. While the button is
pressed sound is reduced to 12dB.
8. Fast Forward button
During CD playback, push [seek ] but-
ton for more than 1.5 seconds (a beep) to
fast forward. For first 5 seconds 5X and
15X after 5 seconds. While the button is
pressed sound is reduced to 12dB.
9. Track Down
Push [seek ] button to move to the
beginning of current music. Each push
will move to previous track. When this
button is pressed from track 1, it will
move to beginning of the last track.
10. Track Up
Push [seek ] button to move to the
beginning of next track. Each push will
move to next track. When this button is
pressed from the last track, it will move to
beginning of the first track.
11. Repeat button
Push [RPT] button to repeat current
track. Push again to disable repeats.
12. SCAN button
Push [CD SCAN] button to listen each
track for 10 seconds. Push again to dis-
able.
13. Mute button
Push [MUTE] button to disable sound.
Push again or other button to enable
sound again.
Page 131 of 283
![KIA Opirus 2008 1.G Owners Manual 3121
Knowing your vehicle
✦In case that you’d like to know
driving time (DT).
Please select the mode of driving time by
adjusting [TRIP] button, mode transition
function key of the concentration k KIA Opirus 2008 1.G Owners Manual 3121
Knowing your vehicle
✦In case that you’d like to know
driving time (DT).
Please select the mode of driving time by
adjusting [TRIP] button, mode transition
function key of the concentration k](/manual-img/2/2898/w960_2898-130.png)
3121
Knowing your vehicle
✦In case that you’d like to know
driving time (DT).
Please select the mode of driving time by
adjusting [TRIP] button, mode transition
function key of the concentration key.
[Mode screen of driving time]
• The figure that is displayed in the dis-play part of trip information displays
driving time until the present.
• The range displayed driving time is from 0:00 to 99:59 and driving time is
accumulated from 0:00 again when
driving time is beyond 99:59.
• The driving time is displayed by ‘---’ when ACC becomes on in off status.
• If [RESET] button of concentration key is pressed more than one second, the
driving time is initialized into 0:00 and
the driving time is accumulated again
from the current.
✦In the case that you’d like to
adjust the clock and the calen-
dar
To adjust clock & calendar, push [CLOCK
MODE] button briefly on the concentra-
tion key.
[The screen of clock]
• This is always displayed after ACC ison.
• Push [CLOCK MODE]to change mode. ‘HOUR’➟ ‘MINUTE’➟ ‘MONTH’➟‘DAY’
light up every 0.5 second.
• If [CLOCK MODE] button is pressed, time can be set up and change with the
part of hour flicker in the same time. In
this time, please set up the change of
time by using [ ], [ ] buttons of
concentration key. • In order to set up minute after seting up
hour, please press [CLOCK MODE]
button. The method to changing the
minute like that of changing the hour is
to set up by using [ ], [ ] of con-
centration key.
• When ‘DAY’ blinks, push [CLOCK MODE] to cancel time adjust mode
and time setting is finished.
• The adjustment mode will be canceled when you press the CLOCK SET but-
ton. The 'second' will start from ‘0’.
• The other buttons are not operated within ten seconds after [CLOCK
MODE] button is pressed, modified
mode is dismissed.
• If [ ], [ ] buttons of the concentra- tion key have been pressed for more
two seconds [ ], [ ] buttons
become FAST COUNT.
Flashing
Flashing
Page 176 of 283

445
Driving your vehicle
Manual operation
The heating and cooling system can be
controlled manually as well by pushing
buttons other than the AUTO button. In
this case, the system works sequentially
according to the order of buttons select-
ed.
When pressing any button except AUTO,
the functions of the buttons not selected
will be controlled automatically.
Press the AUTO button in order to con-
vert to full automatic control of the sys-
tem.
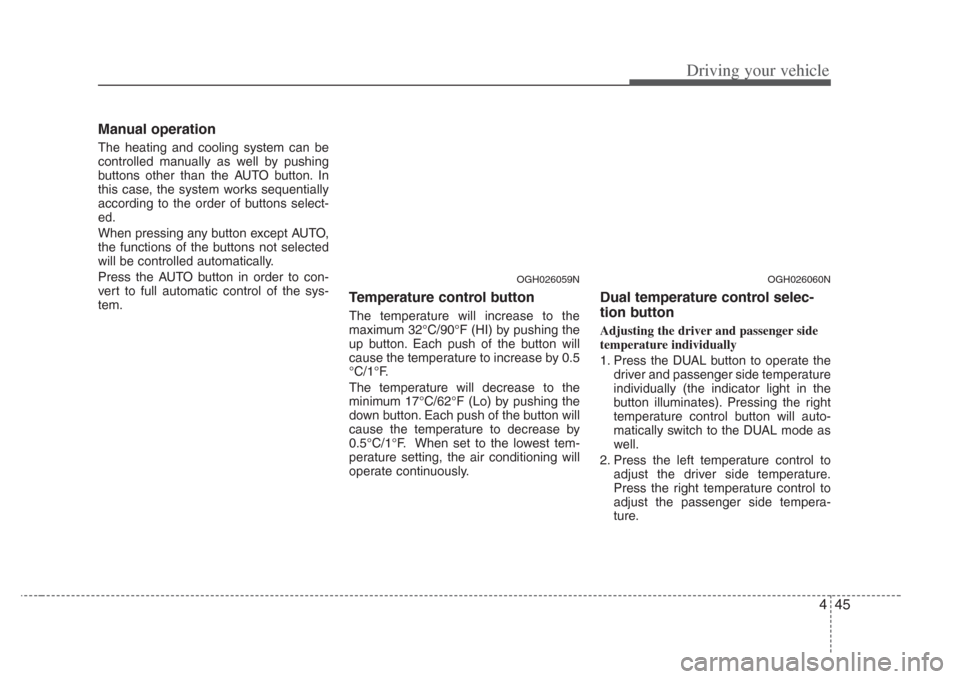
Temperature control button
The temperature will increase to the
maximum 32°C/90°F (HI) by pushing the
up button. Each push of the button will
cause the temperature to increase by 0.5
°C/1°F.
The temperature will decrease to the
minimum 17°C/62°F (Lo) by pushing the
down button. Each push of the button will
cause the temperature to decrease by
0.5°C/1°F. When set to the lowest tem-
perature setting, the air conditioning will
operate continuously.
Dual temperature control selec-
tion button
Adjusting the driver and passenger side
temperature individually
1. Press the DUAL button to operate thedriver and passenger side temperature
individually (the indicator light in the
button illuminates). Pressing the right
temperature control button will auto-
matically switch to the DUAL mode as
well.
2. Press the left temperature control to adjust the driver side temperature.
Press the right temperature control to
adjust the passenger side tempera-
ture.
OGH026060NOGH026059N
Page 209 of 283

525
Driving tips
HOMELINK® WIRELESS CONTROL SYSTEM (IF EQUIPPED)
Your new mirror comes with an integrat-
ed HomeLink Universal Transceiver,
which allows you to program the mirror to
activate your garage door(s), estate gate,
home lighting, etc. The mirror actually
learns the codes from your various exist-
ing transmitters.
MMSA5007
Homelink buttons Glare detection sensor
Indicator lightWARNING
• When programming the
HomeLink® Wireless Control
System, you may be operating a
garage door or gate operator.
Make sure that people and
objects are out of the way of the
moving door or gate to prevent
potential harm or damage.
• Do not use HomeLink with any garage door opener that lacks the
safety stop and rever se feature as
required by federal safety stan-
dards. (This includes any garage
door opener model manufactured
before April 1, 1982.) A garage
door opener which cannot detect
an object, signaling the door to
stop and rever se, does not meet
current federal safety standards.
Using a garage door opener with-
out these features increases risk
of serious injury or death. For
more information, call 1-800-355-
3515 or on the internet at
www.homelink.com.
(Continued)
(Continued)
• Retain the original tran smitter for
future programming procedures
(i.e., new vehicle purcha se). It is
also suggested that upon the sale
of the vehicle, the programmed
HomeLink button s be erased for
security purposes (follow step 1
in the “Programming” portion of
this text).
Page 210 of 283

Driving tips
265
Programming
Your vehicle may require the ignition
switch to be turned to the ACC position
for programming and/or operation of
HomeLink. It is also recommended that a
new battery be replaced in the hand-held
transmitter of the device being pro-
grammed to HomeLink for quicker train-
ing and accurate transmission of the
radio-frequency.
Follow these steps to train your
HomeLink mirror:1. When programming the buttons for the
first time, press and hold the left and
center buttons ( , ) simultan-
iously until the indicator light begins to
flash after approximately 20 seconds.
(This procedure erases the factory-set
default codes. Do Not perform this step
to program additional hand-held trans-
mitters.)
✽NOTICE
For non rolling code garage door open-
ers, follow steps 2 - 3.
For rolling code garage door openers,
follow steps 2 - 6.
For Canadian Programming, please fol-
low the Canadian Programming section.
For help with determining whether your
garage is non-rolling code or rolling
code, please refer to the garage door
openers owner’s manual or contact
HomeLink customer service at 1-800-
355-3515.
MMSA5005
Flashing
Page 211 of 283

527
Driving tips
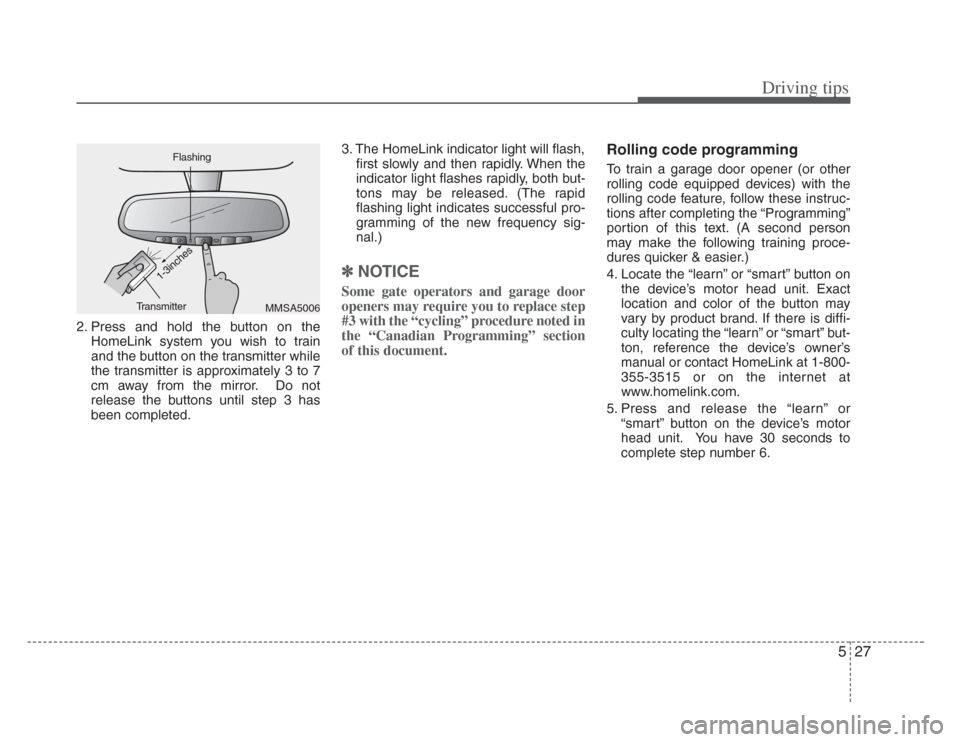
2. Press and hold the button on theHomeLink system you wish to train
and the button on the transmitter while
the transmitter is approximately 3 to 7
cm away from the mirror. Do not
release the buttons until step 3 has
been completed. 3. The HomeLink indicator light will flash,
first slowly and then rapidly. When the
indicator light flashes rapidly, both but-
tons may be released. (The rapid
flashing light indicates successful pro-
gramming of the new frequency sig-
nal.)
✽NOTICE
Some gate operators and garage door
openers may require you to replace step
#3 with the “cycling” procedure noted in
the “Canadian Programming” section
of this document.
Rolling code programming
To train a garage door opener (or other
rolling code equipped devices) with the
rolling code feature, follow these instruc-
tions after completing the “Programming”
portion of this text. (A second person
may make the following training proce-
dures quicker & easier.)
4. Locate the “learn” or “smart” button on
the device’s motor head unit. Exact
location and color of the button may
vary by product brand. If there is diffi-
culty locating the “learn” or “smart” but-
ton, reference the device’s owner’s
manual or contact HomeLink at 1-800-
355-3515 or on the internet at
www.homelink.com.
5. Press and release the “learn” or “smart” button on the device’s motor
head unit. You have 30 seconds to
complete step number 6.
MMSA5006
FlashingTransmitter
1-3inches
Page 212 of 283

Driving tips
285
6. Return to the vehicle and firmly pressand release the programmed
HomeLink button up to three times.
The rolling code equipped device
should now recognize the HomeLink
signal and activate when the
HomeLink button is pressed. The
remaining two buttons may now be
programmed if this has not previously
been done. Refer to the
“Programming” portion of this text.Operating HomeLink
To operate, simply press the pro-
grammed HomeLink button. Activation
will now occur for the trained product
(garage door, security system, entry door
lock, estate gate, or home or office light-
ing). For convenience, the hand-held
transmitter of the device may also be
used at any time. The HomeLink
Wireless Controls System (once pro-
grammed) or the original hand-held
transmitter may be used to activate the
device (e.g. garage door, entry door lock,
etc.). In the event that there are still pro-
gramming difficulties, contact HomeLink
at 1-800-355-3515 or on the internet at
www.homelink.com.
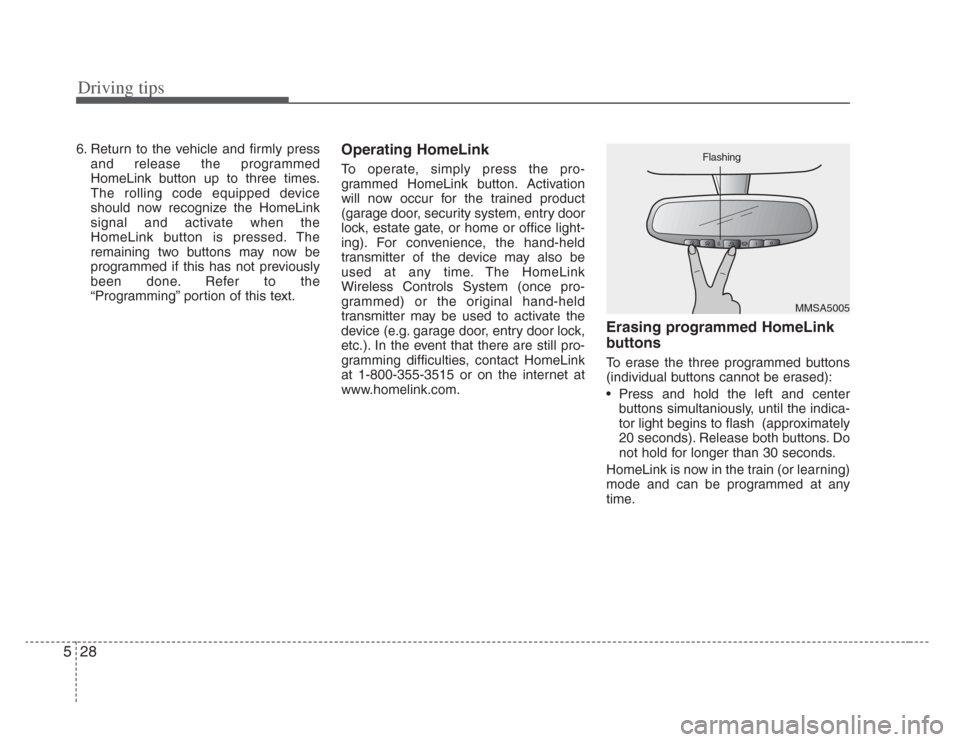
Erasing programmed HomeLink
buttons
To erase the three programmed buttons
(individual buttons cannot be erased):
• Press and hold the left and centerbuttons simultaniously, until the indica-
tor light begins to flash (approximately
20 seconds). Release both buttons. Do
not hold for longer than 30 seconds.
HomeLink is now in the train (or learning)
mode and can be programmed at any
time.
MMSA5005
Flashing