2008 KIA CERATO buttons
[x] Cancel search: buttonsPage 105 of 327
395
1 23456789
Knowing your vehicle
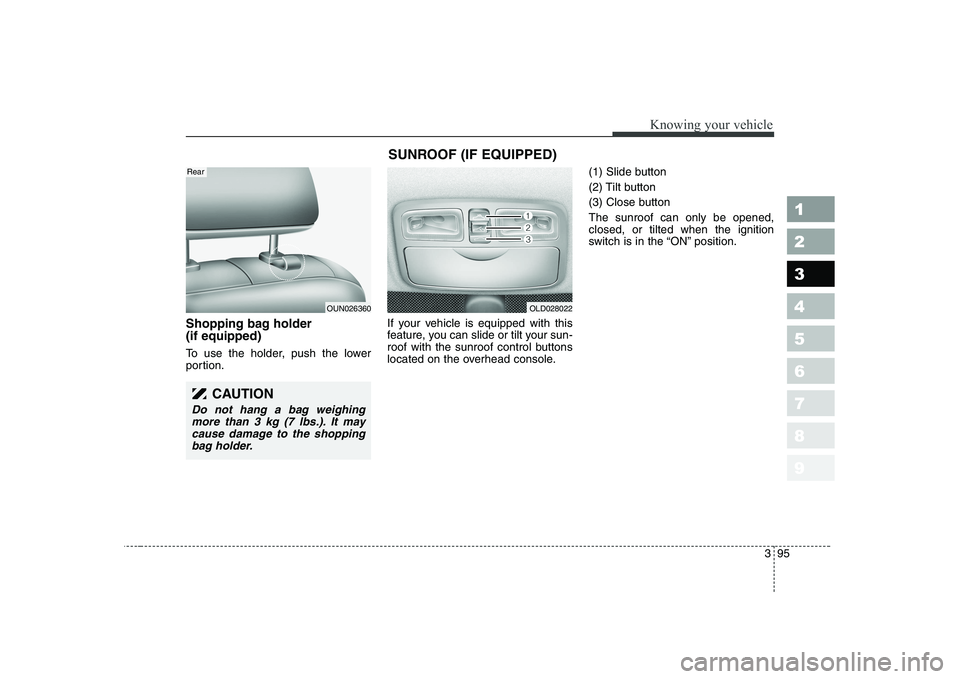
Shopping bag holder (if equipped)
To use the holder, push the lower
portion.If your vehicle is equipped with this
feature, you can slide or tilt your sun-
roof with the sunroof control buttons
located on the overhead console.(1) Slide button
(2) Tilt button
(3) Close buttonThe sunroof can only be opened, closed, or tilted when the ignition
switch is in the “ON” position.
CAUTION
Do not hang a bag weighing
more than 3 kg (7 lbs.). It may cause damage to the shoppingbag holder.
SUNROOF (IF EQUIPPED)
OUN026360OLD028022
Rear
Page 115 of 327
3105
Knowing your vehicle
1 23456789
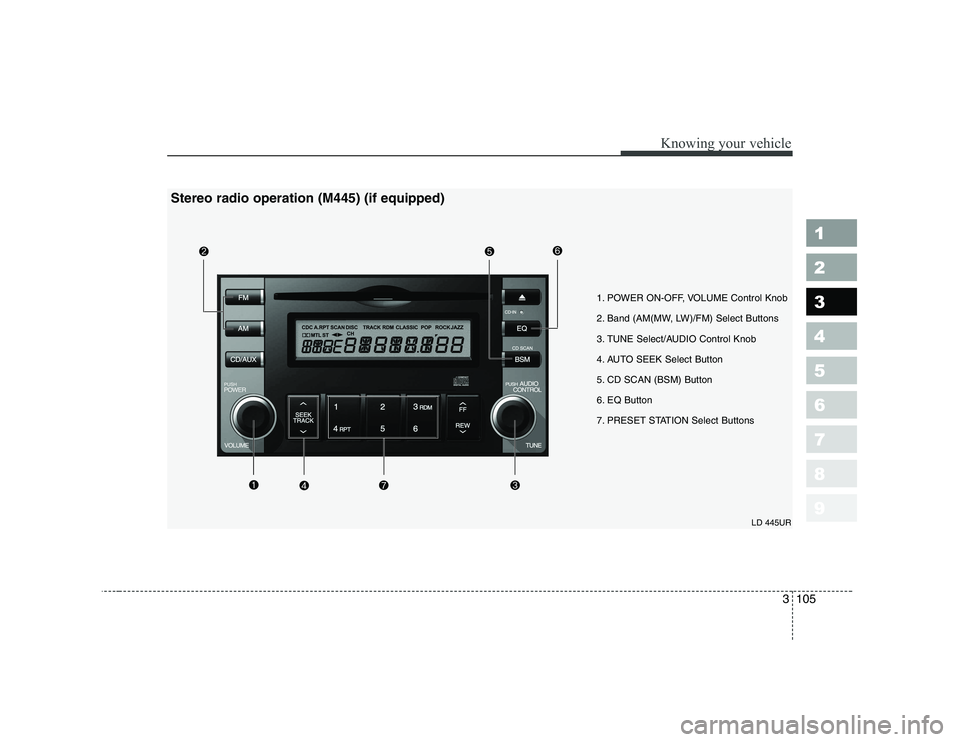
1. POWER ON-OFF, VOLUME Control Knob
2. Band (AM(MW, LW)/FM) Select Buttons
3. TUNE Select/AUDIO Control Knob
4. AUTO SEEK Select Button
5. CD SCAN (BSM) Button
6. EQ Button
7. PRESET STATION Select ButtonsLD 445UR
Stereo radio operation (M445) (if equipped)
Page 117 of 327

3107
Knowing your vehicle
1 23456789
4. AUTO SEEK Select Button(Automatic Channel Selection)
Press the AUTO SEEK select button.
When the side is pressed, theunit will automatically tune to the
next higher frequency and when the side is pressed, it will automati-
cally tune to the next lower frequen-
cy.
5. CD SCAN (BSM) Button
When the CD SCAN (BSM) button is pressed, the six channels from thehighest field intensity are selected
next and stored in memory. The sta-tions selected are stored in thesequence of frequency from the first
preset key.
6. EQ Button
Press the EQ button to select the
CLASSIC, POPS, ROCK, JAZZ and
OFF MODE for the desired tone
quality. Each press of the button
changes the display as follows;
7. PRESET STATION Select
Buttons
Six stations for AM(MW, LW), FM1
and FM2 respectively can be preset
in the electronic memory circuit.
HOW TO PRESET STATIONS
Six AM(MW, LW) and twelve FM sta-
tions may be programmed into the
memory of the radio. Then, by simply
pressing the AM(MW, LW) / FM band
select buttons and/or one of the six
station select buttons, you may recall
any of these stations instantly. To
program the stations, follow thesesteps:
Press AM(MW, LW)/FM selector toset the band for AM(MW, LW), FM1 and FM2.
Select the desired station to be stored by seek or manual tuning.
Determine the preset station select button you wish to use to accessthat station. Press and hold the station select
button for more than 0.8 seconds.
A select button indicator will show
in the display indicating which
select button you have depressed.
The frequency display will flashafter it has been stored into the
memory. You should then release
the button, and proceed to pro-
gram the next desired station. Atotal of 24 stations can be pro-
grammed by selecting one
AM(MW, LW) and two FM stations
per button.
When completed, any preset sta- tion may be recalled by selecting
AM(MW, LW), FM1 or FM2 band
and the appropriate station button.
CAUTION
• Do not place beverages close
to the audio system. The audiosystem mechanism may bedamaged if you spill them.
Do not strike or allow anything to impact the audio system,damage to the system mecha- nisms could occur.
CLASSIC ➟POPS ➟ROCK ➟JAZZ ➟OFF
Page 122 of 327
Knowing your vehicle
112
3
1 23456789
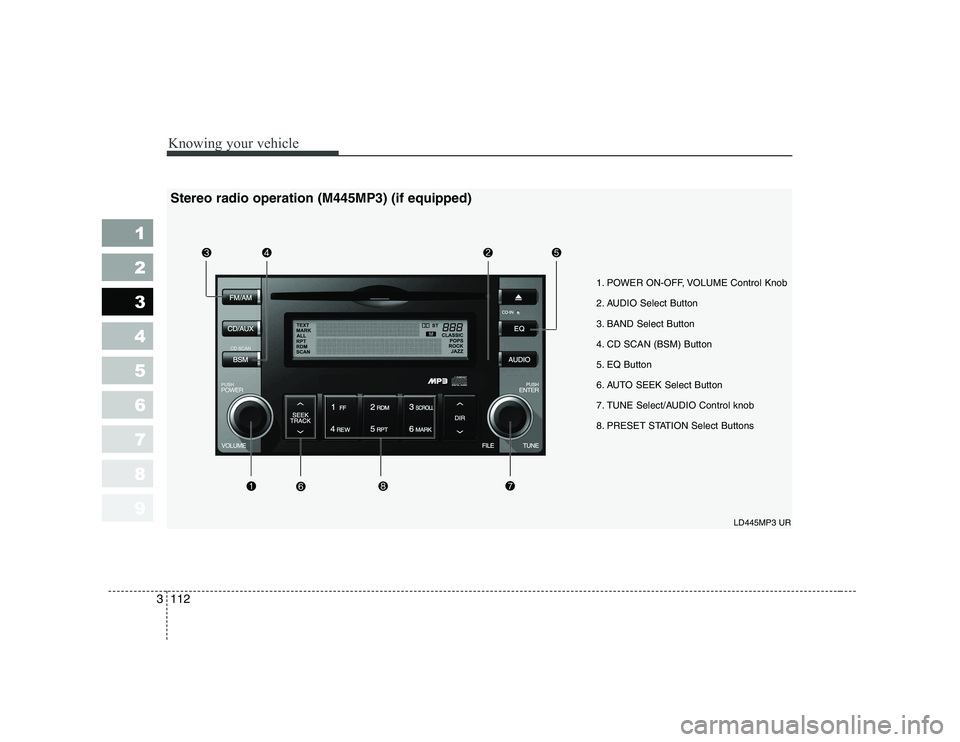
1. POWER ON-OFF, VOLUME Control Knob
2. AUDIO Select Button
3. BAND Select Button
4. CD SCAN (BSM) Button
5. EQ Button
6. AUTO SEEK Select Button
7. TUNE Select/AUDIO Control knob
8. PRESET STATION Select Buttons
LD445MP3 UR
Stereo radio operation (M445MP3) (if equipped)
Page 124 of 327

Knowing your vehicle
114
3
1 23456789
4. CD SCAN (BSM) Button
When the CD SCAN (BSM) button is pressed, the six channels from thehighest field intensity are selected
next and stored in memory. The sta-tions selected are stored in thesequence frequency from the first
preset key.
5. EQ Button
Press the EQ button to select the
CLASSIC, POPS, ROCK, JAZZ and
OFF MODE for the desired tone
quality. Each press of the button
changes the display as follows;
6. AUTO SEEK Select Button
(Automatic Channel Selection)
Press the AUTO SEEK select button.
When the side is pressed, theunit will automatically tune to the
next higher frequency and when the side is pressed, it will automati-
cally tune to the next lower frequen-
cy.
7. TUNE Select/Audio Control Knob
Rotate the knob clockwise to
increase the frequency and turn the
knob counterclockwise to reduce the
frequency.
8. PRESET STATION Select
Buttons
Six stations for AM(MW, LW), FM1
and FM2 respectively can be preset
in the electronic memory circuit.
HOW TO PRESET STATIONS
Six AM(MW, LW) and twelve FM sta-
tions may be programmed into the
memory of the radio. Then, by simply
pressing the AM(MW/LW)/FM band
select button and/or one of the six
station select buttons, you may recall
any of these stations instantly. To
program the stations, follow thesesteps:
Press AM(MW, LW)/FM selector toset the band for AM(MW, LW), FM1 and FM2.
Select the desired station to be stored by seek or manual tuning. Determine the preset station select
button you wish to use to accessthat station.
Press and hold the station select but- ton for more than 0.8 seconds. A
select button indicator will show in the
display indicating which select button
you have depressed. The frequency
display will flash after it has been
stored in to the memory. You should
then release the button, and proceed
to program the next desired station. Atotal of 24 stations can be pro-
grammed by selecting one AM(MW,
LW) and two FM stations per button.
When completed, any preset sta- tion may be recalled by selecting
AM(MW, LW), FM1 or FM2 band
and the appropriate station button.
CLASSIC ➟POPS ➟ROCK ➟JAZZ ➟OFF
CAUTION
Do not place beverages close
to the audio system. The play-back mechanism may be dam-aged if you spill them.
Do not strike or allow anything to impact the audio system,damage to the system mecha-nisms could occur.
Page 131 of 327
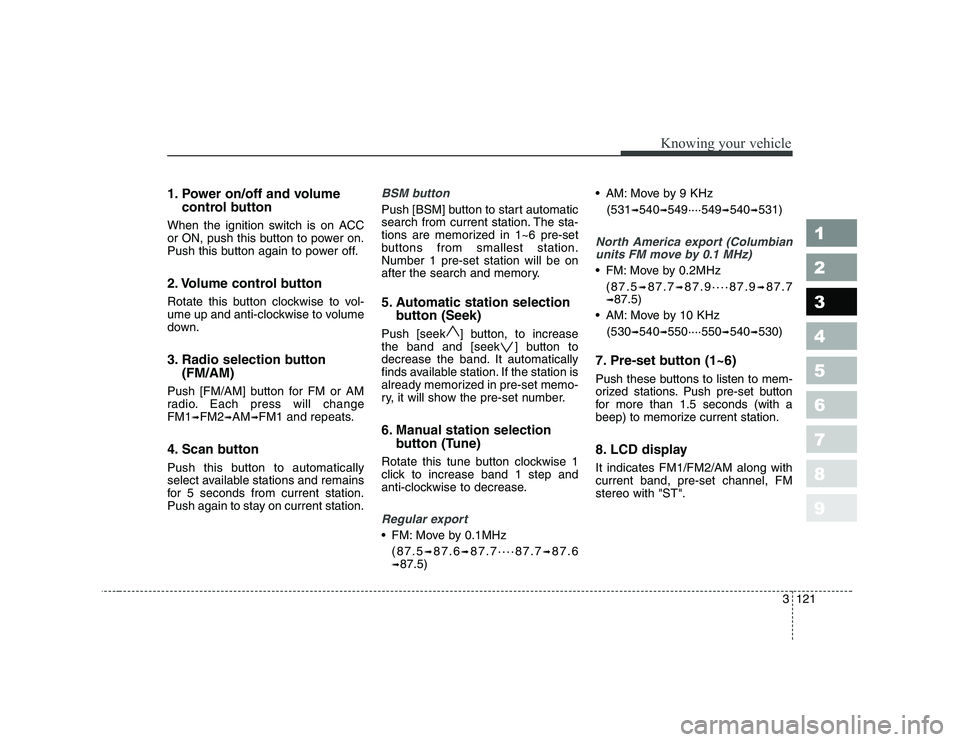
1. Power on/off and volumecontrol button
When the ignition switch is on ACC
or ON, push this button to power on.
Push this button again to power off.
2. Volume control button
Rotate this button clockwise to vol-
ume up and anti-clockwise to volume
down.
3. Radio selection button (FM/AM)
Push [FM/AM] button for FM or AM
radio. Each press will changeFM1 ➟FM2 ➟AM ➟FM1 and repeats.
4. Scan button
Push this button to automatically
select available stations and remains
for 5 seconds from current station.
Push again to stay on current station.BSM button
Push [BSM] button to start automatic
search from current station. The sta-
tions are memorized in 1~6 pre-set
buttons from smallest station.Number 1 pre-set station will be on
after the search and memory.
5. Automatic station selection button (Seek)
Push [seek ] button, to increase
the band and [seek ] button to
decrease the band. It automatically
finds available station. If the station is
already memorized in pre-set memo-
ry, it will show the pre-set number.
6. Manual station selection button (Tune)
Rotate this tune button clockwise 1
click to increase band 1 step and
anti-clockwise to decrease.
Regular export
FM: Move by 0.1MHz (87.5 ➟87.6 ➟87.7····87.7 ➟87.6
➟ 87.5) AM: Move by 9 KHz
(531 ➟540 ➟549····549 ➟540 ➟531)
North America export (Columbian
units FM move by 0.1 MHz)
FM: Move by 0.2MHz
(87.5 ➟87.7 ➟87.9····87.9 ➟87.7
➟ 87.5)
AM: Move by 10 KHz
(530 ➟
540 ➟550····550 ➟540 ➟530)
7. Pre-set button (1~6)
Push these buttons to listen to mem-
orized stations. Push pre-set button
for more than 1.5 seconds (with a
beep) to memorize current station.
8. LCD display It indicates FM1/FM2/AM along with current band, pre-set channel, FMstereo with "ST".
3121
Knowing your vehicle
1 23456789
Page 135 of 327
![KIA CERATO 2008 Owners Manual 6. CD change button
Push [DISC ] button to change to
next CD (From CD 1 to CD 2).
Push [DISC ] button to change to
previous CD (From CD 2 to CD 1). Ifchanger is not fully load, the
changes will be KIA CERATO 2008 Owners Manual 6. CD change button
Push [DISC ] button to change to
next CD (From CD 1 to CD 2).
Push [DISC ] button to change to
previous CD (From CD 2 to CD 1). Ifchanger is not fully load, the
changes will be](/manual-img/2/57951/w960_57951-134.png)
6. CD change button
Push [DISC ] button to change to
next CD (From CD 1 to CD 2).
Push [DISC ] button to change to
previous CD (From CD 2 to CD 1). Ifchanger is not fully load, the
changes will be next available CD.
7. Fast Backward button
During CD playback, push [REW]
button to fast backward. For first 5seconds 5X and 15X after 5 sec-
onds. While the button is pressed
sound is reduced to 12dB.
8. Fast Forward button
During CD playback, push [FF] but-
ton to fast forward. For first 5 sec-
onds 5X and 15X after 5 seconds.
While the button is pressed sound is
reduced to 12dB.
9. Previous track automaticselection button
Push [TRACK ] button to go to
beginning of currently playing track.
Push again to move to beginning of
previous track. 10. Next track automatic selec-
tion button
Push [SEEK ] button to go to move
to beginning of next track.
11. Repeat button
Push [RPT] button to repeat current
track. Push again to disable.
12. SCAN button
Push [SCAN] button to listen each
track for 10 seconds. Push again to
disable.
13. Book Mark button
This is selecting desired tracks.
Select desired tracks and push
[MARK] button for more than 2 sec-
onds. [M] symbol will be indicated
and push for within 1 second to play
[M] selected tracks.
14. RDM button
This button randomly selects track.✽✽ NOTICE
Using CD-R/CD-RW, it may not be played according to CD manufactur-
er, or how it was created. If it does not
play, please avoid using it. It could
cause problems on the system.
15. File search knob
Turn knob left and right to change
track. Push within 5 seconds to play
selected track. It will return to cur-
rently playing track number after 5
seconds.
16. Scroll button
If the tile is too long for MP3/WMA
files, push [SCROLL] button to indi-
cate on LCD display screen.
17. Directory search button
For MP3/WMA files, if there are more
than 2 directories in a CD, push
[Directory Search] buttons to search.
Select desired directory and use
"File Search knob" to search file.Push "File Search knob" within 5
seconds otherwise it will go back to
current playing track.
3125
Knowing your vehicle
1 23456789
Page 201 of 327
Driving your vehicle
66
4
1 23456789
Manual operation The heating and cooling system can
be controlled manually as well by
pushing buttons other than the AUTO
button. In this case, the system
works sequentially according to the
order of buttons selected.
When pressing any button except
AUTO button while automatic opera-
tion, the functions of the buttons notselected will be controlled automati-
cally.
Press the AUTO button in order to
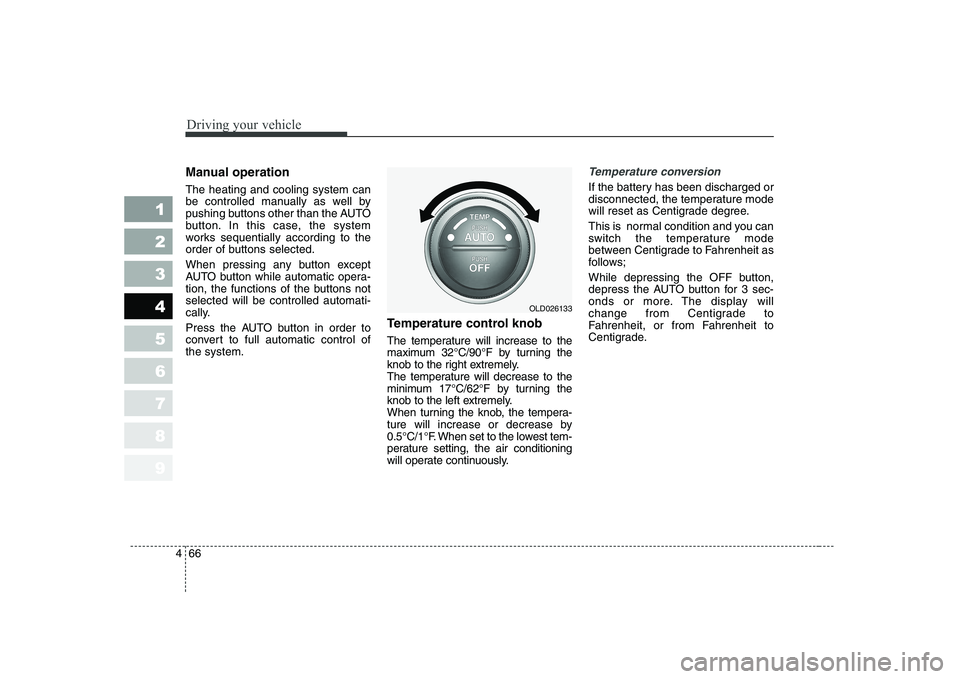
convert to full automatic control ofthe system. Temperature control knob
The temperature will increase to the
maximum 32°C/90°F by turning the
knob to the right extremely.
The temperature will decrease to the
minimum 17°C/62°F by turning the
knob to the left extremely.
When turning the knob, the tempera-
ture will increase or decrease by
0.5°C/1°F. When set to the lowest tem-
perature setting, the air conditioning
will operate continuously.Temperature conversion
If the battery has been discharged or
disconnected, the temperature mode
will reset as Centigrade degree.
This is normal condition and you can
switch the temperature mode
between Centigrade to Fahrenheit as
follows;
While depressing the OFF button,
depress the AUTO button for 3 sec-
onds or more. The display will
change from Centigrade to
Fahrenheit, or from Fahrenheit to
Centigrade.
OLD026133