Page 419 of 490

Fluid Level Check (4.7L and 5.7L Engine)
Check the fluid level while the transmission is at normal
operating temperature. This occurs after at least 15 miles
(25 km) of driving. At normal operating temperature the
fluid cannot be held comfortably between the fingertips.
To check the automatic transmission fluid level properly,
the following procedure must be used:
1. Operate the engine at idle speed and normal operating
temperature.
2. The vehicle must be on level ground.
3. Fully apply the parking brake and press the brake
pedal.
4. Place the gear selector momentarily in each gear
position ending with the lever in P (Park).
5. Remove the dipstick, wipe it clean and reinsert it until
seated.6. Remove the dipstick again and note the fluid level on
both sides. The fluid level should be between the ªHOTº
(upper) reference holes on the dipstick at normal operat-
ing temperature. The fluid level is only valid if there is a
solid coating of oil is seen on both sides of the dipstick. If
the fluid is low, add as required into the dipstick tube.Do
not overfill.After adding any quantity of oil through the
oil fill tube, wait a minimum of two (2) minutes for the oil
to fully drain into the transmission before rechecking the
fluid level.
NOTE:If it is necessary to check the transmissionbelow
the operating temperature, the fluid level should be
between the two ªCOLDº (lower) holes on the dipstick
with the fluid at approximately 70ÉF (21ÉC) (room tem-
perature). If the fluid level is correctly established at
room temperature, it should be between the ªHOTº
(upper) reference holes when the transmission reaches
180ÉF (82ÉC). Remember it is best to check the level at the
normal operating temperature.
MAINTAINING YOUR VEHICLE 419
7
Page 420 of 490
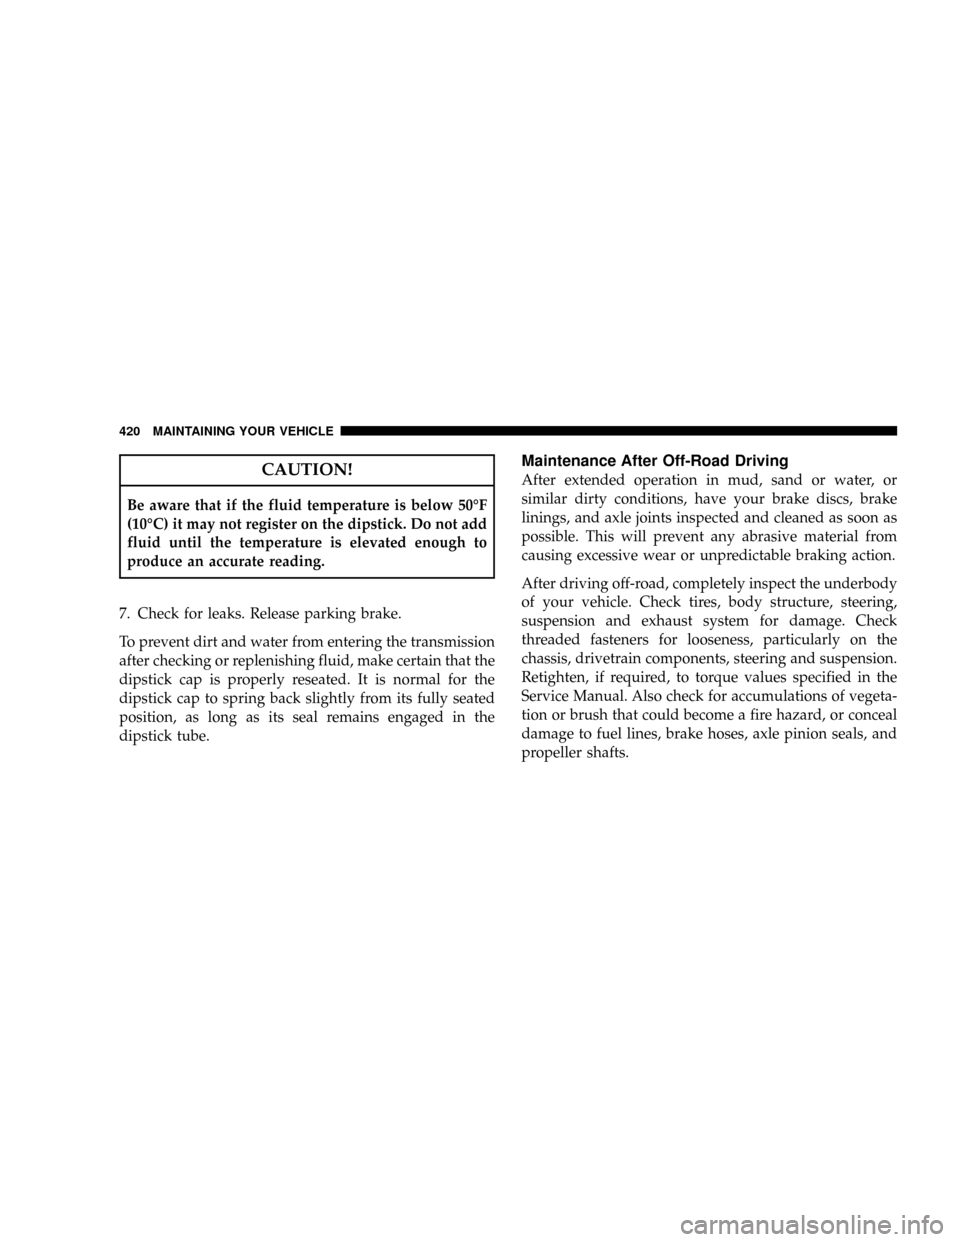
CAUTION!
Be aware that if the fluid temperature is below 50ÉF
(10ÉC) it may not register on the dipstick. Do not add
fluid until the temperature is elevated enough to
produce an accurate reading.
7. Check for leaks. Release parking brake.
To prevent dirt and water from entering the transmission
after checking or replenishing fluid, make certain that the
dipstick cap is properly reseated. It is normal for the
dipstick cap to spring back slightly from its fully seated
position, as long as its seal remains engaged in the
dipstick tube.
Maintenance After Off-Road Driving
After extended operation in mud, sand or water, or
similar dirty conditions, have your brake discs, brake
linings, and axle joints inspected and cleaned as soon as
possible. This will prevent any abrasive material from
causing excessive wear or unpredictable braking action.
After driving off-road, completely inspect the underbody
of your vehicle. Check tires, body structure, steering,
suspension and exhaust system for damage. Check
threaded fasteners for looseness, particularly on the
chassis, drivetrain components, steering and suspension.
Retighten, if required, to torque values specified in the
Service Manual. Also check for accumulations of vegeta-
tion or brush that could become a fire hazard, or conceal
damage to fuel lines, brake hoses, axle pinion seals, and
propeller shafts.
420 MAINTAINING YOUR VEHICLE
Page 428 of 490
Cav-
ityCartridge
FuseMini Fuse Description
13 10 Amp
RedAutowipe (R/A)
14 20 Amp
YellowCigar Ltr (R/A)
15 10 Amp
RedTire Pressure Trans-
ducers (R/O)
16 10 Amp
RedSteering Control Mod-
ule (SCM), Diag. Con-
nector, Cluster (B+)
17 15 Amp
BlueFlipper Glass (B+)
19 Spare
(R/S)
20 10 Amp
RedSentry Key Remote
Entry Module
(SKREEM), Cluster
(R/S)Cav-
ityCartridge
FuseMini Fuse Description
21 Spare
(Acc De-
lay)
22 15 Amp
BlueRear Wiper (B+)
24 10 Amp
RedPower Distribution
Center (PDC) Relays,
Final Drive Control
Module (FDCM),
Front Control Module
(FCM) (R/S), A580
(R/S)
25 10 Amp
RedShifter Assy (BTSI),
Trans. Case Switch,
ESP/ABS, Brake Supp
Rly Coil (R/S)
428 MAINTAINING YOUR VEHICLE
Page 430 of 490
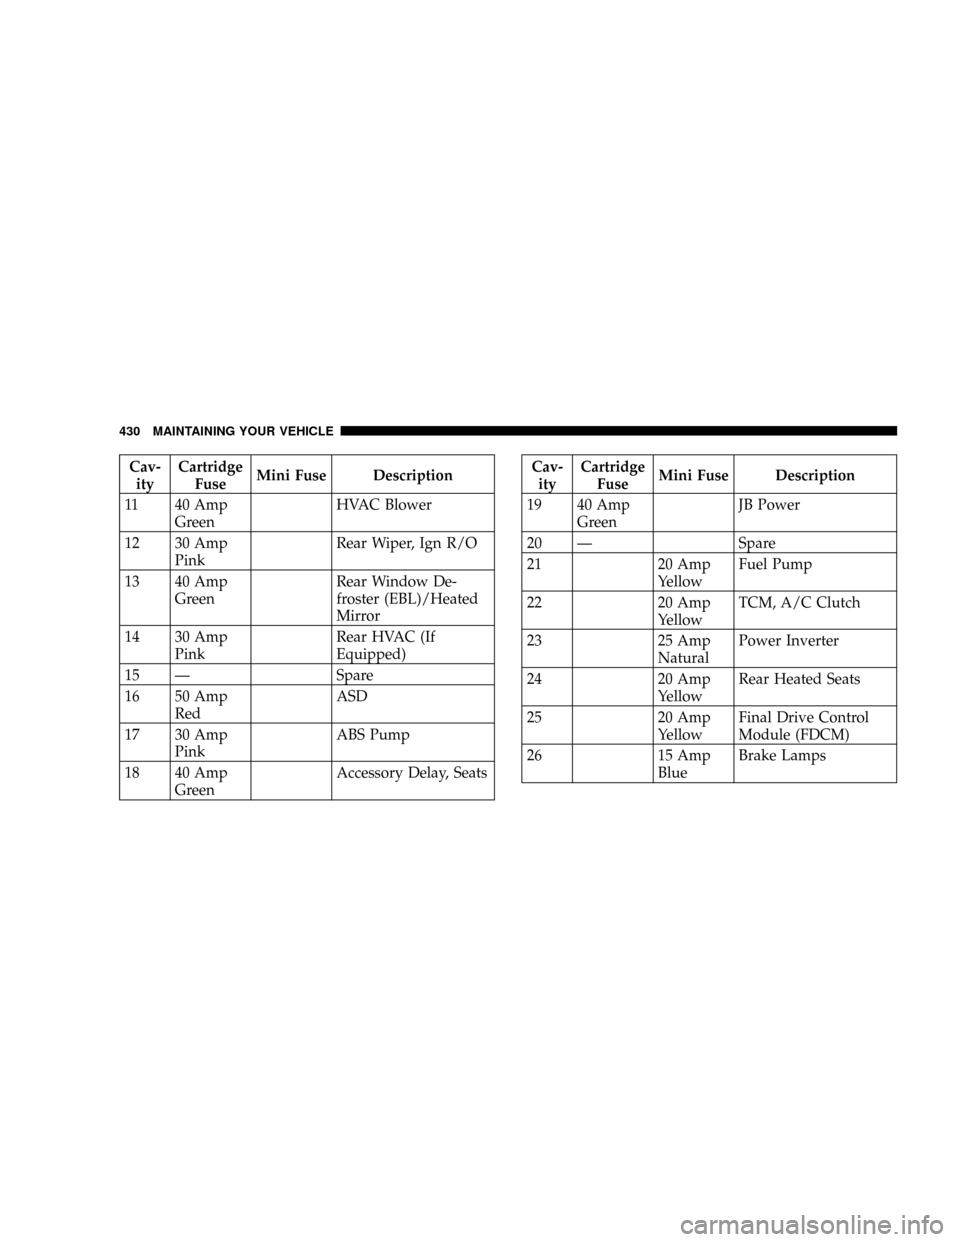
Cav-
ityCartridge
FuseMini Fuse Description
11 40 Amp
GreenHVAC Blower
12 30 Amp
PinkRear Wiper, Ign R/O
13 40 Amp
GreenRear Window De-
froster (EBL)/Heated
Mirror
14 30 Amp
PinkRear HVAC (If
Equipped)
15 Ð Spare
16 50 Amp
RedASD
17 30 Amp
PinkABS Pump
18 40 Amp
GreenAccessory Delay, SeatsCav-
ityCartridge
FuseMini Fuse Description
19 40 Amp
GreenJB Power
20 Ð Spare
21 20 Amp
YellowFuel Pump
22 20 Amp
YellowTCM, A/C Clutch
23 25 Amp
NaturalPower Inverter
24 20 Amp
YellowRear Heated Seats
25 20 Amp
YellowFinal Drive Control
Module (FDCM)
26 15 Amp
BlueBrake Lamps
430 MAINTAINING YOUR VEHICLE
Page 442 of 490

Component Fluid, Lubricant, or Genuine Part
Fuel Selection (5.7L Engines) 87 Octane Acceptable - 89 Octane Recommended
Fuel Selection (3.0L Diesel Engines) Use only the best quality fuel with a calculated Cetane Index of 42±46.
In addition, the manufacturer recommends using diesel fuel with a
sulfur content ofless than or equal to 15 ppm.
Chassis
Component Fluid, Lubricant, or Genuine Part
Automatic Transmission MopartATF+4 Automatic Transmission Fluid
Transfer Case (NV140 Single Speed Only) MopartATF+4 Automatic Transmission Fluid
Transfer Case (NV245 Two Speed Only) MopartNV 247/245 Transfer Case Lubricant
Axle Differential (Front-Rear) MopartSynthetic Gear & Axle Lubricant SAE 75W-140 (API-GL5)
or equivalent with friction modifier additive.
Brake Master Cylinder MopartDOT 3 Brake Fluid, SAE J1703 should be used. If DOT 3,
SAE J1703 brake fluid is not available, then DOT 4 is acceptable.
Use only recommended brake fluids.
Power Steering Reservoir This system requires the use of MopartHydraulic System Power
Steering Fluid (P/N 05142893AA) or equivalent, which meets
DaimlerChrysler Material Standard MS-10838.
442 MAINTAINING YOUR VEHICLE
Page 445 of 490

²Change your engine oil more often if you drive your
vehicle off-road for an extended period of time.
²Under no circumstances should oil change intervals
exceed 6,000 miles (10,000 km) or 6 months, whichever
comes first.
Your dealer will reset the oil change indicator message
after completing the scheduled oil change. If this sched-
uled oil change is performed by someone other than your
dealer the message can be reset by referring to the steps
described under ªOil Change Requiredº in ªUse Factory
Settingsº of the EVIC section in this manual.
At Each Stop for Fuel
²Check the engine oil level about 5 minutes after a fully
warmed engine is shut off. Checking the oil level while
the vehicle is on level ground will improve the accu-
racy of the oil level reading. Add oil only when the
level is at or below the ADD or MIN mark.
²Check the windshield washer solvent and add if
required.
Once a Month
²Check tire pressure and look for unusual wear or
damage.
²Inspect the battery and clean and tighten the terminals
as required.
²Check the fluid levels of coolant reservoir, brake
master cylinder, power steering and transmission and
add as needed.
²Check all lights and other electrical items for correct
operation.
MAINTENANCE SCHEDULES 445
8
M
A
I
N
T
E
N
A
N
C
E
S
C
H
E
D
U
L
E
S
Page 446 of 490
At Each Oil Change
²Change the engine oil filter.
²Inspect the brake hoses and lines.
CAUTION!
Failure to perform the required maintenance items
may result in damage to the vehicle.
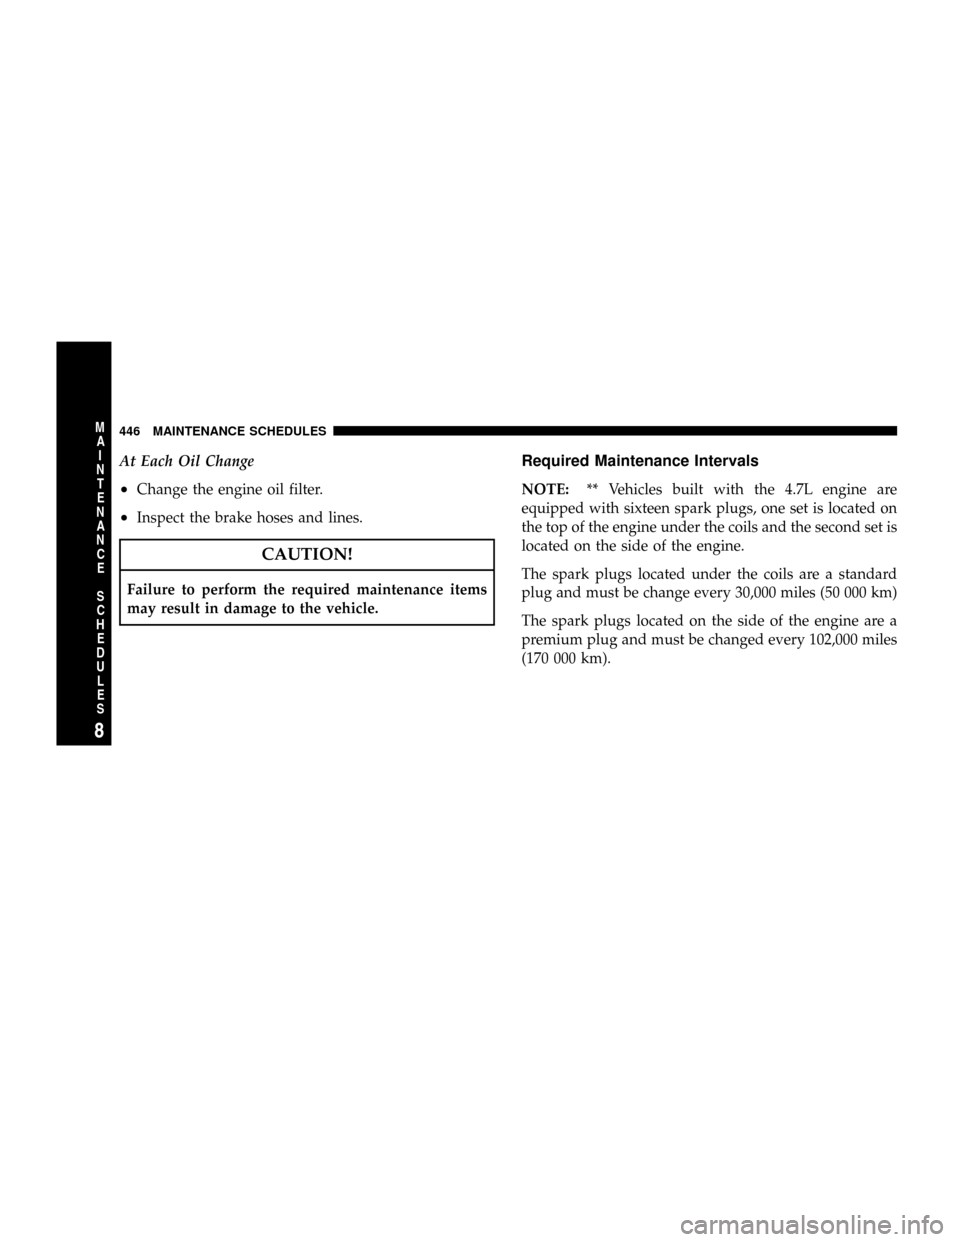
Required Maintenance Intervals
NOTE:** Vehicles built with the 4.7L engine are
equipped with sixteen spark plugs, one set is located on
the top of the engine under the coils and the second set is
located on the side of the engine.
The spark plugs located under the coils are a standard
plug and must be change every 30,000 miles (50 000 km)
The spark plugs located on the side of the engine are a
premium plug and must be changed every 102,000 miles
(170 000 km).
446 MAINTENANCE SCHEDULES
8
M
A
I
N
T
E
N
A
N
C
E
S
C
H
E
D
U
L
E
S
Page 447 of 490
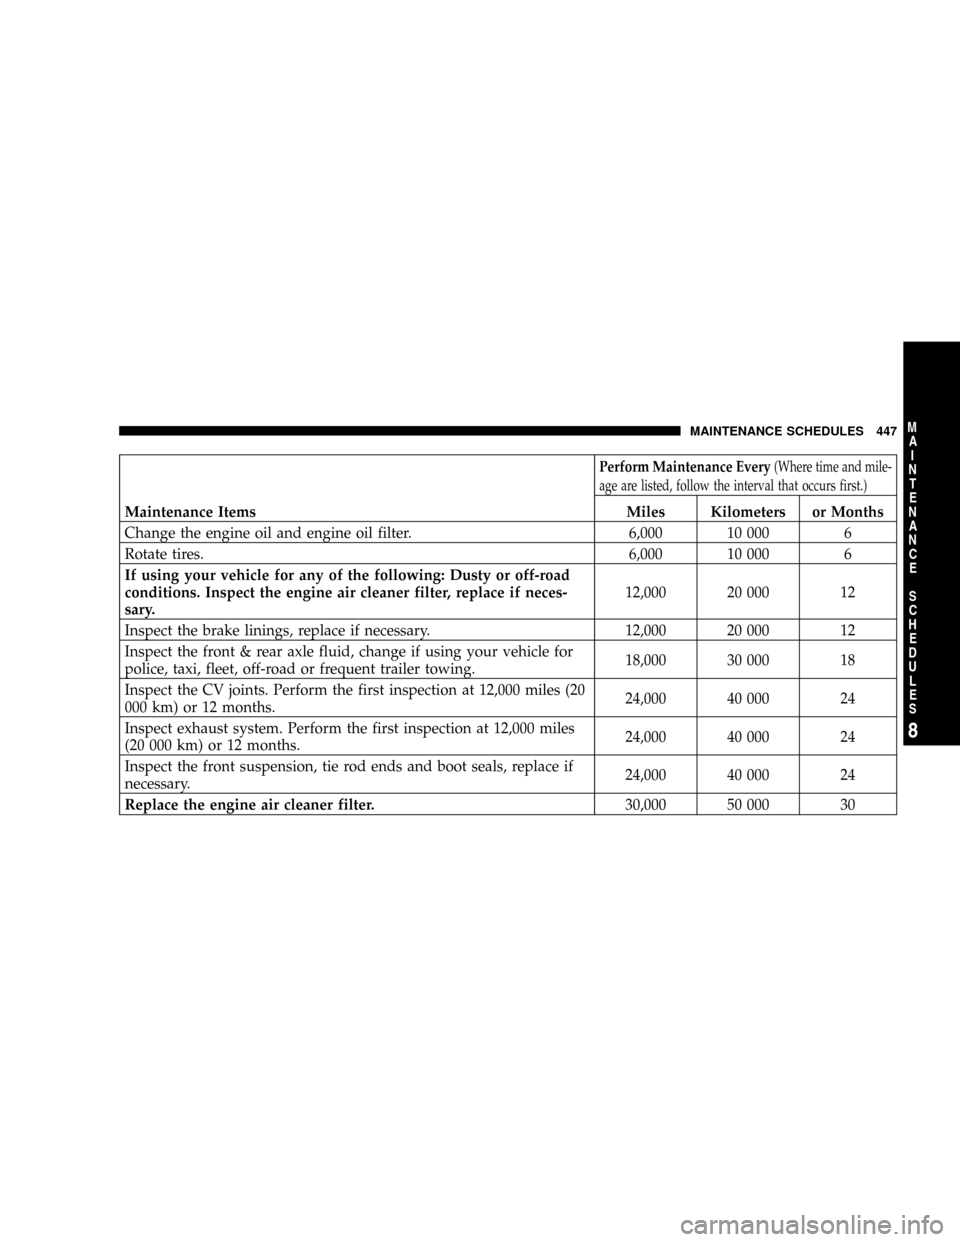
Perform Maintenance Every(Where time and mile-
age are listed, follow the interval that occurs first.)
Maintenance Items Miles Kilometers or Months
Change the engine oil and engine oil filter. 6,000 10 000 6
Rotate tires. 6,000 10 000 6
If using your vehicle for any of the following: Dusty or off-road
conditions. Inspect the engine air cleaner filter, replace if neces-
sary.12,000 20 000 12
Inspect the brake linings, replace if necessary. 12,000 20 000 12
Inspect the front & rear axle fluid, change if using your vehicle for
police, taxi, fleet, off-road or frequent trailer towing.18,000 30 000 18
Inspect the CV joints. Perform the first inspection at 12,000 miles (20
000 km) or 12 months.24,000 40 000 24
Inspect exhaust system. Perform the first inspection at 12,000 miles
(20 000 km) or 12 months.24,000 40 000 24
Inspect the front suspension, tie rod ends and boot seals, replace if
necessary.24,000 40 000 24
Replace the engine air cleaner filter.30,000 50 000 30
MAINTENANCE SCHEDULES 447
8
M
A
I
N
T
E
N
A
N
C
E
S
C
H
E
D
U
L
E
S