2008 INFINITI QX56 lock
[x] Cancel search: lockPage 2390 of 4083

INTERIOR ROOM LAMP CONTROL SYSTEMINL-7
< FUNCTION DIAGNOSIS >
C
DE
F
G H
I
J
K
M A
B
INL
N
O P
INTERIOR LAMP BATTERY SAVER CONTROL
If an interior lamp is left ON and does not turn OFF even when the doors are closed, the BCM turns off power
to the interior lamps automatically to save the batte ry 30 minutes after the ignition switch is turned OFF.
The BCM controls power and ground to all interior lamps.
After the battery saver system turns the la mps OFF, the lamps will illuminate again when
• a signal is received from an Intelligent Key or main power window and door lock/unlock switch, or when the
front door LH lock assembly (key cylinder switch) is locked or unlocked
• a door is opened or closed
• the Intelligent Key is removed from or inserted into the ignition switch.
The Interior lamp battery saver control time peri od can be changed with the function setting of CONSULT-III.
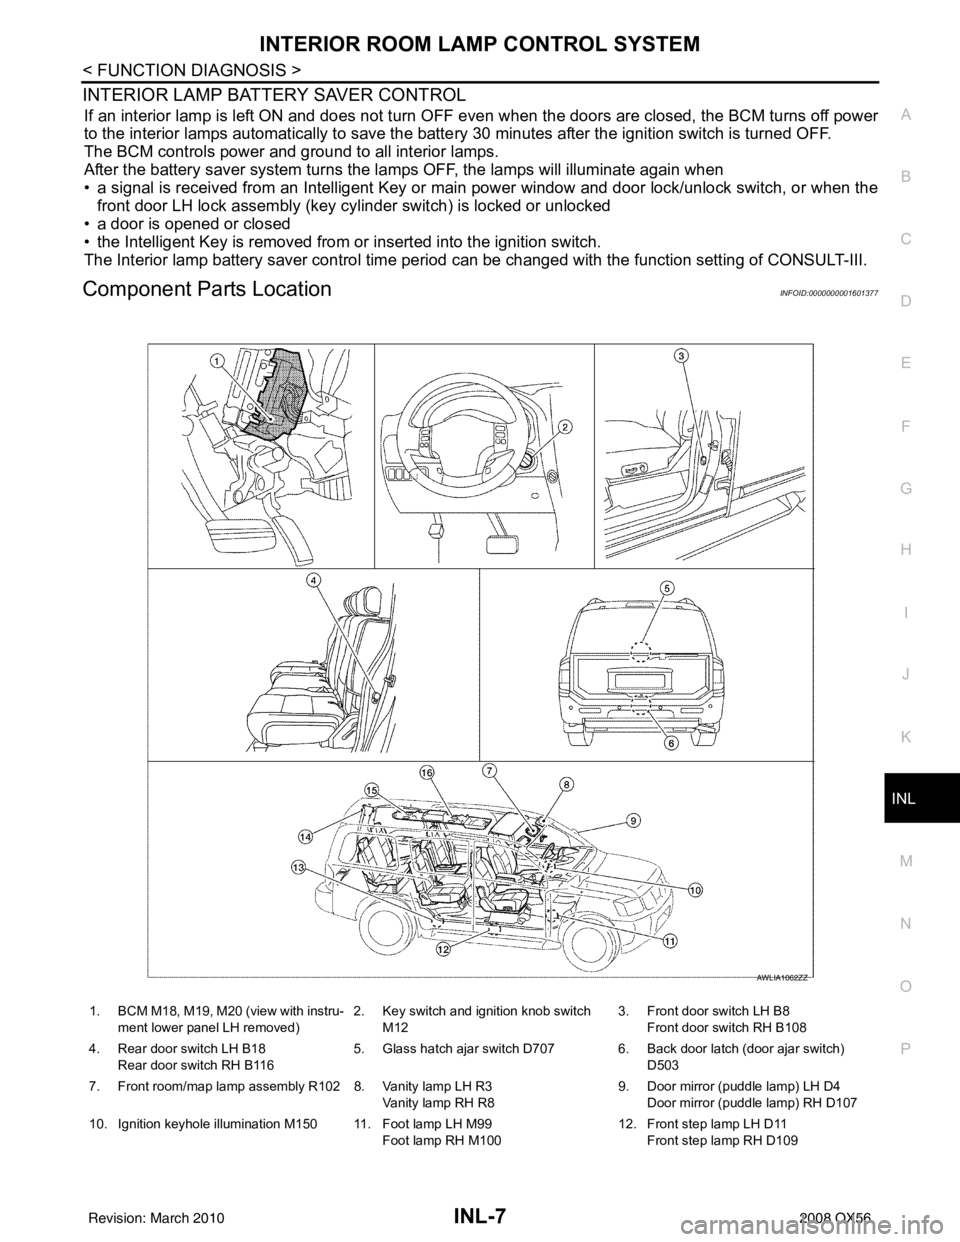
Component Parts LocationINFOID:0000000001601377
1. BCM M18, M19, M20 (view with instru-
ment lower panel LH removed) 2. Key switch and ignition knob switch
M12 3. Front door switch LH B8
Front door switch RH B108
4. Rear door switch LH B18 Rear door switch RH B116 5. Glass hatch ajar switch D707 6. Back door latch (door ajar switch)
D503
7. Front room/map lamp assembly R102 8. Vanity lamp LH R3 Vanity lamp RH R89. Door mirror (puddle lamp) LH D4
Door mirror (puddle lamp) RH D107
10. Ignition keyhole illumination M150 11. Foot lamp LH M99 Foot lamp RH M10012. Front step lamp LH D11
Front step lamp RH D109
AWLIA1062ZZ
Revision: March 2010 2008 QX56
Page 2391 of 4083

INL-8
< FUNCTION DIAGNOSIS >
INTERIOR ROOM LAMP CONTROL SYSTEM
Component Description
INFOID:0000000001601378
13. Rear step lamp LH D206 Rear step lamp RH D306 14. Cargo lamp B153 15. Personal lamp 3rd row R205
16. Personal lamp 2nd row R203
Part name Description
BCM Provides power and ground and controls timer functions for the
interior room lamps, step lamps and cargo lamp.
Key switch and ignition knob switch Provides key in ignition status to the BCM.
Door switches Provides door OPEN/CLOSED status to the BCM.
Glass hatch switch Provides glass hatch OPEN/CLOSED status to the BCM.
Back door latch Provides back door OPEN/CLOSED status to the BCM.
Power window and door lock/unlock switch RH Provides door lock/unlock position switch RH status to the BCM.
Main power window and door lock/unlock switch [front door lock
assembly LH (key cylinder switch)]. Provides door lock/unlock position switch LH status to the BCM.
Revision: March 2010
2008 QX56
Page 2395 of 4083

INL-12
< FUNCTION DIAGNOSIS >
DIAGNOSIS SYSTEM (BCM)
DATA MONITOR
ACTIVE TEST
ROOM LAMP OFF TIME SETMODE 1 0.5 sec.
Sets the interior room lamp gradual dimming time.
MODE 2 1 sec.
MODE 3 2 sec.
MODE 4 3 sec.
MODE 5 4 sec.
MODE 6 5 sec.
MODE 7 0 sec.
Service item
Setting item Setting
Monitor item
[Unit] Description
IGN ON SW
[ON/OFF] The switch status input from ignition switch
KEY ON SW
[ON/OFF] Key switch status input from key slot
DOOR SW-DR
[ON/OFF] The switch status input from front door switch LH
DOOR SW-AS
[ON/OFF] The switch status input from front door switch RH
DOOR SW-RR
[ON/OFF] The switch status input from rear door switch RH
DOOR SW- RL
[ON/OFF] The switch status input from rear door switch LH
BACK DOOR SW
[ON/OFF] The switch status input from back door switch
KEY CYL LK-SW
[ON/OFF] Lock switch status received from key cylinder switch by power window serial link
KEY CYL UN-SW
[ON/OFF] Unlock switch status received from key cylinder switch by power window serial link
CDL LOCK SW
[ON/OFF] Lock switch status received from door lock/unlock switch by power window serial link
CDL UNLOCK SW
[ON/OFF] Unlock switch status received from door lock/unlock switch by power window serial
link
I-KEY LOCK
[ON/OFF] Lock signal status received from remote keyless entry receiver
I-KEY UNLOCK
[ON/OFF] Unlock signal status received from remote keyless entry receiver
Test item
Operation Description
INT LAMP ON
Outputs the interior room lamp control signal to turn the front room/map lamp, per-
sonal lamps (Map lamp switch is in DOOR position) and puddle lamps ON.
OFF Stops the interior room lamp control signal to turn the front room/map lamp, personal
lamps (Map lamp switch is in DOOR position) and puddle lamps OFF.
IGN ILLUM ON
Outputs the ignition keyhole illumination signal to turn the ignition keyhole illumination
ON.
OFF Stops the ignition keyhole illumination signal to turn the ignition keyhole illumination
OFF.
STEP LAMP TEST ON Outputs the step lamp control signal to turn the step lamps and foot lamps ON.
OFF Stops the step lamp control signal to turn the step lamps and foot lamps OFF.
Revision: March 2010 2008 QX56
Page 2396 of 4083

DIAGNOSIS SYSTEM (BCM)INL-13
< FUNCTION DIAGNOSIS >
C
DE
F
G H
I
J
K
M A
B
INL
N
O P
BATTERY SAVER
BATTERY SAVER : CONSULT-III FunctionINFOID:0000000001601385
WORK SUPPORT
DATA MONITOR
ACTIVE TEST
LUGGAGE LAMP TEST ON Outputs the cargo lamp control signal to turn cargo lamp ON.
OFF Stops the cargo lamp control signal to turn cargo lamp OFF.
Test item
Operation Description
Service itemSetting item Setting
ROOM LAMP TIMER SET MODE 1
(ON)
Interior room lamp timer activates with synchronizing all doors.
MODE 2
(OFF) Interior room lamp timer activates with synchronizing the front door LH
only.
Monitor item
[Unit] Description
IGN ON SW
[ON/OFF] The switch status input from ignition switch
KEY ON SW
[ON/OFF] Key switch status input from key slot
DOOR SW-DR
[ON/OFF] The switch status input from front door switch LH
DOOR SW-AS
[ON/OFF] The switch status input from front door switch RH
DOOR SW-RR
[ON/OFF] The switch status input from rear door switch RH
DOOR SW- RL
[ON/OFF] The switch status input from rear door switch LH
BACK DOOR SW
[ON/OFF] The switch status input from back door switch
KEY CYL LK-SW
[ON/OFF] Lock switch status received from key cylinder switch by power window serial link
KEY CYL UN-SW
[ON/OFF] Unlock switch status received from key cylinder switch by power window serial link
CDL LOCK SW
[ON/OFF] Lock switch status received from door lock/unlock switch by power window serial link
CDL UNLOCK SW
[ON/OFF] Unlock switch status received from door lock/unlock switch by power window serial
link
I-KEY LOCK
[ON/OFF] Lock signal status received from remote keyless entry receiver
I-KEY UNLOCK
[ON/OFF] Unlock signal status received from remote keyless entry receiver
Test item
Operation Description
BATTERY SAVER ON Outputs the battery saver output/power supply to turn the interior lamps ON.
OFF Stops the battery saver output/power supply to turn the interior lamps OFF.
Revision: March 2010 2008 QX56
Page 2440 of 4083

PRECAUTIONSINL-57
< PRECAUTION >
C
DE
F
G H
I
J
K
M A
B
INL
N
O P
PRECAUTION
PRECAUTIONS
Precaution for Supplemental Restraint System (SRS) "AIR BAG" and "SEAT BELT
PRE-TENSIONER"
INFOID:0000000004900917
The Supplemental Restraint System such as “AIR BAG” and “SEAT BELT PRE-TENSIONER”, used along
with a front seat belt, helps to reduce the risk or severi ty of injury to the driver and front passenger for certain
types of collision. This system includes seat belt switch inputs and dual stage front air bag modules. The SRS
system uses the seat belt switches to determine the front air bag deployment, and may only deploy one front
air bag, depending on the severity of a collision and w hether the front occupants are belted or unbelted.
Information necessary to service the system safely is included in the SR and SB section of this Service Man-
ual.
WARNING:
• To avoid rendering the SRS inoper ative, which could increase the risk of personal injury or death in
the event of a collision which would result in air bag inflation, all maintenance must be performed by
an authorized NISSAN/INFINITI dealer.
• Improper maintenance, including in correct removal and installation of the SRS, can lead to personal
injury caused by unintentional act ivation of the system. For removal of Spiral Cable and Air Bag
Module, see the SR section.
• Do not use electrical test equipm ent on any circuit related to the SRS unless instructed to in this
Service Manual. SRS wiring harnesses can be identi fied by yellow and/or orange harnesses or har-
ness connectors.
PRECAUTIONS WHEN USING POWER TOOLS (AIR OR ELECTRIC) AND HAMMERS
WARNING:
• When working near the Airbag Diagnosis Sensor Un it or other Airbag System sensors with the Igni-
tion ON or engine running, DO NOT use air or el ectric power tools or strike near the sensor(s) with a
hammer. Heavy vibration could activate the sensor( s) and deploy the air bag(s), possibly causing
serious injury.
• When using air or electric power tools or hammers, always switch the Ignition OFF, disconnect the battery, and wait at least 3 minutes before performing any service.
Precaution Necessary for Steering Wheel Rotation After Battery Disconnect
INFOID:0000000004900918
NOTE:
• This Procedure is applied only to models with Intelligent Key system and NATS (NISSAN ANTI-THEFT SYS-
TEM).
• Remove and install all control units after disconnecti ng both battery cables with the ignition knob in the
″ LOCK ″ position.
• Always use CONSULT-III to perform self-diagnosis as a part of each function inspection after finishing work.
If DTC is detected, perform trouble diagnosis according to self-diagnostic results.
For models equipped with the Intelligent Key system and NATS , an electrically controlled steering lock mech-
anism is adopted on the key cylinder.
For this reason, if the battery is disconnected or if the battery is discharged, the steering wheel will lock and
steering wheel rotation will become impossible.
If steering wheel rotation is required when battery power is interrupted, follow the procedure below before
starting the repair operation.
OPERATION PROCEDURE
1. Connect both battery cables. NOTE:
Supply power using jumper cables if battery is discharged.
2. Use the Intelligent Key or mechanical key to turn the ignition switch to the ″ACC ″ position. At this time, the
steering lock will be released.
3. Disconnect both battery cables. The steering lock will remain released and the steering wheel can be
rotated.
4. Perform the necessary repair operation.
Revision: March 2010 2008 QX56
Page 2441 of 4083

INL-58
< PRECAUTION >
PRECAUTIONS
5. When the repair work is completed, return the ignition switch to the ″LOCK ″ position before connecting
the battery cables. (At this time, the steering lock mechanism will engage.)
6. Perform a self-diagnosis check of a ll control units using CONSULT-III.
General precautions for service operationsINFOID:0000000001534341
• When removing or disassembling any part, be careful not to damage or deform it. Protect parts which may
get in the way with cloth.
• When removing parts with a screw driver or other tool , protect parts by wrapping them with vinyl or tape.
• Keep removed parts protected with cloth.
• If an non-reuseable part is removed, replace it with a new one.
• After re-assembly has been completed, make sure each part functions correctly.
• Never work with wet hands.
• Turn the lighting switch OFF befor e disconnecting and connecting the connector.
• Do not use organic solvent (paint thinner or gasoline) to clean lamps or remove sealant residue.
Revision: March 2010 2008 QX56
Page 2443 of 4083

INL-60
< ON-VEHICLE REPAIR >
INTERIOR ROOM LAMP
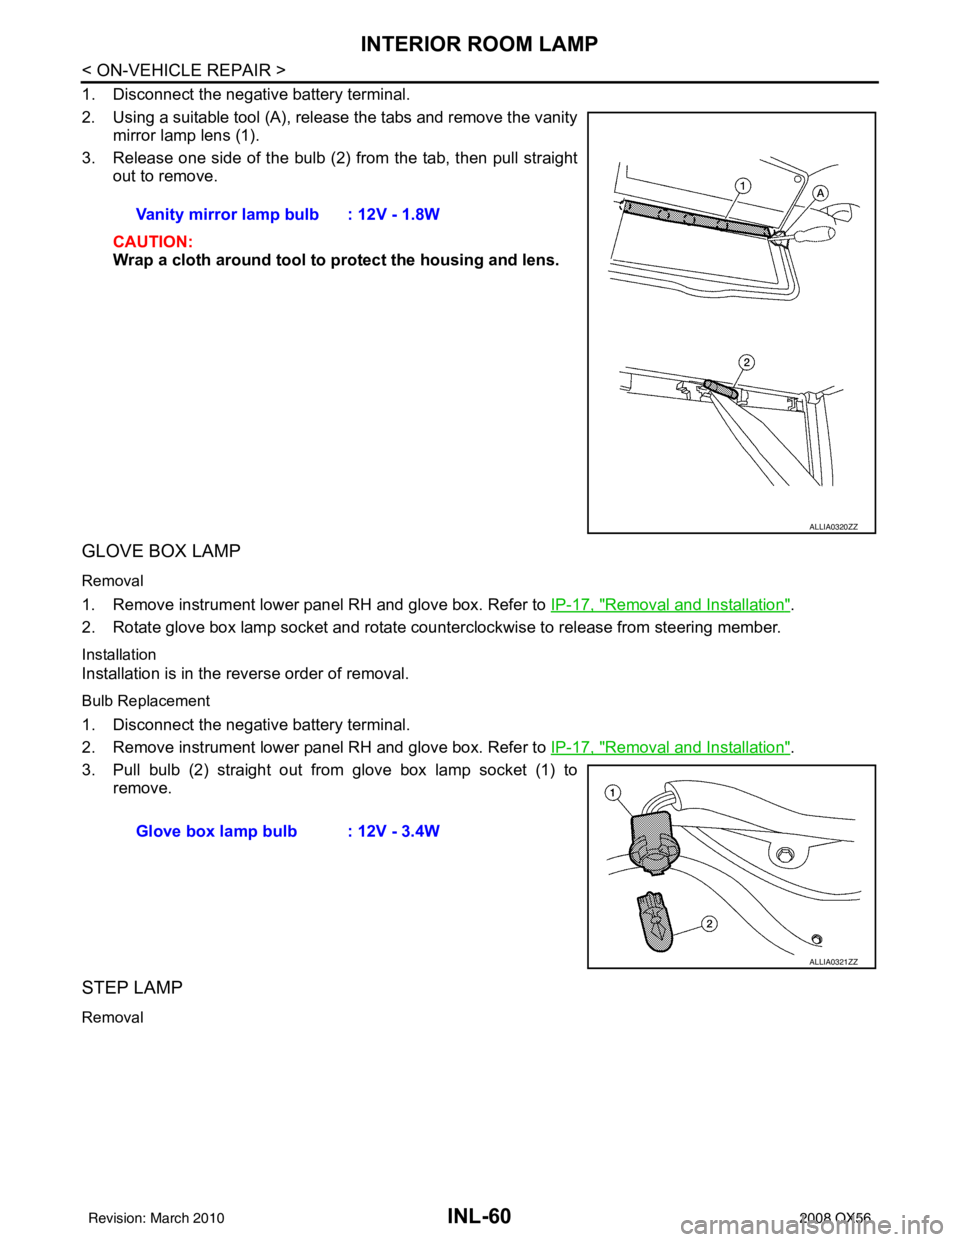
1. Disconnect the negative battery terminal.
2. Using a suitable tool (A), release the tabs and remove the vanitymirror lamp lens (1).
3. Release one side of the bulb (2) from the tab, then pull straight out to remove.
CAUTION:
Wrap a cloth around tool to protect the housing and lens.
GLOVE BOX LAMP
Removal
1. Remove instrument lower panel RH and glove box. Refer to IP-17, "Removal and Installation".
2. Rotate glove box lamp socket and rotate counterclockwise to release from steering member.
Installation
Installation is in the reverse order of removal.
Bulb Replacement
1. Disconnect the negative battery terminal.
2. Remove instrument lower panel RH and glove box. Refer to IP-17, "
Removal and Installation".
3. Pull bulb (2) straight out from glove box lamp socket (1) to remove.
STEP LAMP
Removal
Vanity mirror lamp bulb : 12V - 1.8W
ALLIA0320ZZ
Glove box lamp bulb : 12V - 3.4W
ALLIA0321ZZ
Revision: March 2010 2008 QX56
Page 2445 of 4083

INL-62
< ON-VEHICLE REPAIR >
INTERIOR ROOM LAMP
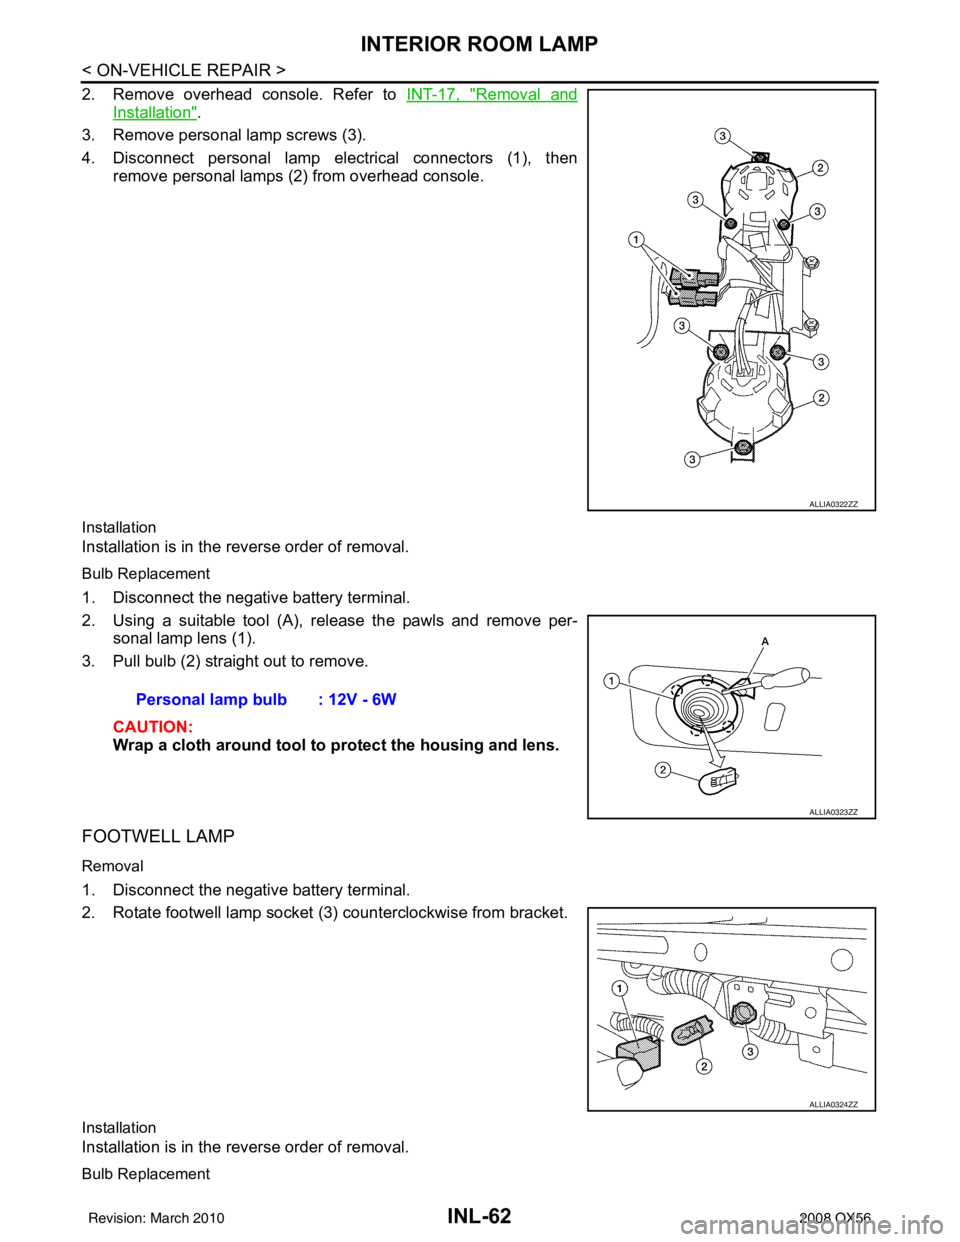
2. Remove overhead console. Refer to INT-17, "Removal and
Installation".
3. Remove personal lamp screws (3).
4. Disconnect personal lamp electrical connectors (1), then remove personal lamps (2) from overhead console.
Installation
Installation is in the reverse order of removal.
Bulb Replacement
1. Disconnect the negative battery terminal.
2. Using a suitable tool (A), release the pawls and remove per-sonal lamp lens (1).
3. Pull bulb (2) straight out to remove.
CAUTION:
Wrap a cloth around tool to protect the housing and lens.
FOOTWELL LAMP
Removal
1. Disconnect the negative battery terminal.
2. Rotate footwell lamp socket (3) counterclockwise from bracket.
Installation
Installation is in the reverse order of removal.
Bulb Replacement
ALLIA0322ZZ
Personal lamp bulb : 12V - 6W
ALLIA0323ZZ
ALLIA0324ZZ
Revision: March 2010 2008 QX56