2008 INFINITI QX56 diagnostic menu
[x] Cancel search: diagnostic menuPage 40 of 4083

ADP-26
< FUNCTION DIAGNOSIS >
DIAGNOSIS SYSTEM (DRIVER SEAT C/U)
DIAGNOSIS SYSTEM (DRIVER SEAT C/U)
Diagnosis DescriptionINFOID:0000000001735430
The auto drive positioner system can be checked and diagnosed for component operation with CONSULT-III.
DIAGNOSTIC MODE
CONSULT-III FunctionINFOID:0000000001735431
SELF-DIAGNOSIS RESULTS
Refer to ADP-123, "DTCIndex".
DATA MONITOR
Diagnostic mode
[AUTO DRIVE POS.] Description
WORK SUPPORT Changes the setting of each function.
SELF-DIAG RESULTS Performs self-diagnosis for the auto drive positioner system and displays the results.
DATA MONITOR Displays input signals transmitted from various switches and sensors to driver seat con-
trol unit in real time.
CAN DIAG SUPPORT MNTR The result of transmit/receive diagnosis of CAN communication can be read.
ACTIVE TEST Drive each output device.
ECU PART NUMBER Displays part numbers of driver seat control unit parts.
Monitor ItemUnitMain
Signals Selection
From
Menu Contents
SET SW “ON/OFF”×× ON/OFF status judged from the setting switch signal.
MEMORY SW1 “ON/OFF”×× ON/OFF status judged from the seat memory switch 1 sig-
nal.
MEMORY SW2 “ON/OFF”×× ON/OFF status judged from the seat memory switch 2 sig-
nal.
SLIDE SW–FR “ON/OFF”×× ON/OFF status judged from the sliding switch (forward) sig-
nal.
SLIDE SW–RR “ON/OFF”×× ON/OFF status judged from the sliding switch (backward)
signal.
RECLN SW–FR “ON/OFF”×× ON/OFF status judged from the reclining switch (forward)
signal.
RECLN SW–RR “ON/OFF”×× ON/OFF status judged from the reclining switch (backward)
signal.
LIFT FR SW–UP “ON/OFF” ××ON/OFF status judged from the lifting switch front (up) sig-
nal.
LIFT FR SW–DN “ON/OFF” ××ON/OFF status judged from the lifting switch front (down)
signal.
LIFT RR SW–UP “ON/OFF” ××ON/OFF status judged from the lifting switch rear (up) sig-
nal.
LIFT RR SW–DN “ON/OFF” ××ON/OFF status judged from the lifting switch rear (down)
signal.
MIR CON SW–UP “ON/OFF” ××ON/OFF status judged from the mirror switch (up) signal.
MIR CON SW–DN “ON/OFF” ××ON/OFF status judged from the mirror switch (down) signal.
MIR CON SW–RH “ON/OFF” ××ON/OFF status judged from the door mirror remote control
switch (passenger side) signal.
MIR CON SW–LH “ON/OFF” ××ON/OFF status judged from the door mirror remote control
switch (driver
side) signal.
Revision: March 2010 2008 QX56
Page 491 of 4083
![INFINITI QX56 2008 Factory Service Manual BRC-24
< FUNCTION DIAGNOSIS >[VDC/TCS/ABS]
DIAGNOSIS SYSTEM [
ABS ACTUATOR AND ELECTRIC UNIT (CONTROL
UNIT)]
DIAGNOSIS SYSTEM [ABS ACTUATOR AND ELECTRIC UNIT (CONTROL
UNIT)]
CONSULT-III Function (AB INFINITI QX56 2008 Factory Service Manual BRC-24
< FUNCTION DIAGNOSIS >[VDC/TCS/ABS]
DIAGNOSIS SYSTEM [
ABS ACTUATOR AND ELECTRIC UNIT (CONTROL
UNIT)]
DIAGNOSIS SYSTEM [ABS ACTUATOR AND ELECTRIC UNIT (CONTROL
UNIT)]
CONSULT-III Function (AB](/manual-img/42/57030/w960_57030-490.png)
BRC-24
< FUNCTION DIAGNOSIS >[VDC/TCS/ABS]
DIAGNOSIS SYSTEM [
ABS ACTUATOR AND ELECTRIC UNIT (CONTROL
UNIT)]
DIAGNOSIS SYSTEM [ABS ACTUATOR AND ELECTRIC UNIT (CONTROL
UNIT)]
CONSULT-III Function (ABS)INFOID:0000000001686255
FUNCTION
CONSULT-III can display each diagnostic item us ing the diagnostic test modes shown following.
SELF-DIAG RESULTS MODE
Operation Procedure
1. Before performing the self-diagnosis, start engine and drive vehicle at 30 km/h (19 MPH) or more for
approximately 1 minute.
How to Erase Self-d iagnosis Results
1. After erasing DTC memory, start engine and drive vehicle at 30 km/h (19 MPH) or more for approximately
1 minute as the final inspection, and make sure that the ABS warning lamp, VDC OFF indicator lamp,
SLIP indicator lamp and brake warning lamp turn OFF.
CAUTION:
If memory cannot be erased, pe rform applicable diagnosis.
NOTE:
• When the wheel sensor malfunctions, after inspecting the wheel sensor system, the ABS warning lamp,
VDC OFF indicator lamp, SLIP indicator lamp and brake warning lamp will not turn OFF even when the
system is normal unless the vehicle is driving at approximately 30 km/h (19 MPH) or more for approxi-
mately 1 minute.
• Brake warning lamp will turn ON in case of parking brake operation (when switch is ON) or of brake fluid level switch operation (when brake fluid is insufficient).
• VDC OFF switch should not stay “ON” position.
Display Item List
Refer to BRC-100, "DTC No. Index".
DATA MONITOR MODE
Display Item List
Diagnostic test mode Function
Work support This mode enables a technician to adjust some devices faster and more accurately by following
the indications on CONSULT-III.
Self-diagnostic results Self-diagnostic results can be read and erased quickly.
Data monitor Input/Output data in the ABS actuator and electric unit (control unit) can be read.
Active test Diagnostic test mode is which CONSULT-III drives some actuators apart from the ABS actuator
and electric unit (control unit) and also shifts some parameters in a specified range.
ECU part number ABS actuator and electric unit (control unit) part number can be read.
CAN diagnostic support monitor The results of transmit/receive diagnosis of CAN communication can be read.
Item
(Unit) Data monitor item selection
Remarks
ECU INPUT
SIGNALS MAIN
SIGNALS SELECTION
FROM MENU
GEAR ××× Gear position judged by transmis-
sion range switch signal is dis-
played.
FR RH SENSOR
(km/h, MPH) ××× Wheel speed calculated by front RH
wheel sensor signal is displayed.
FR LH SENSOR
(km/h, MPH) ××× Wheel speed calculated by front LH
wheel sensor signal is displayed.
RR RH SENSOR
(km/h, MPH) ×××
Wheel speed calculated by rear RH
wheel sensor signal is displayed.
Revision: March 2010
2008 QX56
Page 659 of 4083

CCS
DIAGNOSIS SYSTEM (ICC SENSOR INTEGRATED UNIT)
CCS-19
< FUNCTION DIAGNOSIS >
C
D E
F
G H
I
J
K L
M B
N P A
• Last five cancel (system cancel) causes are displayed.
• “CAUSE OF AUTO-CANCEL” displays times of ignition switch ON/OFF up to 254 maximum. 254 is kept though the number exceeds 254. The num ber returns to 0 when detecting the same cancellation causes.
SELF DIAGNOSTIC RESULT
For details, refer to CCS-55, "Diagnostic Trouble Code (DTC) Chart".
NOTE:
“DTC RESULTS” and “TIME” are indicated on “Self Diagnostic Result”. “TIME” is used as a reference data of
diagnosis. It shows when malfunction is detected.
“TIME” shows the following.
• 0: malfunction is detected at present (from malfunction detection to ignition switch OFF).
CAN communication ([U1000], [U1010])
• 1 ~ 39: Displays when it is normal at present and finds malfunction in the past. It increases like
0→ 1→ 2...38→ 39 after returning to the normal condition whenever IGN OFF→ ON. If it is over 39, it is fixed to
39 until the self-diagnostic results are erased. It retu rns to 0 when malfunction is detected again in the pro-
cess.
Other than CAN communication (other than [U1000], [U1010])
• 1 ~ 49: Displays when it is normal at present and finds malfunction in the past. It increases like 0→ 1→ 2...48→ 49 after returning to the normal condition whenever IGN OFF→ ON. If it is over 49, it is fixed to
49 until the self-diagnostic results are erased. It retu rns to 0 when malfunction is detected again in the pro-
cess.
DATA MONITOR
× : Applicable
VDC/TCS OFF SW ×VDC OFF switch was pressed.
WHEEL SPD UNMATCH ××Wheel speed became different from A/T vehicle speed.
TIRE SLIP ××Wheel slipped.
IGN LOW VOLT ××Power supply voltage became low.
NO RECORD ××—
Monitored Item [unit]MAIN
SIGNALS SELECTION
FROM
MENU Description
VHCL SPEED SE
[km/h] or [mph] ××Indicates vehicle speed calculated from ICC sensor integrated unit through
CAN communication [ABS actuator and electric unit (control unit) transmits
vehicle speed signal (wheel speed) through CAN communication].
SET VHCL SPD
[km/h] or [mph] ××
Indicates set vehicle speed memorized in ICC sensor integrated unit.
THRTL OPENING
[%] ××Indicates throttle position read from ICC sensor integrated unit through CAN
communication (ECM transmits accelerator pedal position signal through
CAN communication).
THRTL SENSOR
[deg] ××NOTE:
This item is displayed, but cannot monitor.
SET DISTANCE
[SHOR/MID/LONG] ××
Indicates set distance memorized in ICC sensor integrated unit.
MAIN SW
[On/Off] ××
Indicates [On/Off] status as judged from ICC steering switch signal (ECM
transmits ICC steering switch signal through CAN communication).
SET/COAST SW
[On/Off] ××Indicates [On/Off] status as judged from ICC steering switch signal (ECM
transmits ICC steering switch signal through CAN communication).
CANCEL SW
[On/Off] ××Indicates [On/Off] status as judged from ICC steering switch signal (ECM
transmits ICC steering switch signal through CAN communication).
RESUME/ACC SW
[On/Off] ××
Indicates [On/Off] status as judged from ICC steering switch signal (ECM
transmits ICC steering switch signal through CAN communication).
DISTANCE SW
[On/Off] ×Indicates [On/Off] status as judged from ICC steering switch signal (ECM
transmits ICC steering switch signal through CAN communication).
CRUISE OPE
[On/Off] ××
Indicates whether controlling or not (ON means “controlling”).
Revision: March 2010 2008 QX56
Page 1049 of 4083
![INFINITI QX56 2008 Factory Service Manual DIAGNOSIS SYSTEM (TRANSFER CONTROL UNIT)DLN-19
< FUNCTION DIAGNOSIS > [ATX14B]
C
EF
G H
I
J
K L
M A
B
DLN
N
O P
12. Move A/T selector lever to N position.
13. Turn 4WD shift switch to AUTO position.
1 INFINITI QX56 2008 Factory Service Manual DIAGNOSIS SYSTEM (TRANSFER CONTROL UNIT)DLN-19
< FUNCTION DIAGNOSIS > [ATX14B]
C
EF
G H
I
J
K L
M A
B
DLN
N
O P
12. Move A/T selector lever to N position.
13. Turn 4WD shift switch to AUTO position.
1](/manual-img/42/57030/w960_57030-1048.png)
DIAGNOSIS SYSTEM (TRANSFER CONTROL UNIT)DLN-19
< FUNCTION DIAGNOSIS > [ATX14B]
C
EF
G H
I
J
K L
M A
B
DLN
N
O P
12. Move A/T selector lever to N position.
13. Turn 4WD shift switch to AUTO position.
14. Move A/T selector lever to P position.
15. Read the flickering of 4WD warning lamp.
Self-diagnosis example
ERASE SELF-DIAGNOSIS
• In order to make it easier to find the cause of hard-to-duplicate malfunctions, malfunction information is
stored into the control unit as necessary during use by the user. This memory is not erased no matter how
many times the ignition switch is turned ON and OFF.
• However, this information is erased by turning igni tion switch OFF after performing self-diagnostics or by
erasing the memory using the CONSULT-III.
DATA MONITOR MODE
Operation Procedure
1. Connect CONSULT-III.
2. Touch DATA MONITOR.
3. Select from SELECT MONITOR ITEM, screen of data monitor mode is displayed.
NOTE:
When malfunction is detected, CONSUL T-III performs REAL-TIME DIAGNOSIS.
Also, any malfunction detected while in th is mode will be displayed at real time.
Display Item List
×: Standard –: Not applicable
PDIA0227E
Monitored item (Unit) Monitor item selection
Remarks
ECU INPUT
SIGNALS MAIN
SIGNALS SELEC-
TION FROM MENU
VHCL/S SEN·FR [km/h] or [mph] ×–×Wheel speed calculated by ABS actuator and
electric unit (control unit).
Signal input with CAN communication line.
VHCL/S SEN·RR [km/h] or [mph] ×–×Wheel speed calculated by TCM.
Signal input with CAN communication line.
ENGINE SPEED [rpm] ×–×Engine speed calculated by ECM.
Signal input with CAN communication line.
THRTL POS SEN [V] ×–×Accelerator peda
l position (APP) sensor sig-
nal voltage is displayed.
Signal input with CAN communication line.
FLUID TEMP SE [V] ×–×Transfer fluid temperature sensor signal volt-
age is displayed.
BATTERY VOLT [V] ×–×Power supply voltage for transfer control unit.
2WD SWITCH [ON/OFF] ×–×4WD shift switch status is displayed.
AUTO SWITCH [ON/OFF] ×–×4WD shift switch status is displayed.
LOCK SWITCH [ON/OFF] ×–×4WD shift switch status is displayed.
(LOCK means 4H of 4WD shift switch.)
Revision: March 2010
2008 QX56
Page 3090 of 4083

DIAGNOSIS SYSTEM (SUSPENSION CONTROL UNIT)
SCS-7
< FUNCTION DIAGNOSIS >
C
D F
G H
I
J
K L
M A
B
SCS
N
O P
DIAGNOSIS SYSTEM (SUS PENSION CONTROL UNIT)
CONSULT-III FunctionINFOID:0000000001731959
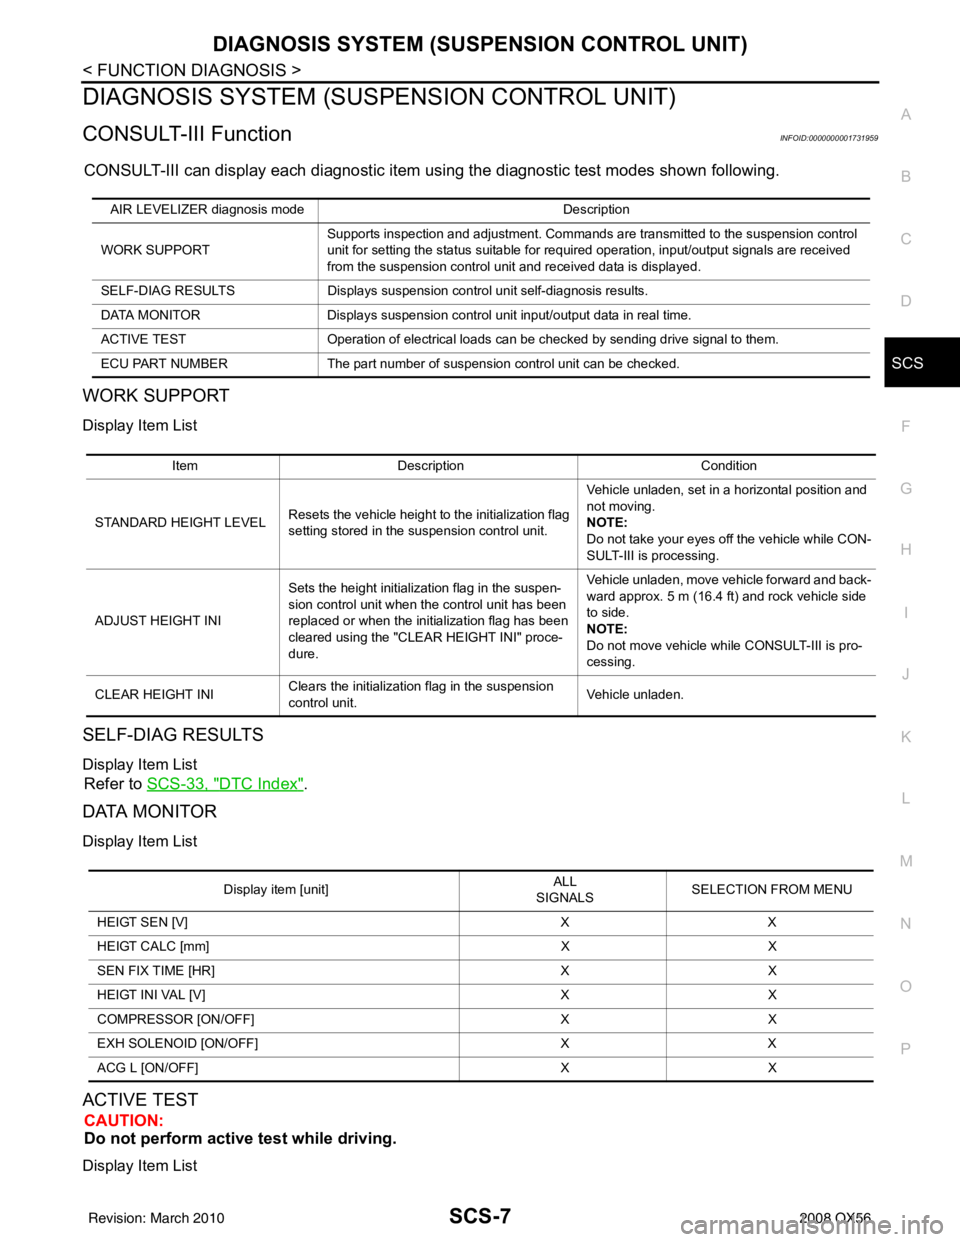
CONSULT-III can display each diagnostic item using the diagnostic test modes shown following.
WORK SUPPORT
Display Item List
SELF-DIAG RESULTS
Display Item List
Refer to SCS-33, "DTC Index".
DATA MONITOR
Display Item List
ACTIVE TEST
CAUTION:
Do not perform active test while driving.
Display Item List
AIR LEVELIZER diagno sis mode Description
WORK SUPPORT Supports inspection and adjustment. Commands are transmitted to the suspension control
unit for setting the status suitable for required operation, input/output signals are received
from the suspension control unit and received data is displayed.
SELF-DIAG RESULTS Displays suspension control unit self-diagnosis results.
DATA MONITOR Displays suspension control unit input/output data in real time.
ACTIVE TEST Operation of electrical loads can be checked by sending drive signal to them.
ECU PART NUMBER The part number of suspension control unit can be checked.
ItemDescription Condition
STANDARD HEIGHT LEVEL Resets the vehicle height to the initialization flag
setting stored in the suspension control unit. Vehicle unladen, set in a horizontal position and
not moving.
NOTE:
Do not take your eyes off the vehicle while CON-
SULT-III is processing.
ADJUST HEIGHT INI Sets the height initialization flag in the suspen-
sion control unit when the control unit has been
replaced or when the initialization flag has been
cleared using the "CLEAR HEIGHT INI" proce-
dure. Vehicle unladen, move vehicle forward and back-
ward approx. 5 m (16.4 ft) and rock vehicle side
to side.
NOTE:
Do not move vehicle wh
ile CONSULT-III is pro-
cessing.
CLEAR HEIGHT INI Clears the initialization flag in the suspension
control unit. Vehicle unladen.
Display item [unit]
ALL
SIGNALS SELECTION FROM MENU
HEIGT SEN [V] XX
HEIGT CALC [mm] XX
SEN FIX TIME [HR] XX
HEIGT INI VAL [V] XX
COMPRESSOR [ON/OFF] XX
EXH SOLENOID [ON/OFF] XX
ACG L [ON/OFF] XX
Revision: March 2010 2008 QX56
Page 3586 of 4083

P0615 STARTER RELAYTM-39
< COMPONENT DIAGNOSIS >
CEF
G H
I
J
K L
M A
B
TM
N
O P
P0615 STARTER RELAY
DescriptionINFOID:0000000001604014
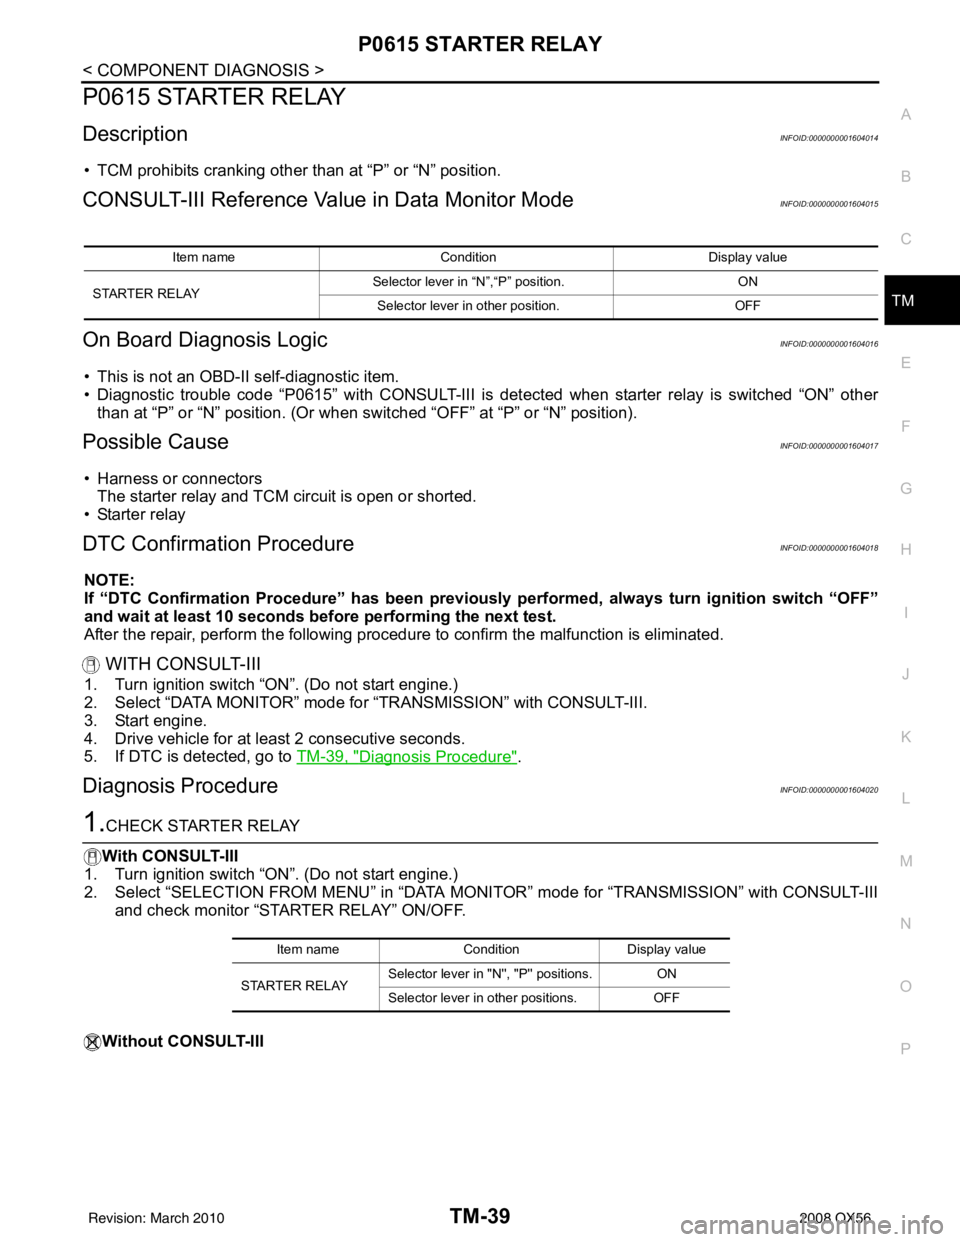
• TCM prohibits cranking other than at “P” or “N” position.
CONSULT-III Reference Val ue in Data Monitor ModeINFOID:0000000001604015
On Board Diagnosis LogicINFOID:0000000001604016
• This is not an OBD-II self-diagnostic item.
• Diagnostic trouble code “P0615” with CONSULT-III is det ected when starter relay is switched “ON” other
than at “P” or “N” position. (Or when s witched “OFF” at “P” or “N” position).
Possible CauseINFOID:0000000001604017
• Harness or connectors
The starter relay and TCM circuit is open or shorted.
•Starter relay
DTC Confirmation ProcedureINFOID:0000000001604018
NOTE:
If “DTC Confirmation Procedure” has been previously performed, always turn ignition switch “OFF”
and wait at least 10 seconds before performing the next test.
After the repair, perform the following procedure to confirm the malfunction is eliminated.
WITH CONSULT-III
1. Turn ignition switch “ON”. (Do not start engine.)
2. Select “DATA MONITOR” mode for “TRANSMISSION” with CONSULT-III.
3. Start engine.
4. Drive vehicle for at least 2 consecutive seconds.
5. If DTC is detected, go to TM-39, "
Diagnosis Procedure".
Diagnosis ProcedureINFOID:0000000001604020
1.CHECK STARTER RELAY
With CONSULT-III
1. Turn ignition switch “ON”. (Do not start engine.)
2. Select “SELECTION FROM MENU” in “DATA MONI TOR” mode for “TRANSMISSION” with CONSULT-III
and check monitor “STARTER RELAY” ON/OFF.
Without CONSULT-III
Item name Condition Display value
STARTER RELAY Selector lever in
“N”,“P” position. ON
Selector lever in other position. OFF
Item nameCondition Display value
STARTER RELAY Selector lever in "N
'', "P'' positions. ON
Selector lever in other positions. OFF
Revision: March 2010 2008 QX56
Page 3590 of 4083

P0705 TRANSMISSION RANGE SWITCH A
TM-43
< COMPONENT DIAGNOSIS >
C EF
G H
I
J
K L
M A
B
TM
N
O P
P0705 TRANSMISSION RANGE SWITCH A
DescriptionINFOID:0000000001604026
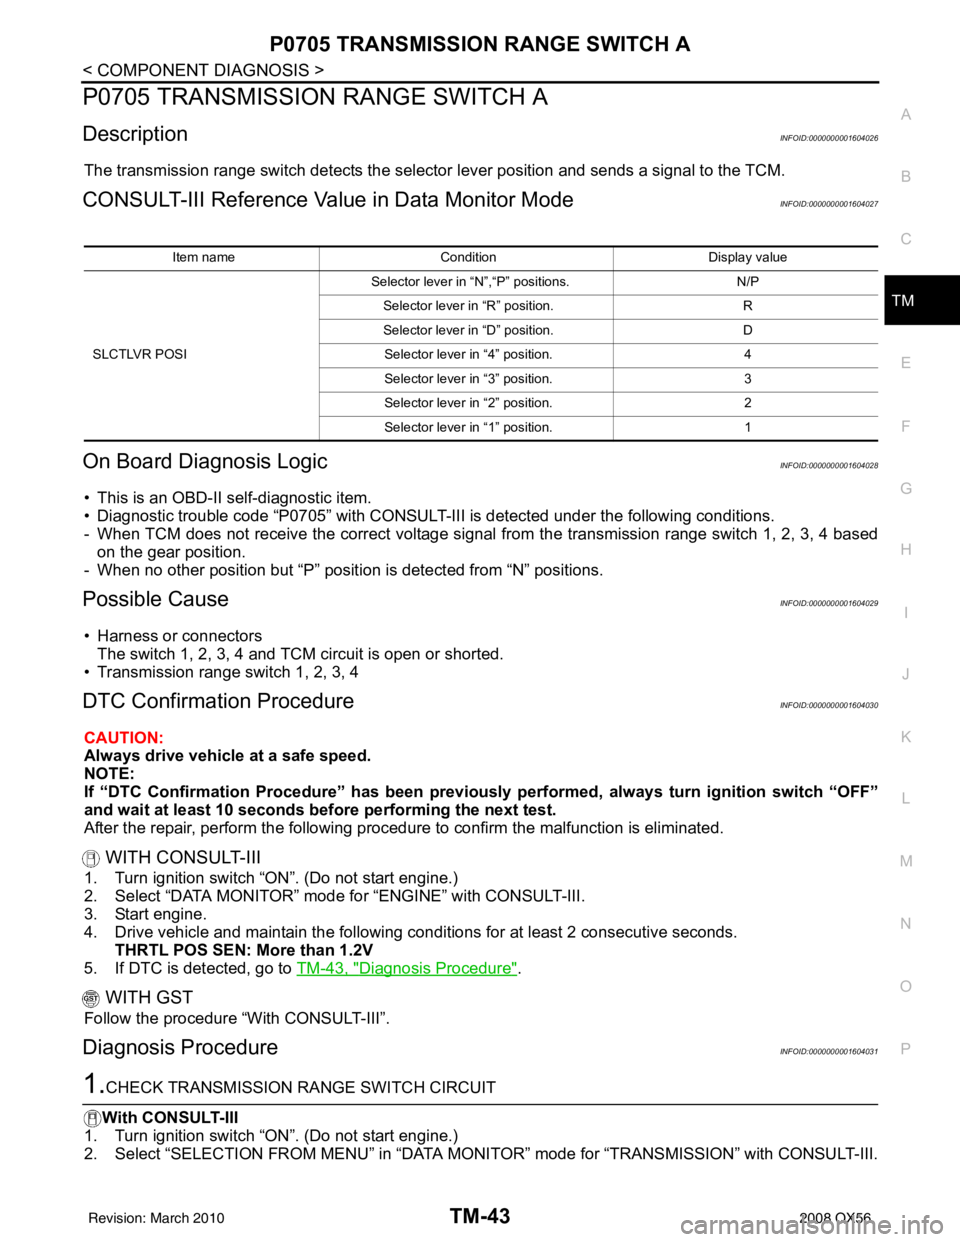
The transmission range switch detects the select or lever position and sends a signal to the TCM.
CONSULT-III Reference Value in Data Monitor ModeINFOID:0000000001604027
On Board Diagnosis LogicINFOID:0000000001604028
• This is an OBD-II self-diagnostic item.
• Diagnostic trouble code “P0705” with CONSULT-III is detected under the following conditions.
- When TCM does not receive the correct voltage signal from the transmission range switch 1, 2, 3, 4 based
on the gear position.
- When no other position but “P” positi on is detected from “N” positions.
Possible CauseINFOID:0000000001604029
• Harness or connectors
The switch 1, 2, 3, 4 and TCM circuit is open or shorted.
• Transmission range switch 1, 2, 3, 4
DTC Confirmation ProcedureINFOID:0000000001604030
CAUTION:
Always drive vehicle at a safe speed.
NOTE:
If “DTC Confirmation Procedure” has been previously performed, always turn ignition switch “OFF”
and wait at least 10 seconds before performing the next test.
After the repair, perform the following procedure to confirm the malfunction is eliminated.
WITH CONSULT-III
1. Turn ignition switch “ON”. (Do not start engine.)
2. Select “DATA MONITOR” mode for “ENGINE” with CONSULT-III.
3. Start engine.
4. Drive vehicle and maintain the following conditions for at least 2 consecutive seconds. THRTL POS SEN: More than 1.2V
5. If DTC is detected, go to TM-43, "
Diagnosis Procedure".
WITH GST
Follow the procedure “With CONSULT-III”.
Diagnosis ProcedureINFOID:0000000001604031
1.CHECK TRANSMISSION RANGE SWITCH CIRCUIT
With CONSULT-III
1. Turn ignition switch “ON”. (Do not start engine.)
2. Select “SELECTION FROM MENU” in “DATA MONI TOR” mode for “TRANSMISSION” with CONSULT-III.
Item nameCondition Display value
SLCTLVR POSI Selector lever in “N”,“P” positions.
N/P
Selector lever in “R” position. R
Selector lever in “D” position. D
Selector lever in “4” position. 4
Selector lever in “3” position. 3
Selector lever in “2” position. 2
Selector lever in “1” position. 1
Revision: March 2010 2008 QX56
Page 3625 of 4083

TM-78
< COMPONENT DIAGNOSIS >
P1731 1ST ENGINE BRAKING
P1731 1ST ENGINE BRAKING
DescriptionINFOID:0000000001604118
Fail-safe function to prevent sudden decrease in speed by engine brake other than at "1" position.
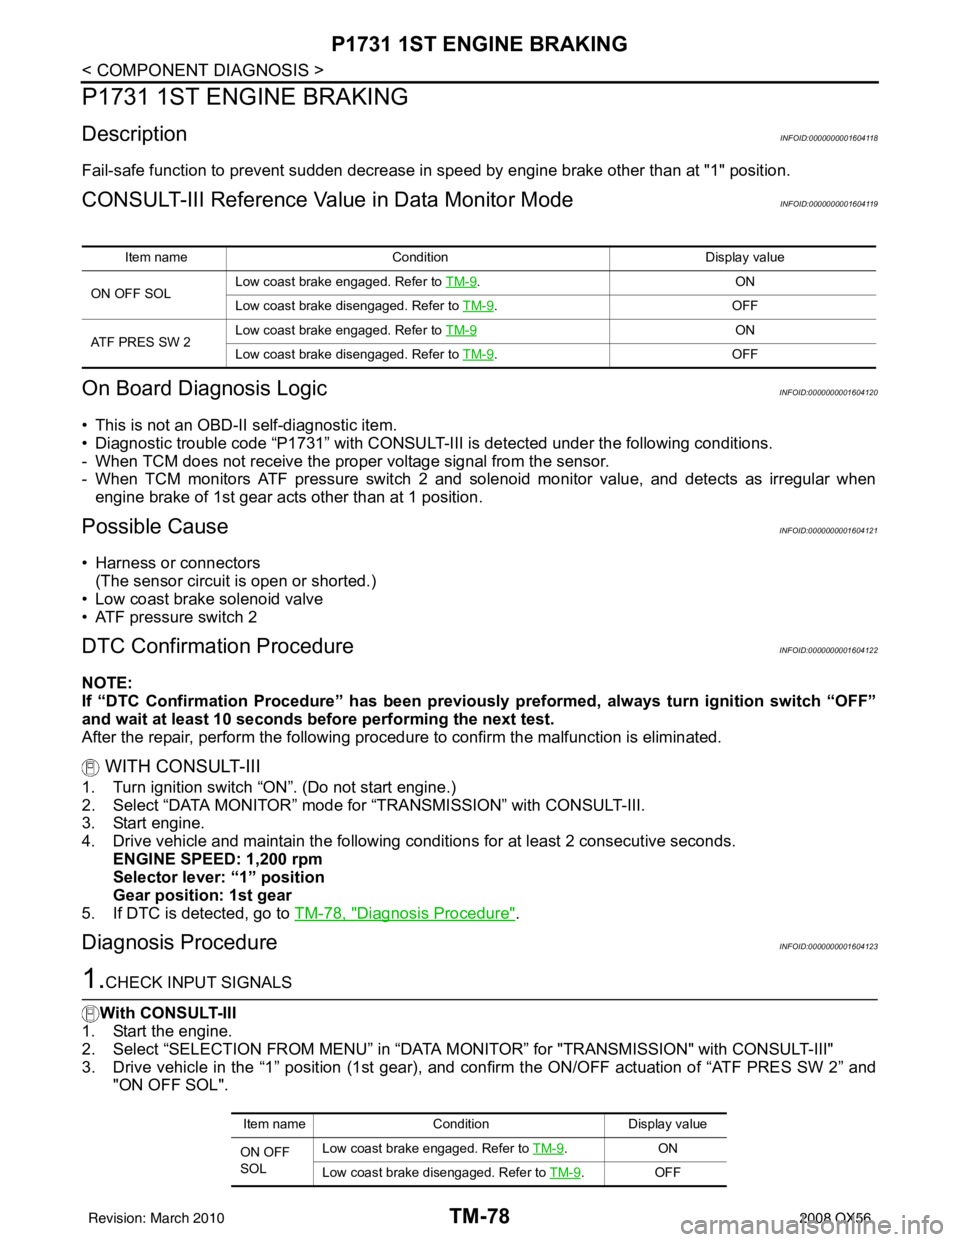
CONSULT-III Reference Value in Data Monitor ModeINFOID:0000000001604119
On Board Diagnosis LogicINFOID:0000000001604120
• This is not an OBD-II self-diagnostic item.
• Diagnostic trouble code “P1731” with CONSULT-III is detected under the following conditions.
- When TCM does not receive the proper voltage signal from the sensor.
- When TCM monitors ATF pressure switch 2 and solenoid monitor value, and detects as irregular when engine brake of 1st gear acts other than at 1 position.
Possible CauseINFOID:0000000001604121
• Harness or connectors(The sensor circuit is open or shorted.)
• Low coast brake solenoid valve
• ATF pressure switch 2
DTC Confirmation ProcedureINFOID:0000000001604122
NOTE:
If “DTC Confirmation Procedure” has been previously preformed, always turn ignition switch “OFF”
and wait at least 10 seconds before performing the next test.
After the repair, perform the following proc edure to confirm the malfunction is eliminated.
WITH CONSULT-III
1. Turn ignition switch “ON”. (Do not start engine.)
2. Select “DATA MONITOR” mode for “TRANSMISSION” with CONSULT-III.
3. Start engine.
4. Drive vehicle and maintain the following conditions for at least 2 consecutive seconds. ENGINE SPEED: 1,200 rpm
Selector lever: “1” position
Gear position: 1st gear
5. If DTC is detected, go to TM-78, "
Diagnosis Procedure".
Diagnosis ProcedureINFOID:0000000001604123
1.CHECK INPUT SIGNALS
With CONSULT-III
1. Start the engine.
2. Select “SELECTION FROM MENU” in “DATA MONITOR” for "TRANSMISSION" with CONSULT-III"
3. Drive vehicle in the “1” position (1st gear), and c onfirm the ON/OFF actuation of “ATF PRES SW 2” and
"ON OFF SOL".
Item name Condition Display value
ON OFF SOL Low coast brake engaged. Refer to
TM-9
.O N
Low coast brake disengaged. Refer to TM-9
.O FF
ATF PRES SW 2 Low coast brake engaged. Refer to
TM-9
ON
Low coast brake disengaged. Refer to TM-9
.O FF
Item name Condition Display value
ON OFF
SOL Low coast brake engaged. Refer to TM-9
.O
N
Low coast brake disengaged. Refer to TM-9
.OFF
Revision: March 2010 2008 QX56