2008 Hyundai Sonata oil level
[x] Cancel search: oil levelPage 215 of 283

6
DO-IT-YOURSELF MAINTENANCE
4
G020C01A-AATVehicle InteriorThe following should be checked each time
when the vehicle is driven:
o Lights operation
o Windshield wiper operation
o Horn operation
o Defroster, heating system operation (and air
conditioning, if installed)
o Steering operation and condition
o Mirror condition and operation
o Turn signal operation
o Accelerator pedal operation
o Brake operation, including parking brake
o Manual transaxle operation, including clutch
operation
o Automatic transaxle operation, including
"Park" mechanism operation
o Seat control condition and operation
o Seat belt condition and operation
o Sun visor operation
If you notice anything that does not operate
correctly or appears to be functioning correctly,
inspect it carefully and seek assistance from
your Hyundai dealer if service is needed.
G020B01A-AATVehicle ExteriorThe following should be checked monthly:
o Overall appearance and condition
o Wheel condition and wheel nut torque
o Exhaust system condition
o Light condition and operation
o Windshield glass condition
o Wiper blade condition
o Paint condition and body corrosion
o Fluid leaks
o Door and hood lock condition
o Tire pressure and condition
(including spare tire)GENERAL CHECKSG020A01NF-AATEngine CompartmentThe following should be checked regularly:
o Engine oil level and condition
o Transaxle fluid level and condition
o Brake fluid level
o Engine coolant level
o Windshield washer fluid level
o Accessory drive belt condition
o Engine coolant hose condition
o Fluid leaks (on or below components)
o Power steering fluid level
o Battery condition
o Air filter condition
o Engine vibration
CHECKING THE ENGINE OILG030B01O-AATRecommended OilThe engine oil quality should meet the following
classification.
API SJ, SL or ABOVE,
ILSAC GF-3 or ABOVE
G030B01JM-U G030A01A-AAT
Engine oil is essential to the performance and
service of the engine. It is suggested that you
check the oil level at least once a week in normal
use and more often if you are on a trip or driving
in severe conditions.
Page 216 of 283

6
DO-IT-YOURSELF MAINTENANCE
5
G030C01JM-AATTo Check the Oil Level
Before checking the oil, warm up the engine to
the normal operating temperature and be sure
your car is parked on level ground. Turn the
engine off.
Wait five minutes, then remove the dipstick,
wipe it off, fully reinsert the dipstick and withdraw
it again. Then note the highest level the oil has
reached on the dipstick. It should be between
the upper ("F") and lower ("L") range.
!
WARNING:
Be very careful not to touch the radiator
hose when checking the engine oil as it may
be hot enough to burn you.
G030C01NF
G030C02NF
(2.4L)
(3.3L)
NOTE:o For good fuel economy, SAE 5W-20 (5W-
30), ILSAC GF-3 engine oil is preferred
regardless of regional option and en-
gine variation.
o If SAE 5W-20, ILSAC GF-3 engine oil is
not available, secondary recommended
engine oil for corresponding tempera-
ture range can be used.
Page 217 of 283

6
DO-IT-YOURSELF MAINTENANCE
6
!!
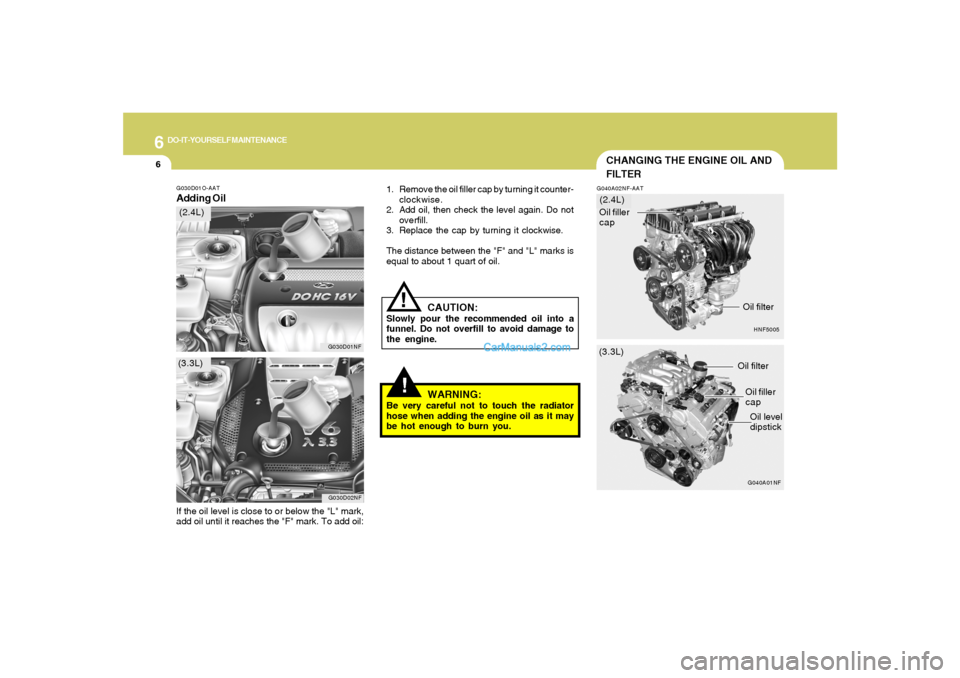
G030D01O-AATAdding Oil
1. Remove the oil filler cap by turning it counter-
clockwise.
2. Add oil, then check the level again. Do not
overfill.
3. Replace the cap by turning it clockwise.
The distance between the "F" and "L" marks is
equal to about 1 quart of oil.
CAUTION:
Slowly pour the recommended oil into a
funnel. Do not overfill to avoid damage to
the engine.
WARNING:
Be very careful not to touch the radiator
hose when adding the engine oil as it may
be hot enough to burn you.
If the oil level is close to or below the "L" mark,
add oil until it reaches the "F" mark. To add oil:
G030D01NF
G030D02NF
(3.3L)(2.4L)
CHANGING THE ENGINE OIL AND
FILTERG040A02NF-AAT
HNF5005(3.3L)(2.4L)
G040A01NFOil filter
Oil filler
cap
Oil level
dipstick Oil filler
cap
Oil filter
Page 218 of 283

6
DO-IT-YOURSELF MAINTENANCE
7
!
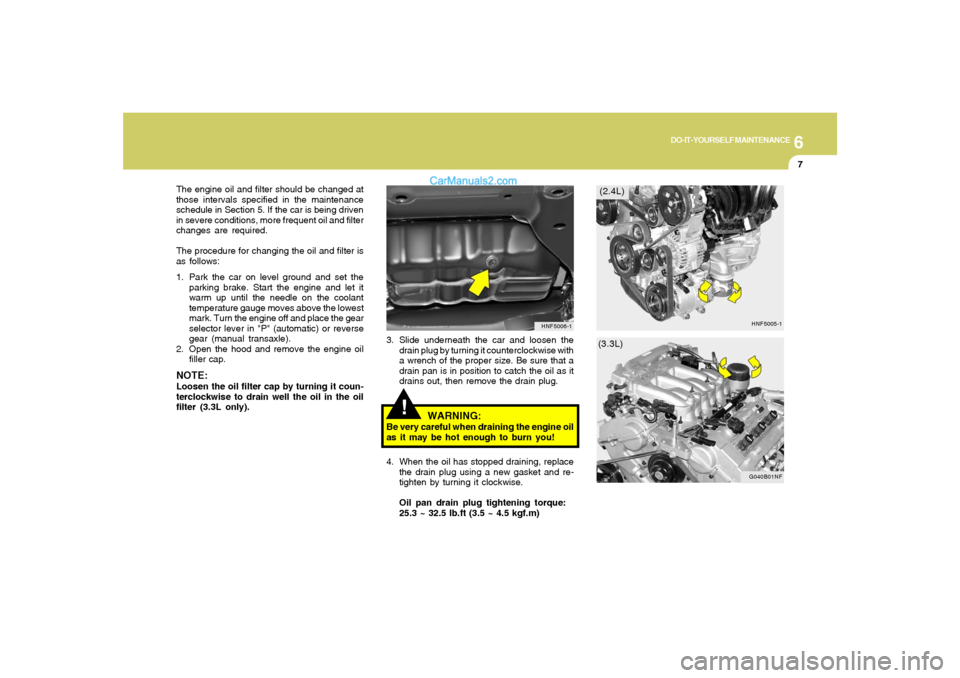
3. Slide underneath the car and loosen the
drain plug by turning it counterclockwise with
a wrench of the proper size. Be sure that a
drain pan is in position to catch the oil as it
drains out, then remove the drain plug.
4. When the oil has stopped draining, replace
the drain plug using a new gasket and re-
tighten by turning it clockwise.
Oil pan drain plug tightening torque:
25.3 ~ 32.5 lb.ft (3.5 ~ 4.5 kgf.m)
HNF5006-1
(2.4L)
(3.3L) The engine oil and filter should be changed at
those intervals specified in the maintenance
schedule in Section 5. If the car is being driven
in severe conditions, more frequent oil and filter
changes are required.
The procedure for changing the oil and filter is
as follows:
1. Park the car on level ground and set the
parking brake. Start the engine and let it
warm up until the needle on the coolant
temperature gauge moves above the lowest
mark. Turn the engine off and place the gear
selector lever in "P" (automatic) or reverse
gear (manual transaxle).
2. Open the hood and remove the engine oil
filler cap.
NOTE:Loosen the oil filter cap by turning it coun-
terclockwise to drain well the oil in the oil
filter (3.3L only).
WARNING:
Be very careful when draining the engine oil
as it may be hot enough to burn you!
HNF5005-1
G040B01NF
Page 219 of 283

6
DO-IT-YOURSELF MAINTENANCE
8
CHECKING AND CHANGING THE
ENGINE COOLANT!
G050A01A-AAT
WARNING:
Do not remove the radiator cap when the
engine is hot. When the engine is hot, the
engine coolant is under pressure and may
erupt through the opening if the cap is
removed. You could be seriously burned if
you do not observe this precaution. Do not
remove the radiator cap until the radiator is
cool to the touch.
!
5. Remove the oil filter by turning it counter-
clockwise with a oil filter wrench of the proper
size. A certain amount of oil will come out
when you remove the filter. So be sure to
have your drain pan in place underneath it.
6. Install a new oil filter in accordance with the
instructions on the carton or on the filter itself.
Do not over-tighten.
Tightening torque:
8.7 ~ 11.6 lb.ft (1.2 ~ 1.6 kgf.m)
Be sure that the mounting surface on the
engine is clean and that the old gasket is
removed completely. Lubricate the new
gasket on the filter with clean engine oil
before installation.
7. Remove the engine oil level dipstick.
8. Refill the crankcase with the recommended
engine oil. Refer to the specification in chap-
ter 9 for engine oil capacity.
CAUTION:
Slowly pour the recommended oil into a
funnel. Do not overfill to avoid damage to
the engine.
NOTE:Always dispose of used engine oil in an
environmentally acceptable manner. It is
suggested that it be placed in a sealed
container and taken to a service station for
reclamation. Do not pour the oil on the
ground or put it into the household trash.
PROPOSITION 65 WARNING:
This product contains a chemical known to
the State of California to cause cancer.
Used engine oil may cause irritation or
cancer of the skin if left in contact with the
skin for prolonged periods of time. Used
engine oil contains chemicals that have
caused cancer in laboratory animals. Al-
ways protect your skin by washing your
hands thoroughly with soap and warm
water as soon as possible after handling
used oil.
!
9. Start the engine and check to be sure no oil
is leaking from the drain plug or oil filter.
10.Shut off the engine and recheck the oil level.
Page 225 of 283

6
DO-IT-YOURSELF MAINTENANCE
14
CAUTION:
o Radiator antifreeze (engine coolant)
should not be used in the washer system
because it will damage the car's finish.
o The washer lever should not be pulled
and the washer should not be operated
if the washer reservoir is empty. This can
damage the washer fluid pump.
!
A good quality washer fluid should be used to fill
the washer reservoir. The fluid level should be
checked more frequently during bad weather or
whenever the washer system is in more fre-
quent use.
The capacity of the washer reservoir is 3.2 U.S.
quarts (4.0 liters).
!
WARNING:
It is always better to check the transaxle oil
level when the engine is cool or cold. If the
engine is hot, you should exercise great
caution to avoid burning yourself on hot
engine or exhaust parts.
CHECKING THE TRANSAXLE OIL
(MANUAL)G100A02NF-AAT
HNF5010
Filler plug
Drain plug
Transaxle lubricant in the manual transaxle
should be checked at those intervals specified
in the vehicle maintenance schedule in Section
5.Recommended OilUse only HYUNDAI GENUINE PARTS MTF
75W/85 (API GL-4) in the manual transaxle.Manual Transaxle Oil CapacityThe oil capacity of the manual transaxle is 2.0
U.S. quarts (1.9 liters).
!
WARNING:
o Windshield washer fluid agents contain
some amounts of alcohol and can be
flammable under certain circumstances.
Do not allow sparks or flame to contact
the washer fluid or the washer fluid
reservoir. Damage to the vehicle or its
occupants could occur.
o Windshield washer fluid is poisonous to
humans and animals. Do not drink wind-
shield washer fluid. Serious injury or
death could occur.
NOTE:It is recommended that the manual transaxle
fluid should be checked by an authorized
Hyundai Dealer.
Page 237 of 283

6
DO-IT-YOURSELF MAINTENANCE
26
FOR MORE INFORMATION ABOUT
YOUR HYUNDAI
G240A01A-AATPOWER STEERING HOSESIt is suggested that you check the power steer-
ing hose connections for fluid leakage at those
intervals specified in the vehicle maintenance
schedule in Section 5.
The power steering hoses should be replaced
if there is severe surface cracking, pulling,
scuffing or worn spots. Deterioration of the hose
could cause premature failure.
POWER STEERING FLUID LEVELG230A01NF-AAT
to make certain that the power steering fluid
level is between the "MAX" and "MIN" level
markings on the fluid reservoir.NOTE:Grinding noise from the power steering
pump may be heard immediately after the
engine is started in extremely cold condi-
tions (below - 4°F). If the noise stops during
warm up, there is no abnormal function in
the system. It is due to a power steering
fluid characteristic in extremely cold condi-
tions.
Recommended Fluid
Use PSF-4 type fluidNOTE:Do not start the engine when the power
steering oil reservoir is empty.
G230A01NFG230A02NF
(2.4L)(3.3L)
G250A01A-AATIf you desire additional information about main-
taining and servicing your Hyundai, you may
purchase a factory Shop Manual at your Hyundai
dealer's parts department. This is the same
manual used by dealership technicians and
while it is highly technical it can be useful in
obtaining a better understanding of your car and
how it works.
The power steering fluid level should be checked
regularly. To check the power steering fluid
level, be sure the engine is "OFF", then check
Page 238 of 283

6
DO-IT-YOURSELF MAINTENANCE
27
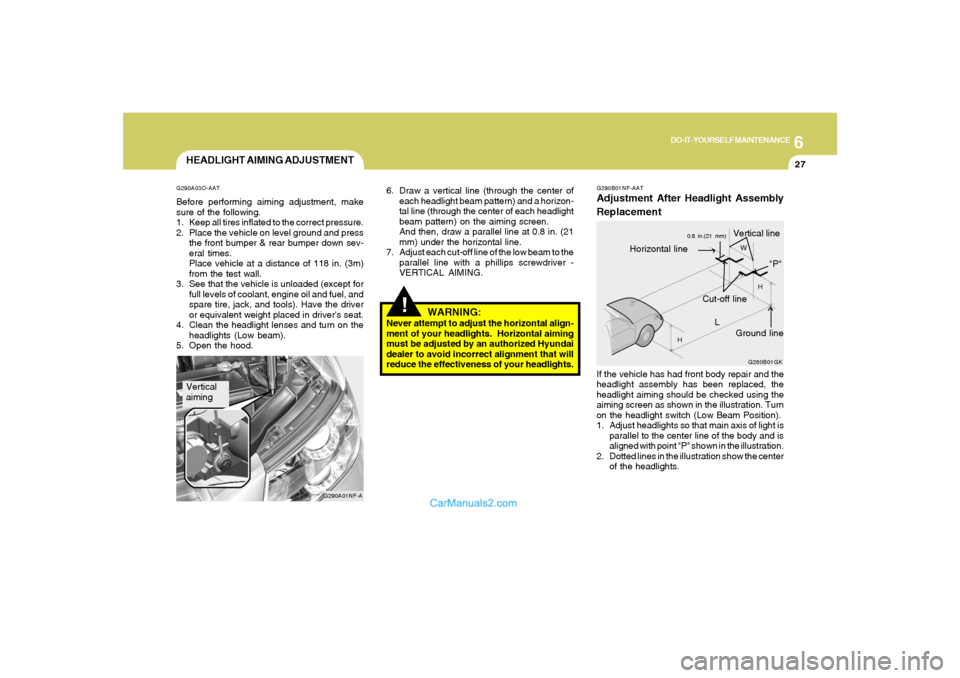
HEADLIGHT AIMING ADJUSTMENTG290A03O-AATBefore performing aiming adjustment, make
sure of the following.
1. Keep all tires inflated to the correct pressure.
2. Place the vehicle on level ground and press
the front bumper & rear bumper down sev-
eral times.
Place vehicle at a distance of 118 in. (3m)
from the test wall.
3. See that the vehicle is unloaded (except for
full levels of coolant, engine oil and fuel, and
spare tire, jack, and tools). Have the driver
or equivalent weight placed in driver's seat.
4. Clean the headlight lenses and turn on the
headlights (Low beam).
5. Open the hood.
G290A01NF-A
Vertical
aiming
!
6. Draw a vertical line (through the center of
each headlight beam pattern) and a horizon-
tal line (through the center of each headlight
beam pattern) on the aiming screen.
And then, draw a parallel line at 0.8 in. (21
mm) under the horizontal line.
7. Adjust each cut-off line of the low beam to the
parallel line with a phillips screwdriver -
VERTICAL AIMING.
WARNING:
Never attempt to adjust the horizontal align-
ment of your headlights. Horizontal aiming
must be adjusted by an authorized Hyundai
dealer to avoid incorrect alignment that will
reduce the effectiveness of your headlights.
G290B01NF-AATAdjustment After Headlight Assembly
Replacement
G260B01GK
L
W
H
H
Cut-off line
Ground line
"P"
Horizontal line
Vertical line
0.8 in.(21 mm)
If the vehicle has had front body repair and the
headlight assembly has been replaced, the
headlight aiming should be checked using the
aiming screen as shown in the illustration. Turn
on the headlight switch (Low Beam Position).
1. Adjust headlights so that main axis of light is
parallel to the center line of the body and is
aligned with point "P" shown in the illustration.
2. Dotted lines in the illustration show the center
of the headlights.