2008 Hyundai Santa Fe fuse panel
[x] Cancel search: fuse panelPage 63 of 355
1
FEATURES OF YOUR HYUNDAI
51
CAUTION:
When installing a container of liquid air
freshener inside the vehicle, do not place
it near the instrument cluster nor on the
instrument panel surface. If there is any
leakage from the air freshener onto these
areas (instrument cluster, instrument
panel or air ventilator), it may damage
these parts. If the liquid from the air
freshener does leak onto these areas,
wash them with water immediately.
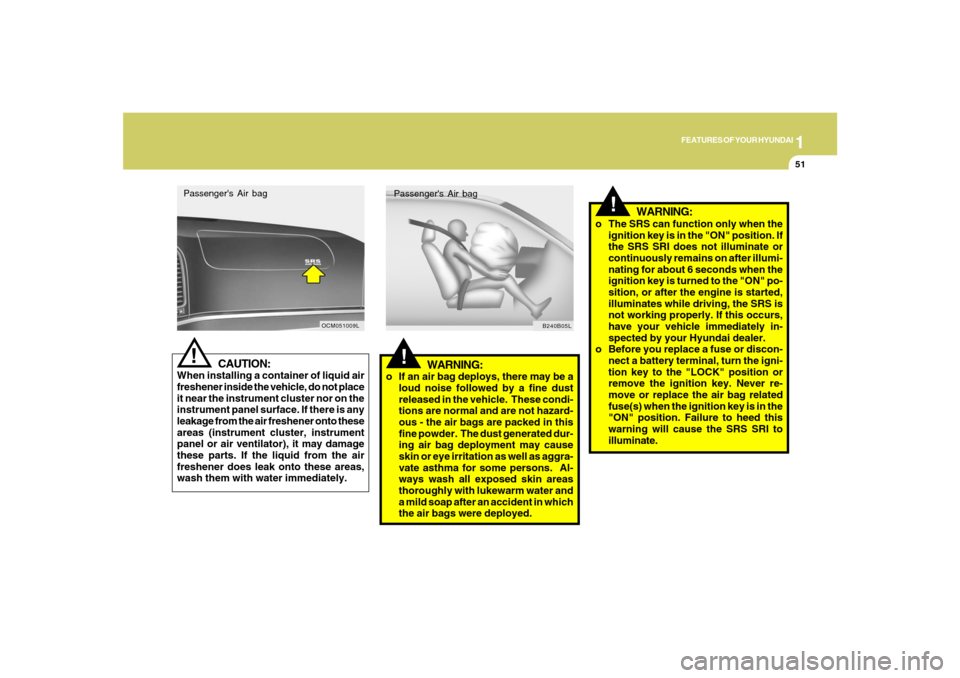
!Passenger's Air bag
OCM051009L
!
WARNING:
o If an air bag deploys, there may be a
loud noise followed by a fine dust
released in the vehicle. These condi-
tions are normal and are not hazard-
ous - the air bags are packed in this
fine powder. The dust generated dur-
ing air bag deployment may cause
skin or eye irritation as well as aggra-
vate asthma for some persons. Al-
ways wash all exposed skin areas
thoroughly with lukewarm water and
a mild soap after an accident in which
the air bags were deployed.Passenger's Air bag
B240B05L
!
o The SRS can function only when the
ignition key is in the "ON" position. If
the SRS SRI does not illuminate or
continuously remains on after illumi-
nating for about 6 seconds when the
ignition key is turned to the "ON" po-
sition, or after the engine is started,
illuminates while driving, the SRS is
not working properly. If this occurs,
have your vehicle immediately in-
spected by your Hyundai dealer.
o Before you replace a fuse or discon-
nect a battery terminal, turn the igni-
tion key to the "LOCK" position or
remove the ignition key. Never re-
move or replace the air bag related
fuse(s) when the ignition key is in the
"ON" position. Failure to heed this
warning will cause the SRS SRI to
illuminate.
WARNING:
Page 211 of 355
1
FEATURES OF YOUR HYUNDAI
199
FEATURES OF YOUR HYUNDAI
199199199199
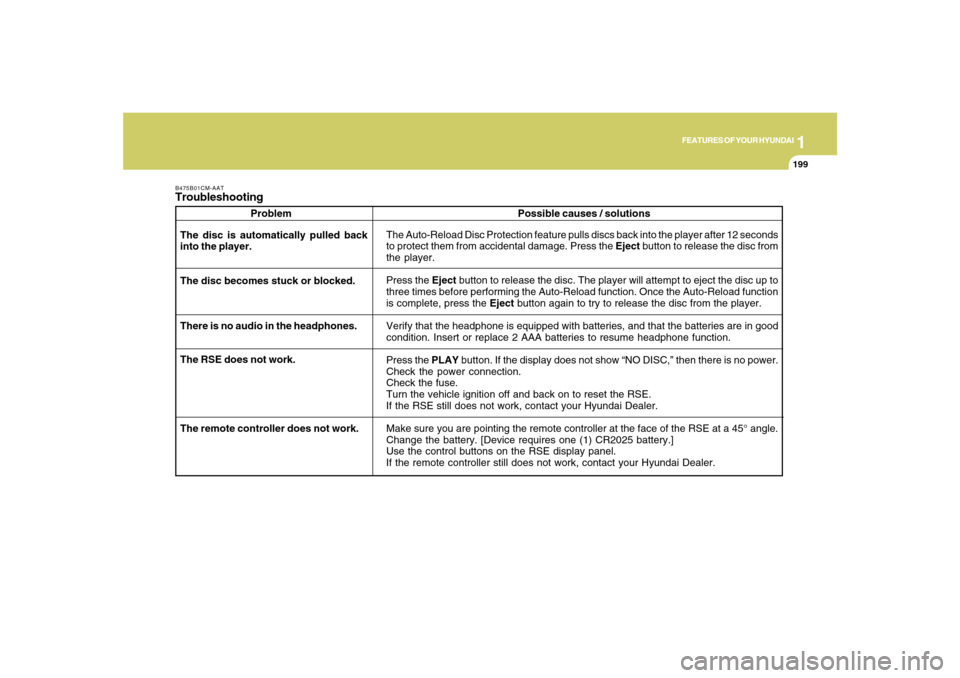
B475B01CM-AATTroubleshooting
Problem
The Auto-Reload Disc Protection feature pulls discs back into the player after 12 seconds
to protect them from accidental damage. Press the Eject button to release the disc from
the player.
Press the Eject button to release the disc. The player will attempt to eject the disc up to
three times before performing the Auto-Reload function. Once the Auto-Reload function
is complete, press the Eject button again to try to release the disc from the player.
Verify that the headphone is equipped with batteries, and that the batteries are in good
condition. Insert or replace 2 AAA batteries to resume headphone function.
Press the PLAY button. If the display does not show “NO DISC,” then there is no power.
Check the power connection.
Check the fuse.
Turn the vehicle ignition off and back on to reset the RSE.
If the RSE still does not work, contact your Hyundai Dealer.
Make sure you are pointing the remote controller at the face of the RSE at a 45° angle.
Change the battery. [Device requires one (1) CR2025 battery.]
Use the control buttons on the RSE display panel.
If the remote controller still does not work, contact your Hyundai Dealer. The disc is automatically pulled back
into the player.
The disc becomes stuck or blocked.
There is no audio in the headphones.
The RSE does not work.Possible causes / solutions
The remote controller does not work.
Page 287 of 355
6
Engine Compartment .................................................... 6-2
General Checks ............................................................ 6-4
Checking the Engine Oil ............................................... 6-5
Checking the Engine Coolant ........................................ 6-7
Changing the Air Cleaner Filter ..................................... 6-8
Windshield Wiper Blades .............................................. 6-9
Checking the Transaxle Oil (Manual) .........................6-11
Checking the Transaxle Fluid (Automatic)..................6-12
Checking the Brakes ..................................................6-14
Air Conditioning Care..................................................6-15
Changing the Climate Control Air Filter .......................6-16
Checking and Replacing Fuses..................................6-17
Checking the Battery..................................................6-20
Power Steering Fluid Level .........................................6-23
Replacement of Light Bulbs ........................................6-24
Bulb Wattage ...............................................................6-31
Fuse Panel Description...............................................6-32
6
DO-IT-YOURSELF MAINTENANCE
Page 305 of 355
6
DO-IT-YOURSELF MAINTENANCE
19
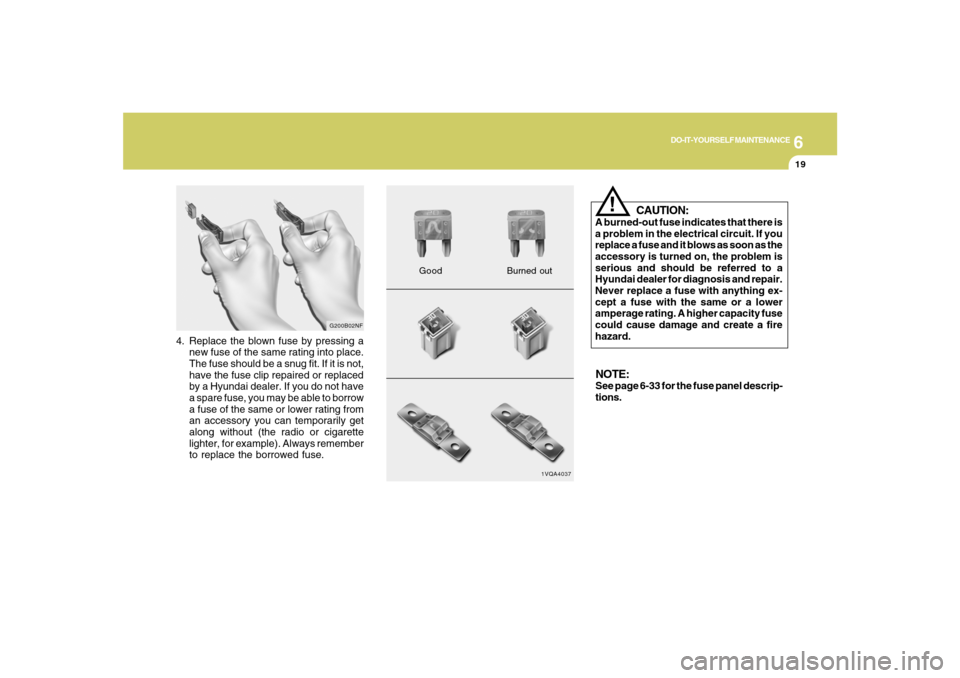
4. Replace the blown fuse by pressing a
new fuse of the same rating into place.
The fuse should be a snug fit. If it is not,
have the fuse clip repaired or replaced
by a Hyundai dealer. If you do not have
a spare fuse, you may be able to borrow
a fuse of the same or lower rating from
an accessory you can temporarily get
along without (the radio or cigarette
lighter, for example). Always remember
to replace the borrowed fuse.
G200B02NF
1VQA4037
GoodBurned out
CAUTION:
A burned-out fuse indicates that there is
a problem in the electrical circuit. If you
replace a fuse and it blows as soon as the
accessory is turned on, the problem is
serious and should be referred to a
Hyundai dealer for diagnosis and repair.
Never replace a fuse with anything ex-
cept a fuse with the same or a lower
amperage rating. A higher capacity fuse
could cause damage and create a fire
hazard.
!
NOTE:See page 6-33 for the fuse panel descrip-
tions.
Page 306 of 355
6
DO-IT-YOURSELF MAINTENANCE
20
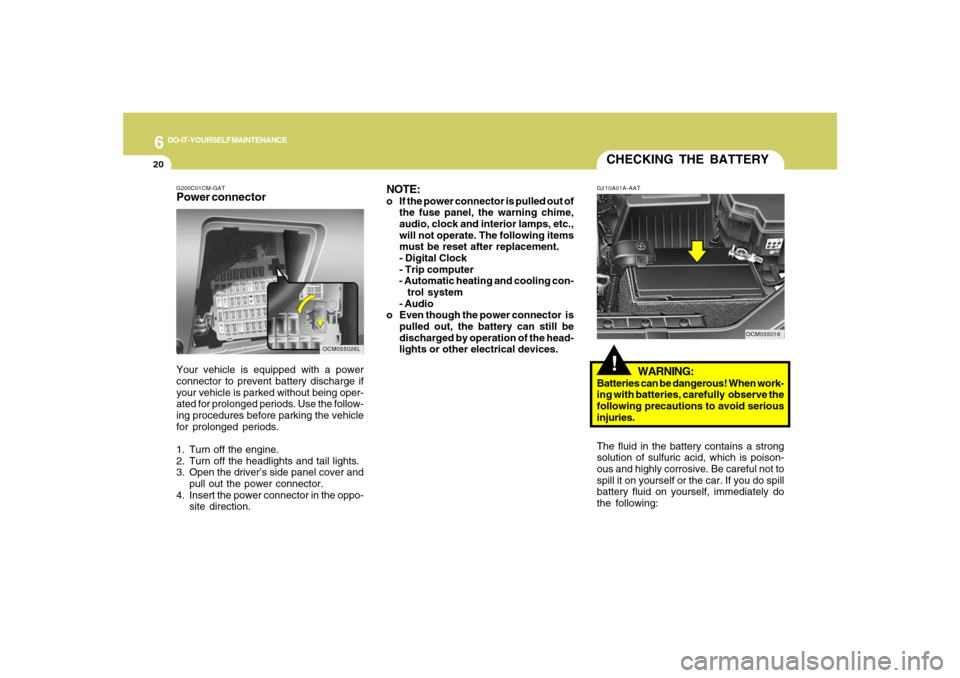
G200C01CM-GATPower connectorNOTE:
o If the power connector is pulled out of
the fuse panel, the warning chime,
audio, clock and interior lamps, etc.,
will not operate. The following items
must be reset after replacement.
- Digital Clock
- Trip computer
- Automatic heating and cooling con-
trol system
- Audio
o Even though the power connector is
pulled out, the battery can still be
discharged by operation of the head-
lights or other electrical devices.
Your vehicle is equipped with a power
connector to prevent battery discharge if
your vehicle is parked without being oper-
ated for prolonged periods. Use the follow-
ing procedures before parking the vehicle
for prolonged periods.
1. Turn off the engine.
2. Turn off the headlights and tail lights.
3. Open the driver’s side panel cover and
pull out the power connector.
4. Insert the power connector in the oppo-
site direction.
OCM055026L
CHECKING THE BATTERY!
G210A01A-AAT
WARNING:
Batteries can be dangerous! When work-
ing with batteries, carefully observe the
following precautions to avoid serious
injuries.
The fluid in the battery contains a strong
solution of sulfuric acid, which is poison-
ous and highly corrosive. Be careful not to
spill it on yourself or the car. If you do spill
battery fluid on yourself, immediately do
the following:
OCM055016
Page 318 of 355
6
DO-IT-YOURSELF MAINTENANCE
32
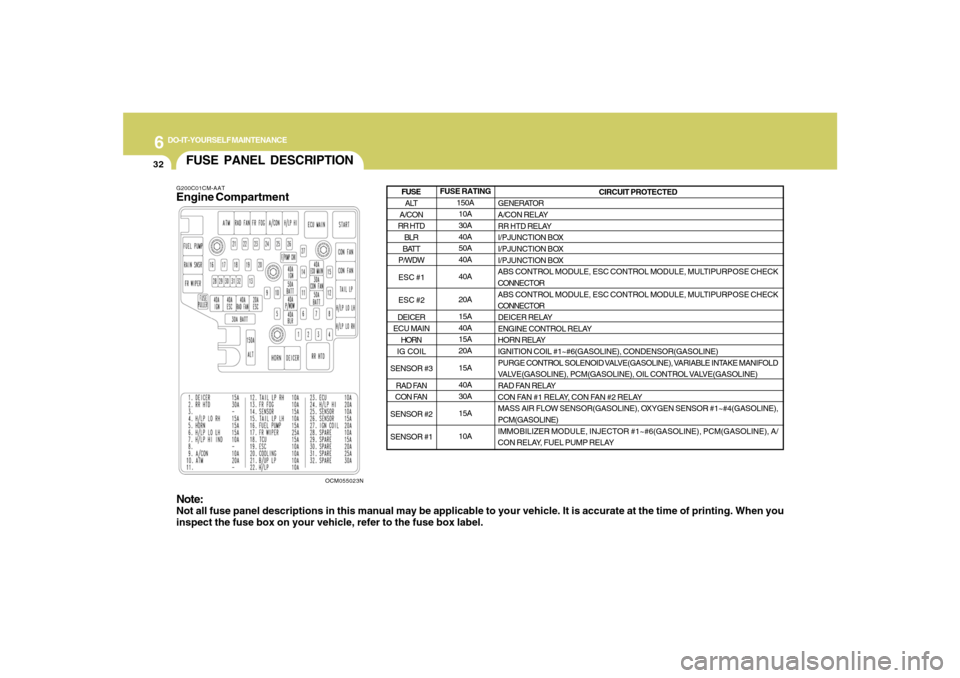
FUSE PANEL DESCRIPTIONG200C01CM-AATEngine Compartment
OCM055023N
Note:Not all fuse panel descriptions in this manual may be applicable to your vehicle. It is accurate at the time of printing. When you
inspect the fuse box on your vehicle, refer to the fuse box label.
FUSE RATING
150A
10A
30A
40A
50A
40A
40A
20A
15A
40A
15A
20A
15A
40A
30A
15A
10ACIRCUIT PROTECTED
GENERATOR
A/CON RELAY
RR HTD RELAY
I/PJUNCTION BOX
I/PJUNCTION BOX
I/PJUNCTION BOX
ABS CONTROL MODULE, ESC CONTROL MODULE, MULTIPURPOSE CHECK
CONNECTOR
ABS CONTROL MODULE, ESC CONTROL MODULE, MULTIPURPOSE CHECK
CONNECTOR
DEICER RELAY
ENGINE CONTROL RELAY
HORN RELAY
IGNITION COIL #1~#6(GASOLINE), CONDENSOR(GASOLINE)
PURGE CONTROL SOLENOID VALVE(GASOLINE), VARIABLE INTAKE MANIFOLD
VALVE(GASOLINE), PCM(GASOLINE), OIL CONTROL VALVE(GASOLINE)
RAD FAN RELAY
CON FAN #1 RELAY, CON FAN #2 RELAY
MASS AIR FLOW SENSOR(GASOLINE), OXYGEN SENSOR #1~#4(GASOLINE),
PCM(GASOLINE)
IMMOBILIZER MODULE, INJECTOR #1~#6(GASOLINE), PCM(GASOLINE), A/
CON RELAY, FUEL PUMP RELAY
ALT
A/CON
RR HTD
BLR
BATT
P/WDW
ESC #1
ESC #2
DEICER
ECU MAIN
HORN
IG COIL
SENSOR #3
RAD FAN
CON FAN
SENSOR #2
SENSOR #1FUSE
Page 320 of 355

6
DO-IT-YOURSELF MAINTENANCE
34
G200E01CM-AATInner Panel
OCM055024N
FUSE RATING
15A
25A
15A
10A
15A
10A
10A
10A
30A
10A
15A
10A
10A
10A
10A
10A
10ACIRCUIT PROTECTED
CIGARETTE LIGHTER
FRONT POWER OUTLET, REAR POWER OUTLET
CENTER POWER OUTLET
POWER OUTSIDE MIRROR SWITCH, AUDIO, ATM KEY LOCK CONTROL MODULE,
DIGITAL CLOCK
MULTIFUNCTION SWITCH, REAR WIPER CONTROL MODULE,REAR WIPER
MOTOR
RAIN SENSOR
RHEOSTAT, BCM, INSTRUMENT CLUSTER
A/C CONTROL MODULE, INCAR & HUMIDITY SENSOR, HIGH BLOWER RELAY,
REAR A/CON SWITCH, ICM RELAY BOX, AQS SENSOR, SUNROOF MOTOR,
BLOWER BELAY, ELECTRO CHROMIC MIRROR
BLOWER RELAY, BLOWER MOTOR, A/C CONTROL MODULE
A/C CONTROL MODULE
SRS CONTROL MODULE
PAB ON/OFF SWITCH, INSTRUMENT CLUSTER
HAZARD SWITCH
MULTIFUNTION SWITCH, STEERING ANGLE SENSOR, ESC SWITCH, ATM KEY
LOCK CONTROL MODULE SEAT WARMER MODULE
OIL LEVEL SENSOR MODULE, BCM
INSTRUMENT CLUSTER, PRE-EXCITATION RESISTOR, BCM, GENERATOR, SEMI
ACTIVE CONTROL MODULE (GASOLINE)
BURGLAR ALARM RELAY
C/LIGHTER
P/OUTLET
P/OUTLET
CTR
AUDIO #2
RR WIPER
IMS
BCM #2
A/CON 2
BLOWER
A/CON 1
A/BAG #1
A/BAG IND
T/SIG
ATM LOCK
BCM #1
CLUSTER
STARTFUSE
Page 350 of 355

10
INDEX
3
Corrosion protection
Cleaning the interior....................................................................... 4-5
Protecting your Hyundai from corrosion....................................... 4-2
Washing and waxing...................................................................... 4-4
Cruise Control................................................................................1-120
D
Defrosting / Defogging ...................................................................1-133
Door
Central door lock............................................................................ 1-9
Door locks...................................................................................... 1-7
Front door edge warning light ...................................................1-119
Drink Holder ......................................................................................1-88
Driving
Driving for economy .....................................................................2-23
Smooth cornering.........................................................................2-24
Winter driving...............................................................................2-24
E
Emission Control System ................................................................... 7-2
Engine
Before starting the engine .............................................................. 2-4
Compartment................................................................................. 6-2
Coolant........................................................................................... 6-7
Coolant temperature gauge .........................................................1-70
If the engine overheats .................................................................. 3-4
Number........................................................................................... 8-2
Oil ................................................................................................... 6-5
Starting........................................................................................... 2-6
Engine Exhaust Can Be Dangerous .................................................. 2-2F
Fan Speed Control.........................................................................1-126
Floor Mat Anchor ...........................................................................1-116
Fog Light
Front.............................................................................................1-83
Front Seats
Adjustable front seats ..................................................................1-16
Adjustable headrests...................................................................1-18
Adjusting seat forward and rearward ..........................................1-16
Adjusting seatback angle .............................................................1-17
Fuel
Capacity......................................................................................... 9-2
Gauge...........................................................................................1-70
Recommendations......................................................................... 1-2
Fuel Filler Lid
Remote release.........................................................................1-113
Full-time AWD Operation..................................................................
2-17
Fuses ................................................................................................6-17
Fuse panel description......................................................................6-32
G
General Checks.................................................................................. 6-4
Glove Box..........................................................................................1-95
H
Hazard Warning System ..................................................................1-83
Heating and Cooling Control..........................................................1-125
Heating and Ventilation
Air flow control...........................................................................1-127