2008 Hyundai Santa Fe air conditioning
[x] Cancel search: air conditioningPage 149 of 355
1
FEATURES OF YOUR HYUNDAI
137
FEATURES OF YOUR HYUNDAI
137137137137
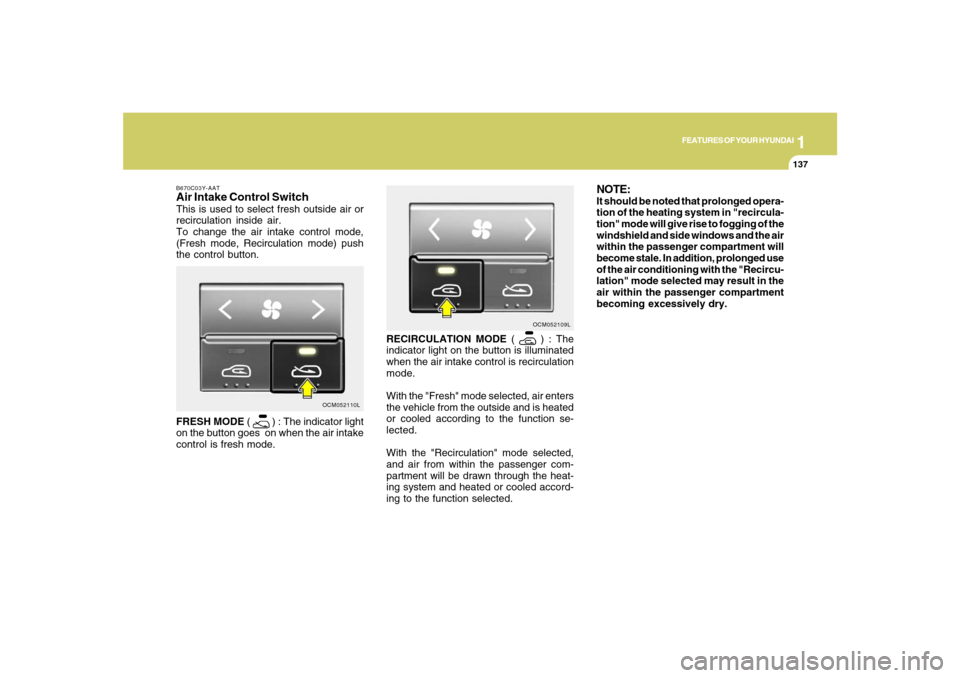
RECIRCULATION MODE (
) : The
indicator light on the button is illuminated
when the air intake control is recirculation
mode.
With the "Fresh" mode selected, air enters
the vehicle from the outside and is heated
or cooled according to the function se-
lected.
With the "Recirculation" mode selected,
and air from within the passenger com-
partment will be drawn through the heat-
ing system and heated or cooled accord-
ing to the function selected.OCM052109L
NOTE:It should be noted that prolonged opera-
tion of the heating system in "recircula-
tion" mode will give rise to fogging of the
windshield and side windows and the air
within the passenger compartment will
become stale. In addition, prolonged use
of the air conditioning with the "Recircu-
lation" mode selected may result in the
air within the passenger compartment
becoming excessively dry.
B670C03Y-AATAir Intake Control SwitchThis is used to select fresh outside air or
recirculation inside air.
To change the air intake control mode,
(Fresh mode, Recirculation mode) push
the control button.
FRESH MODE (
) : The indicator light
on the button goes on when the air intake
control is fresh mode.
OCM052110L
Page 150 of 355
1FEATURES OF YOUR HYUNDAI
138
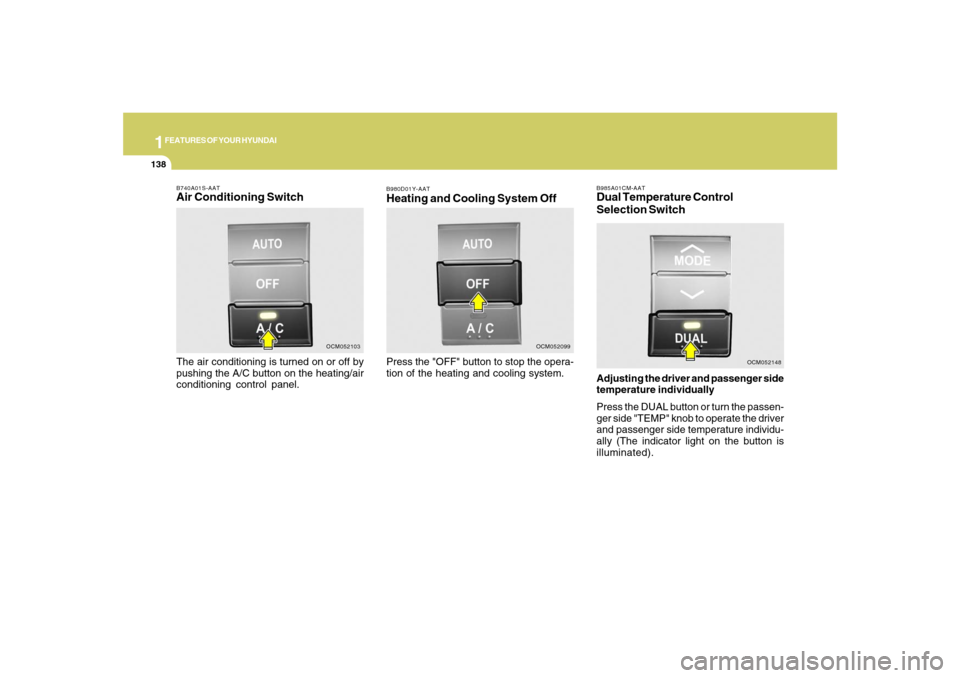
B980D01Y-AATHeating and Cooling System OffPress the "OFF" button to stop the opera-
tion of the heating and cooling system.
OCM052099
B985A01CM-AATDual Temperature Control
Selection SwitchAdjusting the driver and passenger side
temperature individually
Press the DUAL button or turn the passen-
ger side "TEMP" knob to operate the driver
and passenger side temperature individu-
ally (The indicator light on the button is
illuminated).
OCM052148
B740A01S-AATAir Conditioning SwitchThe air conditioning is turned on or off by
pushing the A/C button on the heating/air
conditioning control panel.
OCM052103
Page 153 of 355
1
FEATURES OF YOUR HYUNDAI
141
FEATURES OF YOUR HYUNDAI
141141141141
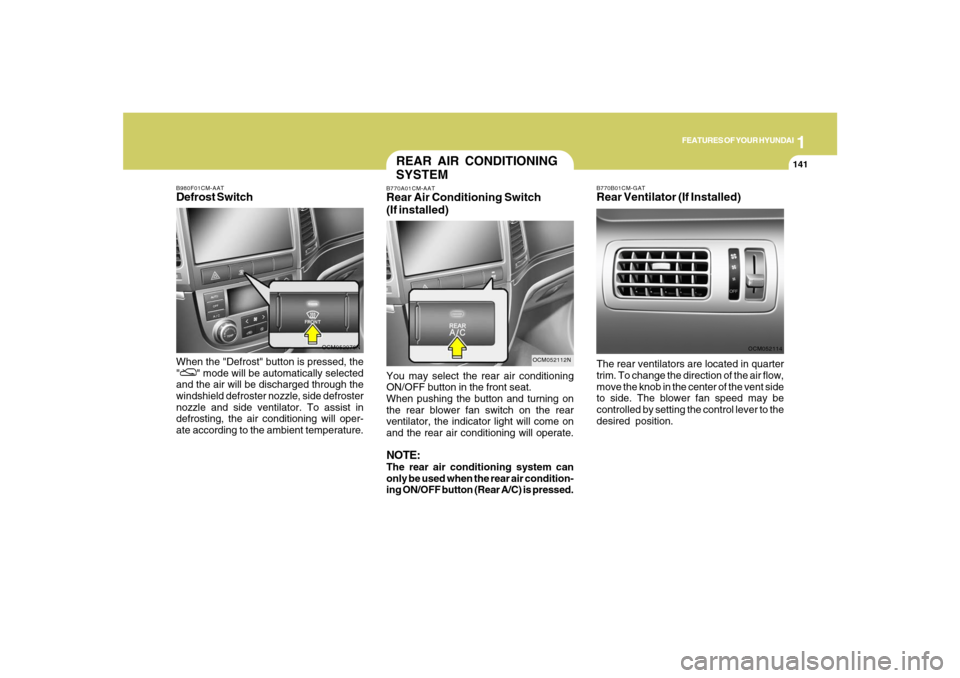
OCM052076N B980F01CM-AAT
Defrost SwitchWhen the "Defrost" button is pressed, the
"
" mode will be automatically selected
and the air will be discharged through the
windshield defroster nozzle, side defroster
nozzle and side ventilator. To assist in
defrosting, the air conditioning will oper-
ate according to the ambient temperature.
B770B01CM-GATRear Ventilator (If Installed)
OCM052114
The rear ventilators are located in quarter
trim. To change the direction of the air flow,
move the knob in the center of the vent side
to side. The blower fan speed may be
controlled by setting the control lever to the
desired position.
REAR AIR CONDITIONING
SYSTEMB770A01CM-AATRear Air Conditioning Switch
(If installed)
OCM052112N
You may select the rear air conditioning
ON/OFF button in the front seat.
When pushing the button and turning on
the rear blower fan switch on the rear
ventilator, the indicator light will come on
and the rear air conditioning will operate.NOTE:The rear air conditioning system can
only be used when the rear air condition-
ing ON/OFF button (Rear A/C) is pressed.
Page 234 of 355
2
DRIVING YOUR HYUNDAI
23
DRIVING FOR ECONOMYC140A02A-AATYou can save fuel and get more miles from
your car if you follow these suggestions:
o Drive smoothly. Accelerate at a moder-
ate rate. Don't make "jack-rabbit" starts
or full-throttle shifts and maintain a
steady cruising speed. Don't race be-
tween stoplights. Try to adjust your
speed to that of the other traffic so you
don't have to change speeds unneces-
sarily. Avoid heavy traffic whenever pos-
sible. Always maintain a safe distance
from other vehicles so you can avoid
unnecessary braking. This also reduces
brake wear.
o Drive at a moderate speed. The faster
you drive, the more fuel your car uses.
Driving at a moderate speed, espe-
cially on the highway, is one of the most
effective ways to reduce fuel consump-
tion.
o Don't "ride" the brake or clutch pedal.
This can increase fuel consumption and
also increase wear on these compo-
nents. In addition, driving with your foot
resting on the brake pedal may cause
the brakes to overheat, which reduces
their effectiveness and may lead to more
serious consequences.o Take care of your tires. Keep them in-
flated to the recommended pressure.
Incorrect inflation, either too much or
too little, results in unnecessary tire
wear. Check the tire pressures at least
once a month.
o Be sure that the wheels are aligned
correctly. Improper alignment can re-
sult from hitting curbs or driving too fast
over irregular surfaces. Poor alignment
causes faster tire wear and may also
result in other problems as well as
greater fuel consumption.
o Keep your car in good condition. For
better fuel economy and reduced main-
tenance costs, maintain your car in ac-
cordance with the maintenance sched-
ule in Section 5. If you drive your car in
severe conditions, more frequent main-
tenance is required (see Section 5 for
details).
o Keep your car clean. For maximum
service, your Hyundai should be kept
clean and free of corrosive materials. It
is especially important that mud, dirt,
ice, etc. not be allowed to accumulate
on the underside of the car. This extra
weight can result in increased fuel con-
sumption and also contribute to corro-
sion.o Travel lightly. Don't carry unnecessary
weight in your car. Weight reduces fuel
economy.
o Don't let the engine idle longer than
necessary. If you are waiting (and not in
traffic), turn off your engine and restart
only when you're ready to go.
o Remember, your Hyundai does not re-
quire extended warm-up. After the en-
gine has started, allow the engine to run
for 10 to 20 seconds prior to placing the
vehicle in gear. In very cold weather,
however, give your engine a slightly
longer warm-up period.
o Don't "lug" or "over-rev" the engine.
Lugging is driving too slowly in too high
a gear resulting in the engine bucking.
If this happens, shift to a lower gear.
Over-revving is racing the engine be-
yond its safe limit. This can be avoided
by shifting at the recommended speeds.
o Use your air conditioning sparingly. The
air conditioning system is operated by
engine power so your fuel economy is
reduced when you use it.
Page 252 of 355
34WHAT TO DO IN AN EMERGENCY
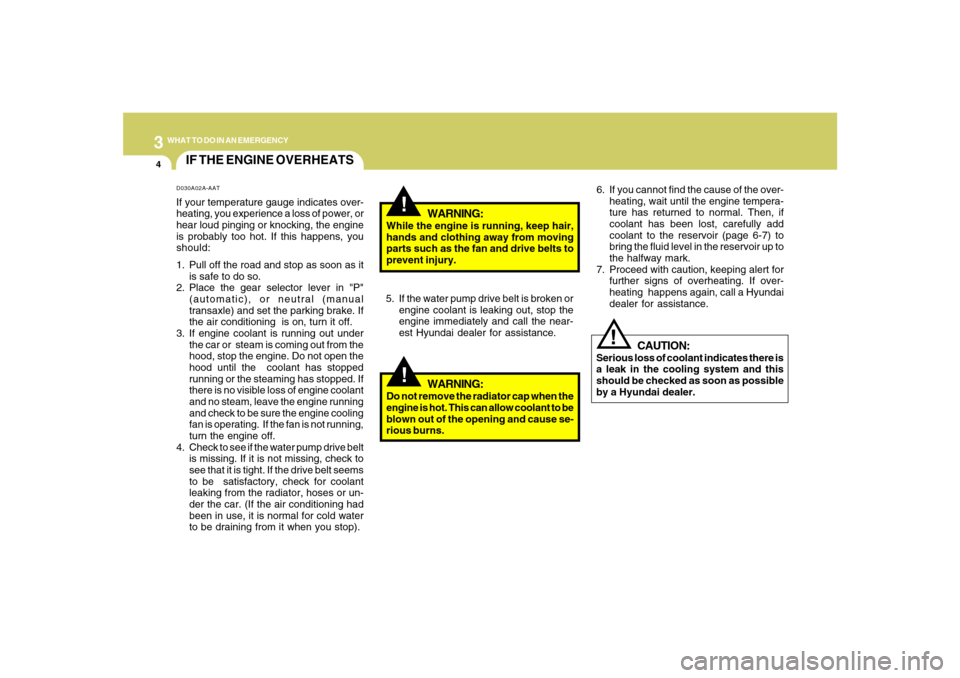
IF THE ENGINE OVERHEATS
!!
!
WARNING:
While the engine is running, keep hair,
hands and clothing away from moving
parts such as the fan and drive belts to
prevent injury.
5. If the water pump drive belt is broken or
engine coolant is leaking out, stop the
engine immediately and call the near-
est Hyundai dealer for assistance.
WARNING:
Do not remove the radiator cap when the
engine is hot. This can allow coolant to be
blown out of the opening and cause se-
rious burns.6. If you cannot find the cause of the over-
heating, wait until the engine tempera-
ture has returned to normal. Then, if
coolant has been lost, carefully add
coolant to the reservoir (page 6-7) to
bring the fluid level in the reservoir up to
the halfway mark.
7. Proceed with caution, keeping alert for
further signs of overheating. If over-
heating happens again, call a Hyundai
dealer for assistance.
CAUTION:
Serious loss of coolant indicates there is
a leak in the cooling system and this
should be checked as soon as possible
by a Hyundai dealer.
D030A02A-AATIf your temperature gauge indicates over-
heating, you experience a loss of power, or
hear loud pinging or knocking, the engine
is probably too hot. If this happens, you
should:
1. Pull off the road and stop as soon as it
is safe to do so.
2. Place the gear selector lever in "P"
(automatic), or neutral (manual
transaxle) and set the parking brake. If
the air conditioning is on, turn it off.
3. If engine coolant is running out under
the car or steam is coming out from the
hood, stop the engine. Do not open the
hood until the coolant has stopped
running or the steaming has stopped. If
there is no visible loss of engine coolant
and no steam, leave the engine running
and check to be sure the engine cooling
fan is operating. If the fan is not running,
turn the engine off.
4. Check to see if the water pump drive belt
is missing. If it is not missing, check to
see that it is tight. If the drive belt seems
to be satisfactory, check for coolant
leaking from the radiator, hoses or un-
der the car. (If the air conditioning had
been in use, it is normal for cold water
to be draining from it when you stop).
Page 281 of 355
5
VEHICLE MAINTENANCE REQUIREMENTS
5
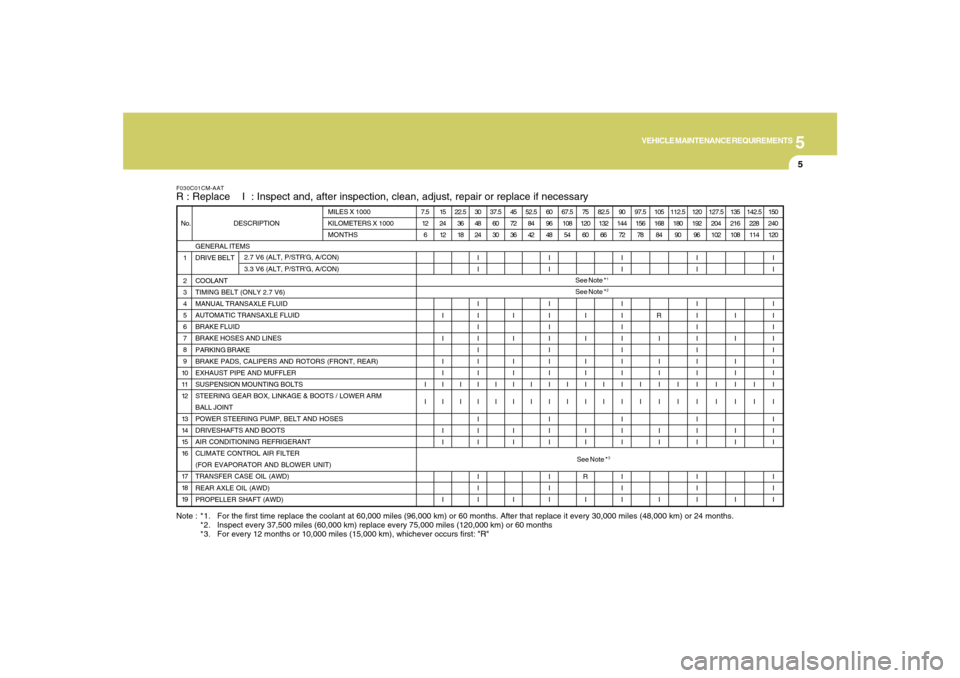
Note : *1. For the first time replace the coolant at 60,000 miles (96,000 km) or 60 months. After that replace it every 30,000 miles (48,000 km) or 24 months.
*2. Inspect every 37,500 miles (60,000 km) replace every 75,000 miles (120,000 km) or 60 months
*3. For every 12 months or 10,000 miles (15,000 km), whichever occurs first: "R"F030C01CM-AATR : Replace I : Inspect and, after inspection, clean, adjust, repair or replace if necessary
GENERAL ITEMS
DRIVE BELT
COOLANT
TIMING BELT (ONLY 2.7 V6)
MANUAL TRANSAXLE FLUID
AUTOMATIC TRANSAXLE FLUID
BRAKE FLUID
BRAKE HOSES AND LINES
PARKING BRAKE
BRAKE PADS, CALIPERS AND ROTORS (FRONT, REAR)
EXHAUST PIPE AND MUFFLER
SUSPENSION MOUNTING BOLTS
STEERING GEAR BOX, LINKAGE & BOOTS / LOWER ARM
BALL JOINT
POWER STEERING PUMP, BELT AND HOSES
DRIVESHAFTS AND BOOTS
AIR CONDITIONING REFRIGERANT
CLIMATE CONTROL AIR FILTER
(FOR EVAPORATOR AND BLOWER UNIT)
TRANSFER CASE OIL (AWD)
REAR AXLE OIL (AWD)
PROPELLER SHAFT (AWD) 1
2
3
4
5
6
7
8
9
10
11
12
13
14
15
16
17
18
19 No. DESCRIPTIONMILES X 1000
KILOMETERS X 1000
MONTHS
2.7 V6 (ALT, P/STR'G, A/CON)
3.3 V6 (ALT, P/STR'G, A/CON)7.5
12
6
I
I15
24
12
I
I
I
I
I
I
I
I
I22.5
36
18
I
I30
48
24
I
I
I
I
I
I
I
I
I
I
I
I
I
I
I
I
I37.5
60
30
I
I45
72
36
I
I
I
I
I
I
I
I
I52.5
84
42
I
I60
96
48
I
I
I
I
I
I
I
I
I
I
I
I
I
I
I
I
I67.5
108
54
I
I75
120
60
I
I
I
I
I
I
I
I
R
I82.5
132
66
I
I90
144
72
I
I
I
I
I
I
I
I
I
I
I
I
I
I
I
I
I97.5
156
78
I
I105
168
84
R
I
I
I
I
I
I
I
I112.5
180
90
I
I120
192
96
I
I
I
I
I
I
I
I
I
I
I
I
I
I
I
I
I127.5
204
102
I
I135
216
108
I
I
I
I
I
I
I
I
I142.5
228
114
I
I150
240
120
I
I
I
I
I
I
I
I
I
I
I
I
I
I
I
I
ISee Note *
1
See Note *
2
See Note *
3
Page 286 of 355
5
VEHICLE MAINTENANCE REQUIREMENTS
10
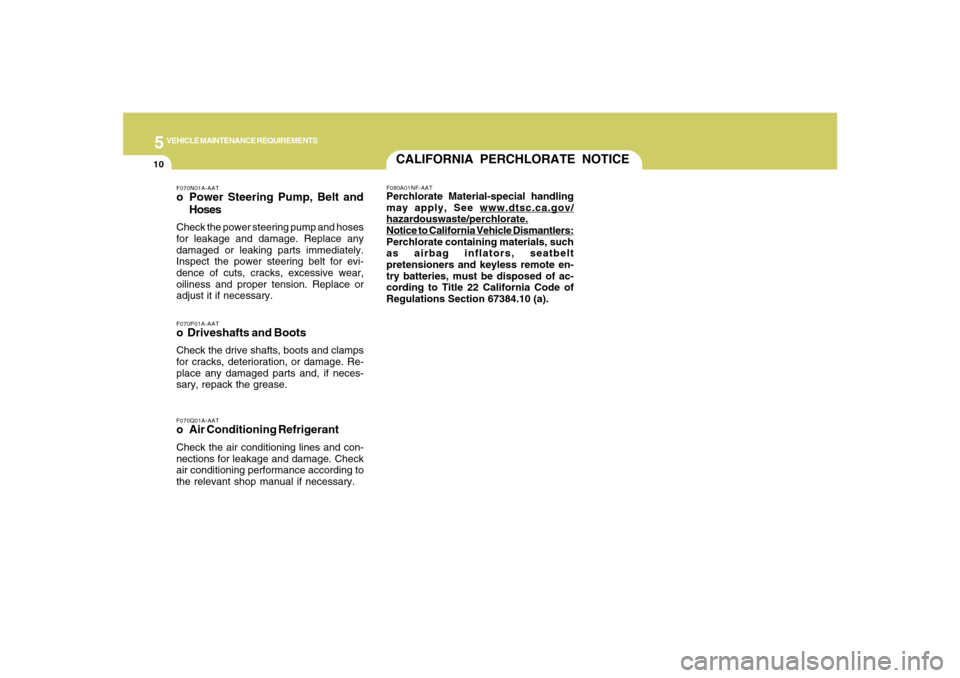
F070Q01A-AATo Air Conditioning RefrigerantCheck the air conditioning lines and con-
nections for leakage and damage. Check
air conditioning performance according to
the relevant shop manual if necessary.F070P01A-AATo Driveshafts and BootsCheck the drive shafts, boots and clamps
for cracks, deterioration, or damage. Re-
place any damaged parts and, if neces-
sary, repack the grease.F070N01A-AATo Power Steering Pump, Belt and
HosesCheck the power steering pump and hoses
for leakage and damage. Replace any
damaged or leaking parts immediately.
Inspect the power steering belt for evi-
dence of cuts, cracks, excessive wear,
oiliness and proper tension. Replace or
adjust it if necessary.
CALIFORNIA PERCHLORATE NOTICEF080A01NF-AATPerchlorate Material-special handling
may apply, See
www.dtsc.ca.gov/
hazardouswaste/perchlorate.Notice to California Vehicle Dismantlers:
Perchlorate containing materials, such
as airbag inflators, seatbelt
pretensioners and keyless remote en-
try batteries, must be disposed of ac-
cording to Title 22 California Code of
Regulations Section 67384.10 (a).
Page 287 of 355
6
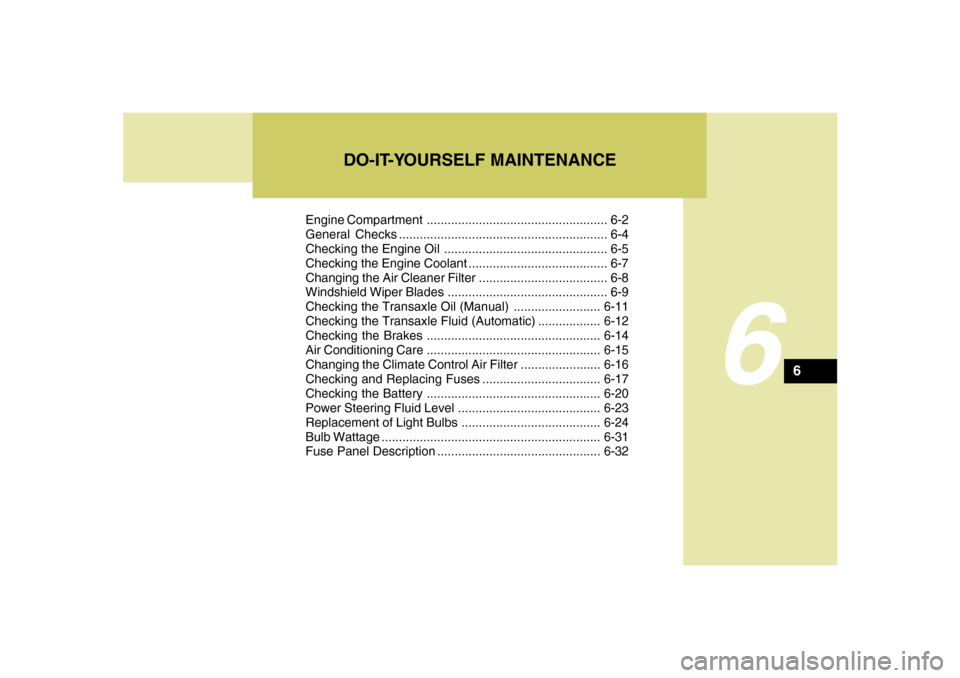
Engine Compartment .................................................... 6-2
General Checks ............................................................ 6-4
Checking the Engine Oil ............................................... 6-5
Checking the Engine Coolant ........................................ 6-7
Changing the Air Cleaner Filter ..................................... 6-8
Windshield Wiper Blades .............................................. 6-9
Checking the Transaxle Oil (Manual) .........................6-11
Checking the Transaxle Fluid (Automatic)..................6-12
Checking the Brakes ..................................................6-14
Air Conditioning Care..................................................6-15
Changing the Climate Control Air Filter .......................6-16
Checking and Replacing Fuses..................................6-17
Checking the Battery..................................................6-20
Power Steering Fluid Level .........................................6-23
Replacement of Light Bulbs ........................................6-24
Bulb Wattage ...............................................................6-31
Fuse Panel Description...............................................6-32
6
DO-IT-YOURSELF MAINTENANCE