2008 Hyundai Santa Fe Motor
[x] Cancel search: MotorPage 238 of 355
2
DRIVING YOUR HYUNDAI
27
TRAILER OR VEHICLE TOWING!
C190A01S-AATIf you are considering towing with your car,
you should first check with your State's
Department of Motor Vehicles to deter-
mine their legal requirements.
Since laws vary from State to State the
requirements for towing trailers, cars, or
other types of vehicles or apparatus may
differ. Ask your Hyundai dealer for further
details before towing.
CAUTION:
Do not do any towing with your car during
its first 1,200 miles (2,000 km) in order to
allow the engine to properly break in.
Failure to heed this caution may result in
serious engine or transaxle damage.
USE OF LIGHTSC180A01A-AATCheck your lights regularly for correct op-
eration and always keep them clean. When
driving during the day in conditions of poor
visibility, it is helpful to drive with head-
lights on low beam. This enables you to be
seen as well as to see.
!
o Driving on tires with no or insufficient
tread is dangerous. Worn-out tires
can result in loss of vehicle control,
collisions, injury, and even death.
Worn-out tires should be replaced as
soon as possible and should never be
used for driving. Always check tire
tread before driving your car. Refer to
8-12 for further information and tread
limits.
WARNING:
2. Fuel, engine coolant and engine oil:
High speed travel consumes more fuel
than urban motoring. Do not forget to check
both engine coolant and engine oil.
3. Drive belt:
A loose or damaged drive belt may result
in overheating of the engine.
Page 278 of 355
5
VEHICLE MAINTENANCE REQUIREMENTS2
F010C01A-AATSpecified Scheduled ProceduresThese are the procedures such as inspec-
tions, adjustments and replacements that
are listed in the maintenance charts start-
ing on page 5-4. These procedures must
be performed at the intervals shown in the
maintenance schedule to assure that your
warranty remains in effect. Although it is
strongly recommended that they be per-
formed by the trained technicians at your
Hyundai dealer, these procedures may be
performed at any qualified service facility.
It is suggested that genuine Hyundai ser-
vice parts be used for any required repairs
or replacements. Other parts of equivalent
quality such as engine oil, engine coolant,
manual or auto transaxle oil, brake fluid
and so on which are not supplied by
Hyundai Motor Company or its distributor
may be used without affecting your war-
ranty coverage but you should always be
sure these are equivalent to the quality of
the original Hyundai parts. Your Owner's
Handbook provides further information
about your warranty coverage.
F010A01A-AATService RequirementsTo ensure that you receive the greatest
number of miles of satisfying operation
from your Hyundai, certain maintenance
procedures must be performed. Although
careful design and engineering have re-
duced these to a minimum, those that are
required are of the utmost importance.
It is your responsibility to have these main-
tenance procedures performed to comply
with the terms of the warranties covering
your new Hyundai. The Owner's Hand-
book supplied with your new vehicle pro-
vides further information about these war-
ranties.
F010B01A-AATMaintenance RequirementsThe maintenance required for your
Hyundai can be divided into three main
areas:
o Specified scheduled procedures
o General checks
o Do-it-yourself maintenance
MAINTENANCE INTERVALS
Page 285 of 355
5
VEHICLE MAINTENANCE REQUIREMENTS
9
F070F01A-AATo Brake Hoses and LinesVisually check for proper installation, chaf-
ing, cracks, deterioration and any leak-
age. Replace any deteriorated or dam-
aged parts immediately.F070E01CM-AATo Automatic Transaxle FluidThe fluid level should be in the “75°C”
range of the dipstick, after the engine and
transaxle are at normal operating tem-
perature. Check the automatic transaxle
fluid level with the engine running and the
transaxle in neutral, with the parking brake
properly applied. Use HYUNDAI GENU-
INE ATF SP III, DIAMOND ATF SP III, SK
ATF SP III or other brands meeting the SP
III specification approved by Hyundai Motor
Co. when adding or changing fluid. Using
the wrong ATF may result in damage to the
ATM.
F070L01A-AATo Suspension Mounting BoltsCheck the suspension connections for
looseness or damage. Retighten to the
specified torque.
F070G02A-AATo Brake FluidCheck brake fluid level in the brake fluid
reservoir. The level should be between
"MIN" and "MAX" marks on the side of the
reservoir. Use only hydraulic brake fluid
conforming to DOT 3 or DOT 4.
F070K01A-AATo Exhaust Pipe and MufflerVisually inspect the exhaust pipes, muffler
and hangers for cracks, deterioration, or
damage. Start the engine and listen care-
fully for any exhaust gas leakage. Tighten
connections or replace parts as neces-
sary.
F070J01A-AATo Brake Pads, Calipers and RotorsCheck the pads for excessive wear, discs
for run out and wear, and calipers for fluid
leakage.F070H01CM-AATo Parking BrakeInspect the parking brake system includ-
ing the parking brake lever (or the parking
brake pedal) and cables. For detailed ser-
vice procedures, refer to the Shop Manual.
F070M01A-AATo Steering Gear Box, Linkage &
Boots/Lower Arm Ball JointWith the vehicle stopped and engine off,
check for excessive free-play in the steer-
ing wheel.
Check the linkage for bends or damage.
Check the dust boots and ball joints for
deterioration, cracks, or damage. Replace
any damaged parts.
Page 298 of 355
6
DO-IT-YOURSELF MAINTENANCE
12
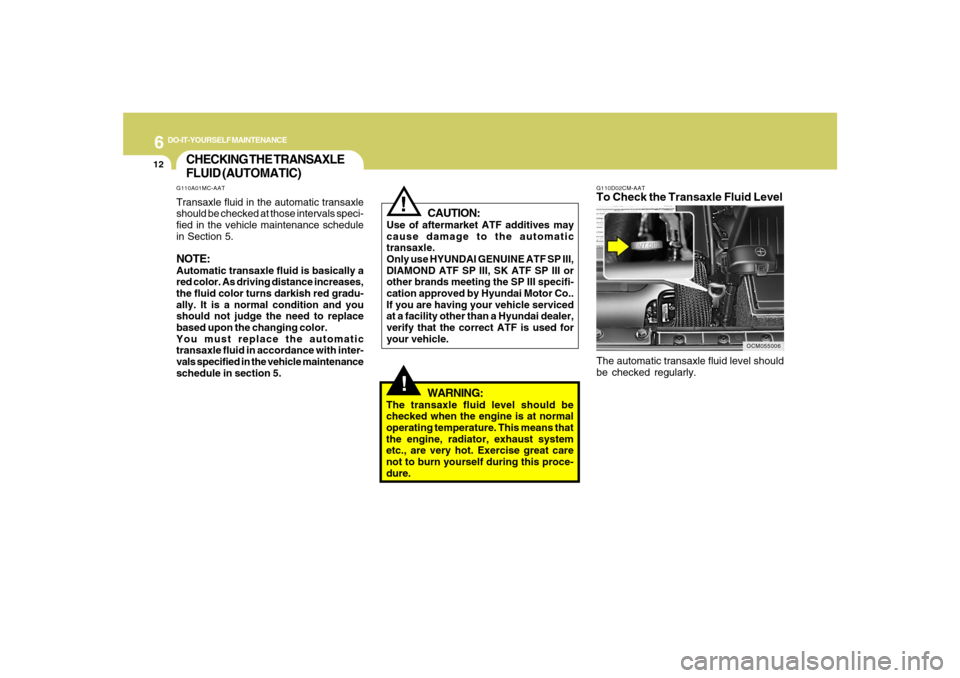
OCM055006 G110D02CM-AAT
To Check the Transaxle Fluid LevelThe automatic transaxle fluid level should
be checked regularly.
CHECKING THE TRANSAXLE
FLUID (AUTOMATIC)
!
WARNING:
The transaxle fluid level should be
checked when the engine is at normal
operating temperature. This means that
the engine, radiator, exhaust system
etc., are very hot. Exercise great care
not to burn yourself during this proce-
dure.
!
CAUTION:
Use of aftermarket ATF additives may
cause damage to the automatic
transaxle.
Only use HYUNDAI GENUINE ATF SP III,
DIAMOND ATF SP III, SK ATF SP III or
other brands meeting the SP III specifi-
cation approved by Hyundai Motor Co..
If you are having your vehicle serviced
at a facility other than a Hyundai dealer,
verify that the correct ATF is used for
your vehicle.
G110A01MC-AATTransaxle fluid in the automatic transaxle
should be checked at those intervals speci-
fied in the vehicle maintenance schedule
in Section 5.NOTE:Automatic transaxle fluid is basically a
red color. As driving distance increases,
the fluid color turns darkish red gradu-
ally. It is a normal condition and you
should not judge the need to replace
based upon the changing color.
You must replace the automatic
transaxle fluid in accordance with inter-
vals specified in the vehicle maintenance
schedule in section 5.
Page 319 of 355

6
DO-IT-YOURSELF MAINTENANCE
33
FUSE RATING
15A
15A
15A
10A
10A
25A
20A
10A
40A
40A
50A
20A
15A
10A
10A
10A
10A
10A
10A
10A
10A
15A
20A
25A
30ACIRCUIT PROTECTED
FUEL PUMP RELAY
H/LP LO LH RELAY
H/LP LO RH RELAY
FR FOG RELAY
I/P JUNCTION BOX
FR WIPER RELAY, RAIN SNSR RELAY, FRONT WIPER MOTOR, MULTIFUNCTION SWITCH
H/LP HI RELAY
HEAD LAMP, INSTRUMENT CLUSTER
IGNITION SWITCH
IGNITION SWITCH, START RELAY
I/P JUNCTION BOX
ATM RELAY(GASOLINE), AWD ECM
PCM(GASOLINE)
GENERATOR
VEHICLE SPEED SENSOR, PCM(GASOLINE), SEMI ACTIVE CONTROL MODULE(GASOLINE)
CON FAN #1 RELAY, CON FAN #2 RELAY
INPUT SPEED SENSOR, OUTPUT SPEED SENSOR, TRANSAXLE RANGE SWITCH, BACK-UP LAMP SWITCH
ABS CONTROL MODULE, ESC CONTROL MODULE, YAW RATE SENSOR, AWD ECM, STOP LAMP SWITCH(GASOLINE), MULTIPURPOSE
CHECK CONNECTOR
REAR COMBINATION LAMP LH, POSITION LAMP LH
REAR COMBINATION LAMP RH, POSITION LAMP RH
GLOVE BOX LAMP, ICM RELAY BOX
-
-
-
-
-
FUEL PUMP
H/LP LO LH
H/LP LO RH
FR FOG
H/LP
FR WIPER
H/LP HI
H/LP HI IND
IGN #1
IGN #2
BATT
AT M
TCU
ALT DSL
ECU
COOLING
B/UP UP
ESC
TAIL LH
TAIL RH
SPARE
SPARE
SPARE
SPARE
SPAREFUSE
Page 320 of 355

6
DO-IT-YOURSELF MAINTENANCE
34
G200E01CM-AATInner Panel
OCM055024N
FUSE RATING
15A
25A
15A
10A
15A
10A
10A
10A
30A
10A
15A
10A
10A
10A
10A
10A
10ACIRCUIT PROTECTED
CIGARETTE LIGHTER
FRONT POWER OUTLET, REAR POWER OUTLET
CENTER POWER OUTLET
POWER OUTSIDE MIRROR SWITCH, AUDIO, ATM KEY LOCK CONTROL MODULE,
DIGITAL CLOCK
MULTIFUNCTION SWITCH, REAR WIPER CONTROL MODULE,REAR WIPER
MOTOR
RAIN SENSOR
RHEOSTAT, BCM, INSTRUMENT CLUSTER
A/C CONTROL MODULE, INCAR & HUMIDITY SENSOR, HIGH BLOWER RELAY,
REAR A/CON SWITCH, ICM RELAY BOX, AQS SENSOR, SUNROOF MOTOR,
BLOWER BELAY, ELECTRO CHROMIC MIRROR
BLOWER RELAY, BLOWER MOTOR, A/C CONTROL MODULE
A/C CONTROL MODULE
SRS CONTROL MODULE
PAB ON/OFF SWITCH, INSTRUMENT CLUSTER
HAZARD SWITCH
MULTIFUNTION SWITCH, STEERING ANGLE SENSOR, ESC SWITCH, ATM KEY
LOCK CONTROL MODULE SEAT WARMER MODULE
OIL LEVEL SENSOR MODULE, BCM
INSTRUMENT CLUSTER, PRE-EXCITATION RESISTOR, BCM, GENERATOR, SEMI
ACTIVE CONTROL MODULE (GASOLINE)
BURGLAR ALARM RELAY
C/LIGHTER
P/OUTLET
P/OUTLET
CTR
AUDIO #2
RR WIPER
IMS
BCM #2
A/CON 2
BLOWER
A/CON 1
A/BAG #1
A/BAG IND
T/SIG
ATM LOCK
BCM #1
CLUSTER
STARTFUSE
Page 321 of 355
6
DO-IT-YOURSELF MAINTENANCE
35
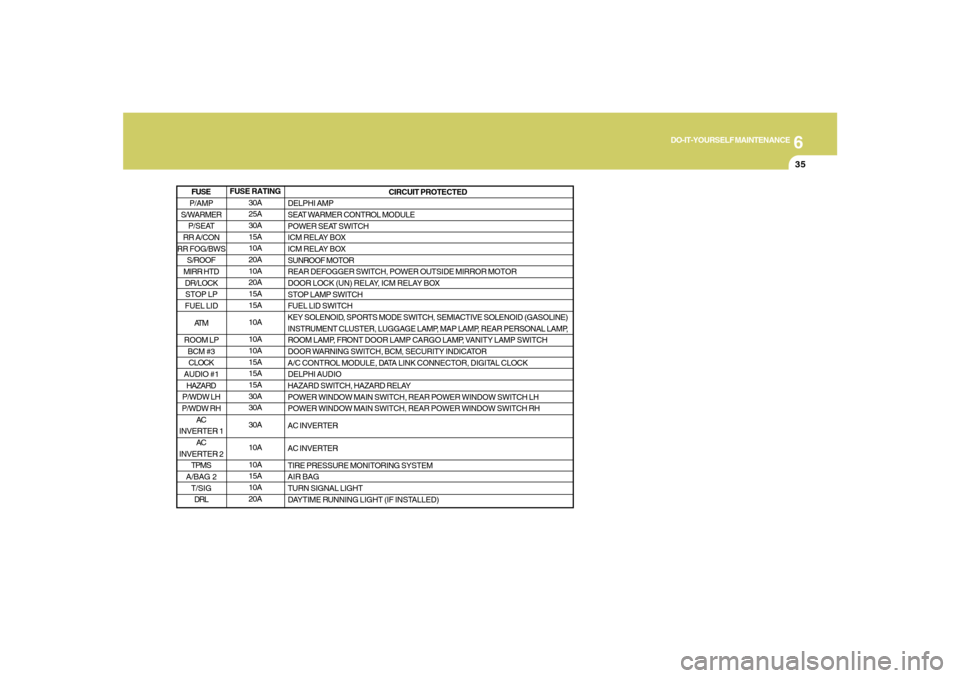
FUSE RATING
30A
25A
30A
15A
10A
20A
10A
20A
15A
15A
10A
10A
10A
15A
15A
15A
30A
30A
30A
10A
10A
15A
10A
20ACIRCUIT PROTECTED
DELPHI AMP
SEAT WARMER CONTROL MODULE
POWER SEAT SWITCH
ICM RELAY BOX
ICM RELAY BOX
SUNROOF MOTOR
REAR DEFOGGER SWITCH, POWER OUTSIDE MIRROR MOTOR
DOOR LOCK (UN) RELAY, ICM RELAY BOX
STOP LAMP SWITCH
FUEL LID SWITCH
KEY SOLENOID, SPORTS MODE SWITCH, SEMIACTIVE SOLENOID (GASOLINE)
INSTRUMENT CLUSTER, LUGGAGE LAMP, MAP LAMP, REAR PERSONAL LAMP,
ROOM LAMP, FRONT DOOR LAMP CARGO LAMP, VANITY LAMP SWITCH
DOOR WARNING SWITCH, BCM, SECURITY INDICATOR
A/C CONTROL MODULE, DATA LINK CONNECTOR, DIGITAL CLOCK
DELPHI AUDIO
HAZARD SWITCH, HAZARD RELAY
POWER WINDOW MAIN SWITCH, REAR POWER WINDOW SWITCH LH
POWER WINDOW MAIN SWITCH, REAR POWER WINDOW SWITCH RH
AC INVERTER
AC INVERTER
TIRE PRESSURE MONITORING SYSTEM
AIR BAG
TURN SIGNAL LIGHT
DAYTIME RUNNING LIGHT (IF INSTALLED)
P/AMP
S/WARMER
P/SEAT
RR A/CON
RR FOG/BWS
S/ROOF
MIRR HTD
DR/LOCK
STOP LP
FUEL LID
AT M
ROOM LP
BCM #3
CLOCK
AUDIO #1
HAZARD
P/WDW LH
P/WDW RH
AC
INVERTER 1
AC
INVERTER 2
TPMS
A/BAG 2
T/SIG
DRLFUSE
Page 332 of 355
8
CONSUMER INFORMATION, REPORTING SAFETY DEFECTS & BINDING ARBITRATION OF WARRANTY CLAIMS
7
o T: Speed Rating. The speed rating
denotes the speed at which a tire is
designed to be driven for extended
periods of time. The ratings range
from "A" to "Z" (98 to 186 MPH).
3. TIN (Tire Identification Number) for
new tire (example: DOT XX XX XXX
XXXX)
o DOT: Abbreviation for the "Depart-
ment of Transportation". The sym-
bol can be placed above, below or
to the left or right of the Tire Iden
tification Number. Indicates tire is
in compliance with the U.S. De-
partment of Transportation Motor
Vehicle Safety Standards.
o 1st two-digit code: Manufacturer's
identification mark
o 2nd two-digit code: Tire size
o 3rd three-digit code: Tire type code
(Optional)
o 4th four-digit code: Date of Manu-
factureo Four numbers represent the week
and year the tire was built. For
example, the numbers 3105 means
the 31st week of 2005.
4. Tire ply composition and material
The number of layers or plies of
rubbercoated fabric in the tire. Tire
manufacturers also must indicate
the materials in the tire, which in-
clude steel, nylon, polyester, and
others. The letter "R" means radial
ply construction; the letter "D" means
diagonal or bias ply construction;
and the letter "B" means belted-bias
ply construction.
5. Maximum permissible inflation
pressure
This number is the greatest amount
of air pressure that should be put in
the tire. Do not exceed the maximum
permissible inflation pressure. Refer
to the Tire and Loading Information
label for recommended inflation pres-
sure.6. Maximum load rating
This number indicates the maximum
load in kilograms and pounds that
can be carried by the tire. When
replacing the tires on the vehicle,
always use a tire that has the same
load rating as the factory installed
tire.
7. Uniform Tire Quality Grading
(UTQG):
Tire manufacturers are required to
grade tires based on three perfor-
mance factors: treadwear, traction
and temperature resistance. For more
information, see Uniform Tire Qual-
ity Grading on page 8-16.