2008 HYUNDAI ENTOURAGE oil temperature
[x] Cancel search: oil temperaturePage 272 of 393

Driving your vehicle32 4 We recommend that you carry emer-
gency equipment, including tire chains,
a window scraper, windshield de-icer,
a bag of sand or salt, flares, a small
shovel and jumper cables.
Make sure you have sufficient ethyl-
ene-glycol coolant in the radiator.
Check the battery condition and
cables. Cold temperatures reduce the
capacity of any battery, so it must be in
excellent condition to provide enough
winter starting power.
Make sure the engine oil viscosity is
suitable for cold weather.
Check the ignition system for loose
connections and damage.
Use antifreeze-formulated windshield
washer fluid. (Do not use engine
coolant antifreeze.)
Do not use the parking brake if it might
freeze. When parking, shift to P (Park)
with an automatic transaxle and block
the rear wheels.
Snow tires If you mount snow tires on your Hyundai,
make sure they are radial tires of the
same size and load range as the original
tires. Mount snow tires on all four wheels
to balance your vehicle’s handling in all
weather conditions. Keep in mind that the
traction provided by snow tires on dry
roads may not be as high as your vehi-
cle's original equipment tires. You should
drive cautiously even when the roads are
clear. Check with the tire dealer for max-
imum speed recommendations.Do not install studded tires without first
checking local, state and municipal regu-
lations for possible restrictions against
their use.Tire chains
Since the sidewalls of radial tires are
thinner, they can be damaged by mount-
ing some types of snow chains on them.
Therefore, the use of snow tires is rec-
ommended instead of snow chains. Do
not mount tire chains on vehicles
equipped with aluminum wheels; snow
chains may cause damage to the wheels.
If snow chains must be used, use wire-
type chains with a thickness of less than
0.59 in (15 mm). Damage to your vehicle
caused by improper snow chain use is
not covered by your vehicle manufactur-
ers warranty.
Install tire chains only on the front tires.
WINTER DRIVING
WARNING
- Snow tire size
Snow tires should be equivalent in
size and type to the vehicle's stan-
dard tires. Otherwise, the safety and
handling of your vehicle may be
adversely affected.
1VQA3007
Page 291 of 393

55
What to do in an emergency
5. Start the engine of the vehicle with the
booster battery and let it run at 2,000
rpm, then start the engine of the vehi-
cle with the discharged battery.If the cause of your battery discharging is
not apparent, you should have your vehi-
cle checked by an Authorized Hyundai
Dealer.Push-starting Vehicles equipped with automatic
transaxle cannot be push-started.
Follow the directions in this section for
jump-starting.If your temperature gauge indicates over-
heating, if you experience a loss of
power, or if you hear a loud knocking or
pinging noise, the engine has probably
overheated. Should any of these symp-
toms occur, use the following procedure:
1. Turn on the hazard warning flasher,
then drive to the nearest safe location
and stop your vehicle; set the auto-
matic transaxle in P (Park) and apply
the parking brake.
2. Make sure the air conditioner is off.
3. If coolant or steam is boiling out of the
radiator, stop the engine and call an
Authorized Hyundai Dealer for assis-
tance.
If coolant is not boiling out, allow the
engine to idle and open the hood to
permit the engine to cool gradually.
If the temperature does not go down
with the engine idling, stop the engine
and allow sufficient time for it to cool.4. The coolant level should then be
checked. If the level in the reservoir is
low, look for leaks at the radiator
hoses and connections, heater hoses
and connections, radiator, and water
pump. If you find a major leak or
another problem that may have
caused the engine to overheat, do not
operate the engine until it has been
corrected. Call an Authorized Hyundai
Dealer for assistance. If you do not
find a leak or other problem, carefully
add coolant to the reservoir.
If the engine frequently overheats, have
the cooling system checked and repaired
by an Authorized Hyundai Dealer.
CAUTION
Never tow a vehicle to start it
because the sudden surge forward
when the engine starts could cause
a collision with the tow vehicle.
CAUTION
- Battery cables
Do not connect the jumper cable
from the negative terminal of the
booster battery to the negative ter-
minal of the discharged battery.
This can cause the discharged bat-
tery to overheat and crack, releas-
ing battery acid.
IF THE ENGINE OVERHEATS
WARNING
- Removing
radiator cap
Do not remove the radiator cap
when the engine and radiator are
hot. Scalding hot coolant and steam
may blow out under pressure. This
could cause serious injury.
Page 315 of 393

Maintenance6 6MAINTENANCE UNDER SEVERE USAGE CONDITIONSSEVERE DRIVING CONDITIONS
A - Repeatedly driving short distance of less than 5miles (8km) in nor-
mal temperature or less than 10miles (16km) in freezing temperature
B - Extensive engine idling or low speed driving for long distances
C - Driving on rough, dusty, muddy, unpaved, graveled or salt- spread
roads
D - Driving in areas using salt or other corrosive materials or in very cold
weatherE - Driving in sandy areas
F - Driving in heavy traffic area over 90°F (32°C)
G - Driving on uphill, downhill, or mountain road
H - Towing a Trailer, or using a camper, or roof rack
I - Driving as a patrol car, taxi, other commercial use or vehicle towing
J - Driving over 100 MPH (170 Km/h)
K - Frequently driving in stop-and-go conditionsENGINE OIL AND FILTER
AIR CLEANER FILTER
SPARK PLUGS
BRAKE PADS, CALIPERS AND ROTORS
REAR DISC BRAKE/LININGS, PARKING BRAKE
STEERING GEAR BOX, LINKAGE & BOOTS/
LOWER ARM BALL JOINT, UPPER ARM BALL JOINT
DRIVE SHAFTS AND BOOTS
AUTOMATIC TRANSAXLE FLUID
CLIMATE CONTROL AIR FILTER
(FOR EVAPORATOR AND BLOWER UNIT)R
I
I
I
I
I
I
R
REVERY 3,000 MILES (4,800 KM) OR 3 MONTHS
MORE FREQUENTLY
MORE FREQUENTLY
MORE FREQUENTLY
MORE FREQUENTLY
MORE FREQUENTLY
EVERY 7,500 MILES (12,000 KM) OR 6 MONTHS
EVERY 30,000 MILES (48,000 KM)
MORE FREQUENTLY
A, B, C, D, E, F, G, H, I, KC, E
B, H
C, D, G, H
C, D, G, H
C, D, E, F, G, H, I
C, D, E, F, H
A, C, E, F, G, H, I
C, E
MAINTENANCE ITEMMAINTENANCE
OPERATIONMAINTENANCE
INTERVALSDRIVING
CONDITION
The following items must be serviced more frequently on cars normally used under severe driving conditions. Refer to the chart
below for the appropriate maintenance intervals.
R : Replace
I : Inspect and, after inspection, clean, adjust, repair or replace if necessary
Page 317 of 393
Maintenance8 6Automatic transaxle fluid The fluid level should be in the “HOT”
range of the dipstick, after the engine
and transaxle are at normal operating
temperature. Check the automatic
transaxle fluid level with the engine run-
ning and the transaxle in neutral, with the
parking brake properly applied. Use
HYUNDAI GENUINE ATF SP-III, DIA-
MOND ATF SP-III, SK ATF SP-III or other
brands meeting the SP III specification
approved by Hyundai Motor Co. when
adding or changing fluid. Using the
wrong ATF may result in damage to the
ATM.Brake hoses and linesVisually check for proper installation,
chafing, cracks, deterioration and any
leakage. Replace any deteriorated or
damaged parts immediately.Brake fluidCheck brake fluid level in the brake fluid
reservoir. The level should be between
"MIN" and "MAX" marks on the side of
the reservoir. Use only hydraulic brake
fluid conforming to DOT 3 or DOT 4.
Rear disc brake / linings, parking
brakeCheck the rear disc brake and linings for
scoring, burning, leaking fluid, broken
parts, and excessive wear. Inspect the
parking brake system including the park-
ing brake pedal and cables. For detailed
service procedures, refer to the Shop
Manual.Brake pads, calipers and rotorsCheck the pads for excessive wear, discs
for run out and wear, and calipers for fluid
leakage.Exhaust pipe and mufflerVisually inspect the exhaust pipes, muf-
fler and hangers for cracks, deterioration,
or damage. Start the engine and listen
carefully for any exhaust gas leakage.
Tighten connections or replace parts as
necessary.Suspension mounting boltsCheck the suspension connections for
looseness or damage. Retighten to the
specified torque.
Steering gear box, linkage &
boots/lower arm ball joint, upper
arm ball jointWith the vehicle stopped and engine off,
check for excessive free-play in the steer-
ing wheel. Check the linkage for bends or
damage. Check the dust boots and ball
joints for deterioration, cracks, or dam-
age. Replace any damaged parts.Power steering pump, belt and
hosesCheck the power steering pump and
hoses for leakage and damage. Replace
any damaged or leaking parts immediate-
ly. Inspect the power steering belt (or
drive belt) for evidence of cuts, cracks,
excessive wear, oiliness and proper ten-
sion. Replace or adjust it if necessary.Drive shafts and bootsCheck the drive shafts, boots and clamps
for cracks, deterioration, or damage.
Replace any damaged parts and, if nec-
essary, repack the grease.Air conditioning refrigerantCheck the air conditioning lines and con-
nections for leakage and damage. Check
air conditioning performance according to
the relevant shop manual if necessary.
Page 321 of 393
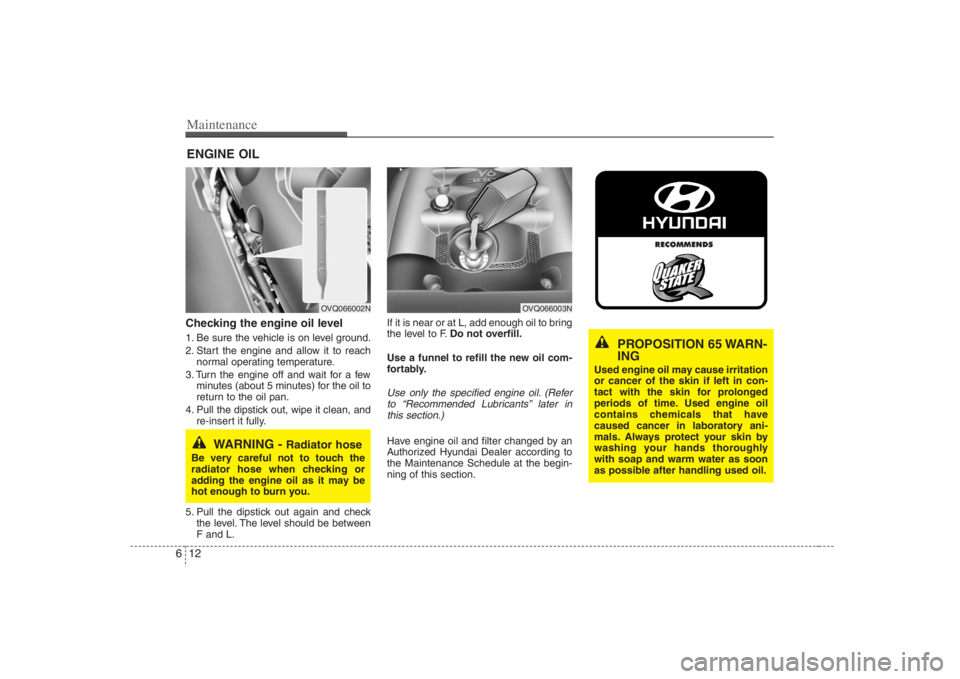
Maintenance12 6ENGINE OILChecking the engine oil level 1. Be sure the vehicle is on level ground.
2. Start the engine and allow it to reach
normal operating temperature.
3. Turn the engine off and wait for a few
minutes (about 5 minutes) for the oil to
return to the oil pan.
4. Pull the dipstick out, wipe it clean, and
re-insert it fully.
5. Pull the dipstick out again and check
the level. The level should be between
F and L.If it is near or at L, add enough oil to bring
the level to F.Do not overfill.
Use a funnel to refill the new oil com-
fortably.
Use only the specified engine oil. (Refer
to “Recommended Lubricants” later in
this section.)Have engine oil and filter changed by an
Authorized Hyundai Dealer according to
the Maintenance Schedule at the begin-
ning of this section.
WARNING -
Radiator hose
Be very careful not to touch the
radiator hose when checking or
adding the engine oil as it may be
hot enough to burn you.
OVQ066002N
OVQ066003N
PROPOSITION 65 WARN-
ING
Used engine oil may cause irritation
or cancer of the skin if left in con-
tact with the skin for prolonged
periods of time. Used engine oil
contains chemicals that have
caused cancer in laboratory ani-
mals. Always protect your skin by
washing your hands thoroughly
with soap and warm water as soon
as possible after handling used oil.
Page 345 of 393
Maintenance36 6For best battery service: Keep the battery securely mounted.
Keep the battery top clean and dry.
Keep the terminals and connections
clean, tight, and coated with petroleum
jelly or terminal grease.
Rinse any spilled electrolyte from the
battery immediately with a solution of
water and baking soda.
If the vehicle is not going to be used for
an extended time, disconnect the bat-
tery cables.Battery recharging Your vehicle has a maintenance-free,
calcium-based battery.
If the battery becomes discharged in a
short time (because, for example, the
headlights or interior lights were left on
while the vehicle was not in use),
recharge it by slow charging (trickle)
for 10 hours.
If the battery gradually discharges
because of high electric load while the
vehicle is being used, recharge it at 20-
30A for two hours.
Items to be reset after the battery
has been discharged or the bat-
tery has been disconnected. Clock (See Chapter 3)
Sunroof (See Chapter 3)
Trip computer (See Chapter 3)
Climate control system (See Chapter
3)
Audio (See Chapter 3)
Power sliding door and power tailgate
(See Chapter 3)
CAUTION
Before performing maintenance
or recharging the battery, turn off
all accessories and stop the
engine.
The negative battery cable must
be removed first and installed last
when the battery is disconnected.
WARNING
- Recharging
battery
When recharging the battery,
observe the following precautions:
The battery must be removed
from the vehicle and placed in an
area with good ventilation.
Do not allow cigarettes, sparks, or
flame near the battery.
Watch the battery during charg-
ing, and stop or reduce the charg-
ing rate if the battery cells begin
gassing (boiling) violently or if
the temperature of the electrolyte
of any cell exceeds 120°F (49°C).
(Continued)
(Continued)
Wear eye protection when check-
ing the battery during charging.
Disconnect the battery charger in
the following order.
1. Turn off the battery charger main
switch.
2. Unhook the negative clamp from
the negative battery terminal.
3. Unhook the positive clamp from
the positive battery terminal.
Page 369 of 393
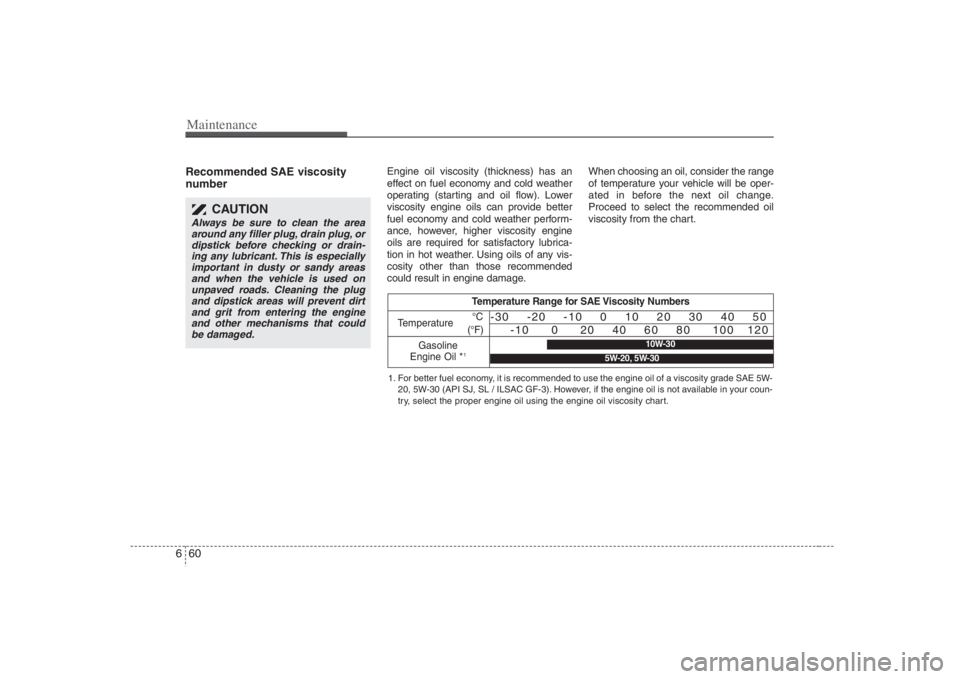
Maintenance60 6Recommended SAE viscosity
number
Engine oil viscosity (thickness) has an
effect on fuel economy and cold weather
operating (starting and oil flow). Lower
viscosity engine oils can provide better
fuel economy and cold weather perform-
ance, however, higher viscosity engine
oils are required for satisfactory lubrica-
tion in hot weather. Using oils of any vis-
cosity other than those recommended
could result in engine damage.When choosing an oil, consider the range
of temperature your vehicle will be oper-
ated in before the next oil change.
Proceed to select the recommended oil
viscosity from the chart.
Temperature Range for SAE Viscosity Numbers
Temperature
Gasoline
Engine Oil *
1°C
(°F)
-30 -20 -10 0 10 20 30 40 50
-10 0 20 40 60 80 100 120
1. For better fuel economy, it is recommended to use the engine oil of a viscosity grade SAE 5W-
20, 5W-30 (API SJ, SL / ILSAC GF-3). However, if the engine oil is not available in your coun-
try, select the proper engine oil using the engine oil viscosity chart.
10W-30
5W-20, 5W-30
CAUTION
Always be sure to clean the area
around any filler plug, drain plug, or
dipstick before checking or drain-
ing any lubricant. This is especially
important in dusty or sandy areas
and when the vehicle is used on
unpaved roads. Cleaning the plug
and dipstick areas will prevent dirt
and grit from entering the engine
and other mechanisms that could
be damaged.
Page 388 of 393
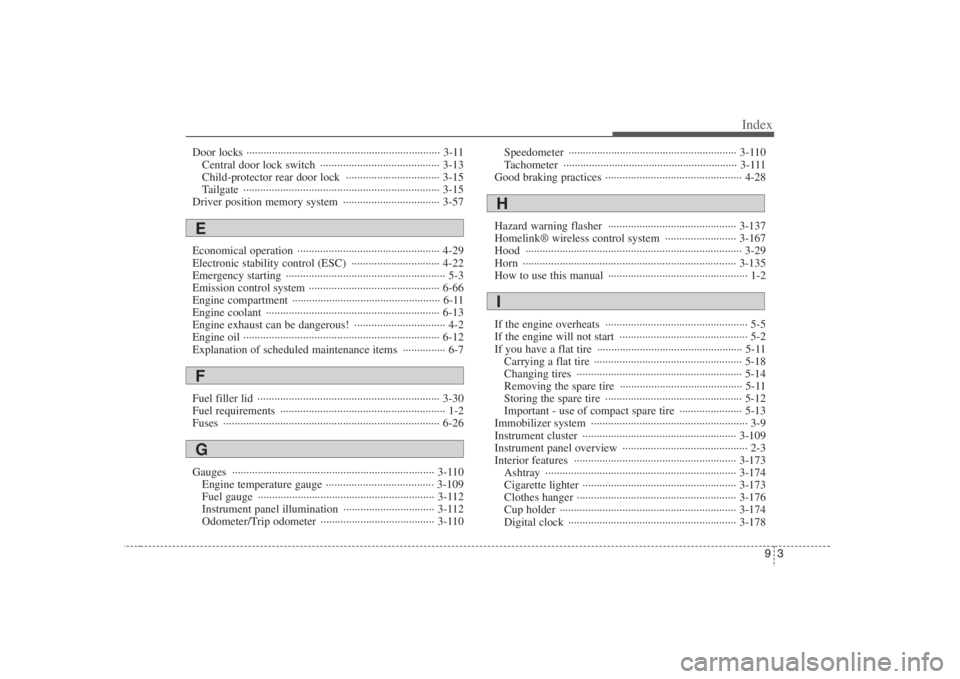
93
Index
Door locks ···································································· 3-11
Central door lock switch ·········································· 3-13
Child-protector rear door lock ································· 3-15
Tailgate ····································································· 3-15
Driver position memory system ·································· 3-57
Economical operation ·················································· 4-29
Electronic stability control (ESC) ······························· 4-22
Emergency starting ························································ 5-3
Emission control system ·············································· 6-66
Engine compartment ···················································· 6-11
Engine coolant ····························································· 6-13
Engine exhaust can be dangerous! ································ 4-2
Engine oil ····································································· 6-12
Explanation of scheduled maintenance items ··············· 6-7
Fuel filler lid ································································ 3-30
Fuel requirements ·························································· 1-2
Fuses ············································································ 6-26
Gauges ······································································· 3-110
Engine temperature gauge ······································ 3-109
Fuel gauge ······························································ 3-112
Instrument panel illumination ································ 3-112
Odometer/Trip odometer ········································ 3-110Speedometer ··························································· 3-110
Tachometer ····························································· 3-111
Good braking practices ················································ 4-28
Hazard warning flasher ············································· 3-137
Homelink® wireless control system ························· 3-167
Hood ············································································ 3-29
Horn ··········································································· 3-135
How to use this manual ················································· 1-2
If the engine overheats ·················································· 5-5
If the engine will not start ············································· 5-2
If you have a flat tire ··················································· 5-11
Carrying a flat tire ···················································· 5-18
Changing tires ·························································· 5-14
Removing the spare tire ··········································· 5-11
Storing the spare tire ················································ 5-12
Important - use of compact spare tire ······················ 5-13
Immobilizer system ······················································· 3-9
Instrument cluster ······················································ 3-109
Instrument panel overview ············································ 2-3
Interior features ························································· 3-173
Ashtray ··································································· 3-174
Cigarette lighter ······················································ 3-173
Clothes hanger ························································ 3-176
Cup holder ······························································ 3-174
Digital clock ··························································· 3-178EFG
HI