2008 HYUNDAI ENTOURAGE hood open
[x] Cancel search: hood openPage 23 of 393

37
Features of your vehicle
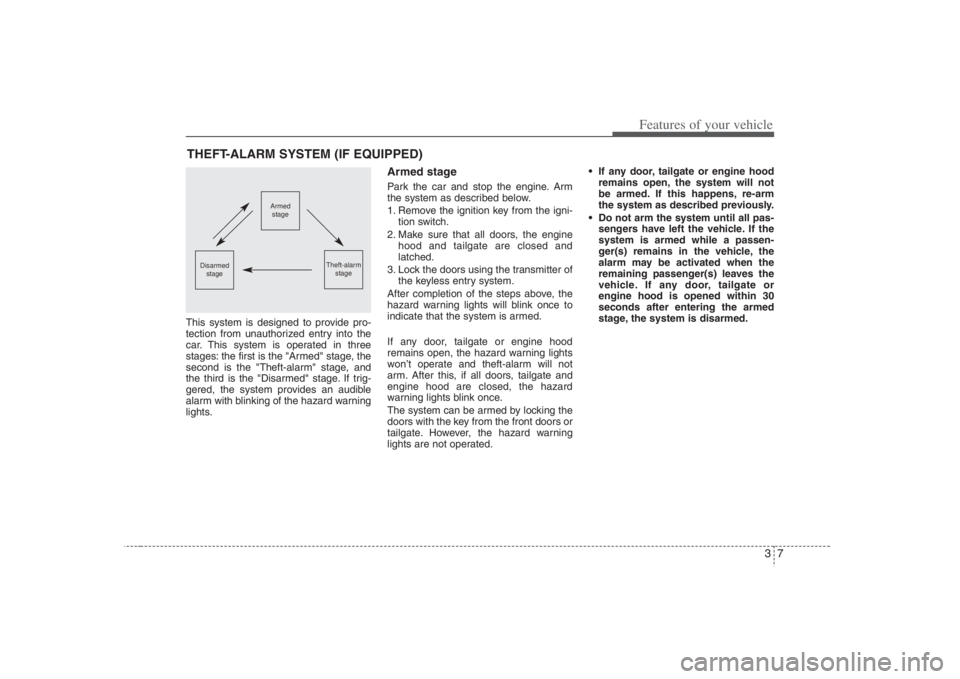
This system is designed to provide pro-
tection from unauthorized entry into the
car. This system is operated in three
stages: the first is the "Armed" stage, the
second is the "Theft-alarm" stage, and
the third is the "Disarmed" stage. If trig-
gered, the system provides an audible
alarm with blinking of the hazard warning
lights.
Armed stagePark the car and stop the engine. Arm
the system as described below.
1. Remove the ignition key from the igni-
tion switch.
2. Make sure that all doors, the engine
hood and tailgate are closed and
latched.
3. Lock the doors using the transmitter of
the keyless entry system.
After completion of the steps above, the
hazard warning lights will blink once to
indicate that the system is armed.
If any door, tailgate or engine hood
remains open, the hazard warning lights
won’t operate and theft-alarm will not
arm. After this, if all doors, tailgate and
engine hood are closed, the hazard
warning lights blink once.
The system can be armed by locking the
doors with the key from the front doors or
tailgate. However, the hazard warning
lights are not operated. If any door, tailgate or engine hood
remains open, the system will not
be armed. If this happens, re-arm
the system as described previously.
Do not arm the system until all pas-
sengers have left the vehicle. If the
system is armed while a passen-
ger(s) remains in the vehicle, the
alarm may be activated when the
remaining passenger(s) leaves the
vehicle. If any door, tailgate or
engine hood is opened within 30
seconds after entering the armed
stage, the system is disarmed.
THEFT-ALARM SYSTEM (IF EQUIPPED)
Armed
stage
Theft-alarm
stage
Disarmed
stage
Page 24 of 393

Features of your vehicle8 3Theft-alarm stageThe alarm will be activated if any of the
following occurs while the system is
armed.
A front or rear door is opened without
using the ignition key or transmitter.
The tailgate is opened without using
the ignition key or transmitter.
The engine hood is opened.
The siren will sound and the hazard
warning lights will blink continuously for
27 seconds, and repeat the alarm 3
times unless the system is disarmed. To
turn off the system, unlock the doors with
the ignition key or transmitter.✽ ✽
NOTICEAvoid trying to start the engine while
the alarm is activated. The vehicle start-
ing motor is disabled during the theft-
alarm stage.
Disarmed stageThe system will be disarmed when the
doors are unlocked by depressing the
unlock button on the transmitter or
unlocked with the ignition key.
After depressing unlock button, the haz-
ard warning lights will blink twice to indi-
cate that the system is disarmed.
After depressing unlock button, if any
door is not opened within 30 seconds,
the system will be rearmed.
If the system is not disarmed with the
ignition key or transmitter, insert the key
in the ignition switch, turn the key to the
ON position and wait for 30 seconds.
Then the system will be disarmed.Your vehicle is equipped with an elec-
tronic engine immobilizer system to
reduce the risk of unauthorized vehicle
use.
Your immobilizer system is comprised of
a small transponder in the ignition key,
and antenna coil in the key cylinder and
Immobilizer Control Unit (or Smartra
Unit).
With this system, whenever you insert
your ignition key into the ignition switch
and turn it to ON, the antenna coil in the
ignition switch receives a signal from the
transponder in the ignition key and then
sends the signal to the ECU (Engine
Control Unit).
The ECU checks the signal whether the
ignition key is valid.
If the key is determined to be valid, the
engine will start.
If the key is determined to be invalid, the
engine will not start.
IMMOBILIZER SYSTEM
(IF EQUIPPED)
Page 45 of 393

329
Features of your vehicle
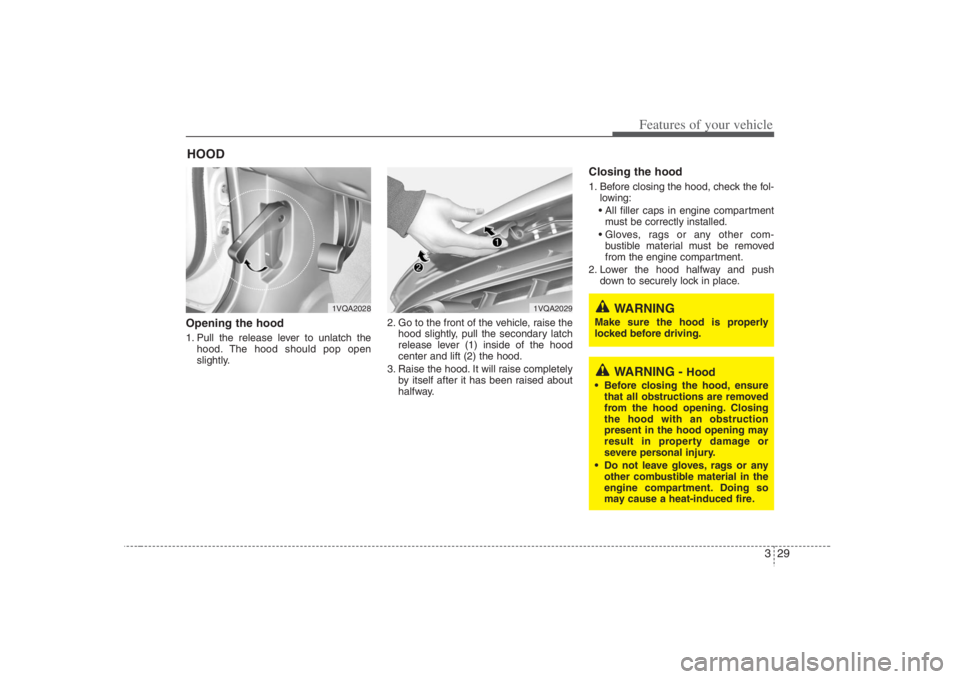
Opening the hood 1. Pull the release lever to unlatch the
hood. The hood should pop open
slightly.2. Go to the front of the vehicle, raise the
hood slightly, pull the secondary latch
release lever (1) inside of the hood
center and lift (2) the hood.
3. Raise the hood. It will raise completely
by itself after it has been raised about
halfway.
Closing the hood1. Before closing the hood, check the fol-
lowing:
must be correctly installed.
bustible material must be removed
from the engine compartment.
2. Lower the hood halfway and push
down to securely lock in place.
HOOD
WARNING -
Hood
Before closing the hood, ensure
that all obstructions are removed
from the hood opening. Closing
the hood with an obstruction
present in the hood opening may
result in property damage or
severe personal injury.
Do not leave gloves, rags or any
other combustible material in the
engine compartment. Doing so
may cause a heat-induced fire.
1VQA2028
1VQA2029
WARNING
Make sure the hood is properly
locked before driving.
Page 291 of 393

55
What to do in an emergency
5. Start the engine of the vehicle with the
booster battery and let it run at 2,000
rpm, then start the engine of the vehi-
cle with the discharged battery.If the cause of your battery discharging is
not apparent, you should have your vehi-
cle checked by an Authorized Hyundai
Dealer.Push-starting Vehicles equipped with automatic
transaxle cannot be push-started.
Follow the directions in this section for
jump-starting.If your temperature gauge indicates over-
heating, if you experience a loss of
power, or if you hear a loud knocking or
pinging noise, the engine has probably
overheated. Should any of these symp-
toms occur, use the following procedure:
1. Turn on the hazard warning flasher,
then drive to the nearest safe location
and stop your vehicle; set the auto-
matic transaxle in P (Park) and apply
the parking brake.
2. Make sure the air conditioner is off.
3. If coolant or steam is boiling out of the
radiator, stop the engine and call an
Authorized Hyundai Dealer for assis-
tance.
If coolant is not boiling out, allow the
engine to idle and open the hood to
permit the engine to cool gradually.
If the temperature does not go down
with the engine idling, stop the engine
and allow sufficient time for it to cool.4. The coolant level should then be
checked. If the level in the reservoir is
low, look for leaks at the radiator
hoses and connections, heater hoses
and connections, radiator, and water
pump. If you find a major leak or
another problem that may have
caused the engine to overheat, do not
operate the engine until it has been
corrected. Call an Authorized Hyundai
Dealer for assistance. If you do not
find a leak or other problem, carefully
add coolant to the reservoir.
If the engine frequently overheats, have
the cooling system checked and repaired
by an Authorized Hyundai Dealer.
CAUTION
Never tow a vehicle to start it
because the sudden surge forward
when the engine starts could cause
a collision with the tow vehicle.
CAUTION
- Battery cables
Do not connect the jumper cable
from the negative terminal of the
booster battery to the negative ter-
minal of the discharged battery.
This can cause the discharged bat-
tery to overheat and crack, releas-
ing battery acid.
IF THE ENGINE OVERHEATS
WARNING
- Removing
radiator cap
Do not remove the radiator cap
when the engine and radiator are
hot. Scalding hot coolant and steam
may blow out under pressure. This
could cause serious injury.
Page 329 of 393

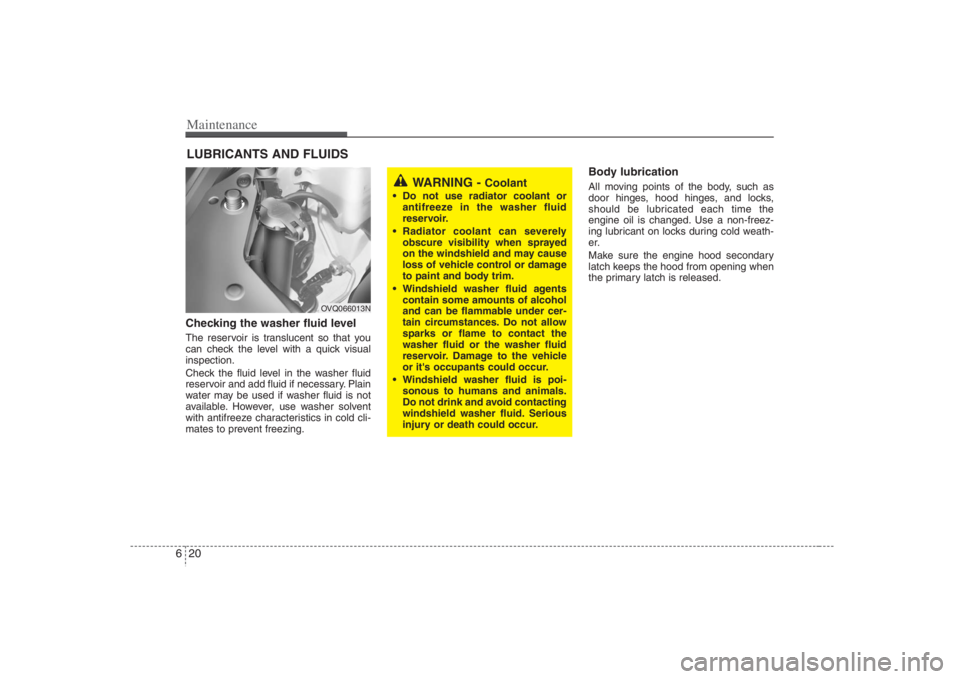
Maintenance20 6LUBRICANTS AND FLUIDS Checking the washer fluid level The reservoir is translucent so that you
can check the level with a quick visual
inspection.
Check the fluid level in the washer fluid
reservoir and add fluid if necessary. Plain
water may be used if washer fluid is not
available. However, use washer solvent
with antifreeze characteristics in cold cli-
mates to prevent freezing.
Body lubrication All moving points of the body, such as
door hinges, hood hinges, and locks,
should be lubricated each time the
engine oil is changed. Use a non-freez-
ing lubricant on locks during cold weath-
er.
Make sure the engine hood secondary
latch keeps the hood from opening when
the primary latch is released.
WARNING -
Coolant
Do not use radiator coolant or
antifreeze in the washer fluid
reservoir.
Radiator coolant can severely
obscure visibility when sprayed
on the windshield and may cause
loss of vehicle control or damage
to paint and body trim.
Windshield washer fluid agents
contain some amounts of alcohol
and can be flammable under cer-
tain circumstances. Do not allow
sparks or flame to contact the
washer fluid or the washer fluid
reservoir. Damage to the vehicle
or it's occupants could occur.
Windshield washer fluid is poi-
sonous to humans and animals.
Do not drink and avoid contacting
windshield washer fluid. Serious
injury or death could occur.
OVQ066013N
Page 361 of 393

Maintenance52 6Headlight bulb (1) Headlight (High)
(2) Headlight (Low)
(3) Position light/Front turn signal light
(4) Front side mark light
(5) Front fog light (if equipped)1. Open the hood and loosen the fasten-
er on the radiator grill cover.
1LDA7048
WARNING
- Halogen bulbs
Halogen bulbs contain pressur-
ized gas that will produce flying
pieces of glass if broken.
Always handle them carefully,
and avoid scratches and abra-
sions. If the bulbs are lit, avoid
contact with liquids. Never touch
the glass with bare hands.
Residual oil may cause the bulb
to overheat and burst when lit. A
bulb should be operated only
when installed in a headlight.
If a bulb becomes damaged or
cracked, replace it immediately
and carefully dispose of it.
Wear eye protection when chang-
ing a bulb. Allow the bulb to cool
down before handling it.
OEP066019
OVQ056003
Page 362 of 393

653
Maintenance
2. Loosen the retaining bolts and remove
the headlight assembly from the body
of the vehicle.
3. Remove the headlight bulb cover by
turning it counterclockwise.
4. Disconnect the headlight bulb socket-
connector.
5. Unsnap the headlight bulb retaining
wire by depressing the end and push-
ing it upward (if equipped).
6. Remove the bulb from the headlight
assembly.7. Install a new headlight bulb and snap
the headlight bulb retaining wire (if
equipped) into position by aligning the
wire with the groove on the bulb.
8. Connect the headlight bulb socket-
connector.
9. Install the headlight bulb cover by turn-
ing it clockwise.
10. Reinstall the headlight assembly to
the body of the vehicle.
Position/Turn signal light bulb1. Open the hood.
2. Loosen the retaining bolts and remove
the headlight assembly from the body
of the vehicle.
3. Remove the socket from the assembly
by turning the socket
counterclockwise until the tabs on the
socket align with the slots on the
assembly.
OEP056025
1VQA5034
OEP056024OEP056043
Type AType B
Page 363 of 393

Maintenance54 64. Remove the bulb from the socket by
pressing it in and rotating it until the
tabs on the bulb align with the slots in
the socket. Pull the bulb out of the
socket.
5. Insert a new bulb by inserting it into
the socket and rotating it until it locks
into place.
6. Install the socket in the assembly by
aligning the tabs on the socket with the
slots in the assembly. Insert the socket
into the assembly and turn the socket
clockwise.
7. Reinstall the headlight assembly to the
body of the vehicle.
Front side mark light bulb1. Open the hood.
2. Loosen the retaining bolts and remove
the headlight assembly from the body
of the vehicle.
3. Remove the socket from the assembly
by turning the socket counterclockwise
until the tabs on the socket align with
the slots on the assembly.
4. Remove the bulb by pulling it straight out.
5. Install a new bulb in the socket.
6. Install the socket in the assembly by
aligning the tabs on the socket with the
slots in the assembly. Insert the socket
into the assembly and turn the socket
clockwise.
7. Reinstall the headlight assembly to the
body of the vehicle.
Front fog light bulb
If the light bulb is not operating, have
the vehicle checked by an authorized
Hyundai Dealer.
OEP056026