Page 115 of 360
Features of your vehicle42 4Trip computer (if equipped)The trip computer is a microcomputer-
controlled driver information system that
displays information related to driving,
including distance to empty, tripmeter,
average fuel consumption and average
speed on the display when the ignition
switch is in ON position.
Mode selection
Push the TRIP button for less than 1 sec-
ond to select distance to empty, tripme-
ter, average fuel consumption and aver-
age speed functions.Distance to empty
This mode indicates the estimated dis-
tance to empty based on the current fuel
in the fuel tank and the amount of fuel
delivered to the engine. When the
remaining distance is below 30 miles (50
km), a “----” symbol will be displayed.
The meter’s working range is from 30 to
999 miles (50 to 999 km).
OHD046035
Average fuel consumption
Average speed
Tripmeter
Distance to empty
OHD046041N
Page 142 of 360
469
Features of your vehicle
AUTOMATIC CLIMATE CONTROL SYSTEM (IF EQUIPPED)
1. Front windshield defrost button
2. Rear window defrost button
3. Air conditioning button
4. Air intake control button5. Temperature control button
6. Fan speed control button
7. AUTO (automatic control) button
8. OFF button9. Mode selection button
10. A/C display
OHD047066
Page 143 of 360

Features of your vehicle70 4Automatic heating and air condi-
tioningThe automatic climate control system is
controlled by simply setting the desired
temperature.
The Full Automatic Temperature Control
(FATC) system automatically controls the
heating and cooling system as follows;
1. Push the AUTO button. It is indicated
by AUTO on the display. The modes,
fan speeds, air intake and air-condi-
tioning will be controlled automatically
by temperature setting.2. Push the TEMP button to set the
desired temperature.
If the temperature is set to the lowest
setting LO, the air conditioning system
will operate continuously.
3. To turn the automatic operation off,
press any button except temperature
control button. If you press the mode
selection button, air-conditioning but-
ton, defrost button, air intake control
button or fan speed button, the select-
ed function will be controlled manually
while other functions operate automat-
ically.
Regardless of the temperature setting,
when using automatic operation, the air
conditioning system can automatically
turn on to decrease the humidity inside
the vehicle, even if the temperature is set
to warm.
OUN026312
CAUTION
Never place anything over the sen-
sor located on the instrument panel
to ensure better control of the heat-
ing and cooling system.
OHD046067
Page 146 of 360

473
Features of your vehicle
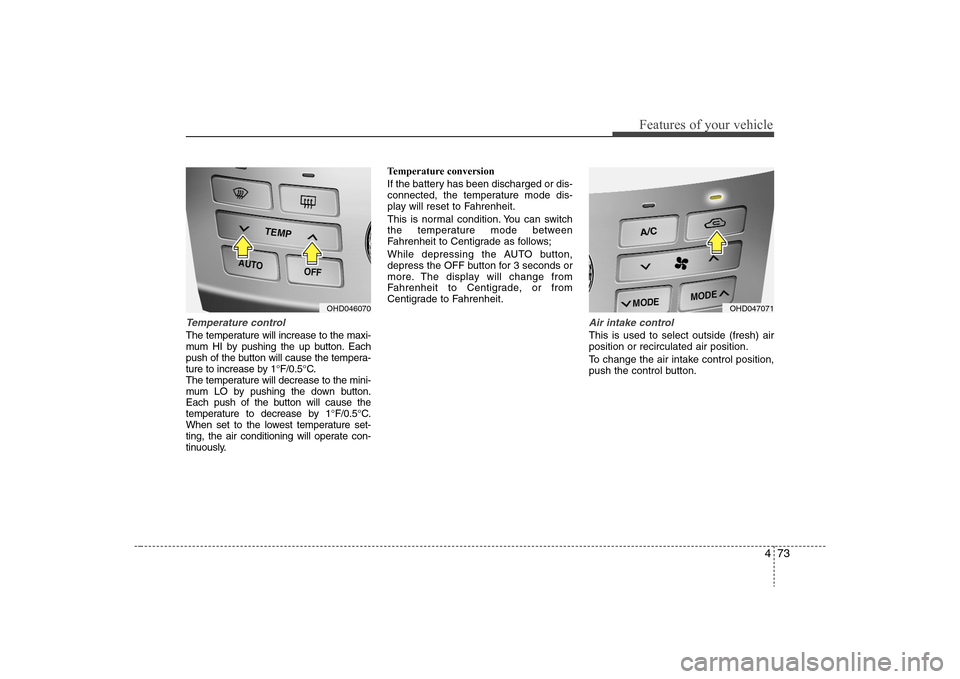
Temperature controlThe temperature will increase to the maxi-
mum HI by pushing the up button. Each
push of the button will cause the tempera-
ture to increase by 1°F/0.5°C.
The temperature will decrease to the mini-
mum LO by pushing the down button.
Each push of the button will cause the
temperature to decrease by 1°F/0.5°C.
When set to the lowest temperature set-
ting, the air conditioning will operate con-
tinuously.Temperature conversion
If the battery has been discharged or dis-
connected, the temperature mode dis-
play will reset to Fahrenheit.
This is normal condition. You can switch
the temperature mode between
Fahrenheit to Centigrade as follows;
While depressing the AUTO button,
depress the OFF button for 3 seconds or
more. The display will change from
Fahrenheit to Centigrade, or from
Centigrade to Fahrenheit.
Air intake controlThis is used to select outside (fresh) air
position or recirculated air position.
To change the air intake control position,
push the control button.
OHD046070
OHD047071
Page 152 of 360

479
Features of your vehicle
Manual climate control system1. Turn the ignition switch to the ON posi-
tion.
2. Turn the mode selection knob to the
defrost position ( ).
3. Push the air intake control button
( ) at least 5 times within 3 sec-
onds.
The indicator light in the air intake control
button will blink 3 times with 0.5 second
of interval. It indicates that the defogging
logic is canceled or returned to the pro-
grammed status.
If the battery has been discharged or dis-
connected, it is reset to the defog logic
status.
Automatic climate control system1. Turn the ignition switch to the ON posi-
tion.
2. Select the defrost position pressing
defrost button ( ).
3. While holding the air conditioning but-
ton (A/C) pressed, press the air intake
control button ( ) at least 5 times
within 3 seconds.
The A/C display blinks 3 times with 0.5
second of interval. It indicates that the
defogging logic is canceled or returned to
the programmed status.
If the battery has been discharged or
disconnected, it is reset to the defog logic
status.
OHD046105N
OHD046106
Page 158 of 360

485
Features of your vehicle
Digital clockWhenever the battery terminals, related
fuses are disconnected, you must reset
the time.
When the ignition switch is in the ACC or
ON position, the clock buttons operate as
follows:
Pressing the “H” button (2) with your
finger, a pencil or similar object will
advance the time displayed by one
hour.Pressing the “M” button (3) with your
finger, a pencil or similar object will
advance the time displayed by one
minute.To clear away minutes, press the “R”
button (1) with your finger, a pencil or
similar object. Then the clock will be
set precisely on the hour.
For example, if the “R” button is
pressed while the time is between 9:01
and 9:29, the display will be reset to
9:00.
9:01 ~ 9:29 display changed to 9:00
9:30 ~ 9:59 display changed to 10:00
Clothes hangerTo use the hanger, pull down the upper
portion of hanger.
OHD046091N
WARNING
Do not adjust the clock while driv-
ing. You may lose your steering
control and cause severe personal
injury or accidents.
OUN026348
CAUTION
Do not hang heavy clothes, since
those may damage the hook.
Page 167 of 360

Features of your vehicle94 44. AUTO SEEK Select Button
(Automatic Channel Selection)Press the AUTO SEEK select button.
When the side is pressed, the unit
will automatically tune to the next higher
frequency and when the side is
pressed, it will automatically tune to the
next lower frequency.5. SCAN ButtonWhen you press the button, frequency is
changed and the next channel is
received automatically. To stay on a sta-
tion, press the SCAN button again.6. PRESET STATION Select
ButtonsSix stations for AM, FM1 and FM2
respectively can be preset in the elec-
tronic memory circuit.
HOW TO PRESET STATIONSSix AM and twelve FM stations may be
programmed into the memory of the
radio. Then, by simply pressing the AM /
FM select button and/or one of the six
station select buttons, you may recall any
of these stations instantly. To program the
stations, follow these steps:
Press AM/FM selector to set the band
for AM, FM1 and FM2.
Select the desired station to be stored
by seek or manual tuning.
Determine the preset station select
button you wish to use to access that
station.
Press the station select button for more
than two seconds. A select button indi-
cator will show in the display indicating
which select button you have
depressed. The frequency display will
flash after it has been stored into the
memory. You should then release the
button, and proceed to program the
next desired station. A total of 24 sta-
tions can be programmed by selecting
one AM and two FM station per button. When completed, any preset station
may be recalled by selecting AM, FM1
or FM2 band and the appropriate sta-
tion button.
CAUTION
Do not place beverages close to
the audio system. The audio sys-
tem mechanism may be damaged
if you spill them.
Do not strike or allow anything to
impact the audio system, damage
to the system mechanisms could
occur.
Page 169 of 360

Features of your vehicle96 41. TAPE PROGRAM/AUX Button This allows you to play the reverse side
of the tape by merely pressing the pro-
gram button. The PLAY and an arrow will
appear in the display to show tape direc-
tion.
If you press this button more than 0.8
seconds. you can change to AUX
mode.
AUX mode is available only when AUX
jack is plugged in and change back to
last mode if you pull it out.2. TAPE EJECT Button When the button is pressed with a
cassette loaded, the cassette will eject.
When the button is pressed during
FF/REW mode, the cassette will eject.3. DOLBY ButtonIf you get background noise during tape
PLAY, you can reduce this considerably
by merely pressing the DOLBY button. If
you want to cancel the DOLBY feature,
press the button again.
4. REPEAT (RPT) Button To repeat the track you are currently
listening to, press the RPT button. To
cancel , press again.
If you do not release RPT operation
when the track ends, it will automati-
cally be replayed.
This process will be continued until you
push the button again.5. AUTO MUSIC Search (AMS)
ButtonPress the button to find the starting point
of each song in a prerecorded music
tape. The quiet space between songs
(must have at least a 4 sec. gap) can be
identified by the AUTO MUSIC Search
button.
Pressing the will play the begin-
ning of the next music segment.
Pressing the will start replay at the
beginning of the music just listened to.
To stop FF or REW action, press the
button again.
6. FF/REW Button Fast forward tape winding starts when
the FF button is pressed during PLAY
or REW mode.
PLAY starts when the FF button is
pressed again during FF mode.
Tape rewinding starts when the
REW button is pressed during PLAY or
FF mode.
PLAY starts when the REW button
pressed again during REW mode.
CAUTION
o Do not insert anything like coins
into the player slot as damage to
the unit may occur.
o Do not place beverages close to
the audio system. The playback
mechanism may be damaged if
you spill them.
o Do not strike or allow anything to
impact the audio system, damage
to the system mechanisms could
occur.
o When no device is connected to
the AUX cable, please pull out the
cable from the JACK on the car.
(AUX MODE is operational and
noise may heard in the AUX
MODE.)