2008 Hyundai Elantra brake
[x] Cancel search: brakePage 287 of 360

711
Maintenance
MAINTENANCE UNDER SEVERE USAGE CONDITIONSSEVERE DRIVING CONDITIONS
A - Repeatedly driving short distance of less than 5miles (8km) in nor-
mal temperature or less than 10miles (16km) in freezing temperature
B - Extensive engine idling or low speed driving for long distances
C - Driving on rough, dusty, muddy, unpaved, graveled or salt- spread
roads
D - Driving in areas using salt or other corrosive materials or in very cold
weatherE - Driving in sandy areas
F - Driving in heavy traffic area over 90°F (32°C)
G - Driving on uphill, downhill, or mountain road
H - Towing a Trailer, or using a camper, or roof rack
I - Driving as a patrol car, taxi, other commercial use or vehicle towing
J - Driving over 100 MPH (170 Km/h)
K - Frequently driving in stop-and-go conditionsENGINE OIL AND FILTER
AIR CLEANER FILTER
SPARK PLUGS
BRAKE PADS, CALIPERS AND ROTORS
REAR BRAKE DRUMS/LININGS, PARKING BRAKE
STEERING GEAR BOX, LINKAGE & BOOTS/
LOWER ARM BALL JOINT, UPPER ARM BALL JOINT
DRIVE SHAFTS AND BOOTS
TIMING BELT/IDLER/TENSIONER
MANUAL TRANSAXLE OIL
AUTOMATIC TRANSAXLE FLUID
CLIMATE CONTROL AIR FILTER
(FOR EVAPORATOR AND BLOWER UNIT)R
R
R
I
I
I
I
R
R
R
REVERY 3,000 MILES (5,000 KM) OR 3 MONTHS
MORE FREQUENTLY
MORE FREQUENTLY
MORE FREQUENTLY
MORE FREQUENTLY
MORE FREQUENTLY
EVERY 7,500 MILES (12,000 KM) OR 6 MONTHS
EVERY 60,000 MILES (96,000 KM) OR 48 MONTHS
EVERY 60,000 MILES (96,000 KM)
EVERY 30,000 MILES (48,000 KM)
MORE FREQUENTLY
A, B, C, D, E, F, G, H, I, KC, E
B, H
C, D, G, H
C, D, G, H
C, D, E, F, G, H, I
C, D, E, F, H
B, C, D, E, F, G
A, C, D, E, F, G, H, I, J
A, C, E, F, G, H, I
C, E
MAINTENANCE ITEMMAINTENANCE
OPERATIONMAINTENANCE
INTERVALSDRIVING
CONDITION
The following items must be serviced more frequently on cars normally used under severe driving conditions. Refer to the chart
below for the appropriate maintenance intervals.
R : Replace I : Inspect and, after inspection, clean, adjust, repair or replace if necessary
Page 290 of 360

Maintenance14 7Manual transaxle fluid
(if equipped)Inspect the manual transaxle fluid
according to the maintenance schedule.✽ ✽
NOTICEIf the oil level is low, check for possible
leaks before adding oil. Do not overfill.Automatic transaxle fluid
(if equipped)The fluid level should be in the "HOT"
range of the dipstick, after the engine
and transaxle are at normal operating
temperature. Check the automatic
transaxle fluid level with the engine run-
ning and the transaxle in neutral, with the
parking brake properly applied.Brake hoses and linesVisually check for proper installation,
chafing, cracks, deterioration and any
leakage. Replace any deteriorated or
damaged parts immediately.
Brake fluidCheck brake fluid level in the brake fluid
reservoir. The level should be between
“MIN” and “MAX” marks on the side of
the reservoir. Use only hydraulic brake
fluid conforming to DOT 3 or DOT 4
specification.Rear disc brake / linings, parking
brakeCheck the rear disc brake and linings for
scoring, burning, leaking fluid, broken
parts, and excessive wear. Inspect the
parking brake system including the park-
ing brake lever and cables.Brake pads, calipers and rotorsCheck the pads for excessive wear, discs
for run out and wear, and calipers for fluid
leakage.Exhaust pipe and mufflerVisually inspect the exhaust pipes, muf-
fler and hangers for cracks, deterioration,
or damage. Start the engine and listen
carefully for any exhaust gas leakage.
Tighten connections or replace parts as
necessary.
Suspension mounting boltsCheck the suspension connections for
looseness or damage. Retighten to the
specified torque.Steering gear box, linkage &
boots/lower arm ball jointWith the vehicle stopped and engine off,
check for excessive free-play in the
steering wheel.
Check the linkage for bends or damage.
Check the dust boots and ball joints for
deterioration, cracks, or damage.
Replace any damaged parts.Drive shafts and bootsCheck the drive shafts, boots and clamps
for cracks, deterioration, or damage.
Replace any damaged parts and, if nec-
essary, repack the grease.Air conditioning refrigerant
(if equipped)Check the air conditioning lines and con-
nections for leakage and damage.
Page 295 of 360

719
Maintenance
BRAKES AND CLUTCH (IF EQUIPPED) FLUIDChecking the brake/clutch fluid
level Check the fluid level in the reservoir peri-
odically. The fluid level should be
between MAX and MIN marks on the
side of the reservoir.
Before removing the reservoir cap and
adding brake/clutch fluid, clean the area
around the reservoir cap thoroughly to
prevent brake/clutch fluid contamination.If the level is low, add fluid to the MAX
level. The level will fall with accumulated
mileage. This is a normal condition asso-
ciated with the wear of the brake linings.
If the fluid level is excessively low, have
the brake system checked by an author-
ized Hyundai dealer.
Use only the specified brake/clutch fluid.
(Refer to the section 9.)
Never mix different types of fluid.
WARNING -
Brake fluid
When changing and adding
brake/clutch fluid, handle it careful-
ly. Do not let it come in contact with
your eyes. If brake/clutch fluid
should come in contact with your
eyes, immediately flush them with a
large quantity of fresh tap water.
Have your eyes examined by a doc-
tor as soon as possible.
WARNING -
Loss of brake
fluid
In the event the brake system
requires frequent additions of fluid,
the vehicle should be inspected by
an authorized Hyundai dealer.
OHD076011
CAUTION
Do not allow brake/clutch fluid to
contact the vehicle's body paint, as
paint damage will result.
Brake/clutch fluid, which has been
exposed to open air for an extended
time should never be used as its
quality cannot be guaranteed. It
should be disposed of properly.
Don't put in the wrong kind of fluid.
A few drops of mineral-based oil,
such as engine oil, in your
brake/clutch system can damage
brake/clutch system parts.
Page 296 of 360

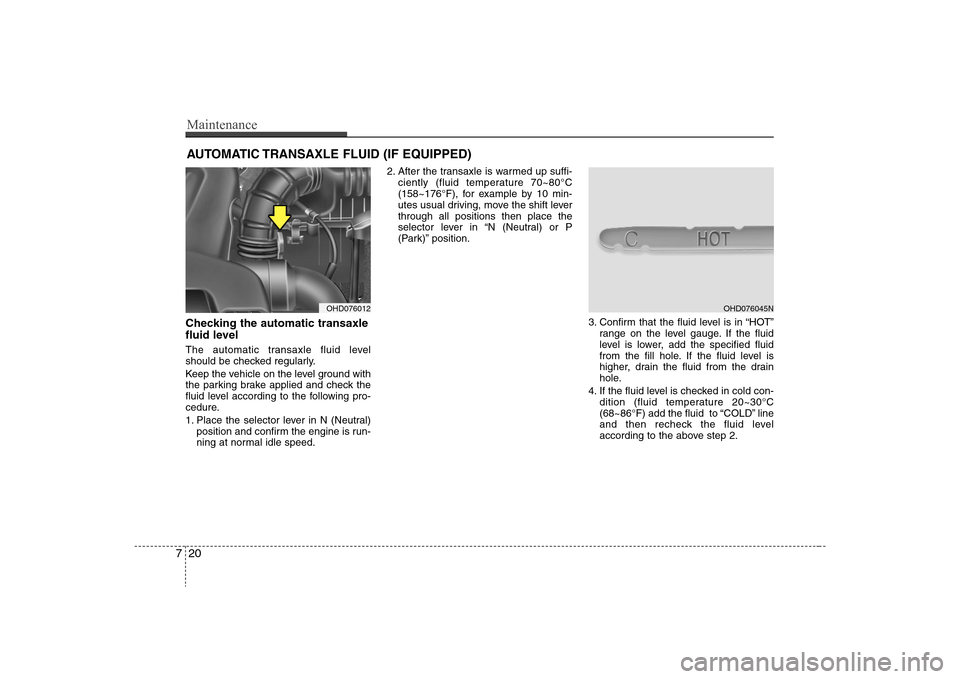
Maintenance20 7AUTOMATIC TRANSAXLE FLUID (IF EQUIPPED)Checking the automatic transaxle
fluid level The automatic transaxle fluid level
should be checked regularly.
Keep the vehicle on the level ground with
the parking brake applied and check the
fluid level according to the following pro-
cedure.
1. Place the selector lever in N (Neutral)
position and confirm the engine is run-
ning at normal idle speed.2. After the transaxle is warmed up suffi-
ciently (fluid temperature 70~80°C
(158~176°F), for example by 10 min-
utes usual driving, move the shift lever
through all positions then place the
selector lever in “N (Neutral) or P
(Park)” position.
3. Confirm that the fluid level is in “HOT”
range on the level gauge. If the fluid
level is lower, add the specified fluid
from the fill hole. If the fluid level is
higher, drain the fluid from the drain
hole.
4. If the fluid level is checked in cold con-
dition (fluid temperature 20~30°C
(68~86°F) add the fluid to “COLD” line
and then recheck the fluid level
according to the above step 2.
OHD076012
OHD076045N
Page 297 of 360

721
Maintenance
✽ ✽
NOTICE“COLD” range is for reference only and
should NOT be used to determine
transaxle fluid level.
✽ ✽
NOTICENew automatic transaxle fluid should be
red. The red dye is added so the assem-
bly plant can identify it as automatic
transaxle fluid and distinguish it from
engine oil or antifreeze. The red dye,
which is not an indicator of fluid quali-
ty, is not permanent. As the vehicle is
driven, the automatic transaxle fluid
will begin to look darker. The color may
eventually appear light brown.
Therefore, have an authorized Hyundai
dealer change the automatic transaxle
fluid according to the Scheduled
Maintenance at the beginning of this
section.Use only the specified automatic
transaxle fluid. (Refer to the section 9.)Changing the automatic transaxle
fluidHave automatic transaxle fluid changed
by an authorized Hyundai dealer accord-
ing to the Maintenance Schedule at the
beginning of this section.
WARNING -
Transaxle fluid
The transaxle fluid level should be
checked when the engine is at nor-
mal operating temperature. This
means that the engine, radiator,
radiator hose and exhaust system
etc., are very hot. Exercise great
care not to burn yourself during
this procedure.
WARNING
- Parking brake
To avoid sudden movement of the
vehicle, apply parking brake and
depress the brake pedal before
moving the shift lever.
CAUTION
Low fluid level causes transaxle
slippage. Overfilling can cause
foaming, loss of fluid and transaxle
malfunction.
The use of a non-specified fluid
could result in transaxle malfunc-
tion and failure.
Page 298 of 360

Maintenance22 7WASHER FLUIDChecking the washer fluid level The reservoir is translucent so that you
can check the level with a quick visual
inspection.
Check the fluid level in the washer fluid
reservoir and add fluid if necessary. Plain
water may be used if washer fluid is not
available. However, use washer solvent
with antifreeze characteristics in cold cli-
mates to prevent freezing.
Checking the parking brake Check the stroke of the parking brake by
counting the number of “clicks’’ heard
while fully applying it from the released
position. Also, the parking brake alone
should securely hold the vehicle on a fair-
ly steep grade. If the stroke is more or
less than specified, have the parking
brake adjusted by an authorized Hyundai
dealer.
Stroke : 7 “clicks’’ at a force of
44 lbs (20 kg, 196 N).
WARNING -
Coolant
Do not use radiator coolant or
antifreeze in the washer fluid
reservoir.
Radiator coolant can severely
obscure visibility when sprayed
on the windshield and may cause
loss of vehicle control or damage
to paint and body trim.
Windshield Washer fluid agents
contain some amounts of alcohol
and can be flammable under cer-
tain circumstances. Do not allow
sparks or flame to contact the
washer fluid or the washer fluid
reservoir. Damage to the vehicle
or occupants could occur.
Windshield washer fluid is poi-
sonous to humans and animals.
Do not drink and avoid contact-
ing windshield washer fluid.
Serious injury or death could
occur.
OHD076013
OHD056005
PARKING BRAKE
Page 311 of 360

735
Maintenance
Tire rotation
To equalize tread wear, it is recom-
mended that the tires be rotated
every 7,500 miles (12,000 km) or
sooner if irregular wear develops.
During rotation, check the tires for
correct balance.
When rotating tires, check for uneven
wear and damage. Abnormal wear is
usually caused by incorrect tire pres-
sure, improper wheel alignment, out-
of-balance wheels, severe braking or
severe cornering. Look for bumps or
bulges in the tread or side of tire.
Replace the tire if you find either of
these conditions. Replace the tire if
fabric or cord is visible. After rotation,
be sure to bring the front and rear tire
pressures to specification and check
lug nut tightness.
Refer to Section 9, “Specifications”.
Disc brake pads should be inspected
for wear whenever tires are rotated.✽ ✽
NOTICERotate radial tires that have an
asymmetric tread pattern only from
front to rear and not from right to
left.
WARNING
Do not use the compact spare
tire for tire rotation.
Do not mix bias ply and radial
ply tires under any circum-
stances. This may cause
unusual handling characteris-
tics that could result in death,
severe injury, or property
damage.
S2BLA790S2BLA790ACBGQ0707A
Without a spare tire With a full-size spare tire (if equipped)
Directional tires (if equipped)
Page 330 of 360

Maintenance54 7LIGHT BULBSUse only the bulbs of the specified
wattage.
✽ ✽
NOTICEAfter heavy, driving rain or washing,
headlight and taillight lenses could
appear frosty. This condition is caused by
the temperature difference between the
lamp inside and outside. This is similar to
the condensation on your windows inside
your vehicle during the rain and doesn’t
indicate a problem with your vehicle. If
the water leaks into the lamp bulb cir-
cuitry, have the vehicle checked by an
authorized Hyundai dealer.
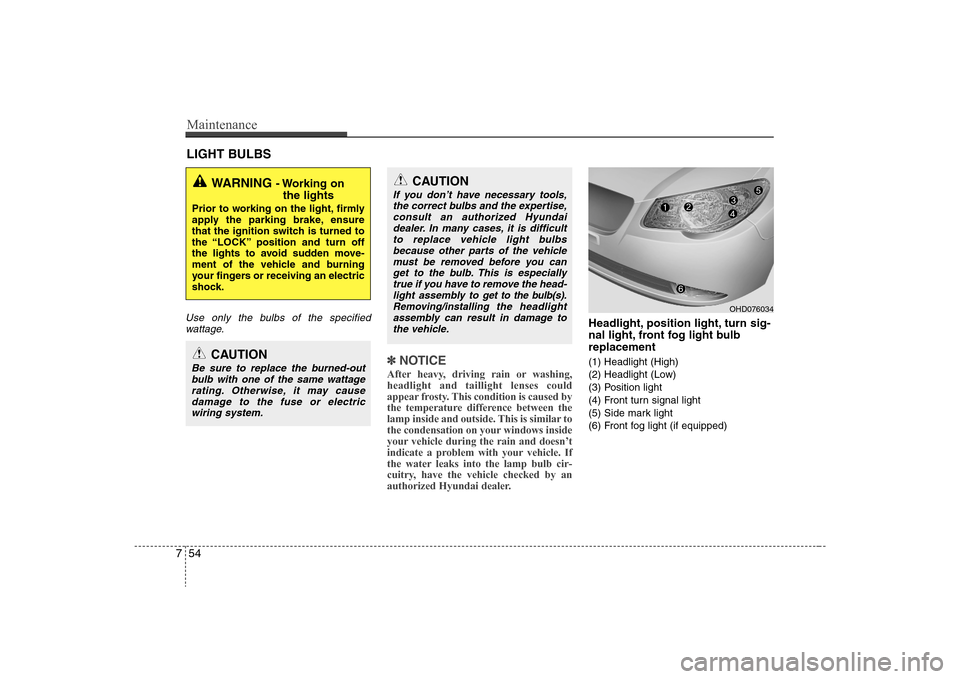
Headlight, position light, turn sig-
nal light, front fog light bulb
replacement(1) Headlight (High)
(2) Headlight (Low)
(3) Position light
(4) Front turn signal light
(5) Side mark light
(6) Front fog light (if equipped)
WARNING
- Working on
the lights
Prior to working on the light, firmly
apply the parking brake, ensure
that the ignition switch is turned to
the “LOCK” position and turn off
the lights to avoid sudden move-
ment of the vehicle and burning
your fingers or receiving an electric
shock.
CAUTION
Be sure to replace the burned-out
bulb with one of the same wattage
rating. Otherwise, it may cause
damage to the fuse or electric
wiring system.
CAUTION
If you don’t have necessary tools,
the correct bulbs and the expertise,
consult an authorized Hyundai
dealer. In many cases, it is difficult
to replace vehicle light bulbs
because other parts of the vehicle
must be removed before you can
get to the bulb. This is especially
true if you have to remove the head-
light assembly to
get to the bulb(s).
Removing/installing
the headlight
assembly can result in damage to
the vehicle.
OHD076034