2008 Hyundai Elantra light
[x] Cancel search: lightPage 148 of 360

475
Features of your vehicle
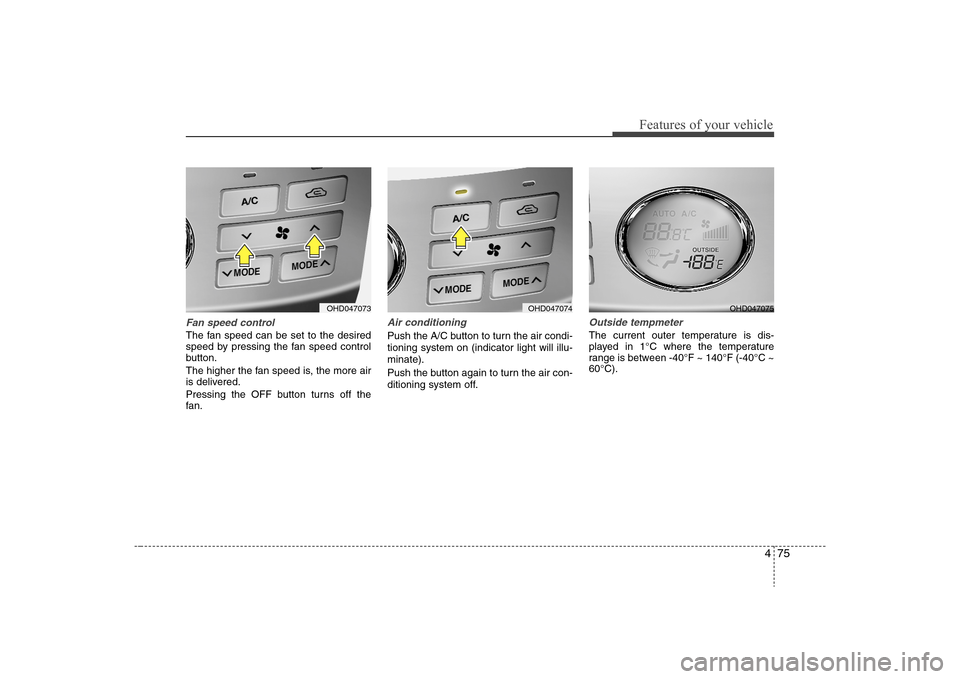
Fan speed controlThe fan speed can be set to the desired
speed by pressing the fan speed control
button.
The higher the fan speed is, the more air
is delivered.
Pressing the OFF button turns off the
fan.
Air conditioningPush the A/C button to turn the air condi-
tioning system on (indicator light will illu-
minate).
Push the button again to turn the air con-
ditioning system off.
Outside tempmeter The current outer temperature is dis-
played in 1°C where the temperature
range is between -40°F ~ 140°F (-40°C ~
60°C).
OHD047073
OHD047074
OHD047075
Page 152 of 360

479
Features of your vehicle
Manual climate control system1. Turn the ignition switch to the ON posi-
tion.
2. Turn the mode selection knob to the
defrost position ( ).
3. Push the air intake control button
( ) at least 5 times within 3 sec-
onds.
The indicator light in the air intake control
button will blink 3 times with 0.5 second
of interval. It indicates that the defogging
logic is canceled or returned to the pro-
grammed status.
If the battery has been discharged or dis-
connected, it is reset to the defog logic
status.
Automatic climate control system1. Turn the ignition switch to the ON posi-
tion.
2. Select the defrost position pressing
defrost button ( ).
3. While holding the air conditioning but-
ton (A/C) pressed, press the air intake
control button ( ) at least 5 times
within 3 seconds.
The A/C display blinks 3 times with 0.5
second of interval. It indicates that the
defogging logic is canceled or returned to
the programmed status.
If the battery has been discharged or
disconnected, it is reset to the defog logic
status.
OHD046105N
OHD046106
Page 153 of 360

Features of your vehicle80 4These compartments can be used to
store small items required by the driver
or passengers.
Center console storage
(if equipped)These compartments can be used to
store small items required by the driver
or front passenger.
To open the center console storage pull
up the lever.
Glove boxTo open the glove box, pull the handle
and the glove box will automatically
open. Close the glove box after use.
STORAGE COMPARTMENT
WARNING
- Flammable
materials
Do not store cigarette lighters,
propane cylinders, or other flamma-
ble/explosive materials in the vehi-
cle. These items may catch fire
and/or explode if the vehicle is
exposed to hot temperatures for
extended periods.
CAUTION
To avoid possible theft, do not
leave valuables in the storage
compartment.
Always keep the storage com-
partment covers closed while
driving. Do not attempt to place
so many items in the storage
compartment that the storage
compartment cover can not close
securely.
OHD046081
OHD046082
WARNING
To reduce the risk of injury in an
accident or sudden stop, always
keep the glove box door closed
while driving.
Page 155 of 360

Features of your vehicle82 4Cigarette lighterFor the cigarette lighter to work, the igni-
tion switch, must be in the ACC position
or the ON position.
To use the cigarette lighter, push it all the
way into its socket. When the element
has heated, the lighter will pop out to the
"ready" position.
Do not hold the cigarette lighter pressed
in. This can damage the heating element
and create a fire hazard.
If it is necessary to replace the cigarette
lighter, use only a genuine Hyundai
replacement or its approved equivalent.
AshtrayThe front ashtray may be opened by
pulling the ashtray lid. To clean the ash-
tray, the plastic receptacle should be
removed by lifting the plastic ash recep-
tacle upward and pulling it out.
INTERIOR FEATURES
OHD046085
CAUTION
Do not hold the lighter in after it is
already heated because it will
overheat.
Only a genuine Hyundai lighter
should be used in the cigarette
lighter socket. The use of plug-in
accessories (shavers, hand-held
vacuums, and coffee pots, for
example) may damage the socket
or cause electrical failure.
If the lighter does not pop out
within 30 seconds, remove it to
prevent overheating.
OHD046086
WARNING
- Ashtray use
Do not use the vehicle’s ashtrays
as waste receptacles.
Putting lit cigarettes or matches
in an ashtray with other com-
bustible materials may cause a
fire.
Page 156 of 360

483
Features of your vehicle
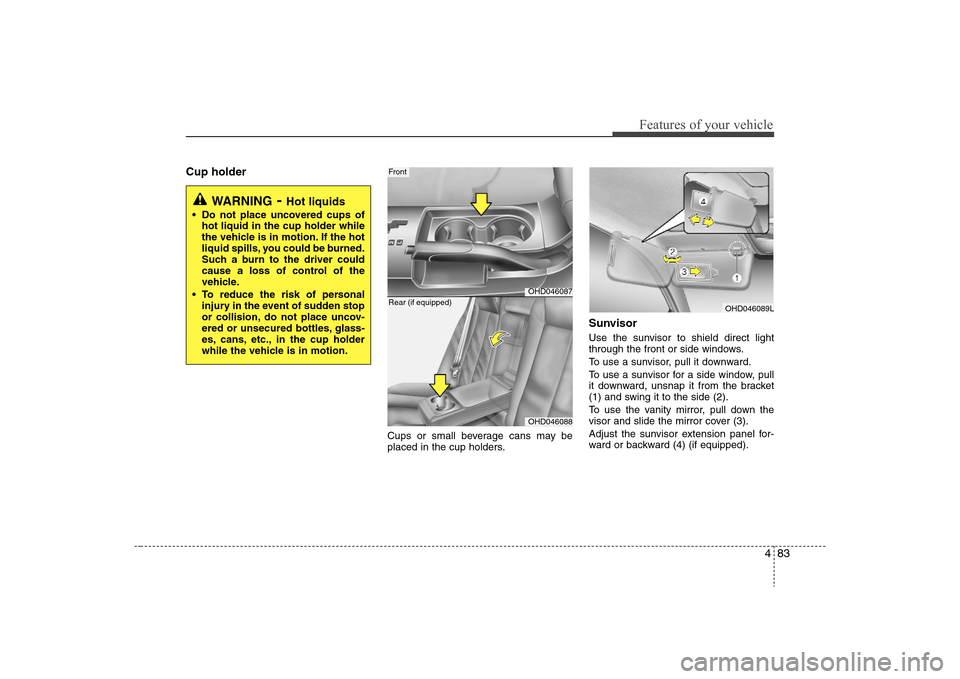
Cup holder
Cups or small beverage cans may be
placed in the cup holders.
SunvisorUse the sunvisor to shield direct light
through the front or side windows.
To use a sunvisor, pull it downward.
To use a sunvisor for a side window, pull
it downward, unsnap it from the bracket
(1) and swing it to the side (2).
To use the vanity mirror, pull down the
visor and slide the mirror cover (3).
Adjust the sunvisor extension panel for-
ward or backward (4) (if equipped).
WARNING
- Hot liquids
Do not place uncovered cups of
hot liquid in the cup holder while
the vehicle is in motion. If the hot
liquid spills, you could be burned.
Such a burn to the driver could
cause a loss of control of the
vehicle.
To reduce the risk of personal
injury in the event of sudden stop
or collision, do not place uncov-
ered or unsecured bottles, glass-
es, cans, etc., in the cup holder
while the vehicle is in motion.
OHD046087
Front
OHD046088
Rear (if equipped)
OHD046089L
Page 164 of 360

491
Features of your vehicle
Care of cassette tapes
(if equipped) Because the thickness of a cassette
tape with the total playback time of
over 60 minutes (C-60) are too thin, we
suggest that you do not use any of
them to avoid having tapes being tan-
gled.
To achieve better sound quality, period-
ically clean the tape head using a cot-
ton stick with colorless alcohol (once
per month).
If a tape is too loose, fasten it to reel by
winding with objects like a pencil.
Because dust or foreign objects on a
cassette tape may damage the play-
back head, always store tapes in their
cases when not in use.
Make sure cassette tapes are kept
away from magnetic devices (TV,
stereo system, etc) in order to achieve
better sound quality.
Be certain that no objects or substances
other than cassette tapes are inserted
into the cassette tape player. Because tape media can be distorted
when exposed to direct sunlight, Do
not leave cassette tapes on the seats,
dashboard or near the back wind-
shield.
Care of disc (if equipped) If the temperature inside the car is too
high, open the car windows for ventilation
before using your car audio.
It is illegal to copy and use
MP3/WMA/AAC/WAVE files without
permission(If equipped with M465, use
only MP3/WMA, If equipped with M445,
use only CD-DA). Use CDs that are cre-
ated only by lawful means.
Do not apply volatile agents such as
benzene and thinner, normal cleaners
and magnetic sprays made for ana-
logue disc onto CDs.
To prevent the disc surface from get-
ting damaged. Hold and carry CDs by
the edges or the edges of the center
hole only.
Clean the disc surface with a piece of
soft cloth before playback (wipe it from
the center to the outside edge).
Do not damage the disc surface or
attach pieces of sticky tape or paper
onto it.
Make sure on undesirable matter other
than CDs are inserted into the CD
player (Do not insert more than one
CD at a time).
Keep CDs in their cases after use to
protect them from scratches or dirt. Depending on the type of CD-R/CD-
RW CDs, certain CDs may not operate
normally according to manufacturing
companies or making and recording
methods. In such circumstances, if you
still continue to use those CDs, they
may cause the malfunction of your car
audio system.
✽ ✽
NOTICE
- Playing an
Incompatible Copy-Protected
Audio CD
Some copy-protected CDs, which do not
comply with the international audio CD
standards(Red Book), may not play on
your car audio. Please note that if you
try to play copy protected CDs and the
CD player of your car audio is not per-
forming to your expectation, this may be
caused by those CDs and not a defect in
the device itself. Please replace those
CDs.
Page 182 of 360

4109
Features of your vehicle
1. LOAD ButtonThis compact disc player will accommo-
date up to six compact discs.
To insert one disc into the player, do the
following:
1. Press and release the LOAD Button.
2. Blue light on the slot will be illuminated
and the lowest number of empty slot
will blink on the display. After "WAIT" is
displayed on the LCD, the slot will open
with "INSERT" displayed on the LCD.
3. Insert a disc partway into the slot, label
side up. The player will pull the disc in.
When the disc is inserted, the disc will
begin to play automatically.✽ ✽
NOTICE• Playback of MP3, AAC, and WMA
file formats are supported. Load to
play time for these formats may be
longer due to the compressed nature
of these discs.
• The disc can be only inserted while the
green light is blinking on the slot.
• This CD player is suitable only for 12
cm discs, do not use irregular shaped
CDs.
To insert multiple discs into the player, do
the followings:
1. Press and hold the LOAD button for
one second or more. You will then hear
a beep sound and the green light on
the slot will be illuminated, and the
numbers of empty disc will blink on the
display.
2. After "WAIT" is displayed on the LCD
with the lowest number of empty slot
blinking, the slot will open with
"INSERT" displayed on the LCD.
3. Insert a disc partway into the slot, label
side up. The player will pull the disc in.
Once the disc is loaded, the numbers
of the empty disc will blink on the dis-
play continuously. If the next "DISC
NO." is displayed when the slot is illu-
minated, you can then load another
disc.
4. Load the remaining disc by following
the same procedures 1 and 2. When
you finished loading 6 discs, the CD
player will begin to play the last CD
loaded.5. To load more than one disc but less
than six, complete Steps 1 and 2.
When you have finished loading discs,
press LOAD button to cancel the load-
ing function or wait for 10 seconds.
The CD player will begin to play the
last CD loaded. As each CD starts to
play, the DISC number will appear on
the display.
✽ ✽
NOTICEThe disc player takes up to six discs.
Do not try to load more than six.2. CD(AUDIO/MP3)/AUX Select
Button Press the CD Button to start CD play-
back, during radio operation or cas-
sette tape playing.
When discs are in the CD deck, if you
press the CD button, the CD player will
begin playing even if the radio or cas-
sette player is being used.
The CD player can be used when the
ignition switch is in either the "ON" or
"ACC" position.
Push the CD button to start CD play-
back without pushing Power ON-OFF
control knob. (Only when a CD is in the
deck.
Page 189 of 360

Features of your vehicle116 41. CD/AUX Selector The system will start playing the CD
when you press this button while radio
or XM is on. (If no CD is found, the LCD
will display "NO DISC" for 3 seconds.)
If the ignition switch of the automobile
is set to ACC (1st notch) or ON (2nd
notch), the system will be turned on
and automatically play the CD from the
last played part when you press this
button even if the power of the audio
system is off. (However, only when the
disc is placed inside the system)2. Disc DeckThis is the place you insert or eject the
CD. When the ignition switch of the auto-
mobile is set to ACC (1st notch) or ON
(2nd notch), if you push the disc in, the
power will be turned on and the CD will
be played. The CD player can play both
12cm and 8cm audio discs. if you insert
a video CD or Data CD then the LCD will
display "ERROR7" and it will turn to the
previous mode (radio or XM).✽ ✽
NOTICEMake sure the printed side of the disk
faces upward when you insert the disk.
3. LCD (Liquid Crystal Display)It displays the state of the song currently
played as well as the information of the
disc including the track, number, CD,
RPT, RDM, SCAN, runtime, and EQ
mode (CLASSIC, POP, ROCK, JAZZ).4. Disc Eject ButtonPress this button to eject the disk when
the disk is in the deck. If no CD is in the
deck, LCD will display “NO DISC” for 3
seconds. (The disk will be ejected when
you press this button even when the igni-
tion switch (ACC) of the automobile is set
to OFF or when the power of the audio
system is off.)✽ ✽
NOTICEForced Eject: When you press and hold
this button for more than 3 seconds, the
disk will be ejected by all means. (Use
this function only when the disk is not
ejected in the abnormal state.)
5. CD IndicatorThis indicator light will be on if the CD is
inside the deck whether the audio sys-
tem is on or off if the ignition switch of the
automobile is set to ACC (1st notch) or
ON (2nd notch). This light will go off
when the CD is ejected.6. SCAN ButtonWhen you press this button, the player
will play 10 seconds of each track (LCD
will display “SCAN”). Press it again to
cancel scanning.7. Search / Selection ButtonTurn the search control to the left or right
while playing CD then the track number
on the LCD will change correspondingly.
When you find the track you want to lis-
ten to, press the button to play the select-
ed song. (The search will be canceled
when you do not select the track within 5
seconds after searching the track.)8. RDM(Random) ButtonPress this button to play the songs in ran-
dom order regardless of the order of
tracks (LCD will display “RDM”). Press it
again to cancel random play.