2008 Hyundai Elantra AUX
[x] Cancel search: AUXPage 185 of 360

Features of your vehicle112 4✽
✽
NOTICE• To assure proper operation of the unit,
keep the vehicle interior temperature
within a normal range by using the
vehicle’s air conditioning or heating
system.
• When replacing the fuse, replace it
with a fuse having the correct capaci-
ty.
• All stored bookmarks are all erased
when the car battery is disconnected
or power to the vehicle is lost. If this
occurs, the bookmarks will have to be
reset.
• Do not add any oil to the rotating
parts. Keep magnets, screwdrivers
and other metallic objects away from
the tape mechanism and head.
✽ ✽
NOTICEWhen using a portable audio device
connected to the power outlet, noise may
occur during playback. If this happens,
use the power source of the portable
audio device.
CAUTION
Do not insert warped or poor
quality discs into the CD player
as damage to the unit may occur.
Do not insert anything like coins
into the player slot as damage to
the unit may occur.
Do not place beverages close to
the audio system. The playback
mechanism may be damaged if
you spill them.
(Continued)
(Continued)
Do not strike or allow anything to
impact the audio system, damage
to the system mechanisms could
occur.
Off-road or rough surface driving
may cause the com- pact disc to
skip. Do not use the compact disc
when driving in such conditions
as damage to the compact disc
face could occur.
Do not attempt to grab or pull the
compact disc out while the disc is
being pulled into the audio unit
by the self-loading mechanism.
Damage to the audio unit and
compact disc could occur.
This equipment is designed to be
used only in a 12 volt DC battery
system with negative ground.
This unit is made of precision
parts. Do not attempt to disas-
semble or adjust any parts.
When driving your vehicle, be
sure to keep the volume of the
unit set low enough to allow you
to hear sounds coming from the
outside.
(Continued)
(Continued)
Do not expose this equipment
(including the speakers and tape)
to water or excessive moisture.
Avoid using recorded compact
discs in your audio unit. Original
compact discs are recommended.
The unit is not sure of playing CD-
RW (Rewritable).
When using the EQ funtion, turn
off the EQ funtion of the device
on the AUX input.
When no device is connected to
the AUX cable, please pull out the
cable from the JACK on the car.
(AUX MODE is operational and
noise may heard in the AUX
MODE.)
Page 188 of 360

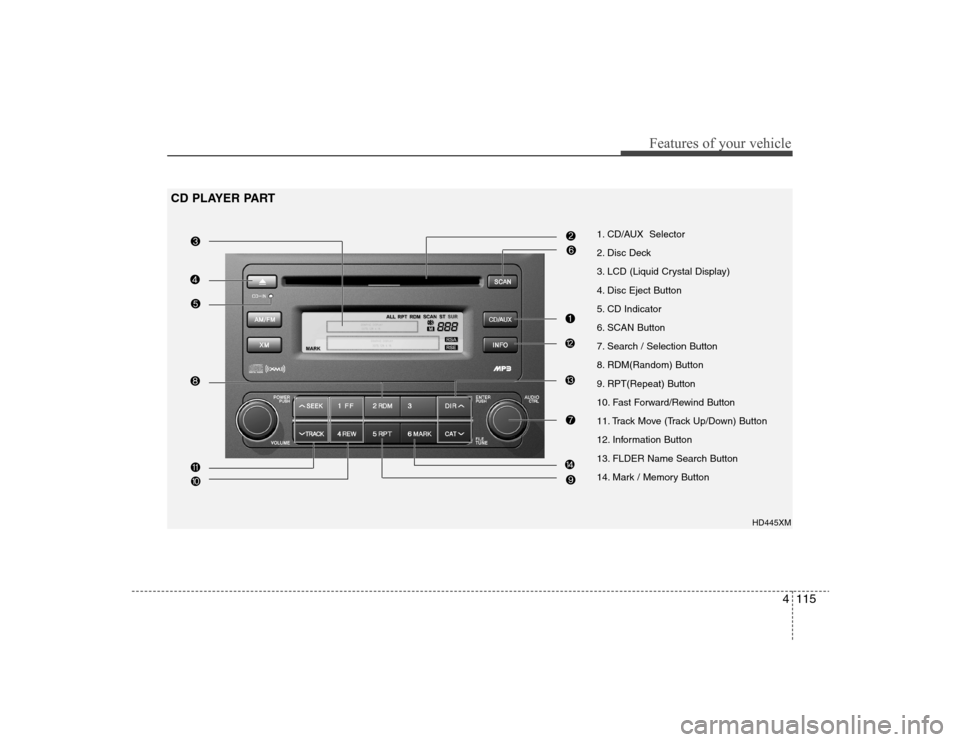
4115
Features of your vehicle
1. CD/AUX Selector
2. Disc Deck
3. LCD (Liquid Crystal Display)
4. Disc Eject Button
5. CD Indicator
6. SCAN Button
7. Search / Selection Button
8. RDM(Random) Button
9. RPT(Repeat) Button
10. Fast Forward/Rewind Button
11. Track Move (Track Up/Down) Button
12. Information Button
13. FLDER Name Search Button
14. Mark / Memory Button
HD445XM
CD PLAYER PART
Page 189 of 360

Features of your vehicle116 41. CD/AUX Selector The system will start playing the CD
when you press this button while radio
or XM is on. (If no CD is found, the LCD
will display "NO DISC" for 3 seconds.)
If the ignition switch of the automobile
is set to ACC (1st notch) or ON (2nd
notch), the system will be turned on
and automatically play the CD from the
last played part when you press this
button even if the power of the audio
system is off. (However, only when the
disc is placed inside the system)2. Disc DeckThis is the place you insert or eject the
CD. When the ignition switch of the auto-
mobile is set to ACC (1st notch) or ON
(2nd notch), if you push the disc in, the
power will be turned on and the CD will
be played. The CD player can play both
12cm and 8cm audio discs. if you insert
a video CD or Data CD then the LCD will
display "ERROR7" and it will turn to the
previous mode (radio or XM).✽ ✽
NOTICEMake sure the printed side of the disk
faces upward when you insert the disk.
3. LCD (Liquid Crystal Display)It displays the state of the song currently
played as well as the information of the
disc including the track, number, CD,
RPT, RDM, SCAN, runtime, and EQ
mode (CLASSIC, POP, ROCK, JAZZ).4. Disc Eject ButtonPress this button to eject the disk when
the disk is in the deck. If no CD is in the
deck, LCD will display “NO DISC” for 3
seconds. (The disk will be ejected when
you press this button even when the igni-
tion switch (ACC) of the automobile is set
to OFF or when the power of the audio
system is off.)✽ ✽
NOTICEForced Eject: When you press and hold
this button for more than 3 seconds, the
disk will be ejected by all means. (Use
this function only when the disk is not
ejected in the abnormal state.)
5. CD IndicatorThis indicator light will be on if the CD is
inside the deck whether the audio sys-
tem is on or off if the ignition switch of the
automobile is set to ACC (1st notch) or
ON (2nd notch). This light will go off
when the CD is ejected.6. SCAN ButtonWhen you press this button, the player
will play 10 seconds of each track (LCD
will display “SCAN”). Press it again to
cancel scanning.7. Search / Selection ButtonTurn the search control to the left or right
while playing CD then the track number
on the LCD will change correspondingly.
When you find the track you want to lis-
ten to, press the button to play the select-
ed song. (The search will be canceled
when you do not select the track within 5
seconds after searching the track.)8. RDM(Random) ButtonPress this button to play the songs in ran-
dom order regardless of the order of
tracks (LCD will display “RDM”). Press it
again to cancel random play.
Page 196 of 360

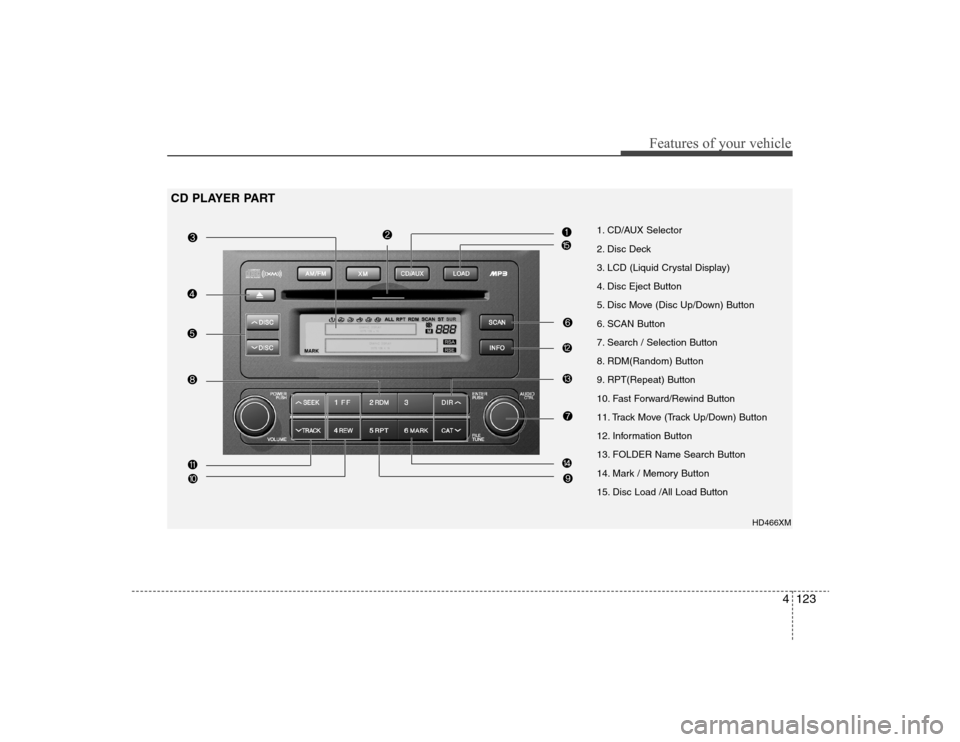
4123
Features of your vehicle
1. CD/AUX Selector
2. Disc Deck
3. LCD (Liquid Crystal Display)
4. Disc Eject Button
5. Disc Move (Disc Up/Down) Button
6. SCAN Button
7. Search / Selection Button
8. RDM(Random) Button
9. RPT(Repeat) Button
10. Fast Forward/Rewind Button
11. Track Move (Track Up/Down) Button
12. Information Button
13. FOLDER Name Search Button
14. Mark / Memory Button
15. Disc Load /All Load Button
HD466XM
CD PLAYER PART
Page 197 of 360

Features of your vehicle124 41. CD/AUX Selector The system will start playing the CD
when you press this button while C186
radio or XM is on. (If no CD is found,
the LCD will display "NO DISC" for 3
seconds.)
If the ignition switch of the automobile
is set to ACC (1st notch) or ON (2nd
notch), the system will be turned on
and automatically play the CD from the
last played part when you press this
button even if the power of the audio
system is off (However, only when the
disc is placed inside the system)2. Disc DeckThis is the place you insert or eject the
CD. To open the deck, press [LOAD] but-
ton. This CD changer can only play audio
CD/MP3/WMA discs and 12cm discs.
Also, if you insert a video CD or a DATA
CD then the LCD will display "ERROR7"
and it will turn to the previous mode
(radio or XM). When the ignition switch of
the automobile is set to ACC (1st notch)
or ON (2nd notch), if you press [LOAD]
button the power will be on and you will
be able to insert the disc even when the
audio system's power is off.
✽ ✽
NOTICE• Do not use 8cm discs.
• The system will not play AAC/WAVE
formats.
• Make sure the printed side of the disk
faces upward when you insert the
disk.3. LCD (Liquid Crystal Display)It displays the state of the song currently
played as well as the information of the
disc including the track, number, CD,
RPT, RDM, SCAN, runtime, EQ mode
(CLASSIC, POP, ROCK, JAZZ), READ-
ING, WAIT, INSERT, NO DISC and so
forth.4. Disc Eject ButtonPress this button to eject the disk when
the disk is in the deck. If no CD is in the
deck, LCD will display “NO DISC” for 3
seconds. (The disk will be ejected when
you press this button even when the igni-
tion switch (ACC) of the automobile is set
to OFF or when the power of the audio
system is off.)✽ ✽
NOTICEALL EJECT: Press and hold this button
for more than 0.8 seconds to eject all
discs inside the deck in respective order.
5. Disc Move (Disc Up/Down)
ButtonIf you want to listen to another disk while
using the CD changer, press [DISC ] ,
[DISC ] button to move to the disc you
want to listent to and play the disc. If all 6
decks of the changer is not full, the num-
ber of the empty deck will not be select-
ed but only the decks with discs will be
played. When moving through discs, the
selected disc will be displayed as "U."6. SCAN ButtonWhen you press this button, the player
will play 10 seconds of each track (LCD
will display “SCAN”). Press it again to
cancel scanning.7. Search / Selection ButtonTurn the search control to the left or right
while playing CD then the track number
on the LCD will change correspondingly.
When you find the track you want to lis-
ten to, press the button to play the select-
ed song. (The search will be canceled
when you do not select the track within 5
seconds after searching the track.)