2008 Hyundai Azera light
[x] Cancel search: lightPage 175 of 345
1
FEATURES OF YOUR HYUNDAI
161161
M465F02TG-AAT1. LOAD ButtonThis compact disc player will accommo-
date up to six compact discs.
To insert one disc into the player, do the
following:
1. Press and release the LOAD Button.
2. Green light on the slot will be illumi-
nated and the lowest number of empty
slot will blink on the display. After "WAIT"
is displayed on the LCD, the slot will
open with "INSERT" displayed on the
LCD.
3. Insert a disc partway into the slot, label
side up. The player will pull the disc in.
When the disc is inserted, the disc will
begin to play automatically.NOTE:o The disc can be only inserted while
the green light is blinking on the slot.
o This CD player is suitable only for 12
cm discs, do not use irregular shaped
CDs.
To insert multiple discs into the player, do
the followings:1. Press and hold the LOAD button for one
second or more. You will then hear a
beep sound and the green light on the
slot will be illuminated, and the num-
bers of empty disc will blink on the
display.
2. After "WAIT" is displayed on the LCD
with the lowest number of empty slot
blinking, the slot will open with "IN-
SERT" displayed on the LCD.
3. Insert a disc partway into the slot, label
side up. The player will pull the disc in.
Once the disc is loaded, the numbers of
the empty disc will blink on the display
continuously. If the next "DISC NO." is
displayed when the slot is illuminated,
you can then load another disc.
4. Load the remaining disc by following
the same procedures 1 and 2. When
you finished loading 6 discs, the CD
player will begin to play the last CD
loaded.
5. To load more than one disc but less than
six, complete Steps 1 and 2. When you
have finished loading discs, press LOAD
button to cancel the loading function or
wait for 10 seconds. The CD player will
begin to play the last CD loaded. As
each CD starts to play, the DISC num-
ber will appear on the display.
NOTE:The disc player takes up to six discs.
Do not try to load more than six.2. Audio/MP3 CD Select Buttono Press the CD Button to start CD play-
back, during radio operation or cas-
sette tape playing.
o When discs are in the CD deck, if you
press the CD button, the CD player will
begin playing even if the radio or cas-
sette player is being used.
o The CD player can be used when the
ignition switch is in either the "ON" or
"ACC" position.NOTE:o Do not stick paper or tape etc., on the
label side or the recording side of any
discs, as it may cause a malfunction.
o The unit cannot play a CDR (Record-
able CD) and CDRW (Rewritable CD)
that is not finalized. Please refer to the
manual of CDR/ CD-RW recorder or
CD-R/CDRW software for more infor-
mation on finalization process.
o Depending on the recording status,
some CD-Rs/CD-RWs may not be
played on this unit.
Page 183 of 345
1
FEATURES OF YOUR HYUNDAI
169169
M445SD02TG-AAT1. CD Selectoro The system will start playing the CD
when you press this button while radio
or XM is on. (If no CD is found, the LCD
will display "NO DISC" for 3 seconds.)
o If the ignition switch of the automobile is
set to ACC (1st notch) or ON (2nd notch),
the system will be turned on and auto-
matically play the CD from the last played
part when you press this button even if
the power of the audio system is off.
(However, only when the disc is placed
inside the system)NOTE:o Do not stick paper or tape etc., on the
label side or the recording side of any
discs, as it may cause a malfunction.
o The unit cannot play a CDR (Record-
able CD) and CDRW (Rewritable CD)
that is not finalized. Please refer to the
manual of CDR/ CD-RW recorder or
CD-R/CDRW software for more infor-
mation on finalization process.
o Depending on the recording status,
some CD-Rs/CD-RWs may not be
played on this unit.o Playback of MP3 and WMA file for-
mats are supported. Load to play time
for these formats may be longer due
to the compressed nature of these
discs.
2. Disc DeckThis is the place you insert or eject the CD.
When the ignition switch of the automobile
is set to ACC (1st notch) or ON (2nd notch),
if you push the disc in, the power will be
turned on and the CD will be played. The
CD player can play both 12cm and 8cm
audio discs. If you insert a video CD or
Data CD then the LCD will display "ER-
ROR7" and it will turn to the previous mode
(radio or XM).NOTE:Make sure the printed side of the disc
faces upward when you insert the disc.3. LCD (Liquid Crystal Display)It displays the state of the song currently
played as well as the information of the
disc including the track, number, CD, RPT,
RDM, SCAN, runtime, and EQ mode
(CLASSIC, POP, ROCK, JAZZ).
4. Disc Eject ButtonPress this button to eject the disc when the
disc is in the deck. If no CD is in the deck,
LCD will display "NO DISC" for 3 seconds.
(The disc will be ejected when you press
this button even when the ignition switch
(ACC) of the automobile is set to OFF or
when the power of the audio system is off.)NOTE:Forced Eject: When you press and hold
this button for more than 3 seconds, the
disc will be ejected by all means. (Use
this function only when the disc is not
ejected in the abnormal state.)5. CD IndicatorThis indicator light will be on if the CD is
inside the deck whether the audio system
is on or off if the ignition switch of the
automobile is set to ACC (1st notch) or ON
(2nd notch). This light will go off when the
CD is ejected.
Page 193 of 345
1
FEATURES OF YOUR HYUNDAI
179179
M455SD02TG-AAT1. CD Selectoro The system will start playing the CD
when you press this button while radio
or XM is on. (If no CD is found, the LCD
will display "NO DISC" for 3 seconds.)
o If the ignition switch of the automobile is
set to ACC (1st notch) or ON (2nd notch),
the system will be turned on and auto-
matically play the CD from the last played
part when you press this button even if
the power of the audio system is off.
(However, only when the disc is placed
inside the system)NOTE:o Do not stick paper or tape etc., on the
label side or the recording side of any
discs, as it may cause a malfunction.
o The unit cannot play a CDR (Record-
able CD) and CDRW (Rewritable CD)
that is not finalized. Please refer to the
manual of CDR/ CD-RW recorder or
CD-R/CDRW software for more infor-
mation on finalization process.
o Depending on the recording status,
some CD-Rs/CD-RWs may not be
played on this unit.o Playback of MP3 and WMA file for-
mats are supported. Load to play time
for these formats may be longer due
to the compressed nature of these
discs.
2. Disc DeckThis is the place you insert or eject the CD.
When the ignition switch of the automobile
is set to ACC (1st notch) or ON (2nd notch),
if you push the disc in, the power will be
turned on and the CD will be played. The
CD player can play both 12cm and 8cm
audio discs. If you insert a video CD or
Data CD then the LCD will display "ER-
ROR7" and it will turn to the previous mode
(radio or XM).NOTE:Make sure the printed side of the disc
faces upward when you insert the disc.3. LCD (Liquid Crystal Display)It displays the state of the song currently
played as well as the information of the
disc including the track, number, CD, RPT,
RDM, SCAN, runtime, and EQ mode
(CLASSIC, POP, ROCK, JAZZ).
4. Disc Eject ButtonPress this button to eject the disc when the
disc is in the deck. If no CD is in the deck,
LCD will display "NO DISC" for 3 seconds.
(The disc will be ejected when you press
this button even when the ignition switch
(ACC) of the automobile is set to OFF or
when the power of the audio system is off.)NOTE:Forced Eject: When you press and hold
this button for more than 3 seconds, the
disc will be ejected by all means. (Use
this function only when the disc is not
ejected in the abnormal state.)5. CD IndicatorThis indicator light will be on if the CD is
inside the deck whether the audio system
is on or off if the ignition switch of the
automobile is set to ACC (1st notch) or ON
(2nd notch). This light will go off when the
CD is ejected.
Page 205 of 345
 button while
playing an MP3 file to display the next
available folder name and [DIR
](Direc-
tory Down) b Hyundai Azera 2008 Owners Manual 1
FEATURES OF YOUR HYUNDAI
191191
13. Directory Name Search ButtonPress [DIR
](Directory Up) button while
playing an MP3 file to display the next
available folder name and [DIR
](Direc-
tory Down) b](/manual-img/35/14485/w960_14485-204.png)
1
FEATURES OF YOUR HYUNDAI
191191
13. Directory Name Search ButtonPress [DIR
](Directory Up) button while
playing an MP3 file to display the next
available folder name and [DIR
](Direc-
tory Down) button, the previous folder name.
Find the folder you searched for and press
7 to play the songs inside the folder from
the top of the list. (If you do not take any
action after searching for the folder for 5 or
more seconds, this search will be can-
celed.)
14. Mark / Memory ButtonYou can choose only the songs you want
to listen to and play them in respective
order. (Refer to the operation method.)
Press again to cancel.
15. Disc Load /All Load ButtonWhen you press [LOAD] button, one of the
empty slots of the CD changer will be
opened in the order of (1), (2), (3), (4), (5).
Insert the CD when the word "INSERT" on
LCD and the light of the deck flicker then
the deck will be closed you will be able to
play and listen to the corresponding CD.
Also, you can load all 6 CDs to all empty
slots of the changer when you press the
[LOAD] button for more than 0.8 seconds
in respective order. In this case the CD you
loaded last will be played. If you do not load
CD for 10 seconds after pressing the
[LOAD] button, or press the [LOAD] button
once again, the loading will be canceled.
In this case, the display for empty disc slots
will go off, and it will be displayed again
when the slot is loaded with a disc.NOTE:o Insert CD only when the word "IN-
SERT" on the LCD and the light of the
deck flicker. (Insert CDs one by one in
respective order.)
o In other cases, the CD will not be
inserted (CD DOOR will be closed),
and if you try to insert CD by force it
may cause damage to the audio sys-
tem.o The disc player takes up to six discs.
Do not try to load more than six.
NOTE:o To assure proper operation of the
unit, keep the vehicle interior tem-
perature within a normal range by
using the vehicle’s air conditioning or
heating system.
o When replacing the fuse, replace it
with a fuse having the correct capac-
ity.
o All stored bookmarks are all erased
when the car battery is disconnected
or power to the vehicle is lost. If this
occurs, the bookmarks will have to be
reset.
o Do not add any oil to the rotating parts.
Keep magnets, screwdrivers and
other metallic objects away from the
tape mechanism and head.
Page 210 of 345
1FEATURES OF YOUR HYUNDAI
196
CARE OF DISCS
B850A02L B850A02F-AAT
Proper HandlingStorage
When not in use, place your discs in their
individual case and store them in a cool
place away from the sun, heat, and dust.
Do not grip or pull out the disc with your
hand while the disc is being pulled into the
unit by the self loading mechanism.Keep Your Discs Clean
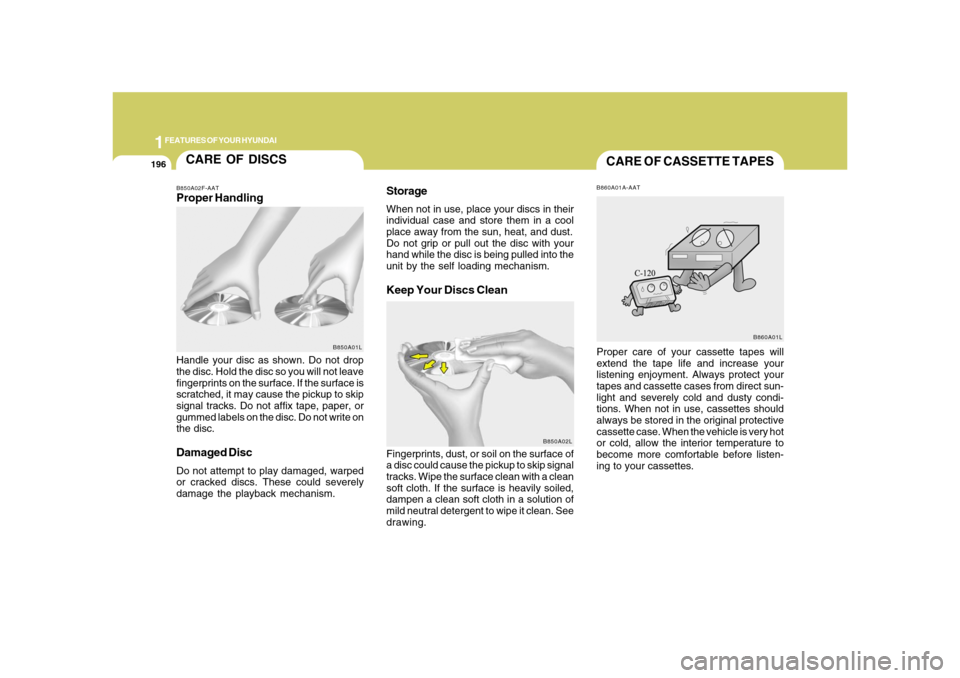
Handle your disc as shown. Do not drop
the disc. Hold the disc so you will not leave
fingerprints on the surface. If the surface is
scratched, it may cause the pickup to skip
signal tracks. Do not affix tape, paper, or
gummed labels on the disc. Do not write on
the disc.Damaged DiscDo not attempt to play damaged, warped
or cracked discs. These could severely
damage the playback mechanism.Fingerprints, dust, or soil on the surface of
a disc could cause the pickup to skip signal
tracks. Wipe the surface clean with a clean
soft cloth. If the surface is heavily soiled,
dampen a clean soft cloth in a solution of
mild neutral detergent to wipe it clean. See
drawing.
B850A01L
CARE OF CASSETTE TAPESB860A01A-AATProper care of your cassette tapes will
extend the tape life and increase your
listening enjoyment. Always protect your
tapes and cassette cases from direct sun-
light and severely cold and dusty condi-
tions. When not in use, cassettes should
always be stored in the original protective
cassette case. When the vehicle is very hot
or cold, allow the interior temperature to
become more comfortable before listen-
ing to your cassettes.
B860A01L
Page 216 of 345
2
DRIVING YOUR HYUNDAI
3
!
!
PROPOSITION 65 WARNING:
Engine exhaust and a wide variety of
automobile components and parts, in-
cluding components found in the interior
furnishings in a vehicle, contain or emit
chemicals known to the State of Califor-
nia to cause cancer and birth defects
and reproductive harm. In addition, cer-
tain fluids contained in vehicles and cer-
tain products of component wear con-
tain or emit chemicals known to the State
of California to cause cancer and birth
defects or other reproductive harm.
BEFORE STARTING
THE ENGINEC020A01TG-AATBefore you start the engine, you should
always:
1. Look around the vehicle to be sure
there are no flat tires, puddles of oil,
water or other indications of possible
trouble.
2. After entering the car, check to be sure
the parking brake is engaged.
3. Check that all windows and lights are
clean.
4. Check that the interior and exterior
mirrors are clean and in position.
5. Check your seat, seatback and head-
rest to be sure they are in their proper
positions.
6. Lock all the doors.
7. Fasten your seat belt and be sure that
all other occupants have fastened
theirs.
8. Turn off all lights and accessories that
are not needed.
9. When you turn the ignition switch to
"ON", check that all appropriate warn-
ing lights are operating and that you
have sufficient fuel.
10. Check the operation of warning lights
and all bulbs when key is in the "ON"
position.
WARNING:
o Always wear appropriate shoes when
operating your vehicle. Unsuitable
shoes (high heels, ski boots, etc.) may
interfere with your ability to use the
brake and accelerator pedal.
o All passengers must be properly
belted whenever the vehicle is mov-
ing. Refer to pages: 1-27 through 1-
34 for more information on their proper
use.
o Always check the surrounding areas
near your vehicle for people, espe-
cially children, before putting a car
into 'drive'.
Page 218 of 345
2
DRIVING YOUR HYUNDAI
5
!
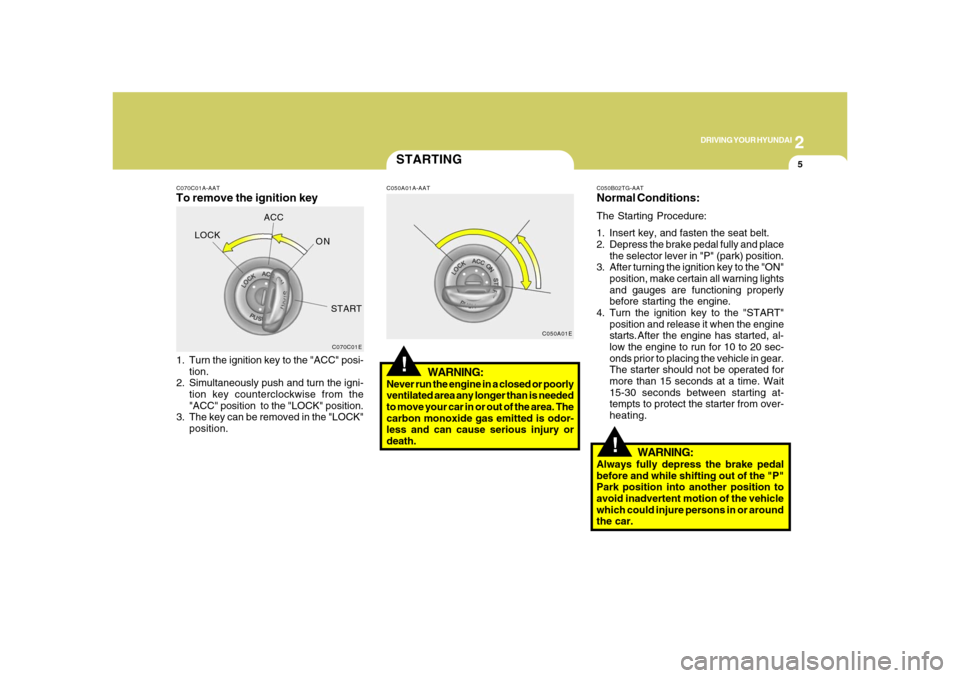
C070C01A-AATTo remove the ignition key1. Turn the ignition key to the "ACC" posi-
tion.
2. Simultaneously push and turn the igni-
tion key counterclockwise from the
"ACC" position to the "LOCK" position.
3. The key can be removed in the "LOCK"
position.
C070C01E
LOCKACC
ON
START
STARTING!
C050A01A-AAT
WARNING:
Never run the engine in a closed or poorly
ventilated area any longer than is needed
to move your car in or out of the area. The
carbon monoxide gas emitted is odor-
less and can cause serious injury or
death.
C050A01EC050B02TG-AAT
Normal Conditions:The Starting Procedure:
1. Insert key, and fasten the seat belt.
2. Depress the brake pedal fully and place
the selector lever in "P" (park) position.
3. After turning the ignition key to the "ON"
position, make certain all warning lights
and gauges are functioning properly
before starting the engine.
4. Turn the ignition key to the "START"
position and release it when the engine
starts.After the engine has started, al-
low the engine to run for 10 to 20 sec-
onds prior to placing the vehicle in gear.
The starter should not be operated for
more than 15 seconds at a time. Wait
15-30 seconds between starting at-
tempts to protect the starter from over-
heating.
WARNING:
Always fully depress the brake pedal
before and while shifting out of the "P"
Park position into another position to
avoid inadvertent motion of the vehicle
which could injure persons in or around
the car.
Page 219 of 345
2
DRIVING YOUR HYUNDAI
6
!
CAUTION:
Never shift into "R" or "P" position while
the vehicle is moving.
Depress the brake pedal when shift-
ing.
The selector lever can be shifted
freely.
The first few shifts on a new vehicle, or if the
battery has been disconnected, may be
somewhat abrupt. This is a normal condi-
tion, and the shifting sequence will adjust
after shifts are cycled a few times by the
T.C.M (Transaxle Control Module).
C090A01TG
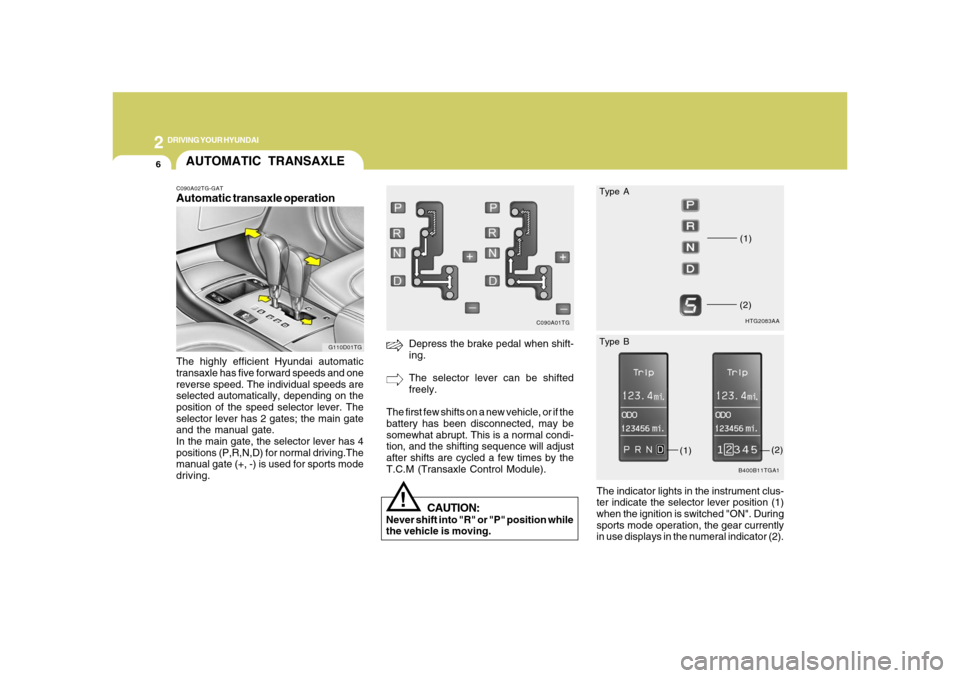
AUTOMATIC TRANSAXLEC090A02TG-GATAutomatic transaxle operationThe highly efficient Hyundai automatic
transaxle has five forward speeds and one
reverse speed. The individual speeds are
selected automatically, depending on the
position of the speed selector lever. The
selector lever has 2 gates; the main gate
and the manual gate.
In the main gate, the selector lever has 4
positions (P,R,N,D) for normal driving.The
manual gate (+, -) is used for sports mode
driving.
G110D01TG
The indicator lights in the instrument clus-
ter indicate the selector lever position (1)
when the ignition is switched "ON". During
sports mode operation, the gear currently
in use displays in the numeral indicator (2).
HTG2083AA(1)(2)B400B11TGA1
(1)
(2) Type A
Type B