2008 Hyundai Azera ECU
[x] Cancel search: ECUPage 48 of 345
1FEATURES OF YOUR HYUNDAI34
!
WARNING:
o A child restraint system must be
placed in the rear seat. Never install
a child or infant seat on the front
passenger's seat. Should an accident
occur and cause the passenger's
front airbag to deploy, it could se-
verely injure or kill an infant or child
seated in an infant or child seat. Thus
only use a child restraint in the rear
seat of your vehicle.
o A safety belt or child restraint system
can become very hot if it is left in a
closed vehicle on a sunny day, even
if the outside temperature does not
feel hot. Be sure to check the seat
cover and buckles before placing a
child there.
o When the child restraint system is not
in use, store it in the trunk or fasten it
with a safety belt so that it will not be
thrown forward in the case of a sud-
den stop or an accident.
o Children may be seriously injured or
killed by an inflating airbag. All chil-
dren, even those too large for child
restraints, must ride in the rear seat.
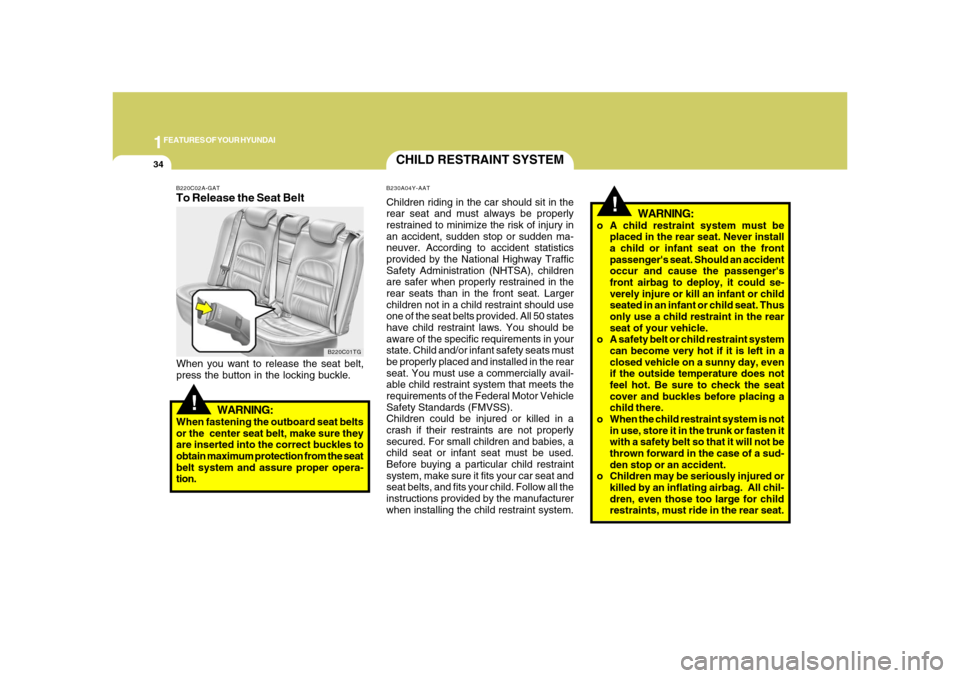
B220C02A-GATTo Release the Seat BeltWhen you want to release the seat belt,
press the button in the locking buckle.
!
WARNING:
When fastening the outboard seat belts
or the center seat belt, make sure they
are inserted into the correct buckles to
obtain maximum protection from the seat
belt system and assure proper opera-
tion.
CHILD RESTRAINT SYSTEMB230A04Y-AATChildren riding in the car should sit in the
rear seat and must always be properly
restrained to minimize the risk of injury in
an accident, sudden stop or sudden ma-
neuver. According to accident statistics
provided by the National Highway Traffic
Safety Administration (NHTSA), children
are safer when properly restrained in the
rear seats than in the front seat. Larger
children not in a child restraint should use
one of the seat belts provided. All 50 states
have child restraint laws. You should be
aware of the specific requirements in your
state. Child and/or infant safety seats must
be properly placed and installed in the rear
seat. You must use a commercially avail-
able child restraint system that meets the
requirements of the Federal Motor Vehicle
Safety Standards (FMVSS).
Children could be injured or killed in a
crash if their restraints are not properly
secured. For small children and babies, a
child seat or infant seat must be used.
Before buying a particular child restraint
system, make sure it fits your car seat and
seat belts, and fits your child. Follow all the
instructions provided by the manufacturer
when installing the child restraint system.
B220C01TG
Page 49 of 345
1
FEATURES OF YOUR HYUNDAI
35
!
To reduce the chance or serious or fatal
injuries:
o Children of all ages are safer when
restrained in the rear seat. A child
riding in the front passenger seat can
be forcefully struck by an inflating
airbag resulting in serious or fatal
injuries.
o Always follow the instructions for in-
stallation and use of the child restraint
maker.
o Always make sure the child seat is
secured properly in the car and your
child is securely restrained in the child
seat.
o Never hold a child in your arms or lap
when riding in a vehicle. The violent
forces created during a crash will tear
the child from your arms and throw
the child against the car’s interior.
o Never put a seat belt over yourself
and a child. During a crash, the belt
could press deep into the child caus-
ing serious internal injuries.o Never leave children unattended in a
vehicle – not even for a short time.
The car can heat up very quickly,
resulting in serious injuries to chil-
dren inside. Even very young chil-
dren may inadvertently cause the
vehicle to move, entangle themselves
in the windows, or lock themselves or
others inside the vehicle.
o Never allow two children, or any two
persons, to use the same seat belt.
o Children often squirm and reposition
themselves improperly. Never let a
child ride with the shoulder belt under
their arm or behind their back. Al-
ways properly position and secure
children in rear seat.
o Never allow a child to stand-up or
kneel on the seat or floorboard of a
moving vehicle. During a collision or
sudden stop, the child can be violently
thrown against the vehicles interior,
resulting in serious injury.
o Never use an infant carrier or a child
safety seat that "hooks" over a
seatback, it may not provide adequate
security in an accident.
!
WARNING: WARNING:
!
WARNING:
B230B01NF-AATUsing a Child Restraint SystemFor small children and babies, the use of
a child seat or infant seat is required. This
child seat or infant seat should be of appro-
priate size for the child and should be
installed in accordance with the
manufacturer's instructions. It is further
required that the seat be placed in the
vehicle's rear seat. Your vehicle is pro-
vided with three child restraint hook hold-
ers for installing the child seat or infant
seat. o Seat belts can become very hot, es-
pecially when the car is parked in
direct sunlight. Always check seat
belt buckles before fastening them
over a child.
o Always store or secure a child seat,
even when it is not in use. During a
collision or sudden stop, the child seat
could be thrown inside the vehicle.
Page 50 of 345

1FEATURES OF YOUR HYUNDAI36
!For vehicles with adjustable headrests,
route the tether strap under the head-
rest and between the headrest posts,
otherwise route the tether strap over the
top of the seatback.
3. Connect the tether strap hook to the
child restraint hook holder and tighten
to secure the seat.
WARNING:
o A child can be seriously injured or
killed in a collision if the child restraint
is not properly anchored. Always
follow the child seat manufacturer’s
instructions for installation and use.
o Never mount more than one child re-
straint to a single tether or to a single
lower anchorage point. The increased
load caused by multiple seats may
cause the tethers or anchorage points
to break, causing serious injury or
death.
2. Route the child restraint seat tether strap
over the seatback.
B230C02TG
Rear seat package trayTether Strap Hook
Child Restraint Hook Holders
B230C05A-AATInstalling a Child Restraint Seat with
the "Tether Anchorage" SystemThree child restraint hook holders are lo-
cated on the rear seat package tray.To install the child restraint seat1. Open the tether anchor cover on the
rear seat package tray.
B230C01TG
Tether Anchor Cover
Child Restraint
Hook Holder
Front of Vehicle
Page 51 of 345
1
FEATURES OF YOUR HYUNDAI
37
B230D07E-AATSecuring the Child Restraint Seat
with the "ISOFIX" systemSome child seat manufacturers make safety
seats that are labeled as ISOFIX or ISOFIX-
compatible child seats. These seats in-
clude two rigid or webbing mounted at-
tachments that connect to two ISOFIX an-
chors at specific seating positions in your
vehicle. This type of child seat eliminates
the need to use seat belts to attach the child
seat in the rear seats.
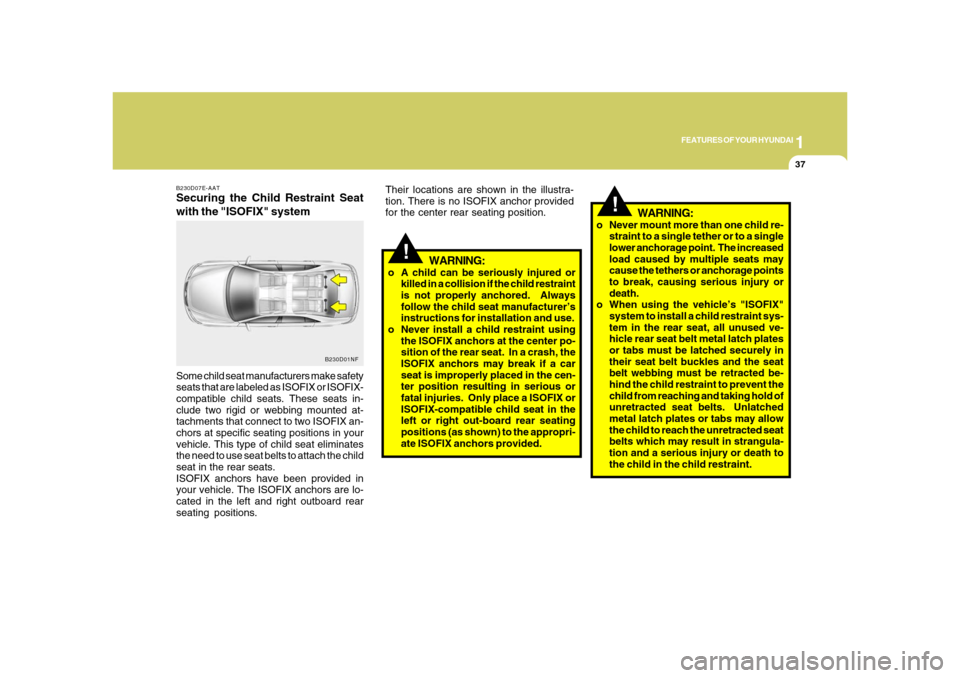
ISOFIX anchors have been provided in
your vehicle. The ISOFIX anchors are lo-
cated in the left and right outboard rear
seating positions.
B230D01NF
!
WARNING:
o A child can be seriously injured or
killed in a collision if the child restraint
is not properly anchored. Always
follow the child seat manufacturer’s
instructions for installation and use.
o Never install a child restraint using
the ISOFIX anchors at the center po-
sition of the rear seat. In a crash, the
ISOFIX anchors may break if a car
seat is improperly placed in the cen-
ter position resulting in serious or
fatal injuries. Only place a ISOFIX or
ISOFIX-compatible child seat in the
left or right out-board rear seating
positions (as shown) to the appropri-
ate ISOFIX anchors provided. Their locations are shown in the illustra-
tion. There is no ISOFIX anchor provided
for the center rear seating position.
!
o Never mount more than one child re-
straint to a single tether or to a single
lower anchorage point. The increased
load caused by multiple seats may
cause the tethers or anchorage points
to break, causing serious injury or
death.
o When using the vehicle’s "ISOFIX"
system to install a child restraint sys-
tem in the rear seat, all unused ve-
hicle rear seat belt metal latch plates
or tabs must be latched securely in
their seat belt buckles and the seat
belt webbing must be retracted be-
hind the child restraint to prevent the
child from reaching and taking hold of
unretracted seat belts. Unlatched
metal latch plates or tabs may allow
the child to reach the unretracted seat
belts which may result in strangula-
tion and a serious injury or death to
the child in the child restraint.
WARNING:
Page 53 of 345
1
FEATURES OF YOUR HYUNDAI
39
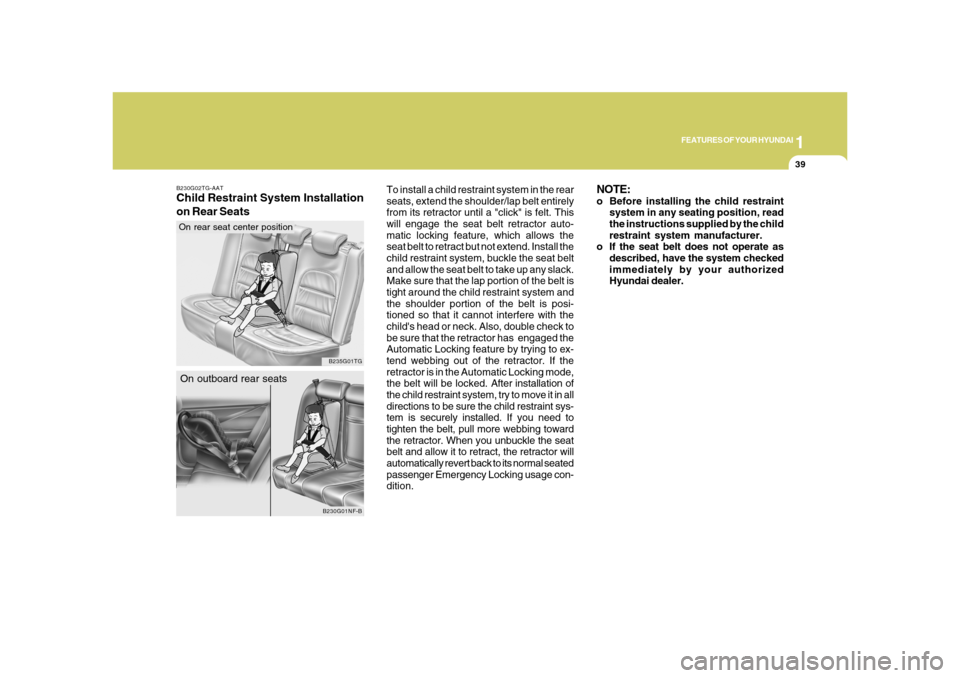
To install a child restraint system in the rear
seats, extend the shoulder/lap belt entirely
from its retractor until a "click" is felt. This
will engage the seat belt retractor auto-
matic locking feature, which allows the
seat belt to retract but not extend. Install the
child restraint system, buckle the seat belt
and allow the seat belt to take up any slack.
Make sure that the lap portion of the belt is
tight around the child restraint system and
the shoulder portion of the belt is posi-
tioned so that it cannot interfere with the
child's head or neck. Also, double check to
be sure that the retractor has engaged the
Automatic Locking feature by trying to ex-
tend webbing out of the retractor. If the
retractor is in the Automatic Locking mode,
the belt will be locked. After installation of
the child restraint system, try to move it in all
directions to be sure the child restraint sys-
tem is securely installed. If you need to
tighten the belt, pull more webbing toward
the retractor. When you unbuckle the seat
belt and allow it to retract, the retractor will
automatically revert back to its normal seated
passenger Emergency Locking usage con-
dition.
B230G02TG-AATChild Restraint System Installation
on Rear Seats
B230G01NF-B
On outboard rear seats
B235G01TG
On rear seat center position
NOTE:o Before installing the child restraint
system in any seating position, read
the instructions supplied by the child
restraint system manufacturer.
o If the seat belt does not operate as
described, have the system checked
immediately by your authorized
Hyundai dealer.
Page 119 of 345
1
FEATURES OF YOUR HYUNDAI
105
!
Integrated HomeLink
® Wireless Con-
trol System
The HomeLink
® Wireless Control System
provides a convenient way to replace up to
three hand-held radio-frequency (RF)
transmitters with a single built-in device.
This innovative feature will learn the radio
frequency codes of most current transmit-
ters to operate devices such as gate op-
erators, garage door openers, entry door
locks, security systems, even home light-
ing. Both standard and rolling code-
equipped transmitters can be programmed
by following the outlined procedures. Ad-
ditional HomeLink
® information can be
found at: www.homelink.com or by calling
1-800-355-3515.
CAUTION:
Before programming HomeLink
® to a
garage door opener or gate operator,
make sure that people and objects are
out of the way of the device to prevent
potential harm or damage. Do not use
HomeLink
® with any garage door opener
that lacks the safety stop and reverse
features as required by U.S. federal
safety standards (this includes any ga-
rage door opener model manufactured
before April 1, 1982). A garage door that
cannot detect an object - signaling the
door to stop and reverse - does not meet
current U.S. federal safety standards.
Using a garage door opener without these
features increases the risk of serious
injury or death.Programming HomeLink
®
NOTE:o When programming a garage door
opener, it is advised to park the ve-
hicle outside of the garage.
o It is recommended that a new battery
be placed in the hand-held transmit-
ter of the device being programmed
to HomeLink
® for quicker training and
accurate transmission of the radio-
frequency signal.
o Some vehicles may require the igni-
tion switch to be turned to the second
(or "accessories") position for pro-
gramming and/or operation of
HomeLink.
o In the event that there are still pro-
gramming difficulties or questions
after following the programming steps
listed below, contact HomeLink
® at:
www.homelink.com or 1-800-355-
3515. Retain the original transmitter of the RF
device you are programming for use in
other vehicles as well as for future
HomeLink
® programming. It is also sug-
gested that upon the sale of the vehicle, the
programmed HomeLink
® buttons be
erased for security purposes.
1. Press and hold the button for more
than 6 seconds. When the compass
memory is cleared a "C" will appear in
the display.
2. To calibrate the compass, drive the
vehicle in 2 complete circles at less than
5 MPH (8 Km/h).
Page 121 of 345

1
FEATURES OF YOUR HYUNDAI
107
4. Press and hold the just-trained
HomeLink
® button and observe the red
Status Indicator LED. If the indicator
light stays on constantly, programming
is complete and your device should
activate.
5. To program the remaining two
HomeLink® buttons, follow either steps
1 through 4 above for other Rolling
Code devices or steps 2 through 5 in
Standard Programming for standard
devices.
During programming, your handheld trans-
mitter may automatically stop transmitting.
Continue to press the Integrated
HomeLink
® Wireless Control System but-
ton (note steps 2 through 4 in the Standard
Programming portion of this document)
while you press and re-press ("cycle") your
handheld transmitter every two seconds
until the frequency signal has been learned.
The indicator light will flash slowly and
then rapidly after several seconds upon
successful training.Operating HomeLink
®
To operate, simply press and release the
programmed HomeLink
® button. Activa-
tion will now occur for the trained device
(i.e. garage door opener, gate operator,
security system, entry door lock, home/
office lighting, etc.). For convenience, the
hand-held transmitter of the device may
also be used at any time.
Reprogramming a Single HomeLink
®
Button
To program a new device to a previously
trained HomeLink
® button, follow these
steps:
1. Press and hold the desired HomeLink
®
button. Do NOT release until step 4 has
been completed.
2. When the indicator light begins to flash
slowly (after 20 seconds), position the
handheld transmitter 1 to 3 inches away
from the HomeLink
® surface.
3. Press and hold the handheld transmit-
ter button. The HomeLink
® indicator light
will flash, first slowly and then rapidly.
4. When the indicator light begins to flash
rapidly, release both buttons.
5. Press and hold the just-trainedHomeLink
® button and observe the red
Status Indicator LED. If the indicator
light stays on constantly, programming
is complete and your new device should
activate.
Erasing HomeLink
® Buttons
Individual buttons cannot be erased. How-
ever, to erase all three programmed but-
tons:
1. Press and hold the two outer HomeLink
®
buttons until the indicator light begins to
flash-after 20 seconds.
2. Release both buttons. Do not hold for
longer than 30 seconds.
The Integrated HomeLink
® Wireless Con-
trol System is now in the training (learn)
mode and can be programmed at any time
following the appropriate steps in the Pro-
gramming sections above.
FCC ID: NZLZTVHL3
IC: 4112A-ZTVHL3
Page 123 of 345
1
FEATURES OF YOUR HYUNDAI
109
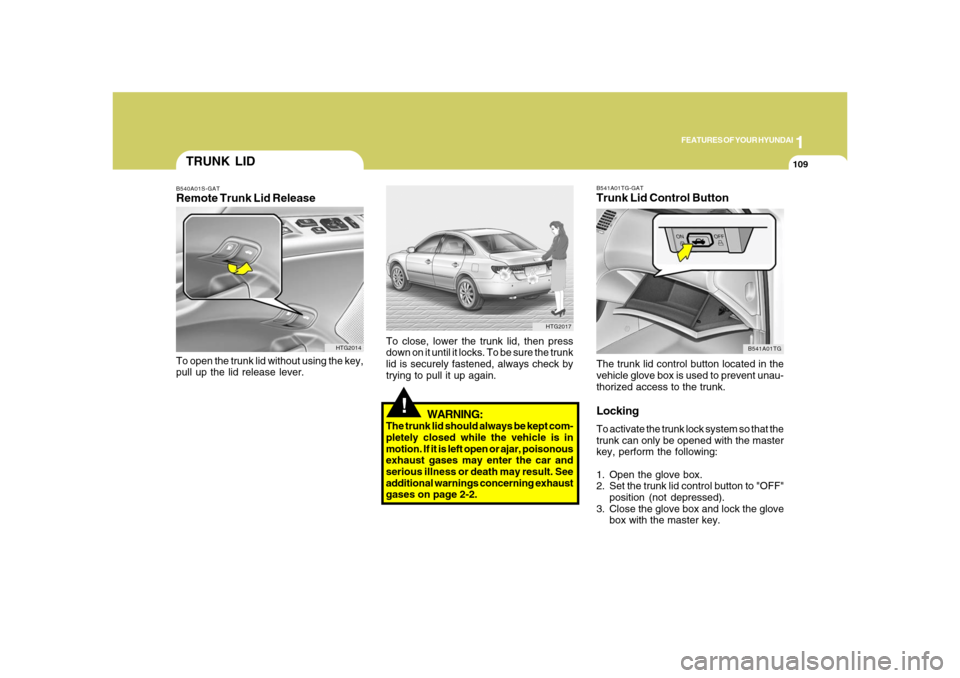
B541A01TG-GATTrunk Lid Control ButtonThe trunk lid control button located in the
vehicle glove box is used to prevent unau-
thorized access to the trunk.LockingTo activate the trunk lock system so that the
trunk can only be opened with the master
key, perform the following:
1. Open the glove box.
2. Set the trunk lid control button to "OFF"
position (not depressed).
3. Close the glove box and lock the glove
box with the master key.
B541A01TG
!
WARNING:
The trunk lid should always be kept com-
pletely closed while the vehicle is in
motion. If it is left open or ajar, poisonous
exhaust gases may enter the car and
serious illness or death may result. See
additional warnings concerning exhaust
gases on page 2-2.To close, lower the trunk lid, then press
down on it until it locks. To be sure the trunk
lid is securely fastened, always check by
trying to pull it up again.
HTG2017
TRUNK LIDB540A01S-GATRemote Trunk Lid ReleaseTo open the trunk lid without using the key,
pull up the lid release lever.
HTG2014