Page 255 of 329

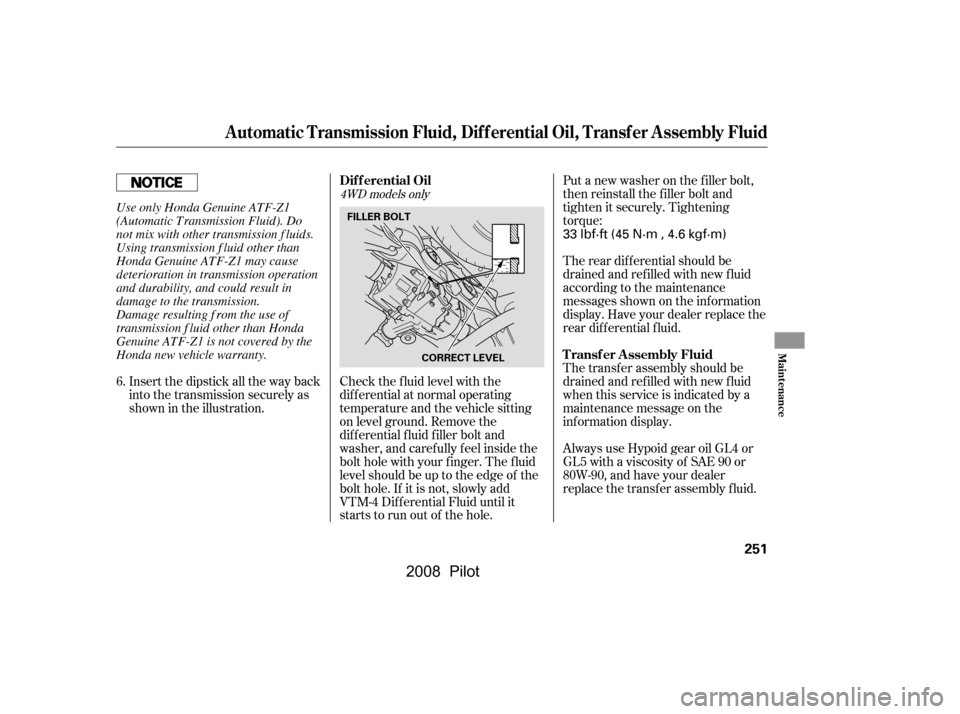
Put a new washer on the f iller bolt,
then reinstall the f iller bolt and
tighten it securely. Tightening
torque:
Check the f luid level with the
dif f erential at normal operating
temperature and the vehicle sitting
on level ground. Remove the
dif f erential f luid f iller bolt and
washer, and caref ully f eel inside the
bolt hole with your f inger. The f luid
level should be up to the edge of the
bolt hole. If it is not, slowly add
VTM-4 Dif f erential Fluid until it
starts to run out of the hole. The rear dif f erential should be
drained and ref illed with new f luid
according to the maintenance
messages shown on the inf ormation
display. Have your dealer replace the
rear dif f erential f luid.
The transf er assembly should be
drained and ref illed with new f luid
when this service is indicated by a
maintenance message on the
inf ormation display.
Always use Hypoid gear oil GL4 or
GL5 with a viscosity of SAE 90 or
80W-90, and have your dealer
replace the transfer assembly fluid.
Insert the dipstick all the way back
into the transmission securely as
shown in the illustration.
6.
4WD models only
Dif f erential Oil
Transf er Assembly Fluid
Automatic Transmission Fluid, Dif f erential Oil, Transf er Assembly Fluid
Maint enance
251
FILLER BOLTCORRECT LEVEL
33 lbf·ft (45 N·m , 4.6 kgf·m)
Use only Honda Genuine ATF-Z1
(Automatic Transmission Fluid). Do
not mix with other transmission f luids.
Using transmission f luid other than
Honda Genuine ATF-Z1 may cause
deterioration in transmission operation
and durability, and could result in
damage to the transmission.
Damage resulting f rom the use of
transmission f luid other than Honda
Genuine ATF-Z1 is not covered by the
Honda new vehicle warranty.
�\f���—�\f���—�\f���y�
�
�������
���y���
�(���+�����\f�y�\f�������y
2008 Pilot
Page 279 of 329

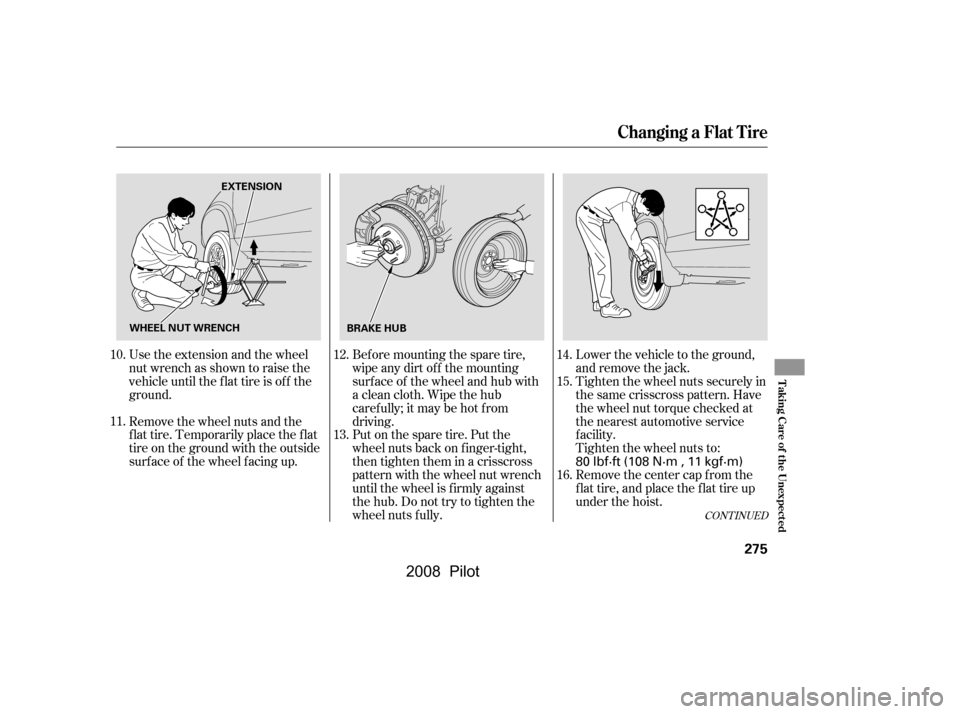
Use the extension and the wheel
nut wrench as shown to raise the
vehicle until the f lat tire is of f the
ground.Bef ore mounting the spare tire,
wipeanydirtoff themounting
surface of the wheel and hub with
a clean cloth. Wipe the hub
carefully;itmaybehotfrom
driving.
Put on the spare tire. Put the
wheel nuts back on f inger-tight,
then tighten them in a crisscross
pattern with the wheel nut wrench
until the wheel is f irmly against
the hub. Do not try to tighten the
wheel nuts f ully.Tighten the wheel nuts securely in
the same crisscross pattern. Have
the wheel nut torque checked at
the nearest automotive service
f acility.
Tighten the wheel nuts to:
Remove the center cap from the
flat tire, and place the flat tire up
under the hoist.
Remove the wheel nuts and the
flat tire. Temporarily place the flat
tire on the ground with the outside
surf ace of the wheel f acing up. Lower the vehicle to the ground,
and remove the jack.
10.
11. 12.
13.14.
15.
16.
CONT INUED
Changing a Flat Tire
T aking Care of t he Unexpect ed
275
EXTENSION
BRAKE HUB
WHEEL NUT WRENCH
80 lbf·ft (108 N·m , 11 kgf·m)
�\f���—�\f���—�\f���y�
�
����\f������y���
�(���+�����\f�y�\f�����\f�y
2008 Pilot
Page 280 of 329
Insert the hoist bracket into the
center hole of the f lat tire.
Slowly turn the wheel nut wrench
clockwisetotakeuptheslackof
the hoist cable. Make sure the
bracketisseatedinthecenter
hole of the f lat tire.Turn the wheel nut wrench
clockwise until the f lat tire rests
against the underbody of the
vehicle and you hear the hoist
click.
Store the jack in its holder. Turn
the jack’s end bracket to lock it in
place. Replace the cover. Store the
tools.
Refer to
(see page ).
17.
18. 19.
20. 21. 213
Changing a Flat Tire
Changing a T ire with
TPMS
276
WHEEL NUT WRENCH
Loose items can fly around the
interiorinacrashandcould
seriously injure the occupants.
Store the wheel, jack, and tools
securely before driving.
Always raise the spare tire hoist, even
if you are not stowing a tire. If the
hoist is lef t down, it will be damaged
during driving and need to be replaced.
�\f���—�\f���—�\f���y�
�
����\f������y���
�(���+�����\f�y�\f�����
�y
2008 Pilot
Page 294 of 329

�µ
�µ
�Î
�Î�Î �Î
No. No. Amps.Amps. Circuits Protected Circuits Protected
1
2
3
4
5
6
7
8
9
10
11
12
13 1
2
3
4
5
6
7
8
9
10
11
12
13
14
15
16 20 A
20 A
20 A
20 A
10 A
20 A
20 A
15 A
15 A
10 A
20 A
7.5 A
7.5 A 20 A
20 A
15 A
10 A
7.5 A
7.5 A 10 A
15 A
7.5 A
7.5 A 10 A
7.5 A
7.5 A 30 A Fuel Pump
SRS
Heater Control, A/C Clutch
Relay, Cooling Fan Relay
Power Mirror, ABS
Daytime Running Light
ECU(PCM),CruiseControl
OPDS, Rear Wiper
ACC Relay
Back-up Lights, Instrument
Lights
Turn Signals
VTM-4
Front Wiper
Not used Driver’s Power Window
Driver’s Power Seat Reclining
Heated Seat
Driver’s Power Seat Sliding
Not used
Daytime Running Light
Driver’s side Rear Power
Window
Front Passenger’s Power
Window
Front Accessory Socket
Small Light
Interior Light
Power Door Lock
Back Up
Moonroof
Moonroof
Passenger’s Side Rear Power
Window
Canadian models
:
Canadian models
Fuse Locations
290
Driver’s Side
INTERIOR FUSE BOX
Passenger’s Side
Front Front
:
�\f���—�\f���—�\f���y�
�
�����������y���
�(���+�����\f�y�\f�������y
2008 Pilot
Page 322 of 329

......................................
Saf ety Belts .10
............
Safety Defects, Reporting .310
.................................
Saf ety Features .9
.........................................
Airbags .11
.....................................
Seat Belts .10
.............
Saf ety Labels, Location of .58
..............................
Saf ety Messages .iii
.........................................
Seat Belts .10
...............
Additional Information .21
Automatic Seat Belt
...............................
Tensioners .23
.....................................
Cleaning .260
......................
Lap/Shoulder Belt .22
................................
Maintenance .23
Reminder Light and
................................
Beeper .21,62 ...................
System Components .25
...............
Use During Pregnancy .19
...
Wearing a Lap/Shoulder Belt .15
....................................
Seat Heaters .86
.................................................
Seats .87
............
Folding the Second Seat .89
...............
Folding the Third Seat .90
..........................
Head Restraints .91
.........
Reclining the Second Seat .89
............
Reclining the Third Seat .90
.......................
Third Seat Access .90
...................
Seats, Adjusting the .87-91
............................
Security System .176
...............................
Serial Number .292
...........................
Service Intervals .237
.............................
Service Manual .311
.........
Service Station Procedures .189
..........................
Setting the Clock .142
Shif ting the Automatic
.............................
Transmission .206
.....
Shif t Lever Position Indicator .206
........................
Shif t Lock Release .209
Side Marker Lights, Bulb
.........................
Replacement in .255
..............................
Side Airbags .11,31
..........................
Of f Indicator .34,63
...................
Radiator Overheating .280
.............
Radio/CD Sound System .115
...........................
Readiness Codes .305
...............................
Rear A/C Unit .113
............
Rear Audio Control Panel .149
........
Rear Entertainment System .144
..
Rear Lights, Bulb Replacement .258
.
Rear View Camera and Monitor .182
............................
Rear View Mirror .92
.................
Rear Window Def ogger .77
.
Rear Window Wiper and Washer .74
..........
Reclining the Seat Backs .87-91
.............................
Reminder Lights .61
................
Remote Audio Controls .140
.................
Remote Control (RES) .171
.......................
Remote Transmitter .83
Replacement Inf ormation
................
Engine Oil and Filter .246
.................................
Floor Mats .260
..........................................
Fuses .285
................................
Light Bulbs .254
........................................
Minder .243
................................
Timing Belt .252
...........................................
Tires .265 .............................
Wiper Blades .261
Replacing Seat Belts Af ter a ............................................
Crash .23
...
Reserve Tank, Engine Coolant .192
...............................
Restraint, Child .38
..................
Reverse Gear Position .207
................................
Rotation, Tire .266
Index
R
S
VI
�����—�����—�����y�
�
�������
���y���
�(���+�������y���������y
2008 Pilot