Page 63 of 329

This section gives inf ormation about
the controls and displays that
contribute to the daily operation of
your vehicle. All the essential
controls are within easy reach............................
Control Locations .60
............................
Instrument Panel .61
..........
Instrument Panel Indicators .62
.............................................
Gauges .70
...................................
Trip Meter .70
.....................................
Odometer .70
..................................
Fuel Gauge .70
...................
Temperature Gauge .71
Outside Temperature
...................................
Indicator .71
..........
Check Fuel Cap Message .72
Controls Near the Steering ...........................................
Wheel .73
.
Windshield Wipers and Washers .74
.........
Turn Signals and Headlights .75
Automatic Lighting Off .....................................
Feature .76
............
Daytime Running Lights .76
........
Instrument Panel Brightness .76
.................
Hazard Warning Button .77
.................
Rear Window Def ogger .77
..........
Steering Wheel Adjustment .78
...............................
Keys and Locks .79
........................
Immobilizer System .80
................................
Ignition Switch .81 ......................................
Door Locks .82
......................
Power Door Locks .82
........................................
Tailgate .82
..................
Childproof Door Locks .83
.......................
Remote Transmitter .83
....................................
Seat Heaters .86
.................................................
Seats .87
..........................
Head Restraints .91
.............................................
Mirrors .92
..............................
Power Windows .94
.........................................
Moonroof .96
.................................
Parking Brake .97
...........
Interior Convenience Items .98
.......................
Beverage Holders .99
...............
Console Compartment .99
....................................
Glove Box .99
....................
Sunglasses Holder .100
................
Conversation Mirror .100
...................................
Sun Visor .101
............................
Vanity Mirror .101
........
Accessory Power Sockets .101
...............................
Interior Lights .102
Instruments and Controls
Inst rument s and Cont rols
59
�\f���—�\f���—�\f���y�
�
����\f������y���
�(���+�����\f�y�\f�\f�����y
2008 Pilot
Page 77 of 329
�Î�Î
�Î
�Î �Î
�Î
�Î
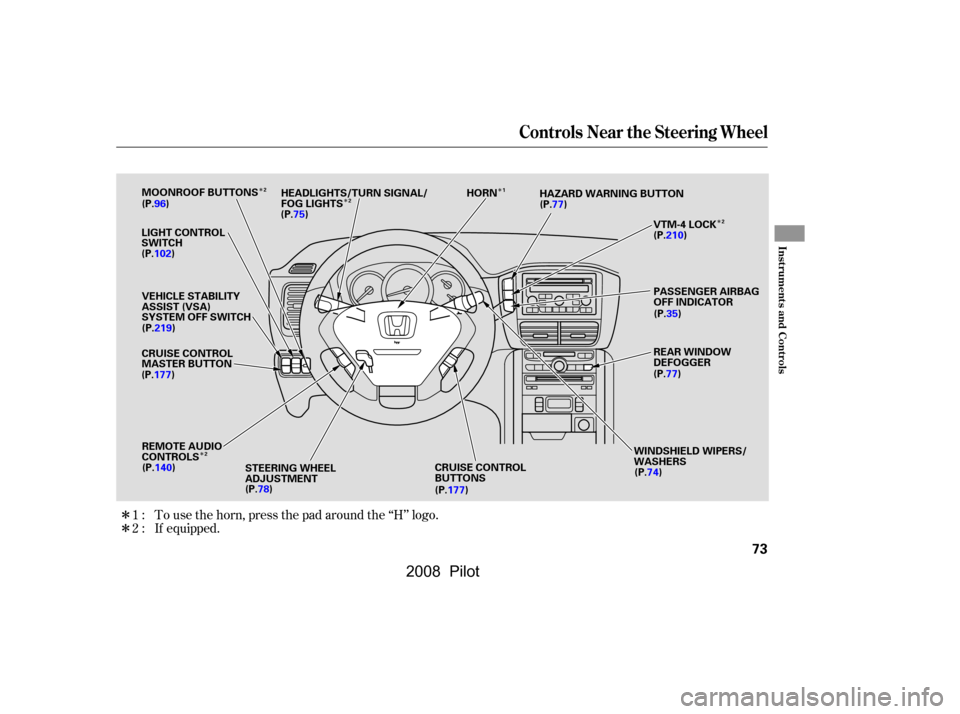
If equipped. To use the horn, press the pad around the ‘‘H’’ logo.
1:
2:
Controls Near the Steering Wheel
Inst rument s and Cont rols
73
LIGHT CONTROL
SWITCH HAZARD WARNING BUTTON
WINDSHIELD WIPERS/
WASHERS
STEERING WHEEL
ADJUSTMENT PASSENGER AIRBAG
OFF INDICATOR
(P.96)
(P.102)
CRUISE CONTROL
MASTER BUTTON
(P.78) CRUISE CONTROL
BUTTONS(P.77)
(P.35)
(P.77)
(P.74) REAR WINDOW
DEFOGGER
(P.75)
(P.177) (P.140) (P.177)(P.210)
VEHICLE STABILITY
ASSIST (VSA)
SYSTEM OFF SWITCH
MOONROOF BUTTONS
HEADLIGHTS/TURN SIGNAL/
FOG LIGHTS
VTM-4 LOCK
REMOTE AUDIO
CONTROLS (P.219) HORN
2
2
2
2 1
�����—�����—�����y�
�
�����������y���
�(���+�������y���������y
2008 Pilot
Page 82 of 329
Push the lever under the steering
column all the way down.
Move the steering wheel so it
points to your chest, not toward
your f ace. Make sure you can see
the instrument panel gauges and
indicators.Make sure you have securely
locked the steering wheel in place
by trying to move it up and down.
Make any steering wheel adjustment
bef ore you start driving.
Push the lever up to lock the
steering wheel in position.
1.
2. 3.
4.
Steering Wheel A djustment
78
LEVER
Adjusting the steering wheel
position while driving may
cause you to lose control of the
vehicle and be seriously injured
inacrash.
Adjust the steering wheel only
when the vehicle is stopped.
�\f���—�\f���—�\f���y�
�
���������\f�y���
�(���+�����\f�y�\f�\f�����y
2008 Pilot
Page 85 of 329
, ACCESSORY
(I), ON (II), and START (III). You can insert or
remove the key only in this position.
To turn the key, the shift lever mus")
�µ�µ
�µ
�µ
The ignition switch has f our
positions: LOCK (0), ACCESSORY
(I), ON (II), and START (III). You can insert or
remove the key only in this position.
To turn the key, the shift lever must
be in Park, and you must push the
key in slightly. You can
operate the audio system and the
accessory power sockets in this
position.
If the f ront wheels are turned, the
anti-theft lock may make it difficult
to turn the key. Firmly turn the
steering wheel to the lef t or right as
you turn the key.
Use this position
only to start the engine. The switch
returns to the ON (II) position when
you let go of the key. You will hear a reminder beeper if
you leave the key in the LOCK (0) or
the ACCESSORY (I) position and
open the driver’s door. Remove the
key to turn of f the beeper.
TheshiftlevermustbeinPark
bef ore you can remove the key f rom
the ignition switch.
This is the normal key
position when driving. Several of the
indicators on the instrument panel
come on as a test when you turn the
ignition switch f rom the
ACCESSORY (I) to the ON (II)
position.
LOCK (0) A CCESSORY (I)
ST A RT (III)
ON (II)
Ignition Switch
Inst rument s and Cont rols
81
�\f���—�\f���—�\f���y�
�
�����������y���
�(���+�����\f�y�\f�\f�����y
2008 Pilot
Page 118 of 329
�µ
�µ
�µ
Theclimatecontrolsystemhastwo
sensors. A sunlight sensor is in the
top of the dashboard, and a
temperature sensor is next to the
steering column. Do not cover the
sensors or spill any liquid on them.
OFF (center) The rear A/C unit
shuts off.
Warm Air Turn this dial clockwise
to increase the temperature.
Cool Air Turn this dial
counterclockwise to decrease the
temperature.
On EX, EX-L, and EX-SE models
Sunlight and T emperature
Sensors
Vents, Heating, and A/C
114
SUNLIGHT SENSOR TEMPERATURE SENSOR
COOL AIR WARM AIR
�\f���—�\f���—�\f���y�
�
�����������y���
�(���+�����\f�y�\f�
�
���y
2008 Pilot
Page 144 of 329

If you are playing a CD
If you are listening to the radio
Except f or LX models,usetheCH
buttontoskiptothebeginningof the
next track. You will see the CD and
track number in the display.
,usethe
CHbuttontogotothenextpreset
station. You will see the number of
the preset button in the display. To
change bands, press the AM/FM
button.
The MODE button changes the
audio mode between FM1, FM2, AM,
XM, CD, and DVD/AUX (if a disc is
inserted).
The CH button has three functions,
depending on whether you are
listening to the radio, or playing a
CD.
The middle button adjusts the
volume. Press the top or bottom of
the button and hold it until the
desired volume is reached, then
release it.
Three controls f or the audio system
are mounted in the steering wheel
hub. These let you control basic
f unctions without removing your
hand f rom the wheel.
Remote Audio Controls
140
CH BUTTON
VOLUME
BUTTON MODE
BUTTON
�\f���—�\f���—�\f���y�
�
�������
���y���
�(���+�����\f�y�\f�
�����y
2008 Pilot
Page 181 of 329

without keeping your f oot on the
accelerator pedal. It should be used
f or cruising on straight, open
highways. It is not recommen")
Cruise control allows you to maintain
asetspeedabove25mph(40km/h)
without keeping your f oot on the
accelerator pedal. It should be used
f or cruising on straight, open
highways. It is not recommended f or
city driving, winding roads, slippery
roads, heavy rain, or bad weather.Push in the cruise control master
button. The indicator on the
instrument panel will come on. The CRUISE button can be
lefton,evenwhenthesystemisnot
in use.
Accelerate to the desired cruising
speedabove25mph(40km/h).
Press and release the SET/
wheel. The indicator on the
instrument panel comes on to Cruise control may not hold the set
speed when you are going up and
down hills. If your speed increases
going down a hill, use the brakes to
slow down. This will cancel cruise
control. To resume the set speed,
press the RES/ACCEL button. The
indicator on the instrument panel will
come back on.
1.
2.
3.
Using the Cruise Control
Cruise Control
Features
177
NOTE:
CRUISE CONTROL MASTER BUTTON
CANCEL
BUTTON
SET/DECEL
BUTTON
RES/ACCEL BUTTON
Improper use of the cruise
control can lead to a crash.
Use the cruise control only
when traveling on open
highways in good weather.
�\f���—�\f���—�\f���y�
�
�����������y���
�(���+�����\f�y�\f�
�����y
DECELbuttononthesteering
show the system is now activated.
2008 Pilot
Page 182 of 329

You can increase the set cruising
speed in any of these ways:Push on the accelerator pedal.
Accelerate to the desired cruising
speed, then press the SET/
DECEL button.
You can decrease the set cruising
speed in any of these ways: Press and hold the SET/DECEL
button. Release the button when
you reach the desired speed. To slow down in very small
amounts, tap the SET/DECEL
button. Each time you do this,
your vehicle will slow down about
1 mph (1.6 km/h).
Tap the brake pedal lightly with
your f oot. The CRUISE
CONTROL indicator on the
instrument panel will go out.
When the vehicle slows to the
desired speed, press the SET/
DECEL button.
Even with the cruise control turned
on, you can still use the accelerator
pedal to speed up f or passing. Af ter
completing the pass, take your foot
of f the accelerator pedal. The vehicle
will return to the set cruising speed.
Resting your f oot on the brake pedal
causes cruise control to cancel. You can cancel cruise control in any
of these ways:
Tap the brake pedal.
Push the CANCEL button on the
steering wheel.
Pushthecruisecontrolmaster
button.
To increase the speed in very
small amounts, tap the RES/
ACCEL button. Each time you do
this, your vehicle will speed up
about 1 mph (1.6 km/h). When you push the CANCEL button
or tap on the brake pedal, the system
will remember the previously set
cruising speed. To return to that
speed, accelerate to above 25 mph
(40 km/h), and then press and
release the RES/ACCEL button. The
CRUISE CONTROL indicator comes
on. The vehicle will accelerate to the
same cruising speed as bef ore.
Pressingthecruisecontrolmaster
button turns the system off and
erases the previous cruising speed.
Press and hold the RES/ACCEL
button. When you reach the
desired cruising speed, release the
button.
Changing the Set Speed Canceling Cruise Control
Resuming the Set Speed
Cruise Control
178
�\f���—�\f���—�\f���y�
�
�����������y���
�(���+�����\f�y�\f�
�����y
2008 Pilot