Page 275 of 329

This section covers the more
common problems that motorists
experience with their vehicles. It
gives you inf ormation about how to
safely evaluate the problem and what
to do to correct it. If the problem has
stranded you on the side of the road,
you may be able to get going again.
If not, you will also f ind instructions
on getting your vehicle towed.......................
Compact Spare Tire .272
....................
Changing a Flat Tire .273
.............
If the Engine Won’t Start .277
................................
Jump Starting .278
..............
If the Engine Overheats .280
.........
Low Oil Pressure Indicator .282
..........
Charging System Indicator .282
.......
Malf unction Indicator Lamp .283
...............
Brake System Indicator .284
......................
Emergency Towing .285
..............................................
Fuses .285
..............................
Fuse Locations .289
Taking Care of the Unexpected
T aking Care of t he Unexpect ed
271
�\f���—�\f���—�\f���y�
�
����\f��\f���y���
�(���+�����\f�y�\f�������y
2008 Pilot
Page 276 of 329

Use the compact spare tire as a
temporary replacement only. Get
your regular tire repaired or replaced,
and put it back on your vehicle as
soon as you can.
Check the inf lation pressure of the
compact spare tire every time you
check the other tires. It should be
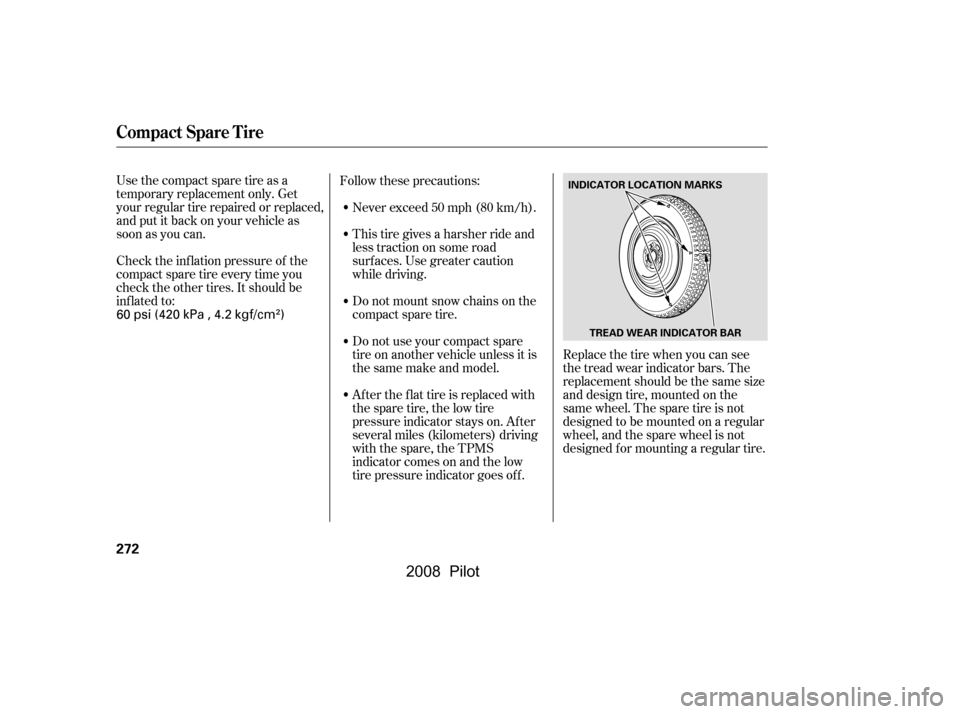
inf lated to:Replace the tire when you can see
the tread wear indicator bars. The
replacement should be the same size
and design tire, mounted on the
same wheel. The spare tire is not
designed to be mounted on a regular
wheel, and the spare wheel is not
designed f or mounting a regular tire.
Follow these precautions:
Never exceed 50 mph (80 km/h).
This tire gives a harsher ride and
less traction on some road
surf aces. Use greater caution
while driving.
Do not mount snow chains on the
compact spare tire.
Do not use your compact spare
tire on another vehicle unless it is
thesamemakeandmodel.
After the flat tire is replaced with
the spare tire, the low tire
pressure indicator stays on. Af ter
several miles (kilometers) driving
with the spare, the TPMS
indicator comes on and the low
tire pressure indicator goes of f .
Compact Spare Tire
272
TREAD WEAR INDICATOR BAR
INDICATOR LOCATION MARKS
60 psi (420 kPa , 4.2 kgf/cm)
�\f���—�\f���—�
�\f�y�
���������
���y���
�(���+�����\f�y�\f�������y
2008 Pilot
Page 277 of 329

CONT INUED
If you have a f lat tire while driving,
stop in a saf e place to change it.
Drive slowly along the shoulder until
you get to an exit or an area to stop
that is far away from the traffic lanes.
Park the vehicle on f irm, level, and
non-slippery ground. Put the
transmission in Park. Apply the
parking brake.
If you are towing a trailer, unhitch
it.
Turn on the hazard warning lights,
and turn the ignition switch to the
LOCK (0) position. Have all
passengers get out of the vehicle
while you change the tire.
Turn the jack’s end bracket
counterclockwise to loosen it, then
remove the jack and tools.
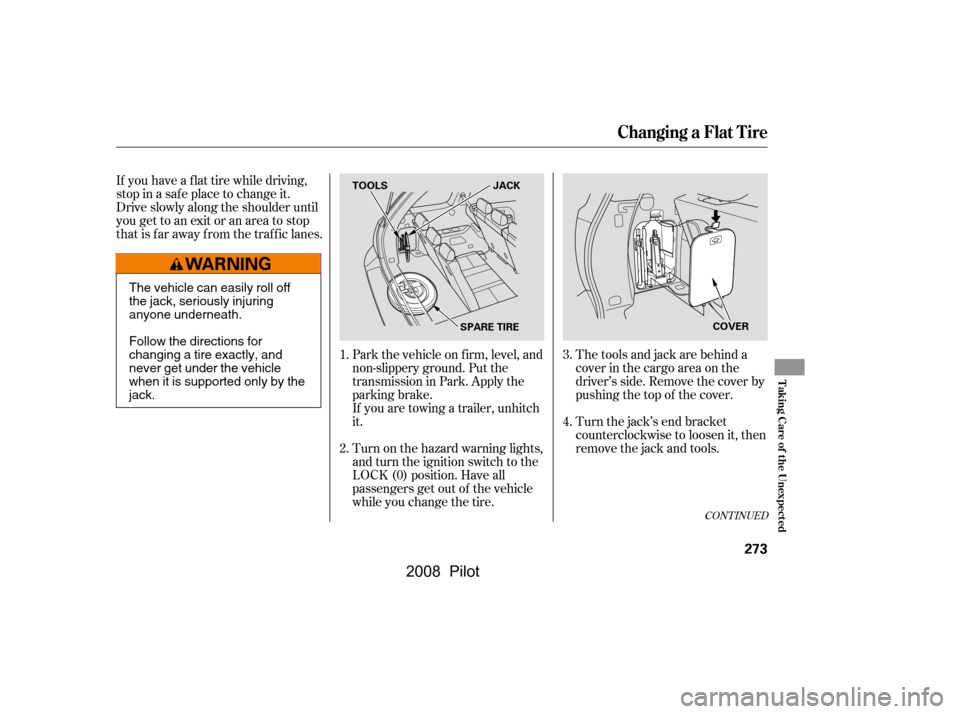
Thetoolsandjackarebehinda
cover in the cargo area on the
driver’s side. Remove the cover by
pushing the top of the cover.
2.
1. 3.
4.
Changing a Flat Tire
T aking Care of t he Unexpect ed
273
SPARE TIRE
TOOLS
COVER
JACK
The vehicle can easily roll off
the jack, seriously injuring
anyone underneath.
Follow the directions for
changing a tire exactly, and
never get under the vehicle
when it is supported only by the
jack.
�����—�����—�����y�
�
�������
���y���
�(���+�������y���������y
2008 Pilot
Page 278 of 329
Put the wheel nut wrench on the
hoist shaf t. Turn the wrench
counterclockwise to lower the
spare tire to the ground. Keep
turning the wheel nut wrench to
create slack in the cable.
Remove the bracket from the
spare tire.
The spare tire is stored
underneath the rear cargo area.
Remove the plastic cover on the
cargo area lining to access the
shaft for the spare tire hoist. Loosen each wheel nut 1/2 turn
with the wheel nut wrench.Placethejackunderthejacking
point nearest the tire you need to
change. Turn the end bracket
clockwise until the top of the jack
contacts the jacking point. Make
sure the jacking point tab is
restinginthejacknotch.
8.
7.
6.
5. 9.
Changing a Flat Tire
274
BRACKET
JACKING POINT
WHEEL NUT WRENCH
The wheel nut wrench supplied with
your vehicle is specially adapted to f it
the hoist shaf t. Do not use any other
tool.
�\f���—�\f���—�\f���y�
�
����\f������y���
�(���+�����\f�y�\f�������y
2008 Pilot
Page 279 of 329

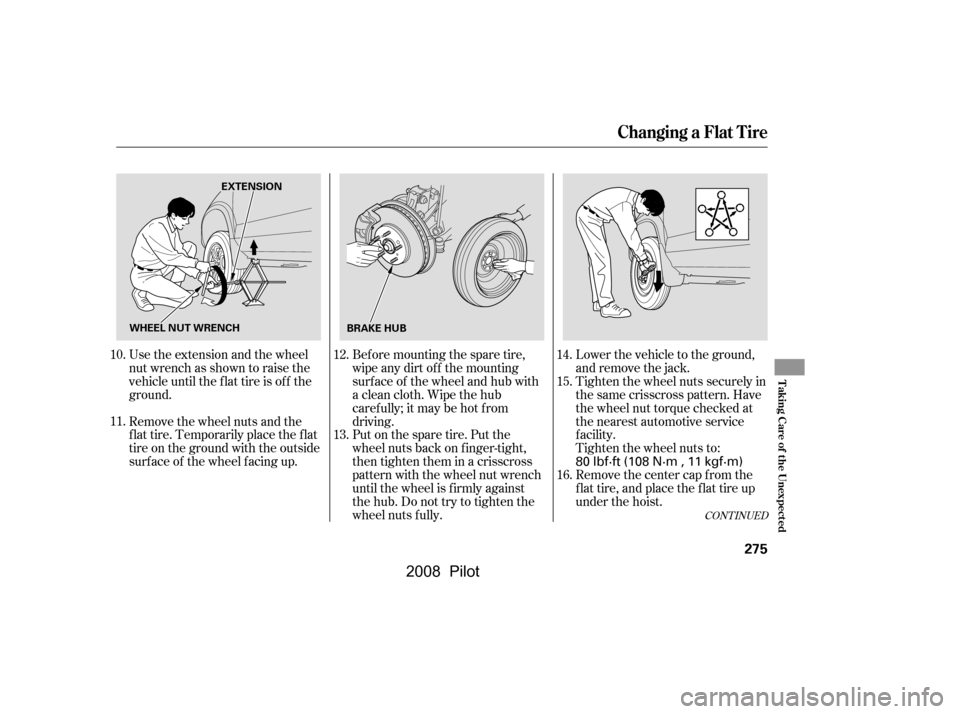
Use the extension and the wheel
nut wrench as shown to raise the
vehicle until the f lat tire is of f the
ground.Bef ore mounting the spare tire,
wipeanydirtoff themounting
surface of the wheel and hub with
a clean cloth. Wipe the hub
carefully;itmaybehotfrom
driving.
Put on the spare tire. Put the
wheel nuts back on f inger-tight,
then tighten them in a crisscross
pattern with the wheel nut wrench
until the wheel is f irmly against
the hub. Do not try to tighten the
wheel nuts f ully.Tighten the wheel nuts securely in
the same crisscross pattern. Have
the wheel nut torque checked at
the nearest automotive service
f acility.
Tighten the wheel nuts to:
Remove the center cap from the
flat tire, and place the flat tire up
under the hoist.
Remove the wheel nuts and the
flat tire. Temporarily place the flat
tire on the ground with the outside
surf ace of the wheel f acing up. Lower the vehicle to the ground,
and remove the jack.
10.
11. 12.
13.14.
15.
16.
CONT INUED
Changing a Flat Tire
T aking Care of t he Unexpect ed
275
EXTENSION
BRAKE HUB
WHEEL NUT WRENCH
80 lbf·ft (108 N·m , 11 kgf·m)
�\f���—�\f���—�\f���y�
�
����\f������y���
�(���+�����\f�y�\f�����\f�y
2008 Pilot
Page 280 of 329
Insert the hoist bracket into the
center hole of the f lat tire.
Slowly turn the wheel nut wrench
clockwisetotakeuptheslackof
the hoist cable. Make sure the
bracketisseatedinthecenter
hole of the f lat tire.Turn the wheel nut wrench
clockwise until the f lat tire rests
against the underbody of the
vehicle and you hear the hoist
click.
Store the jack in its holder. Turn
the jack’s end bracket to lock it in
place. Replace the cover. Store the
tools.
Refer to
(see page ).
17.
18. 19.
20. 21. 213
Changing a Flat Tire
Changing a T ire with
TPMS
276
WHEEL NUT WRENCH
Loose items can fly around the
interiorinacrashandcould
seriously injure the occupants.
Store the wheel, jack, and tools
securely before driving.
Always raise the spare tire hoist, even
if you are not stowing a tire. If the
hoist is lef t down, it will be damaged
during driving and need to be replaced.
�\f���—�\f���—�\f���y�
�
����\f������y���
�(���+�����\f�y�\f�����
�y
2008 Pilot
Page 299 of 329

�µ
�µ
�µ
�µ �µ�µ
�µ
�µ
�µ
�µ
�µ
�µ
�µ
�µ
�µ
�µ
�µ
�µ
�µ
�µ
�µ
�µ
�µ
�µ
�µ
�Î
�Î
�Î
�Î
Specif ications
Technical Inf ormation
295
Lights
Fuses Engine
Air Conditioning
Alignment
Tires
Headlights
Front side marker lights
Front position lights
Front turn signal lights
Side turn signal lights
Front fog lights
Rear side marker lights
Rear turn signal/hazard lights
Stop/Taillights
Backup lights
License plate lights
High-mount brake light
Front map lights
Rear map lights
Cargo area light
Vanity mirror light
Door (Courtesy) light
21 W/5 W
5W
12 V
12 V
3CP
21 CP (18 W)
8W
4CP
5W
5W
21 W
3CP
55 W
3CP
12 V
12 V 1.1 W
12 V
12 V
12 V
12 V
12 V
12 V
12 V
12 V 21 W/5 W 5W
12 V
12 V
12 V
12 V
12 V
Interior
Under-hood Type
BorexStroke
Displacement
Compression ratio
Spark plugs
SKJ16DR-M11IZFR5K-1110.0 : 1
211.8 cu-in (3,471 cm
)
3.50 x 3.66 in (89.0 x 93.0 mm) Water cooled 4-stroke SOHC,
i-VTEC V6 gasoline engine (2WD) Water cooled 4-stroke SOHC,
VTEC V6 gasoline engine (4WD)
12 V
12 V
55 W
60 W
Refrigerant type
Charge quantity
Lubricant type
Toe-in
Camber
Caster
Size
Pressure 60 psi (420 kPa , 4.2 kgf/cm
)
32 psi (220 kPa , 2.2 kgf/cm)
T155/90D16 110M P235/70R16 104S
1°98’ 1°88’
0°50’
0°50’
0°76’
0°66’ 0.00 in (0.0 mm)
0.00 in (0.0 mm)
3.8 W
21 CP (18 W) HFC-134a (R-134a)
24.7 26.5 oz (700 750 g) ND-OIL8
See page290or the fuse label
attached to the dashboard.
See page290or the fuse label
attached to the inside of the fuse
box door under the dashboard.
See page289or the fuse box
cover. Front/Rear
Spare
Front/Rear
Spare
Front
Rear
Front
Rear
Front
Driver’s side
Passenger’s side NGK:
DENSO:
(2WD)
(2WD)
(2WD)(4WD)
(4WD)
(4WD)
High
Low
(AMBER)
(H11)(HB3)
(H11)
1 : EX-L and EX-SE models
2 : LX, LX-VP, and EX models
1 2
�\f���—�\f���—�\f���y�
�
���������\f�y���
�(���+�����\f�y�\f���\f�\f�y
2008 Pilot
Page 304 of 329

�µ
Each tire, including the spare (if
provided), should be checked
monthly when cold and inf lated to
the inf lation pressure recommended
by the vehicle manuf acturer on the
vehicle placard or tire inf lation
pressure label.
(If your vehicle has tires of a
dif f erent size than the size indicated
on the vehicle placard or tire
inf lation pressure label, you should
determine the proper tire inf lation
pressure f or those tires.)Accordingly, when the low tire
pressure telltale illuminates, you
should stop and check your tires as
soon as possible, and inf late them to
the proper pressure.Driving on a signif icantly under-
inf lated tire causes the tire to
overheat and can lead to tire failure.
Under-inf lation also reduces f uel
efficiency and tire tread life, and may
af f ect the vehicle’s handling and
stopping ability.
Please note that the TPMS is not a
substitute for proper tire
maintenance, and it is the driver’s
responsibility to maintain correct tire
pressure, even if under-inf lation has
not reached the level to trigger
illumination of the TPMS low tire
pressure telltale.
As an added safety feature, your
vehicle has been equipped with a tire
pressure monitoring system (TPMS)
that illuminates a low tire pressure
telltale
and/or
when one or more of your tires is
signif icantly under-inf lated.
Tire Pressure Monitoring System (TPMS) Required Federal Explanation
300
�\f���—�\f���—�\f���y�
�
�����������y���
�(���+�����\f�y�\f���\f���y
2008 Pilot