Page 150 of 329

�Î
�Î
To operate the rear entertainment
system from the front panel, turn the
RR CTRL knob clockwise. The
amber RR LED comes on to show
that the control panel is enabled.The DVD player in your rear
entertainment system can play DVD
video discs and CDs. It features
Dolby noise reduction.
Open the overhead screen by
pushing the OPEN button. The
screen will swing down part-way.
Pivot the screen the rest of the way.
If you pivot the screen too f ar
f orward, past the second detent, the
display will turn of f . Pivot the screen
back to the second or first detent to
turn the display back on. To close
the screen, pivot it up until it latches.
To play the radio, the buttons for the
f ront entertainment system have the
same f unctions.
If aCDisloadedinthemainCD
player or CD changer, select CD/
CHG.If theCDisloadedinthe
lower player, select DVD/AUX.
Dolby noise reduction is manufactured under
license from Dolby Laboratories Licensing
Corporation. ‘‘DOLBY’’ and the double-D symbol are trademarks of Dolby Laboratories
Licensing Corporation.
To Select Rear Entertainment
f rom the Front Control Panel Operating the DVD Player f rom
the Front Control Panel
Rear Entertainment System
146
REAR CONTROL PANEL
OPEN BUTTON
OVERHEAD SCREEN
�\f���—�\f���—�\f���y�
�
�����������y���
�(���+�����\f�y�\f�
���
�y
2008 Pilot
Page 151 of 329
�µ�µ
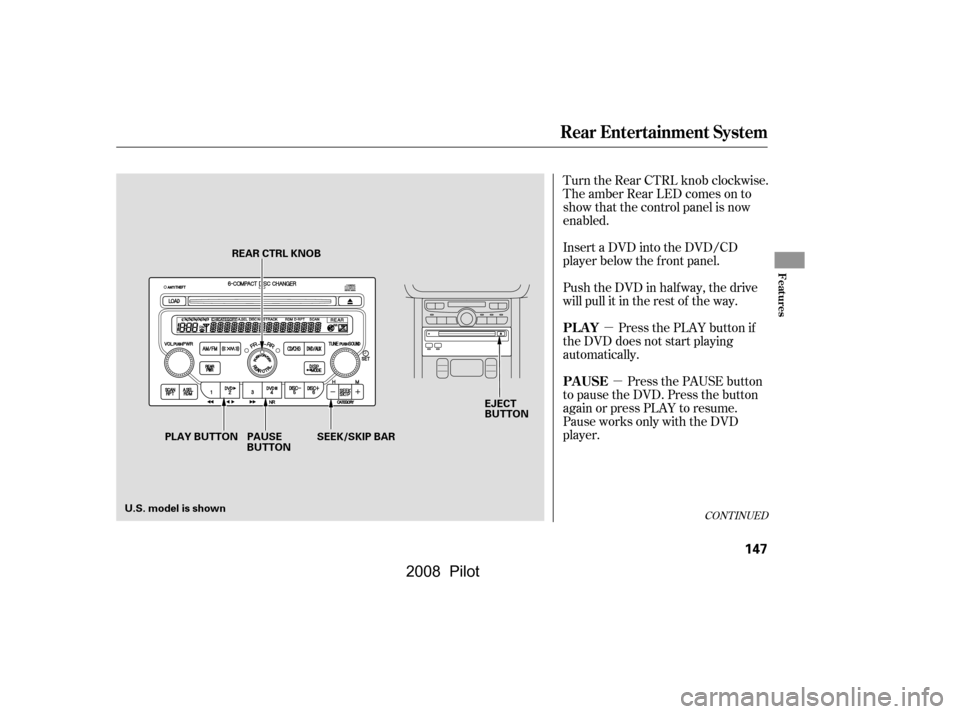
Turn the Rear CTRL knob clockwise.
The amber Rear LED comes on to
show that the control panel is now
enabled.
Insert a DVD into the DVD/CD
player below the f ront panel.
Push the DVD in half way, the drive
will pull it in the rest of the way.
Press the PLAY button if
the DVD does not start playing
automatically.
Press the PAUSE button
to pause the DVD. Press the button
again or press PLAY to resume.
Pause works only with the DVD
player.
CONT INUED
PL AY
PAUSE
Rear Entertainment System
Features
147
EJECT
BUTTON
PLAY BUTTON PAUSE BUTTON
REAR CTRL KNOB
SEEK/SKIP BAR
U.S. model is shown
�\f���—�\f���—�\f���y�
�
�����������y���
�(���+�����\f�y�\f�
�����y
2008 Pilot
Page 152 of 329

�µ
�µ
�´
�µ
�´ �µPress the eject button to
remove the DVD from the drive.
Press and hold the
button to move f orward; you will
see ‘‘CUE’’ in the display. Press and
hold the button to move
backward; you will see ‘‘REV’’ in the
display. Release the button when the
system reaches the point you want.
Each time you press and release the
button of the SEEK/SKIP, the
system skips f orward to the
beginning of the next track or
chapter. Press and release the
buttontoskipbackwardtothe
beginning of the current track or
chapter. Press it again to skip to the
beginning of the previous track or
chapter. To return f ront panel control to the
front audio system, turn the REAR
CTRL knob counterclockwise.
To turn on the rear entertainment
system f rom the rear control panel,
press the PWR button. Use the AM/
FM button, XM button (U.S. models),
CD button, DVD/AUX button (U.S.
models), or AUX button (Canadian
models) to select the entertainment
source. The selected source will be
shown in the display. Make sure the
rear control operation has not been
disabled with the REAR CTRL knob
on the f ront panel.
Rear Entertainment System
EJECT
SEEK /SK IP
To Return to Front Audio
ControlsUsing the Rear Control Panel
148
�\f���—�\f���—�\f���y�
�
�������\f���y���
�(���+�����\f�y�\f�
�����y
2008 Pilot
Page 253 of 329

The coolant level should be up to
the base of the f iller neck. Add
coolant if it is low.Check the f luid level in the
windshield washer reservoir at least
monthly during normal use.
Pourthecoolantslowlyand
caref ully so you do not spill any.
Clean up any spill immediately; it
could damage components in the
engine compartment.
Put the radiator cap back on and
tighten it.
Pour coolant into the reserve tank.
Fill it to half way between the MAX
and MIN marks. Put the cap back
on the reserve tank.
Do not add any rust inhibitors or
other additives to your vehicle’s
cooling system. They may not be
compatible with the coolant or
engine components. Fill the reservoir with a good-quality
windshield washer f luid. This
increases the cleaning capability and
prevents f reezing in cold weather.
When you ref ill the reservoir, clean
the edges of the windshield wiper
blades with windshield washer f luid
on a clean cloth. This will help to
condition them.
The low washer
level indicator comes on when the
level is low (see page ).
Make sure the engine and radiator
are cool.
Relieve any pressure in the cooling
system by turning the radiator cap
counterclockwise, without
pressing down.
Remove the radiator cap by
pushing down and turning
counterclockwise.
2.
1. 67
2.
3. 4.
5.
6.
On Canadian models:
Windshield Washers
Engine Coolant, Windshield Washers
Maint enance
249
RADIATOR CAP
Do not use engine antif reeze or a
vinegar/water solution in the
windshield washer reservoir. Antif reeze
can damage your vehicle’s paint, while
a vinegar/water solution can damage
the windshield washer pump. Use only
commercially-available windshield
washer f luid.
�\f���—�\f���—�\f���y�
�
�����������y���
�(���+�����\f�y�\f�������y
2008 Pilot
Page 258 of 329

Open the hood.
Remove the electrical connector
f rom the bulb by squeezing the
connector to unlock the tab, then
slide the connector of f the bulb.
Remove the bulb by turning it
approximately one-quarter turn
counterclockwise.Insert the new bulb into the hole,
and turn it one-quarter turn
clockwise to lock it in place.
Push the electrical connector onto
the new bulb.
Turn on the headlights to test the
new bulb.
Theheadlightswereproperlyaimed
when your vehicle was new. If you
regularly carry heavy items in the
trunk, readjustment may be required.
Adjustment should be done by your
dealer or other qualif ied mechanic.
Your vehicle has halogen headlight
bulbs. When replacing a bulb, handle
it by its base, and protect the glass
f rom contact with your skin or hard
objects. If you touch the glass, clean
it with denatured alcohol and a clean
cloth.
1.
2.
3.4.
5.
6.
Headlight A iming
Replacing a Headlight Bulb
Lights
254
TAB
BULB CONNECTOR
Halogen headlight bulbs get very hot
when lit. Oil, perspiration, or a scratch
on the glass can cause the bulb to
overheat and shatter.
�\f���—�\f���—�\f���y�
�
�����������y���
�(���+�����\f�y�\f�������y
2008 Pilot
Page 259 of 329
To remove the f ront turn signal
bulb, push it in slightly and turn it
counterclockwise.
Install the new bulb into the
socket and reinstall it.Insert the socket back into the
headlight assembly. Turn it
clockwise to lock it in place.
Turn on the lights to make sure
the new bulb is working.
Remove the socket from the
headlight assembly by turning it
one-quarter turn counterclockwise. To remove a bulb, pull it straight
out of its socket.
Install the new bulb into the
socket.
Remove the socket from the
headlight assembly by turning it
one-quarter turn counterclockwise. Insert the socket back into the
headlight assembly. Turn it
clockwise to lock it in place.
Turn on the lights to make sure
the new bulb is working.
1. 4.
5.
3.
2. 1.2.
3.
4.
5.
Lights
Replacing a Front T urn Signal
Bulb
Replacing a Parking L ight/Front
Side Marker L ight Bulbs
Maint enance
255
SOCKET
SOCKET
BULB
BULB
�\f���—�\f���—�\f���y�
�
�����������y���
�(���+�����\f�y�\f�����\f�y
2008 Pilot
Page 260 of 329

If you are changing the bulb on
the driver’s side, start the engine,
turn the steering wheel all the way
to the left, and turn off the engine.
If you are changing the bulb on
the passenger’s side, turn the
steering wheel to the right.
Use a f lat-tipped screwdriver to
remove the three holding clips
f rom the inner f ender.Pull the inner f ender cover away
f rom the f ender.
Remove the socket from the turn
signal assembly by turning it one-
quarter turn counterclockwise.Pull the burned out bulb straight
out of its socket.
Push the new bulb straight into
the socket until it bottoms.
Insert the socket back into the
turn signal assembly. Turn it
clockwise to lock it in place.
Turn on the lights to make sure
the new bulb is working.
Put the inner f ender cover in place.
Install the three holding clips.
Lock each clip in place by pushing
on the center.
1.
4.5.
3.
2. 6.
7.
8.
Lights
Replacing a Side Turn Signal Bulb
256
SOCKET
BULB
CLIPS
�\f���—�\f���—�\f���y�
�
�����������y���
�(���+�����\f�y�\f�����
�y
2008 Pilot
Page 261 of 329
If equipped
Use a wrench to remove the
mounting bolt f rom the underbody.
Pull the under cover away f rom
the bumper.Remove the electrical connector
f rom the bulb by pushing on the
tab and pulling the connector
down.
Remove the bulb by turning it one-
quarter turn counterclockwise.
Insert the new bulb into the
assembly and turn it one-quarter
turn clockwise to lock it in place.Turn on the lights to make sure
the new bulb is working.
Reinstall the mounting bolt on the
under cover.
1. 4.
5.
3.
2. 6.
7.
Lights
ReplacingaFogLightBulb
Maint enance
257
BOLT
BULB
CONNECTOR
�\f���—�\f���—�\f���y�
�
�������\f���y���
�(���+�����\f�y�\f�������y
2008 Pilot