Page 173 of 524
Moves the seat
forward and
backward. To change the lumbar support, movethe lever on the right side of the
seat-back forward or backward.
Keep moving the lever f orward or
backward until you f ind a suitable
position.
Moves the f ront of
the seat up or down.
(Driver’s seat only) Raises or lowers the
seat. (Driver’s seat
only)
Moves the whole
seat up and forward,
or down and
backward. The f ront
of the seat also tilts
up or down at the
same time. (Driver’s
seat only)
Adjusts the seat-
back angle f orward
or backward.
On EX, EX-L and Touring models
Driver’s L umbar Support
Seats
170
�����—�����—�����y���������������y���
�(�����������y���
�����y
2008 Odyssey
Page 209 of 524
Turn on the f ront and rear individual
map lights by pushing the lens of
each light. Push the lens again to
turn it of f . You can also operate
these lights with the light control
switch (see page ).
After all doors are closed tightly, the
light(s) dims slightly, then f ades out
in about 30 seconds.
With the light control switch in the
door activated position, all the
individual map lights come on when
you unlock the door with the remote
transmitter (see page ).
With any door lef t open, the lights
stay on about 3 minutes, then go out.
You can change the ‘‘INTERIOR
LIGHT DIMMING TIME’’ setting on
the multi-information display (see
page ).
All the individual map lights come
onandstayonaslongasthe
switch remains in the ON position.
On Touring models
147
118 205
When the switch is in the ON position:Individual Map L ights
Interior Lights
206
Front
�����—�����—�����y��������
������y���
�(�����������y�����
�
�y
2008 Odyssey
Page 222 of 524

�Û�Ý
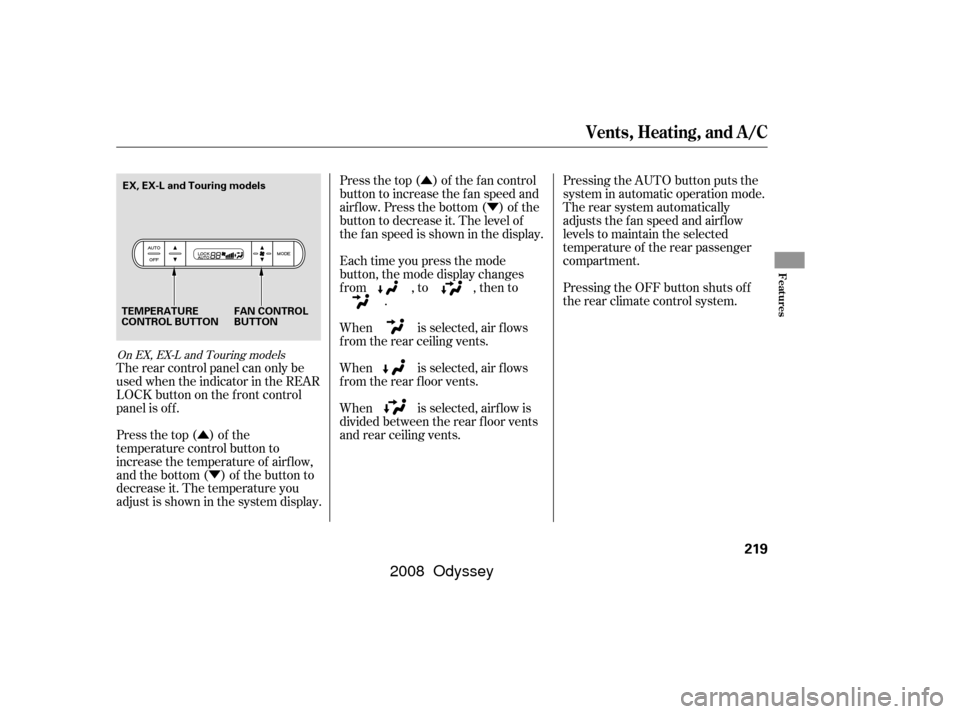
�Û �Ý Press the top ( ) of the f an control
button to increase the f an speed and
airf low. Press the bottom ( ) of the
button to decrease it. The level of
the f an speed is shown in the display.
Each time you press the mode
button, the mode display changes
from , to , then to
.
When is selected, air f lows
f rom the rear ceiling vents.
When is selected, air f lows
f rom the rear f loor vents.
When is selected, airf low is
divided between the rear f loor vents
and rear ceiling vents. Pressing the AUTO button puts the
system in automatic operation mode.
The rear system automatically
adjusts the fan speed and airflow
levels to maintain the selected
temperature of the rear passenger
compartment.
Pressing the OFF button shuts off
the rear climate control system.
Press the top ( ) of the
temperature control button to
increase the temperature of airf low,
and the bottom ( ) of the button to
decrease it. The temperature you
adjust is shown in the system display. The rear control panel can only be
used when the indicator in the REAR
LOCK button on the f ront control
panel is off.
On EX, EX-L and Touring models
Vents, Heating, and A/C
Features
219
TEMPERATURE
CONTROL BUTTON FAN CONTROL
BUTTON
EX, EX-L and Touring models
�����—�����—�����y���������������y���
�(�����������y���������y
2008 Odyssey
Page 231 of 524

�µ
�µ
�µ
�µ The specif ications f or compatible
WMA f iles are:Sampling f requency:
32/44.1/48 kHz
Bit rate:
48/64/80/96/128/160/192 kbps
Compatible with variable bit rate
and multi-session
Maximum layers
(including ROOT): 8 layers Insert a disc about half way into the
disc slot. The drive will pull the disc
intherestof thewaytoplayit.You
operate the disc player with the
same controls used f or the radio.
The number of the current track is
showninthedisplay.Whenplayinga
disc in MP3 or WMA, the numbers
of the current f older and f ile are
shown. The system will continuously
play a disc until you change modes.
You cannot load and play 3-inch
(8-cm)discsinthissystem.
For inf ormation on how to handle
and protect compact discs, see page
. Each time you press the DISP
(preset 1) button, the display shows
you the text data on a disc, if the disc
was recorded with text data.
You can see the album, artist, and
track name in the display. If a disc is
recorded in MP3 or WMA, you can
see the f older and f ile name, and the
album, artist, and track tag.
With the f older name, you will see
the FOLDER indicator in the display.
The TRACK indicator is shown with
the file or track name.
When you press and release the
DISP button while a disc without text
data is playing, you will see ‘‘NO
INFO’’ on the display.
The display shows up to about 16
characters of selected text data (the
f older name, f ile name, etc.).
272
Playing a Disc (L X and Canadian DX models)
To Load a Disc
Text Data Display Function
228
�����—�
�
�—�����y�
���������
���y���
�(�����������y���������y
2008 Odyssey
Page 232 of 524

�µ�´
�µ
�¼
If the text data has more than 16
characters, you will see the first 15
characters and the indicator in
the display. Press and hold the DISP
button until the next 16 characters
are shown. You can see up to about
31 characters of the text data.
If youpressandholdtheDISP
button again, the display shows the
f irst 16 characters again.
If any letter is not available, it is
replaced with ‘‘ . ’’ (dot) in the display.
When the disc has no text data, you
will see ‘‘NO INFO’’ on the display.
You will also see some text data
under these conditions:
When a new f older, f ile, or track is
selected.
When you change the audio mode
to play a disc with text data or in
MP3 or WMA. When you insert a disc, and the
system begins to play.
When playing a CD-DA with text
data, the album and track name are
showninthedisplay.Withadiscin
MP3 or WMA, the display shows the
f older and f ile name.
When you turn on the audio system
next time, the system keeps your
selection with the DISP button. Each time you press and
release the SKIP bar, the player
skips forward to the beginning of the
next track (f ile in MP3 or WMA
mode). Press and release the to
skip backward to the beginning of
the current track. Press it again to
skip to the beginning of the previous
track.
To move rapidly within a track, press
andholdthe or SKIPbar. You can use the SKIP bar while a
disc is playing to select passages and
change tracks (f iles in MP3/WMA
mode).
CONT INUED
Playing a Disc (L X and Canadian DX models)
T o Change or Select T racks/Files
SK IPFeatures
229
�����—�
�
�—�����y�
�����������
�y���
�(�����������y���������y
2008 Odyssey
Page 233 of 524

�µ�µ
�µ
In MP3 or WMA mode In MP3 or WMA mode
To
select a different folder, turn the
TUNE knob to move to the
beginning of the next f older. Turn
the knob to the right until it clicks
once to skip to the next folder, and to
the lef t to move to the beginning of
the current f older. Turn it again to
skip to the beginning of the previous
f older. Turning the TUNE knob
more than two clicks skips several
folders. The scan f unction samples all tracks
(f iles in MP3 or WMA) on the disc in
the order they are recorded on the
disc. To activate scan, press and hold
the SCAN/RPT button. You will see
SCAN in the display. You will get a
10 second sampling of each track/
f ile on the disc. Press and hold the
SCAN/RPT button f or about 2
seconds to get out of scan mode and
play the last track/f ile sampled.
This
feature, when activated, samples the
f irst f ile of each f older on the disc.
To activate f older scan, press and
hold the SCAN/RPT button to select
SCAN, then press and release the
button again to select f older scan.
You will see F-SCAN in the display.
The system plays the f irst f ile in the
f irst f older f or about 10 seconds. If
you do nothing, the system will then
play the f irst f iles in the remaining
f olders f or 10 seconds each. Af ter
playing the f irst f ile of the last f older,
the system plays normally.
Each time you press and release the
SCAN/RPT button, the mode
changes f rom f ile scan to f older scan,
then to normal playing.
Playing a Disc (L X and Canadian DX models)
FOLDER SELECTION SCA N (T RA CK /FIL E SCA N)
F-SCAN (FOLDER SCAN)
230
�����—�
�
�—�����y�
�������������y���
�(�����������y���������y
2008 Odyssey
Page 234 of 524

�µ�µ�µ
CONT INUED
To continuously replay
a track (f ile in MP3 or WMA mode),
press and release the SCAN/RPT
button. You will see RPT in the
display. Press and hold the SCAN/
RPT button for 2 seconds to turn it
off. This feature,
when activated, replays all f iles on
the selected f older in the order they
are compressed. To activate folder
repeat, press the SCAN/RPT button
twice. You will see F-RPT in the
display. The system continuously
replays the current f older. Press the
SCAN/RPT button again to turn it
off.
Each time you press and release the
SCAN/RPT button, the mode
changes f rom f ile repeat to f older
repeat, then to normal playing. This f eature plays the
tracks (the f iles in MP3 or WMA
mode) within a disc in random order.
To activate random play, press and
release the RDM button. In MP3 or
WMA mode, press the RDM button
twice to select RDM (within a disc
random play). You will see RDM in
the display. Press the RDM button
again to turn it off.
In MP3 or WMA mode
Playing a Disc (L X and Canadian DX models)
REPEAT (TRACK/FILE
REPEAT) FOLDER-REPEAT RANDOM (Random within a
disc)
Features
231
�����—�
�
�—�����y�
�������������y���
�(�����������y���������y
2008 Odyssey
Page 235 of 524

�µ
In MP3 or WMA mode
This
feature, when activated, plays all
f iles on the selected f older in random
order. To activate f older random,
press the RDM button. You will see
F-RDM in the display. The system
will then select and play f iles
randomly. This continues until you
deactivate f older random by pressing
and holding the RDM button f or 2
seconds.
Each time you press and release the
RDM button, the mode changes
f rom f older random play to random
play (within a disc random play),
then to normal playing. Press the eject button ( ) to
remove the disc. If you eject the disc,
but do not remove it f rom the slot,
the system will automatically reload
the disc af ter 10 seconds and put it in
pause mode. To begin playing, press
the CD button.
Press the AM or FM button to
switch to the radio while a disc is
playing. Press the CD button to play
the disc.
If you turn the system of f while a
disc is playing, either with the PWR/
VOL knob or by turning of f the
ignition switch, the disc will stay in
the drive. When you turn the system
back on, the disc will begin playing
where it lef t of f .For inf ormation on how to handle
and protect compact discs, see page
.
272
Playing a Disc (L X and Canadian DX models)
FOLDER-RANDOM T o Stop Playing a Disc Protecting Compact Discs
232
�����—�
�
�—�����y�
�������������y���
�(�����������y���������y
2008 Odyssey