Page 60 of 280

This section gives inf ormation about
the controls and displays that
contribute to the daily operation of
your vehicle. All the essential
controls are within easy reach............................
Control Locations .58
............................
Instrument Panel .59
..........
Instrument Panel Indicators .60
.............................................
Gauges .67
...................................
Trip Meter .67
.....................................
Odometer .68
..................................
Fuel Gauge .68
..........
Check Fuel Cap Indicator .68
..................
Maintenance Minder .69
Controls Near the Steering ...........................................
Wheel .70
.
Windshield Wipers and Washers .71
.........
Turn Signals and Headlights .72
........
Instrument Panel Brightness .74
.................
Hazard Warning Button .74
.................
Rear Window Def ogger .74
..........
Steering Wheel Adjustment .75
...............................
Keys and Locks .76
........................
Immobilizer System .77
................................
Ignition Switch .78
......................................
Door Locks .79
......................
Power Door Locks .79
..............
Childproof Door Locks .80
............................................
Tailgate .81
.......................
Remote Transmitter .83
.................................................
Seats .86 ..............................
Power Windows .94
.............................................
Mirrors .95
.................................
Parking Brake .96
...........
Interior Convenience Items .97
.......................
Beverage Holders .98
....................................
Glove Box .98
...........
Accessory Power Socket .99
......................................
Sun Visor .99
.................................
Interior Lights .99
Instruments and Controls
Inst rument s and Cont rols
57
�\f���—�\f���—�����y���\f���������
�y���
�(�������
�\f�y�\f�\f�����y
2008 Fit
Page 89 of 280
�µ
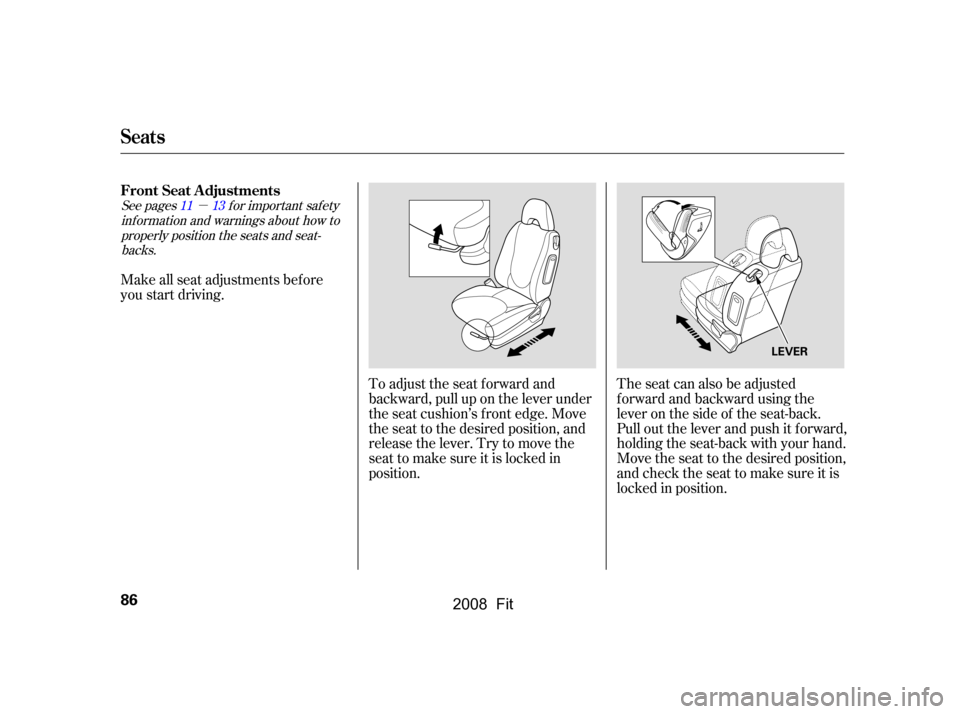
See pagesf or important saf ety
inf ormation and warnings about how toproperly position the seats and seat-backs. 1113
Make all seat adjustments bef ore
you start driving.
The seat can also be adjusted
f orward and backward using the
lever on the side of the seat-back.
Pull out the lever and push it f orward,
holding the seat-back with your hand.
Move the seat to the desired position,
andchecktheseattomakesureitis
locked in position.
To adjust the seat forward and
backward, pull up on the lever under
the seat cushion’s f ront edge. Move
the seat to the desired position, and
releasethelever.Trytomovethe
seat to make sure it is locked in
position.
FrontSeatAdjustments
Seats
86
LEVER
�\f���—�\f���—�����y���\f�����������y���
�(�������
�\f�y�\f�\f���
�y
2008 Fit
Page 90 of 280
See pagef or important saf etyinf ormation and a warning aboutimproperly positioning head restraints. 13
Your vehicle is equipped with head
restraints in all seating positions to
help protect you and your
passengers f rom whiplash and other
injuries.
To change the seat-back angle of the
f ront seat, pull up the lever on the
outside of the seat bottom.
Once a seat is adjusted correctly,
rock it back and f orth to make sure it
is locked in position. You can adjust the angle of the rear
seat-backs separately. To change the
seat-back angle, pull up the release
leverontheoutersideof theseat-
back.
CONT INUED
Head Restraints
Rear Seat Adjustments
Seats
Inst rument s and Cont rols
87
LEVER
�\f���—�\f���—�����y���\f���������\f�y���
�(�������
�\f�y�\f�\f�����y
2008 Fit
Page 92 of 280
Remove the f ront head restraints
(see page ), and store them
securely.
You can recline the seat-backs on the
f ront seats so they are level with the
rear seat cushions, making a large
cushioned area. To do this:
Recline the rear seat-backs as far
backward as possible (see page ).
When a passenger is seated in the
rear center seating position, make
sure the center head restraint is
properly positioned.
Make sure the head restraint locks
in position when you reinstall it.
1.2.
87 88
CONT INUED
Reclining the Front Seats
Seats
Inst rument s and Cont rols
89
SLIDE LEVER
SEAT-BACK ANGLE
ADJUSTMENT LEVER
REAR CENTER
RELEASE BUTTON
�\f���—�\f���—�����y���\f�������\f���y���
�(�������
�\f�y�\f�\f�����y
2008 Fit
Page 93 of 280
Pull up the rear seat cushion, and
f old the seat leg down. Push the seat
cushion f irmly against the seat-back
to lock it.
The lef t and right rear seat cushions
can be lifted up separately to make
room f or cargo.
Remove any items from the seat
beforeyoufolduptheseatcushion.
Pull up the seat-back angle
adjustment lever, and pivot the
seat-back backward until it is level
with the rear seat cushion.
Using the slide lever, move the
frontseatcushionsasfarforward
as possible.
Reverse this procedure to return the
f ront seats to the upright position.
When you return the seat-back to its
upright position, hold the seat-back
to keep it f rom going up too quickly.
Make sure you install the head
restraints and securely lock the seats
bef ore driving.
3.
4.
Seats
Folding the Rear Seat Up
90
�\f���—�\f���—�����y���\f�������
�
�y���
�(�������
�\f�y�\f�\f�����y
2008 Fit
Page 156 of 280
Check the seat adjustment (see
page ).
Check the adjustment of the
inside and outside mirrors (see
page ).
Check the steering wheel
adjustment (see page ).
Fasten your seat belt. Check that
your passengers have f astened
their seat belts (see page ).
When you start the engine, check
the gauges and indicators in the
instrument panel (see page ).
Make sure the doors and the
tailgate are securely closed and
locked.
Youshoulddothefollowingchecks
and adjustments bef ore you drive
your vehicle.
Make sure all windows, mirrors,
and outside lights are clean and
unobstructed. Remove f rost, snow,
or ice.
Check that the hood is f ully closed.
Visually check the tires. If a tire
looks low, use a gauge to check its
pressure (see page ).
Check that any items you may be
carrying are stored properly or
f astened down securely.
1.
2.
10.14
3.
4. 5.
6.
7.
8.
9.
95
75
59
209 86
Preparing to Drive
Driving
153
�\f���—�\f���—�����y���\f�������
���y���
�(�������
�\f�y�\f�
�����y
2008 Fit

, and store them
securely.
You can recline the seat-backs on the
f ront seats so they are level with the
rear seat cushions, making a large
cushioned are")

.
Check the adjustment of the
inside and outside mirrors (see
page ).
Check the steering wheel
adjustment (see page ).
Fasten your seat belt. Check that
you")