Page 48 of 280

When not using the LATCH system,
all child seats must be secured to the
vehicle with the lap part of a lap/
shoulder belt.With the child seat in the desired
seating position, route the belt
through the child seat according
to the seat maker’s instructions,
then insert the latch plate into the
buckle.To activate the lockable retractor,
slowly pull the shoulder part of the
belt all the way out until it stops,
then let the belt feed back into the
retractor.
Af ter the belt has retracted, tug on
it. If the belt is locked, you will not
be able to pull it out. If you can pull
thebeltout,itisnotlocked,and
you will need to repeat these steps.
In addition, the lap/shoulder belts in
all seating positions except the
driver’s have a lockable retractor
that must be activated to secure a
child seat.
If you intend to install a child seat in
the center seating position of the
rear seat, remove its head restraint,
and make sure the detachable seat
belt is securely latched (see page
). 2.
1.
3.
93
CONT INUED
Installing a Child Seat with a L ap/
Shoulder Belt
Installing a Child Seat
Driver and Passenger Saf ety
45
�\f���—�\f���—�����y���\f�������
���y���
�(�������
�\f�y�\f�\f���\f�y
2008 Fit
Page 53 of 280

Does the shoulder belt cross
between the child’s neck and arm?
Is the lap part of the belt as low as
possible, touching the child’s
thighs?
Will the child be able to stay
seated like this f or the whole trip?
If you answer yes to all these
questions, the child is ready to wear
the lap/shoulder belt correctly. If
you answer no to any question, the
child needs to ride on a booster seat. A child who has outgrown a f orward- f acing child seat should ride in a
back seat and use a booster seat
until the lap/shoulder belt f its them
properly without the booster.Some states and Canadian provinces
also require children to use a booster
seat until they reach a given age or
weight (e.g., 6 years or 60 lbs). Be
sure to check current laws in the
states or provinces where you intend
to drive.
Booster seats can be high-back or
low-back. Whichever style you select,
make sure the booster seat meets
f ederal saf ety standards (see page
) and that you f ollow the booster
seat maker’s instructions.
3.
4.
5.
35
Protecting L arger Children
Using a Booster Seat
50
�\f���—�\f���—�����y���\f�����������y���
�(�������
�\f�y�\f�\f�����y
2008 Fit
Page 60 of 280

This section gives inf ormation about
the controls and displays that
contribute to the daily operation of
your vehicle. All the essential
controls are within easy reach............................
Control Locations .58
............................
Instrument Panel .59
..........
Instrument Panel Indicators .60
.............................................
Gauges .67
...................................
Trip Meter .67
.....................................
Odometer .68
..................................
Fuel Gauge .68
..........
Check Fuel Cap Indicator .68
..................
Maintenance Minder .69
Controls Near the Steering ...........................................
Wheel .70
.
Windshield Wipers and Washers .71
.........
Turn Signals and Headlights .72
........
Instrument Panel Brightness .74
.................
Hazard Warning Button .74
.................
Rear Window Def ogger .74
..........
Steering Wheel Adjustment .75
...............................
Keys and Locks .76
........................
Immobilizer System .77
................................
Ignition Switch .78
......................................
Door Locks .79
......................
Power Door Locks .79
..............
Childproof Door Locks .80
............................................
Tailgate .81
.......................
Remote Transmitter .83
.................................................
Seats .86 ..............................
Power Windows .94
.............................................
Mirrors .95
.................................
Parking Brake .96
...........
Interior Convenience Items .97
.......................
Beverage Holders .98
....................................
Glove Box .98
...........
Accessory Power Socket .99
......................................
Sun Visor .99
.................................
Interior Lights .99
Instruments and Controls
Inst rument s and Cont rols
57
�\f���—�\f���—�����y���\f���������
�y���
�(�������
�\f�y�\f�\f�����y
2008 Fit
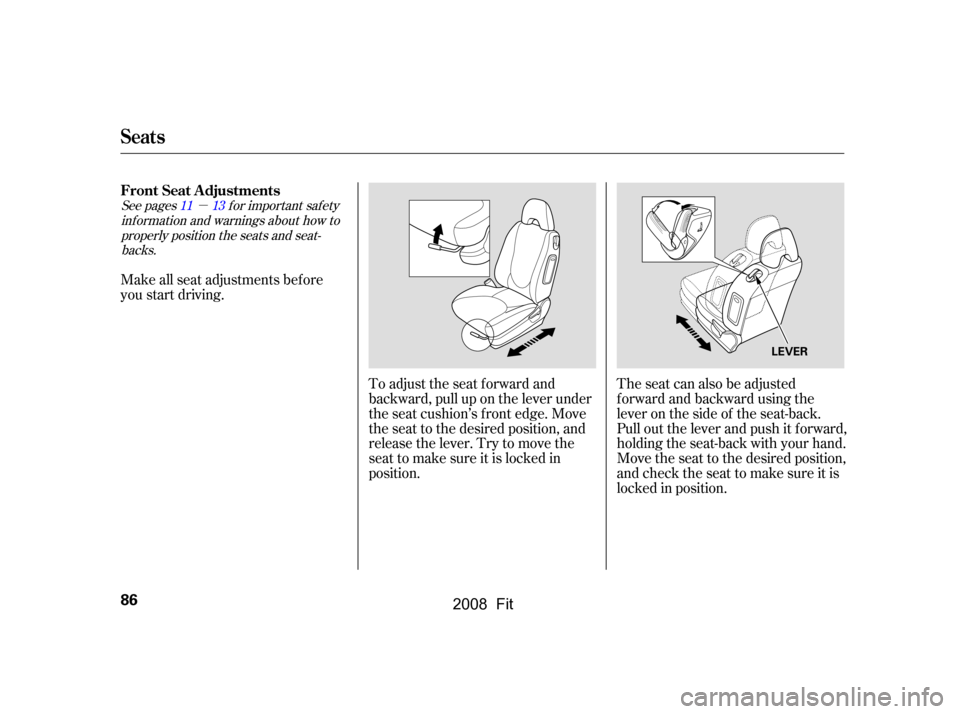
Page 89 of 280
�µ
See pagesf or important saf ety
inf ormation and warnings about how toproperly position the seats and seat-backs. 1113
Make all seat adjustments bef ore
you start driving.
The seat can also be adjusted
f orward and backward using the
lever on the side of the seat-back.
Pull out the lever and push it f orward,
holding the seat-back with your hand.
Move the seat to the desired position,
andchecktheseattomakesureitis
locked in position.
To adjust the seat forward and
backward, pull up on the lever under
the seat cushion’s f ront edge. Move
the seat to the desired position, and
releasethelever.Trytomovethe
seat to make sure it is locked in
position.
FrontSeatAdjustments
Seats
86
LEVER
�\f���—�\f���—�����y���\f�����������y���
�(�������
�\f�y�\f�\f���
�y
2008 Fit
Page 90 of 280
See pagef or important saf etyinf ormation and a warning aboutimproperly positioning head restraints. 13
Your vehicle is equipped with head
restraints in all seating positions to
help protect you and your
passengers f rom whiplash and other
injuries.
To change the seat-back angle of the
f ront seat, pull up the lever on the
outside of the seat bottom.
Once a seat is adjusted correctly,
rock it back and f orth to make sure it
is locked in position. You can adjust the angle of the rear
seat-backs separately. To change the
seat-back angle, pull up the release
leverontheoutersideof theseat-
back.
CONT INUED
Head Restraints
Rear Seat Adjustments
Seats
Inst rument s and Cont rols
87
LEVER
�\f���—�\f���—�����y���\f���������\f�y���
�(�������
�\f�y�\f�\f�����y
2008 Fit
Page 91 of 280
The head restraints in the rear outer
seating positions do not adjust f or
height. To remove one f or cleaning
or repair, push the release button,
and lif t the restraint up.
The f ront head restraints adjust f or
height. You need both hands to
adjust a restraint. Do not attempt to
adjust it while driving. To raise it,
pull upward. To lower the restraint,
push the release button sideways,
and push the restraint down.
Theyaremosteffectivewhenyou
adjust them so the center of the back
of the occupant’s head rests against
the center of the restraint.
Seats
88
RELEASE
BUTTON
FRONT
Failure to reinstall the head
restraints can result in severe
injury during a crash.
Always replace the head
restraints before driving.
�\f���—�\f���—�����y���\f�����������y���
�(�������
�\f�y�\f�\f�����y
2008 Fit
Page 92 of 280
Remove the f ront head restraints
(see page ), and store them
securely.
You can recline the seat-backs on the
f ront seats so they are level with the
rear seat cushions, making a large
cushioned area. To do this:
Recline the rear seat-backs as far
backward as possible (see page ).
When a passenger is seated in the
rear center seating position, make
sure the center head restraint is
properly positioned.
Make sure the head restraint locks
in position when you reinstall it.
1.2.
87 88
CONT INUED
Reclining the Front Seats
Seats
Inst rument s and Cont rols
89
SLIDE LEVER
SEAT-BACK ANGLE
ADJUSTMENT LEVER
REAR CENTER
RELEASE BUTTON
�\f���—�\f���—�����y���\f�������\f���y���
�(�������
�\f�y�\f�\f�����y
2008 Fit
Page 93 of 280
Pull up the rear seat cushion, and
f old the seat leg down. Push the seat
cushion f irmly against the seat-back
to lock it.
The lef t and right rear seat cushions
can be lifted up separately to make
room f or cargo.
Remove any items from the seat
beforeyoufolduptheseatcushion.
Pull up the seat-back angle
adjustment lever, and pivot the
seat-back backward until it is level
with the rear seat cushion.
Using the slide lever, move the
frontseatcushionsasfarforward
as possible.
Reverse this procedure to return the
f ront seats to the upright position.
When you return the seat-back to its
upright position, hold the seat-back
to keep it f rom going up too quickly.
Make sure you install the head
restraints and securely lock the seats
bef ore driving.
3.
4.
Seats
Folding the Rear Seat Up
90
�\f���—�\f���—�����y���\f�������
�
�y���
�(�������
�\f�y�\f�\f�����y
2008 Fit


, and store them
securely.
You can recline the seat-backs on the
f ront seats so they are level with the
rear seat cushions, making a large
cushioned are")
