Page 66 of 280

position and goes of f af ter a f ew
seconds. In normal driving
condi")
This indicator monitors the
temperature of the engine coolant. It
normallycomesonwhenyouturn
the ignition switch to the ON (II)
position and goes of f af ter a f ew
seconds. In normal driving
conditions, this indicator should not
blink or stay on. In severe driving
conditions, such as very hot weather
or a long period of uphill driving, this
indicator may blink. This means the
engine coolant temperature is high.
If the indicator begins to blink while
you are driving, be sure to slow down
to prevent overheating. If the
indicator stays on, pull safely to the
side of the road and turn of f the
engine. See page f or instructions
and precautions on checking the
engine’s cooling system.This indicator monitors the
temperature of the engine coolant. If
there is no problem, this indicator
comes on when the engine is cold. If
it comes on when the engine is warm
(normal operating temperature),
have the vehicle inspected by your
dealer as soon as possible.
Do not drive the vehicle while the
indicator is on or the engine may be
damaged. The lef t or right turn signal indicator
blinks when you signal a lane change
or turn. If an indicator does not blink
or blinks rapidly, it usually means
one of the turn signal bulbs is
burned out (see page ). Replace
the bulb as soon as possible, since
other drivers cannot see that you are
signaling.
When you press the hazard warning
button, both turn signal indicators
and all turn signals on the outside of
the vehicle f lash.
228 198
Instrument Panel Indicators
High T emperature
Indicator
Low Temperature
Indicator Turn Signal and
Hazard Warning
Indicators
Inst rument s and Cont rols
63
�\f���—�\f���—�����y���\f���������\f�y���
�(�������
�\f�y�\f�\f�����y
2008 Fit
Page 71 of 280

The odometer shows the total
distance your vehicle has been
driven. It measures miles in U.S.
models and kilometers in Canadian
models. It is illegal under U.S.
federal law and Canadian provincial
regulations to disconnect, reset, or
alter the odometer with the intent to
change the number of miles or
kilometers indicated.
This shows how much f uel you have.
It may show slightly more or less
than the actual amount. The needle
returns to the bottom after you turn
of f the ignition.If your f uel f ill cap is loose or
missing, a ‘‘CHECK FUEL CAP’’
messageappearsastextonthe
information display after you start
the engine. The message appears
from CHECK to FUEL, then to CAP
repeatedly.
If the system still detects a loose or
missing f uel f ill cap, the malf unction
indicator lamp (MIL) comes on.
Turn the engine of f , and check or
retighten the f uel f ill cap until it
clicks at least once. The MIL goes
out after several days of normal
driving once the cap is tightened or
replaced. If it does not go out, have
your dealer inspect the vehicle. For
more information, see page .
Turn the engine of f and conf irm the
f uel f ill cap is installed. If it is, loosen
the cap, then retighten it until it
clicks at least once. You can cycle
the message of f of the display by
pressing the select/reset knob
repeatedly, but this message will be
displayed each time the engine is
started. It will take several days of
normal driving f or the vehicle to turn
the warning of f . 231
Odometer
Fuel Gauge Check Fuel Cap Indicator
Gauges
68
Avoid driving with an extremely low
f uel level. Running out of f uel could
cause the engine to misf ire, damaging
the catalytic converter.
�\f���—�\f���—�����y���\f�����������y���
�(�������
�\f�y�\f�\f�����y
2008 Fit
Page 73 of 280
�Î
�Î
�Î
�Î
�Î
�Î�Î
�Î
�Î
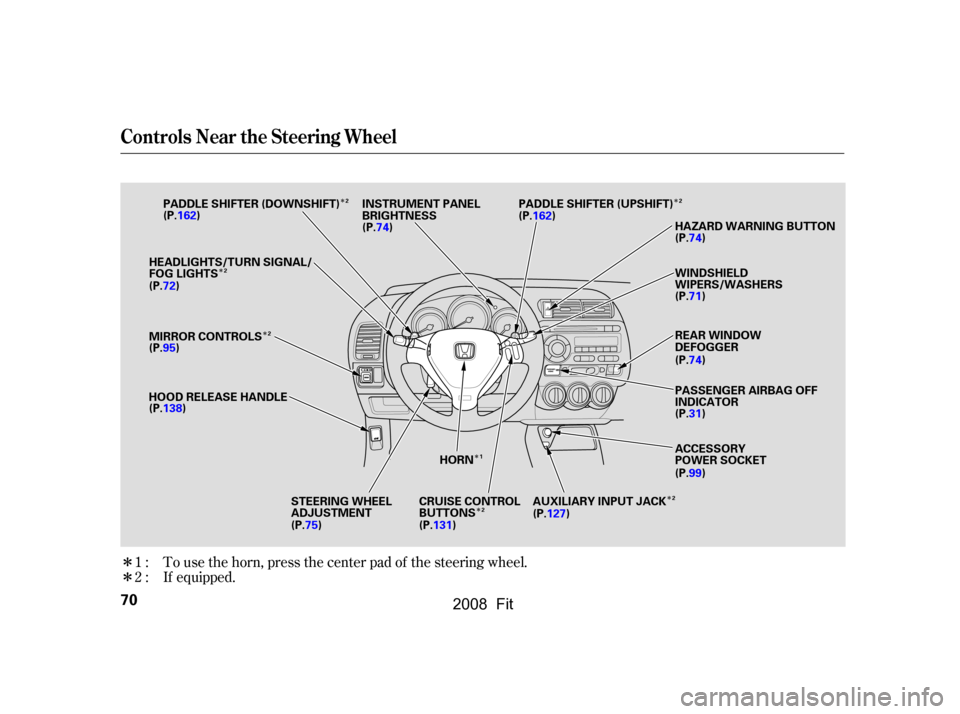
To use the horn, press the center pad of the steering wheel.
If equipped.
1:
2:
Controls Near the Steering Wheel
70
HORN
MIRROR CONTROLS
WINDSHIELD
WIPERS/WASHERS
REAR WINDOW
DEFOGGER
PASSENGER AIRBAG OFF
INDICATOR
(P.31)
ACCESSORY
POWER SOCKET
HEADLIGHTS/TURN SIGNAL/
FOG LIGHTS
(P.72)
(P.95)
HOOD RELEASE HANDLE (P.138)
(P.99) (P.71)
(P.74) HAZARD WARNING BUTTON
(P.74)
CRUISE CONTROL
BUTTONS AUXILIARY INPUT JACK
STEERING WHEEL
ADJUSTMENT
PADDLE SHIFTER (DOWNSHIFT) PADDLE SHIFTER (UPSHIFT)
INSTRUMENT PANEL
BRIGHTNESS
(P.75) (P.131) (P.127)
(P.162)
(P.74)(P.162)1
2
2
22
2
2
�����—�����—�����y���������������y���
�(�������
���y���������y
2008 Fit
Page 77 of 280
. This causes all four
outside turn signals and both turn
indicators in the instrument panel to
f lash. Use the hazard warning lig")
Pushthebuttontoturnonthe
hazard warning lights (f our-way
flashers). This causes all four
outside turn signals and both turn
indicators in the instrument panel to
f lash. Use the hazard warning lights
if you need to park in a dangerous
area near heavy traffic, or if your
vehicle is disabled.
You can change the instrument panel
brightness only when the light
switch is on.
The rear window def ogger will clear
fog,frost,andthinicefromthe
window. Push the def ogger button to
turn it on and of f . The indicator in
the button comes on to show the
def ogger is on. You must manually
shut of f the rear window def ogger
when it is no longer needed.
Turntheknobontheupperpartof
the instrument panel to adjust the
brightness.
You will hear a beep when maximum
or minimum brightness is reached.
You will also hear a beep when the
maximum level is canceled by
turning the knob a click to the lef t. Rear Window Def ogger
Hazard Warning Button
Instrument Panel Brightness
Instrument Panel Brightness, Hazard Warning Button, Rear Window Def ogger
74
INSTRUMENT PANEL BRIGHTNESS
CONTROL KNOB
�\f���—�\f���—�����y���\f�������
�\f�y���
�(�������
�\f�y�\f�\f�����y
2008 Fit
Page 89 of 280
�µ
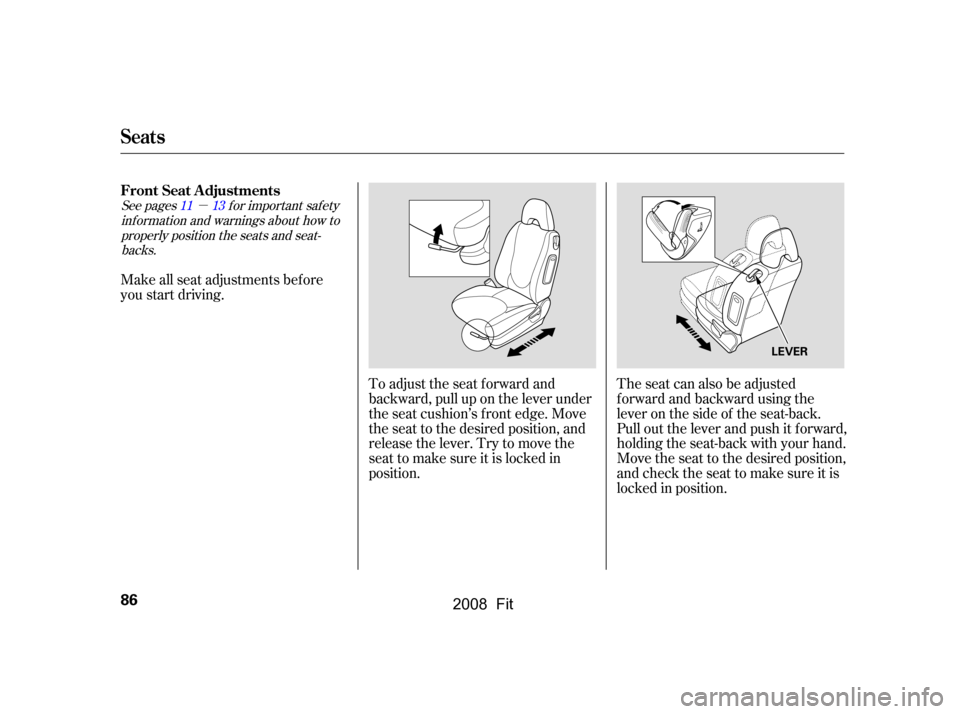
See pagesf or important saf ety
inf ormation and warnings about how toproperly position the seats and seat-backs. 1113
Make all seat adjustments bef ore
you start driving.
The seat can also be adjusted
f orward and backward using the
lever on the side of the seat-back.
Pull out the lever and push it f orward,
holding the seat-back with your hand.
Move the seat to the desired position,
andchecktheseattomakesureitis
locked in position.
To adjust the seat forward and
backward, pull up on the lever under
the seat cushion’s f ront edge. Move
the seat to the desired position, and
releasethelever.Trytomovethe
seat to make sure it is locked in
position.
FrontSeatAdjustments
Seats
86
LEVER
�\f���—�\f���—�����y���\f�����������y���
�(�������
�\f�y�\f�\f���
�y
2008 Fit
Page 90 of 280
See pagef or important saf etyinf ormation and a warning aboutimproperly positioning head restraints. 13
Your vehicle is equipped with head
restraints in all seating positions to
help protect you and your
passengers f rom whiplash and other
injuries.
To change the seat-back angle of the
f ront seat, pull up the lever on the
outside of the seat bottom.
Once a seat is adjusted correctly,
rock it back and f orth to make sure it
is locked in position. You can adjust the angle of the rear
seat-backs separately. To change the
seat-back angle, pull up the release
leverontheoutersideof theseat-
back.
CONT INUED
Head Restraints
Rear Seat Adjustments
Seats
Inst rument s and Cont rols
87
LEVER
�\f���—�\f���—�����y���\f���������\f�y���
�(�������
�\f�y�\f�\f�����y
2008 Fit
Page 218 of 280
. To
remove it, cover the terminals with a
solution of baking soda and water. It
will bubble up and turn brown. When
this stops, w")
�µ
Check the terminals f or corrosion (a
white or yellowish powder). To
remove it, cover the terminals with a
solution of baking soda and water. It
will bubble up and turn brown. When
this stops, wash it of f with plain
water. Dry off the battery with a
cloth or paper towel. Coat the
terminals with grease to help prevent
f uture corrosion.
If your vehicle’s battery is
disconnected, or goes dead, the
audio system may disable itself . The
nexttimeyouturnontheradio,you
will see ‘‘ENTER CODE’’ in the
f requency display. Use the preset
bars to enter the code (see page).
Battery posts,
terminals, and related accessories
contain lead and lead compounds.
If you need to connect the battery to
a charger, disconnect both cables to
prevent damaging your vehicle’s
electrical system. Always disconnect
the negative ( ) cable first, and
reconnect it last.
If your vehicle’s battery is
disconnected, or goes dead, the time
setting is lost. To reset the time, see
page .
If additional battery maintenance is
needed, see your dealer or a
qualif ied technician.
129
128
WARNING:
Wash your hands af ter handling.
Checking the Battery
Maint enance
215
The battery gives off explosive
hydrogen gas during normal
operation.
A spark or flame can cause the
battery to explode with enough
force to kill or seriously hurt you.
Wear protective clothing and a
face shield, or have a skilled
technician do the battery
maintenance.
�\f���—�\f���—�����y���\f�������
���y���
�(�������
�\f�y�\f�����\f�y
2008 Fit
Page 222 of 280

If you have a f lat tire while driving,
stop in a saf e place to change it.
Drive slowly along the shoulder until
you get to an exit or an area to stop
that is far away from the traffic lanes.Turn on the hazard warning lights,
and turn the ignition switch to the
LOCK (0) position. Have all
passengers get out of the vehicle
while you change the tire.
Park the vehicle on f irm, level, and
non-slippery ground. Put the
transmission in Park (automatic)
or reverse (manual). Apply the
parking brake.Open the tailgate. Raise the cargo
area f loor lid by lif ting it up with
the strap that has a loop. To keep
the f loor lid open, hook the loop of
the strap to a leg of the rear center
head restraint.
Take the tool kit out of the spare
tire.
4.
3.
2.
1.
CONT INUED
Changing a Flat Tire
T aking Care of t he Unexpect ed
219
JACK STRAP
TOOL KIT
SPARE
TIRE
LOOP
The vehicle can easily roll off
the jack, seriously injuring
anyone underneath.
Follow the directions for
changing a tire exactly, and
never get under the vehicle
when it is supported only by the
jack.
�\f���—�\f���—�����y���\f�����������y���
�(�������
�\f�y�\f�������y
2008 Fit