Page 282 of 373

�µ�µ�µ
�µ
�µ
�Ì
�µ
Engine oil level Check every
time you fill the fuel tank. See
page .
Engine coolant level Check the
radiator reserve tank every time
you f ill the f uel tank. See page .
Automatic transmission Check
the f luid level monthly. See page
.
Brakes Check the f luid level
monthly. See page .
Tires Check the tire pressure
monthly. Examine the tread f or
wear and foreign objects. See page .
Youshouldcheckthefollowing
items at the specif ied intervals. If
you are unsure of how to perf orm
any check, turn to the appropriate
page listed. U.S. Vehicles:
According to state and federal
regulations, f ailure to perf orm
maintenance on the items marked
with will not void your emissions
warranties. However, all
maintenance services should be
perf ormed in accordance with the
intervals indicated by the
inf ormation display.
Lights Check the operation of
the headlights, parking lights,
taillights, high-mount brake light,
and license plate light monthly.
See page .
We recommend using Honda parts
and fluids whenever you have
maintenance done. These are
manuf actured to the same high
quality standards as the original
components, so you can be conf ident
of their perf ormance and durability. However, service at a dealer is not
mandatory to keep your warranties
in effect. Maintenance may be done
by any qualif ied service f acility or
person who is skilled in this type of
automotive service. Make sure to
have the service f acility or person
reset the display as previously
described. Keep all receipts as proof
of completion, and have the person
who does the work f ill out your
Honda Service History or Canadian
Maintenance Log. Check your
warranty booklet f or more
inf ormation. 230
230
287 289
302
291
Maintenance Minder
Owner’s Maintenance Checks Maintenance,
replacement, or repair of
emissions control devices and
systems may be done by any
automotive repair establishment
or individual using parts that are
‘‘certif ied’’ to EPA standards.
278
�����—�����—�����y�
����
�
������y���
�(�,�����
���y���������y
2008 CR- V
Page 295 of 373
CONT INUED
Theheadlightswereproperlyaimed
when your vehicle was new. If you
regularly carry heavy items in the
cargo area or pull a trailer,
readjustment may be required.
Adjustmentsshouldbedonebyyour
dealer or other qualif ied technician.Your vehicle has halogen headlight
bulbs. When replacing a bulb, handle
it by its base, and protect the glass
f rom contact with your skin or hard
objects. If you touch the glass, clean
it with denatured alcohol and a clean
cloth.
Open the hood.
To change the headlight bulb on
the driver’s side, remove the
under-hood f use box f rom its stay
by pulling it out.
1.
Headlight A iming Replacing a Headlight Bulb
Lights
Maint enance
291
Halogen headlight bulbs get very hot
when lit. Oil, perspiration, or a scratch
on the glass can cause the bulb to
overheat and shatter.
�\f���—�\f���—�����y�
����
��������y���
�(�,�����
�\f�y�\f�������y
2008 CR- V
Page 296 of 373
�à
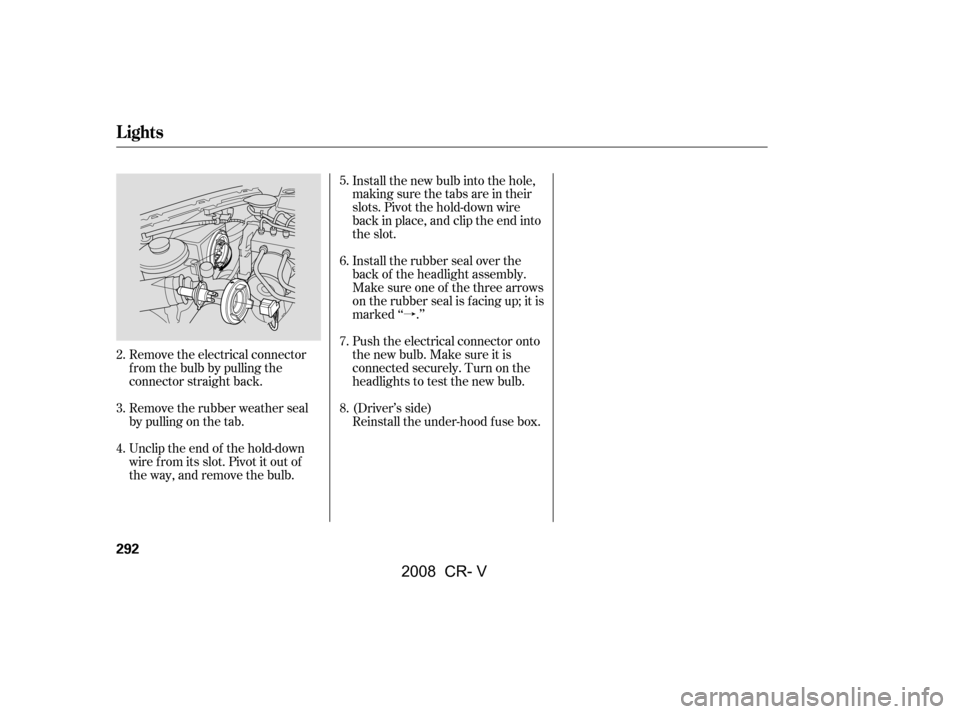
Remove the electrical connector
f rom the bulb by pulling the
connector straight back.
Remove the rubber weather seal
by pulling on the tab.
Unclip the end of the hold-down
wire f rom its slot. Pivot it out of
the way, and remove the bulb. Install the new bulb into the hole,
making sure the tabs are in their
slots. Pivot the hold-down wire
back in place, and clip the end into
the slot.
Install the rubber seal over the
back of the headlight assembly.
Make sure one of the three arrows
on the rubber seal is f acing up; it is
marked ‘‘ .’’
Push the electrical connector onto
the new bulb. Make sure it is
connected securely. Turn on the
headlights to test the new bulb.
(Driver’s side)
Reinstall the under-hood f use box.
4.
2.
3. 5.
6.
7.
8.
Lights
292
�\f���—�\f���—�����y�
����
��������y���
�(�,�����
�\f�y�\f�������y
2008 CR- V
Page 297 of 373
Insert the socket back into the
headlight assembly. Turn it
clockwise to lock it in place.
Turn on the lights to make sure
the new bulb is working.
(Driver’s side)
Reinstall the coolant reserve tank.
Open the hood.
To change the turn signal bulb on
the driver’s side, remove the
engine coolant reserve tank by
pulling it out of its holder. Remove the socket from the
headlight assembly by turning it
one-quarter turn counterclockwise.
Pull the bulb straight out of its
socket. Push the new bulb straight
into the socket until it bottoms.
1. 2.
3.4.
5.
6.
Lights
Replacing a Front T urn Signal
Light Bulb
Maint enance
293
�\f���—�\f���—�����y�
����
������
�y���
�(�,�����
�\f�y�\f�������y
2008 CR- V
Page 298 of 373
Insert the socket back into the
headlight assembly. Turn it
clockwise to lock it in place.
Turn on the lights to make sure
the new bulb is working.
Reinstall the f use box in place
securely.
(Driver’s side)
Open the hood.
To change the parking light/f ront
side marker on the driver’s side,
removethefuseboxfromitsstay
by pulling out. Remove the socket from the
headlight assembly by turning it
one-quarter turn counterclockwise.
Pull the bulb straight out of its
socket. Push the new bulb straight
into the socket until it bottoms.
1. 2.
3.4.
5.
6.
Lights
Replacing a Parking L ight/Front
Side Marker L ight Bulb
294
FUSE BOX
On the passenger’s side
�\f���—�\f���—�����y�
����
����\f�\f�y���
�(�,�����
�\f�y�\f�������y
2008 CR- V
Page 299 of 373
Determine which of the f our bulbs
is burned out: stop/taillight, back-
up light, turn signal, or side
marker.
Remove the socket by turning it
one-quarter turn counterclockwise.
Use a Phillips-head screwdriver to
remove the taillight assembly
mounting screw under each cover.
Pull the taillight assembly out of
the rear pillar.
Open the tailgate. Place a cloth on
the edge of the cover. Remove the
covers by caref ully prying on the
edge with a small f lat-tip
screwdriver.
2.
3. 4.
5.
1.
CONT INUED
Replacing Rear Bulbs
Lights
Maint enance
295
BULBS
COVER
SCREWS
BULBS
�\f���—�\f���—�����y�
����
����\f���y���
�(�,�����
�\f�y�\f���\f�\f�y
2008 CR- V
Page 300 of 373
Reinstall the socket into the light
assembly by turning it clockwise
until it locks.
Align the clips on the taillight
assembly with the holes in the
body, then push the taillight
assembly into place. Tighten the
two mounting screws securely and
reinstall the covers.
Pull the bulb straight out of its
socket. Push the new bulb straight
into the socket until it bottoms.
Turn on the lights to make sure
the new bulb is working.Open the tailgate. Place a cloth on the side edge ofthe cover. Remove the cover by
caref ully prying on the edge with a
small f lat-tip screwdriver and
pulling the cover of f .
Remove the socket f rom the light
assembly by turning it one-quarter
turn counterclockwise.
Unlatch the top of the cover by
pulling back on it with your hands.
1. 2.
6.
7.
8.
9.
3.
Replacing a High-mount Brake
Light Bulb
Lights
296
�\f���—�\f���—�����y�
����
����
���y���
�(�,�����
�\f�y�\f���\f�
�y
2008 CR- V
Page 301 of 373

The driver’s f loor mat that came
with your vehicle hooks over the
f loor mat anchors. This keeps the
f loor mat f rom sliding f orward and
possibly interf ering with the pedals.
Dirt build-up in the loops of the seat
belt anchors can cause the belts to
retract slowly. Wipe the insides of
the loops with a clean cloth
dampened in mild soap and warm
water or isopropyl alcohol.
If your seat belts get dirty, use a sof t
brush with a mixture of mild soap
and warm water to clean them. Do
not use bleach, dye, or cleaning
solvents. Let the belts air-dry bef ore
you use the vehicle.
Pull the bulb straight out of its
socket. Push the new bulb straight
into the socket until it bottoms.
Press the brake pedal to make
sure the new bulb is working.
Put the socket back into the light
assembly, and turn it clockwise to
lock it in place.
Put the cover back on the light
assembly. Push it in until it locks
in place.
4.
5.
6.
7.
CONT INUED
Floor Mats
Cleaning the Seat Belts
Lights, Cleaning the Seat Belts, Floor Mats
Maint enance
297
LOOP
�\f���—�\f���—�����y�
����
��������y���
�(�,�����
�\f�y�\f���\f���y
2008 CR- V


Reinstall the coolant reserve")


