Page 182 of 413
 position bef ore operating the
moonroof switch on the ceiling
console.
To open the moonroof f ully, pull
back the moonroof switch f irmly.
The mo")
If equipped
Turn the ignition switch to the ON
(II) position bef ore operating the
moonroof switch on the ceiling
console.
To open the moonroof f ully, pull
back the moonroof switch f irmly.
The moonroof opens all the way. To
stop the moonroof f rom opening
f ully, brief ly move the switch in
either direction.
To tilt the moonroof , push the center
of the moonroof switch straight up.
To stop the moonroof f rom tilting
f ully open, push the moonroof switch
forward.To open or close the moonroof
partially, pull or push the moonroof
switch lightly to the f irst detent and
hold it. The moonroof will stop when
you release the switch.
If your vehicle’s battery is
disconnected or goes dead, or the
driver’s window f use is removed, the
AUTO f unction will be disabled. To
reset the AUTO function after
reconnecting the battery or installing
the f use, do this:
Start the engine. Push down and
hold the driver’s window switch
until the window is f ully open.
Pull and hold the driver’s window
switch to close the window
completely, then hold the switch
f or about 2 seconds.
If the power windows do not operate
properly af ter resetting, have your
vehicle checked by your dealer.
1. 2. Moonroof
Power Windows, Moonroof
100
MOONROOF SWITCH
Tilt
Close Open
�����—�����—�����y�����������
���y���
�(�#���������y���
�����y
Page 183 of 413
 position bef ore operating the
moonroof switch on the ceiling
console.
To open the moonroof f ully, pull
back the moonroof switch f irmly.
The mo")
If equipped
Turn the ignition switch to the ON
(II) position bef ore operating the
moonroof switch on the ceiling
console.
To open the moonroof f ully, pull
back the moonroof switch f irmly.
The moonroof opens all the way. To
stop the moonroof f rom opening
f ully, brief ly move the switch in
either direction.
To tilt the moonroof , push the center
of the moonroof switch straight up.
To stop the moonroof f rom tilting
f ully open, push the moonroof switch
forward.To open or close the moonroof
partially, pull or push the moonroof
switch lightly to the f irst detent and
hold it. The moonroof will stop when
you release the switch.
If your vehicle’s battery is
disconnected or goes dead, or the
driver’s window f use is removed, the
AUTO f unction will be disabled. To
reset the AUTO function after
reconnecting the battery or installing
the f use, do this:
Start the engine. Push down and
hold the driver’s window switch
until the window is f ully open.
Pull and hold the driver’s window
switch to close the window
completely, then hold the switch
f or about 2 seconds.
If the power windows do not operate
properly af ter resetting, have your
vehicle checked by your dealer.
1. 2. Moonroof
Power Windows, Moonroof
100
MOONROOF SWITCH
Tilt
Close Open
�����—�����—�����y�����������
���y���
�(�#���������y���
�����y
Page 270 of 413

Wait a f ew minutes af ter turning the
engine of f bef ore you check the oil.
Put your f ingers under the f ront
edge of the hood near the center.
Slide your hand to the lef t until
you f eel the hood latch handle.
Push this handle up to release it.
Lif t up the hood.
If the hood latch handle moves
stif f ly, or if you can open the hood
without lifting the handle, the
mechanism should be cleaned and
lubricated. Pull the support rod out of its clip
by holding the grip, and insert the
end into the designated hole in thehood.
To close the hood, lif t it up slightly
to remove the support rod f rom
the hole. Put the support rod back
into its holding clip. Lower the
hood to about a f oot (30 cm) above
the fender, then let it drop. Make
sure it is securely latched.
Remove the dipstick (orange
handle).
Insert it all the way back in its tube.
Wipe of f the dipstick with a clean
cloth or paper towel.
3.
1. 2.
3.
2.
CONT INUED
Service Station Procedures
Oil Check
Bef ore Driving
183
DIPSTICK
SUPPORT ROD
LATCH GRIP
Except Si
�����—�����—�����y���
�����������y���
�(�#���������y���
�����y
Page 271 of 413

Wait a f ew minutes af ter turning the
engine of f bef ore you check the oil.
Put your f ingers under the f ront
edge of the hood near the center.
Slide your hand to the lef t until
you f eel the hood latch handle.
Push this handle up to release it.
Lif t up the hood.
If the hood latch handle moves
stif f ly, or if you can open the hood
without lifting the handle, the
mechanism should be cleaned and
lubricated. Pull the support rod out of its clip
by holding the grip, and insert the
end into the designated hole in thehood.
To close the hood, lif t it up slightly
to remove the support rod f rom
the hole. Put the support rod back
into its holding clip. Lower the
hood to about a f oot (30 cm) above
the fender, then let it drop. Make
sure it is securely latched.
Remove the dipstick (orange
handle).
Insert it all the way back in its tube.
Wipe of f the dipstick with a clean
cloth or paper towel.
3.
1. 2.
3.
2.
CONT INUED
Service Station Procedures
Oil Check
Bef ore Driving
183
DIPSTICK
SUPPORT ROD
LATCH GRIP
Except Si
�����—�����—�����y���
�����������y���
�(�#���������y���
�����y
Page 284 of 413
Make sure all windows, mirrors,
and outside lights are clean and
unobstructed. Remove f rost, snow,
or ice.
Check that the hood and trunk are
f ully closed.Check that any items you may be
carrying are stored properly or
f astened down securely.
Check the seat adjustment (see
page ).
Check the adjustment of the
inside and outside mirrors (see
page ).
Check the steering wheel
adjustment (see page ).
Make sure the doors are securely
closed and locked.Fasten your seat belt. Check that
your passengers have f astened
their seat belts (see page ).
Youshoulddothefollowingchecks
and adjustments every day bef ore
you drive your vehicle.
When you start the engine, check
the gauges and indicators in the
instrument panel (see page ).
Visually check the tires. If a tire
looks low, use a gauge to check its
pressure (see page ).
1. 2. 3. 4.
9.
8.
7.
6.
5.
10.
91
75 14
57
254 102
Preparing to Drive
Driving
197
�����—�����—�����y���
�����������y���
�(�#���������y���������y
Page 294 of 413

Check the brakes after driving
through deep water. Apply the
brakes moderately to see if they f eel
normal. If not, apply them gently and
f requently until they do. Be extra
cautious in your driving.
The hydraulic system that operates
the brakes has two separate circuits.
Each circuit works diagonally across
the vehicle (the lef t-f ront brake is
connected with the right-rear brake,
etc.). If one circuit should develop a
problem, you will still have braking
at two wheels.If the brake pads need replacing, you
will hear a distinctive, metallic
screeching sound when you apply
the brake pedal. If you do not have
the brake pads replaced, they will
screech all the time. It is normal f or
the brakes to occasionally squeal or
squeak when you apply them.
Your vehicle is equipped with f ront
disc brakes. The brakes on the rear
wheels may be disc or drum,
depending on the model. A power
assist helps reduce the ef f ort needed
on the brake pedal. The anti-lock
brake system (ABS) helps you retain
steering control when braking very
hard.
Resting your f oot on the pedal keeps
the brakes applied lightly, builds up
heat, and reduces their ef f ectiveness
and reduces brake pad life. In
addition, f uel economy can be
reduced. It also keeps your brake
lights on all the time, conf using
drivers behind you.
Constant application of the brakes
when going down a long hill builds
up heat and reduces their ef f ective-
ness. Use the engine to assist the
brakes by taking your f oot of f the
accelerator and downshif ting to a
lower gear. Braking System Design
Brake Pad Wear Indicators
Braking System
Driving
207
�����—�����—�����y�
�������������y���
�(�#���������y�����
���y
Page 314 of 413

�µ�µ�µ
�µ
�µ
�µ
�Ì Engine oil level Check every
time you fill the fuel tank. See
page .
Engine coolant level Check the
radiator reserve tank every time
you f ill the f uel tank. See page .
Automatic transmission Check
the f luid level monthly. See page
.
Brakes Check the f luid level
monthly. See page .
Tires Check the tire pressure
monthly. Examine the tread f or
wear and foreign objects. See page .
Lights Check the operation of
the headlights, parking lights,
taillights, high-mount brake light,
and license plate lights monthly.
See page .
U.S. Vehicles:
According to state and federal
regulations, f ailure to perf orm
maintenance on the items marked
with will not void your emissions
warranties. However, all
maintenance services should be
perf ormed in accordance with the
intervals indicated by the
inf ormation display.
Youshouldcheckthefollowing
items at the specif ied intervals. If
you are unsure of how to perf orm
any check, turn to the appropriate
page listed.
However, service at a dealer is not
mandatory to keep your warranties
in effect. Maintenance may be done
by any qualif ied service f acility or
person who is skilled in this type of
automotive service. Make sure to
have the service f acility or person
reset the display as previously
described. Keep all receipts as proof
of completion, and have the person
who does the work f ill out your
Honda Service History or Canadian
Maintenance Log. Check your
warranty booklet f or more
inf ormation.
We recommend using Honda parts
and fluids whenever you have
maintenance done. These are
manuf actured to the same high
quality standards as the original
components, so you can be conf ident
of their perf ormance and durability.
183
185
240 242
254
244
Maintenance Minder
Maintenance,
replacement, or repair of
emissions control devices and
systems may be done by any
automotive repair establishment
or individual using parts that are
‘‘certif ied’’ to EPA standards.
Owner’s Maintenance Checks
228
�����—�����—�����y���
��
��������y���
�(�#���������y���������y
Page 316 of 413
�Î
�Î
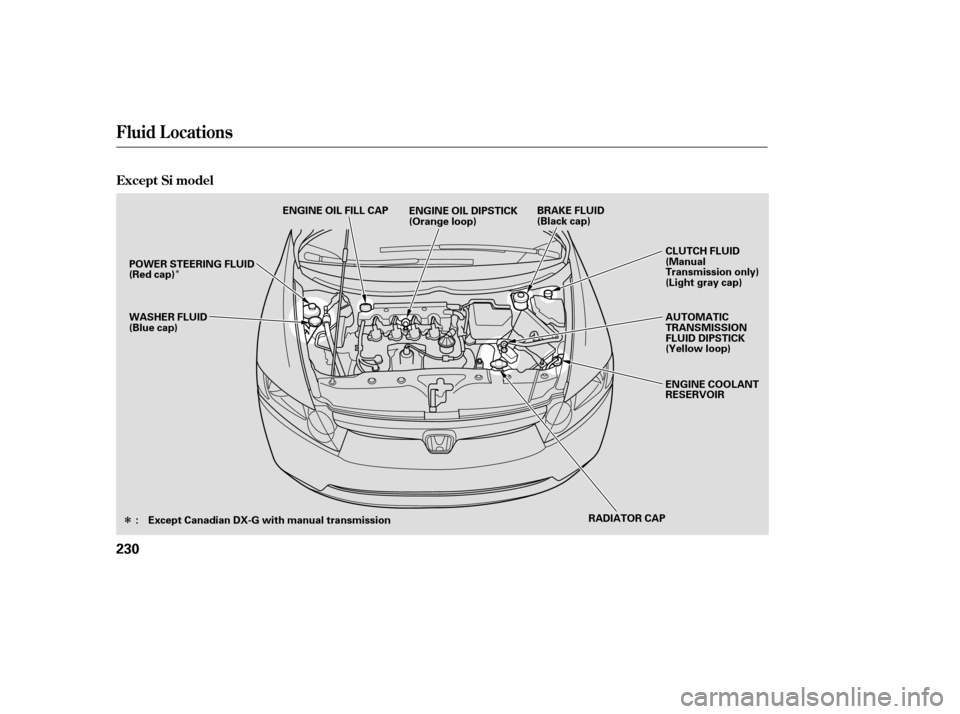
Fluid Locations
Except Si model
230
RADIATOR CAP AUTOMATIC
TRANSMISSION
FLUID DIPSTICK
(Yellow loop)
ENGINE COOLANT
RESERVOIR
CLUTCH FLUID
(Manual
Transmission only)
(Light gray cap)
WASHER FLUID
(Blue cap) BRAKE FLUID
(Black cap)
ENGINE OIL DIPSTICK
(Orange loop)
ENGINE OIL FILL CAP
POWER STEERING FLUID
(Red cap)
: Except Canadian DX-G with manual transmission
�����—�
���—�����y�
����
��������y���
�(�#���������y���������y