Page 4 of 300

2008 Civic Hybrid Online Reference Owner's Manual
\
Contents
Owner's Identification Form
Introduction .............................................................................................................................\
............................. i
A Few Words About Safety ......................................................................\
........................................................ iii
Your Vehicle at a Glance (main controls) ......................................................................\
................................ 3
Driver and Passenger Safety (seat belts, SRS, and child protection) .......................................................... 5
Instruments and Controls (indicators, gauges, dashboard, and steering column) ......................................... 55
Features (climate control, audio, steering wheel, security, and cruise control)........................................................ 101
Before Driving (fuel, vehicle break- in, and cargo loading) ............................................................................ 173
Driving (engine and transmission operation) .......................................................................\
............................... 189
Maintenance (minder, fluid checking, minor services, and vehicle storage) ..................................................... 205
Taking Care of the Unexpected (flat tire, dead battery, overheating, and fuses) ..................................... 241
Technical Information (vehicle specifications, tires, and emissions controls) ................................................ 265
Warranty and Customer Relations (U. S. and Canada only) (warranty and contact information) ......... 279
Authorized Manuals (U. S. only) (how to order) .......................................................................\
.................... 283
Index ......................................................................\
......................................................... ...................................... I
Service Information Summary ( fluid capacities and tire pressures)
\
\
1 00X31-SNC-6200
Page 6 of 300
Your Vehicle at a Glance
Your Vehicle at a Glance
3
GAUGES INSTRUMENT PANEL INDICATORS AUDIO SYSTEMAUXILIARY INPUT JACK ACCESSORY
POWER SOCKET
(P.64)
(P.58)
(P.9,24) PASSENGER’S FRONT AIRBAG
DRIVER’S FRONT
AIRBAG
MIRROR CONTROLS
POWER DOOR LOCK
MASTER SWITCH
POWER WINDOW
SWITCHES
FUEL FILL DOOR
RELEASE HANDLE
TRUNK RELEASE
HANDLE DOOR LOCK TAB
AUTOMATIC TRANSMISSION (CVT) (P.80)
CLIMATE CONTROL
SYSTEM
(P.167) (P.192)(P.102)
(P.99)
(P.108)
(P.9,24)
(P.80)
(P.94)
(P.175)
(P.87)
Vehicle with navigation system is shown (P.96)
�����—�����—�����y�
���������
���y���
�(�#���������y���������y
2008 Civic Hybrid
Page 59 of 300
Control L ocations
56
POWER WINDOW
SWITCHES
MIRROR CONTROLS
FUEL FILL DOOR
RELEASE HANDLEINSTRUMENT PANEL INDICATORS
GAUGES
AUDIO SYSTEM
POWER DOOR LOCK
MASTER SWITCH (P.58)
(P.64)
(P.80) (P.80)
DOOR LOCK TAB
TRUNK RELEASE
HANDLE AUTOMATIC TRANSMISSION (CVT)
AUXILIARY INPUT JACK ACCESSORY POWER
SOCKET
CLIMATE CONTROL
SYSTEM
(P.94)
(P.175)
(P.87) (P.108)
(P.102)
(P.99)
(P.167) (P.192)
Vehicle with navigation system is shown (P.96)
�\f���—�\f���—�\f���y�
�������������y���
�(�#�������\f�y�\f�\f���
�y
2008 Civic Hybrid
Page 104 of 300

The heating and air conditioning
system in your vehicle provides a
comf ortable driving environment in
all weather conditions.
The standard audio system has
many f eatures. This section
describes those f eatures and how to
use them. (If you have an optional
audio system, ref er to the operating
instructions that came with it.)
Your vehicle has an anti-theft audio
system that requires a code number
to enable it.
The security system helps to dis-
courage vandalism and thef t of your
vehicle..............................
Climate Control .102
................................
Audio System .108
Audio System (Models without
...............
navigation system) .110
.....................
To Play the Radio .111
Playing the XM
Satellite
...................
Radio (Optional) .114
...........................
To Play a Disc .120
...
Disc Player Error Messages .126
Audio System (Models with ...............
navigation system) .128
......................
Playing the Radio .128
Playing the XM
Satellite
......................................
Radio .132
............................
Playing a Disc .140
...
Disc Player Error Messages .148
.....................
Playing a PC Card .149
........
PC Card Error Messages .160
............
AM/FM Radio Reception .161
..................
Protecting Your Discs .163
.................
Radio Thef t Protection .166
................
Remote Audio Controls .167
..........................
Setting the Clock .168
............................
Security System .169
...............................
Cruise Control .170
Features
Features
101
�\f���—�\f���—�\f���y�
����\f�\f������y���
�(�#�������\f�y�\f�
�\f���y
2008 Civic Hybrid
Page 106 of 300

Only on models equipped withNavigation System
The climate control system f or your
vehicle can also be operated using
the voice control system. See the
NavigationsectioninyourQuick
Start Guide f or an overview of this
system and the Navigation System
manual f or complete details.
The automatic climate control
system adjusts the f an speed and
airflow levels to maintain the interior
temperature you select. You can manually select various
f unctions of the climate control
system when it is in f ull automatic
mode. All other f eatures remain
automatically controlled.
Making any manual selection causes
thewordAUTOinthedisplaytogo
out.
Turn this dial to increase or decrease
the fan speed and airflow.
Turning this dial clockwise increases
the temperature of the airflow.
Set the desired temperature by
turning the temperature control
dial. You will see AUTO in the
system’s display.
Press the AUTO button. The system automatically selects the
proper mix of conditioned and/or
heated air that will, as quickly as
possible, raise or lower the interior
temperature to your pref erence.
When you set the temperature to its
lower limit ( ) or its upper limit
( ), the system runs at f ull
cooling or heating only. It does not
regulate the interior temperature.
In cold weather, the fan will not
come on automatically until the
heater starts to develop warm air.
In ‘‘AUTO’’ mode, the air conditioner
may not work if the humidity inside
the vehicle is low. To activate the air
conditioner, press A/C button.
Voice Control System Semi-automatic Operation
Using A utomatic Climate Control Fan Control Dial
T emperature Control Dial
Climat e Cont rol
Features
103
�\f���—�\f���—�\f���y�
����\f�
��
���y���
�(�#�������\f�y�\f�
�\f���y
2008 Civic Hybrid
Page 110 of 300
Press the OFF button. However, a
lack of airf low can cause the
windowstofogup.Youshouldkeep
the fan on at all times so stale air and
moisture do not build up in the
interior and cause f ogging.To regulate the interior temperature
and humidity, the climate control
system has two sensors. A sunlight
sensor is located in the top of the
dashboard and a temperature/
humidity sensor is next to the
steering column. Do not cover the
sensors or, spill liquid or spray
chemical cleaners on the sensors.
To Turn Everything Off Sunlight, Temperature, and
Humidity Sensors
Climat e Cont rol
Features
107
TEMPERATURE/HUMIDITY SENSOR
SUNLIGHT SENSOR
�\f���—�\f���—�\f���y�
����\f�
������y���
�(�#�������\f�y�\f�
�
���y
2008 Civic Hybrid
Page 233 of 300

This f ilter removes the dust and
pollenthatisbroughtinfromthe
outside through the heating and
cooling system/climate control
system.
Have your dealer replace the filter
when this service is indicated by a
maintenance message on the
inf ormation display. It should be
replaced every 15,000 miles (24,000
km) if you drive primarily in urban
areas that have high concentrations
of soot in the air, or if the f low f rom
the heating and cooling system
becomeslessthanusual.Check the condition of the wiper
blades at least every 6 months.
Replace them if you f ind signs of
cracking in the rubber, and areas
that are getting hard or if they leave
streaks and unwiped areas when
used.
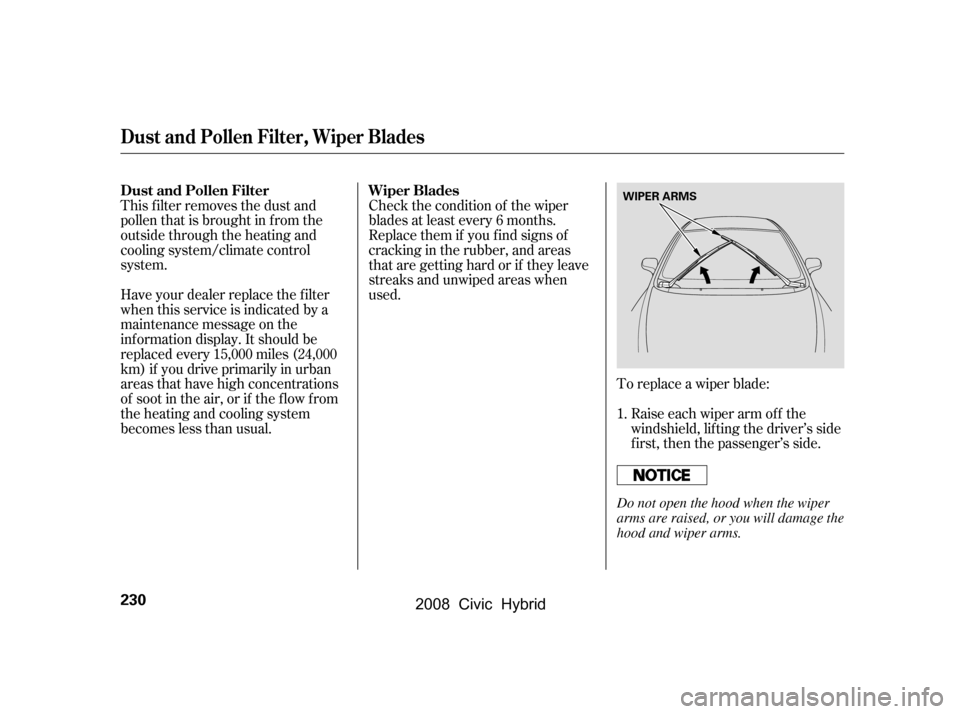
To replace a wiper blade:Raise each wiper arm off the
windshield, lif ting the driver’s side
first, then the passenger’s side.
1.
Dust and Pollen Filter, Wiper Blades
Dust and Pollen Filter Wiper Blades
230
WIPER ARMS
Do not open the hood when the wiper
arms are raised, or you will damage the
hood and wiper arms.
�\f���—�\f���—�\f���y�
����
��������y���
�(�#�������\f�y�\f�������y
2008 Civic Hybrid
Page 252 of 300

�´
�´
Although this seems like a simple
procedure, you should take several
precautions.
To jump start your vehicle:
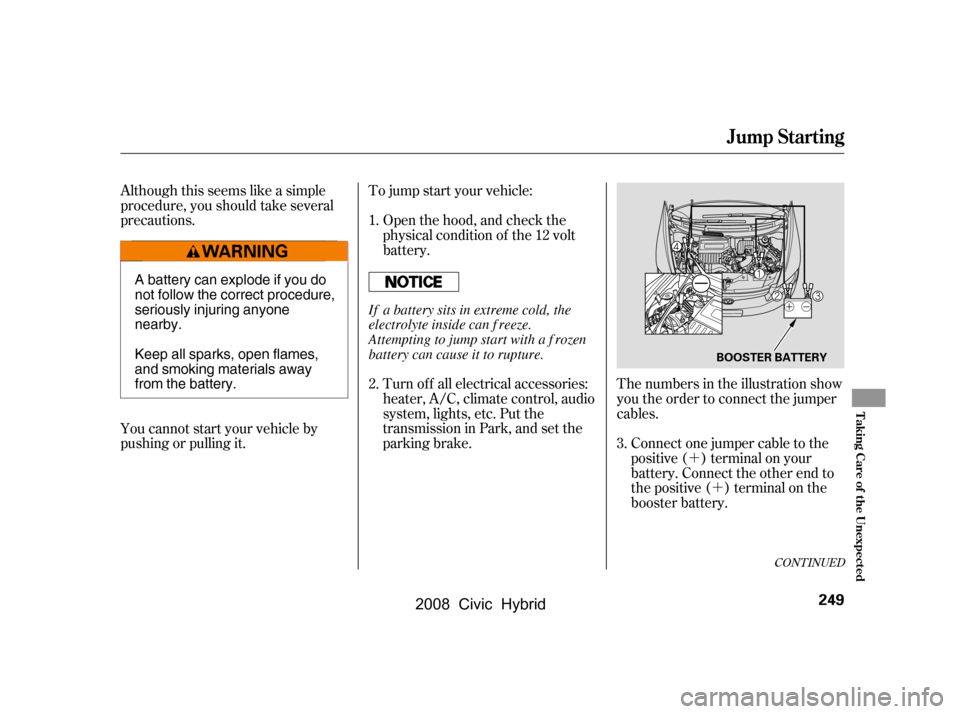
The numbers in the illustration show
you the order to connect the jumper
cables.
Connect one jumper cable to the
positive ( ) terminal on your
battery. Connect the other end to
the positive ( ) terminal on the
booster battery.
You cannot start your vehicle by
pushing or pulling it.
Open the hood, and check the
physical condition of the 12 volt
battery.
Turn of f all electrical accessories:
heater, A/C, climate control, audio
system, lights, etc. Put the
transmission in Park, and set the
parking brake.
1.
2.
3.
CONT INUED
Jump Starting
T aking Care of t he Unexpect ed
249
BOOSTER BATTERY
A battery can explode if you do
not follow the correct procedure,
seriously injuring anyone
nearby.
Keep all sparks, open flames,
and smoking materials away
from the battery.
If a battery sits in extreme cold, the
electrolyte inside can f reeze.
Attempting to jump start with a f rozen
battery can cause it to rupture.
�����—�����—�����y�
������
��
���y���
�(�#���������y���������y
2008 Civic Hybrid