Page 8 of 303
�Î �Î�Î
�Î
�Î
�Î �Î
�Î
�Î �Î�Î
Only on vehicles equipped with navigation system. Ref er to the navigati
on system manual.
To use the horn, press the center pad of the steering wheel.
If equipped.
1:2:3:
Your Vehicle at a Glance
4
HEADLIGHTS/TURN SIGNALS
REAR WINDOW
DEFOGGER
WINDSHIELD WIPERS/WASHERS
INSTRUMENT PANEL
BRIGHTNESS
SEL/RESET BUTTON
HAZARD WARNING
BUTTON
ACCESSORY POWER
SOCKET
PASSENGER AIRBAG OFF
INDICATOR
(P.29)
DISPLAY CHANGE
BUTTON
HEATED MIRRORS
CRUISE
CONTROL
BUTTONS (P.178)
NAVIGATION SYSTEM VOICE CONTROL BUTTONS
(P.72)
(P.73)(P.66)
(P.65)
(P.104)
(P.217) (P.71)
(P.177)(P.75)
(P.182) (P.105)
(P.74)
AUXILIARY INPUT JACK
MIRROR CONTROLS
VEHICLE
STABILITY
ASSIST (VSA)
SYSTEM OFF
SWITCH
STEERING WHEEL
ADJUSTMENTS
REMOTE AUDIO
CONTROLS HORN
(P.108)(P.74) 3
3
1 3
3
3 32
�����—�����—�
�
�y�
�������������y���
�(�+���������y���������y
Page 56 of 303
�Î
�Î
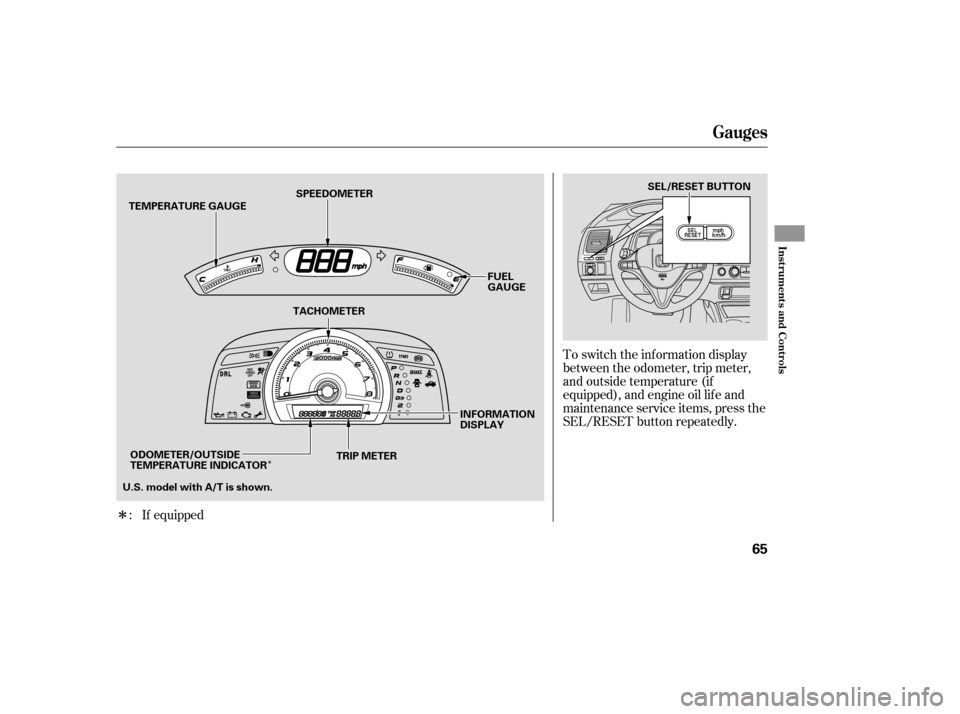
To switch the information display
between the odometer, trip meter,
and outside temperature (if
equipped), and engine oil lif e and
maintenance service items, press the
SEL/RESET button repeatedly.
If equipped
:
Gauges
Inst rument s and Cont rols
65
SPEEDOMETER
TRIP METER INFORMATION
DISPLAYFUEL
GAUGE
TACHOMETER
TEMPERATURE GAUGE
U.S. model with A/T is shown. SEL/RESET BUTTON
ODOMETER/OUTSIDE
TEMPERATURE INDICATOR
�����—�����—�
�
�y�
����
����
���y���
�(�+���������y���������y
Page 57 of 303
 or Centigrade (Canadian
models). To see the outside
temperature, press and release the
SEL")
�¶�¶�µ
�µ�µ�µ�µ
�µ�µ�µ
This indicator displays the outside
temperature in Fahrenheit (U.S.
models) or Centigrade (Canadian
models). To see the outside
temperature, press and release the
SEL/RESET button until the
temperature is shown on the
inf ormation display.
The temperature sensor is in the
f ront bumper. Theref ore, the
temperature reading can be af f ected
by heat ref lection f rom the road
surf ace, engine heat, and the
exhaust f rom surrounding traf f ic.
This can cause an incorrect
temperature reading when your
speed is under 19 mph (30 km/h).
The sensor delays the display update
until it reaches the correct outside
temperature. This may take several
minutes. In certain weather conditions,
temperature readings near f reezing
(32°F, 0°C) could mean that ice is
f orming on the road surf ace.
If the outside temperature is
incorrectly displayed, you can adjust
it up to 5°F in U.S. models ( 3°C
in Canadian models) warmer or
cooler.
When it reaches the desired value,
release the SEL/RESET button. You
should see the new outside
temperature displayed.
Select the outside temperature
display, then press and hold the
SEL/RESET button f or 10 seconds.
The f ollowing sequence will appear
for1secondeach:0,1,2,3,4,5, 5,
4, 3, 2, 1, 0 (U.S.) or 0, 1, 2,
3, 3, 2, 1, 0 (Canada).
NOTE: The temperature must be
stabilized bef ore doing this
procedure.
If equipped
Outside Temperature Indicator
Gauges
Inst rument s and Cont rols
67
�����—�����—�
�
�y�
����
��������y���
�(�+���������y���������y
Page 58 of 303

This shows how much f uel you have.
It may show slightly more or less
than the actual amount.This shows the temperature of the
engine’s coolant. During normal
operation, the reading should rise to
about the middle of the gauge. In
severe driving conditions, such as
very hot weather or a long period of
uphill driving, the reading may rise
intotheupperhalfofthegauge.Ifit
reaches the red (Hot) mark, pull
safely to the side of the road. See
page f or instructions and
precautions on checking the engine
cooling system.Your vehicle’s onboard diagnostic
system will detect a loose or missing
f uel f ill cap as an evaporative system
leak. The f irst time a leak is detected
a ‘‘CHECK FUEL CAP’’ message
appears on the information display.
Turn the engine of f , and conf irm the
f uel f ill cap is installed. If it is, loosen
it, then retighten it until it clicks at
least once. The message should go
off after several days of normal
driving once you tighten or replace
the f uel f ill cap. To scroll to another
display, press the SEL/RESET
button. The ‘‘CHECK FUEL CAP’’
message will appear each time you
restart the engine until the system
turns the message of f .
279
Fuel Gauge T emperature Gauge Check Fuel Cap Message
Gauges
68
Avoid driving with an extremely low
f uel level. Running out of f uel could
cause the engine to misf ire, damaging
the catalytic converter.
�����—�����—�
�
�y�
����
��������y���
�(�+���������y���������y
Page 59 of 303
The inf ormation display in the
instrument panel shows you the
engine oil lif e and maintenance
service items when the ignition
switch is in the ON (II) position. This
inf ormation helps to keep you aware
of the periodic maintenance your
vehicle needs f or continued trouble-
f ree driving. Ref er to page f or
more inf ormation.
If the system still detects a leak in
your vehicle’s evaporative emissions
system, the malf unction indicator
lamp (MIL) comes on. If the f uel f ill
cap was not already tightened, turn
the engine of f , and check or
retighten the f uel f ill cap until it
clicks at least once. The MIL should
go off after several days of normal
driving once the cap is tightened or
replaced. If the MIL does not go of f ,
have your vehicle inspected by a
dealer. For more inf ormation, see
page .
282 225
Maintenance Minder
Gauges
Inst rument s and Cont rols
69
�����—�����—�
�
�y�
����
��������y���
�(�+���������y���������y
Page 60 of 303
The inf ormation display in the
instrument panel shows you the
engine oil lif e and maintenance
service items when the ignition
switch is in the ON (II) position. This
inf ormation helps to keep you aware
of the periodic maintenance your
vehicle needs f or continued trouble-
f ree driving. Ref er to page f or
more inf ormation.
If the system still detects a leak in
your vehicle’s evaporative emissions
system, the malf unction indicator
lamp (MIL) comes on. If the f uel f ill
cap was not already tightened, turn
the engine of f , and check or
retighten the f uel f ill cap until it
clicks at least once. The MIL should
go off after several days of normal
driving once the cap is tightened or
replaced. If the MIL does not go of f ,
have your vehicle inspected by a
dealer. For more inf ormation, see
page .
282 225
Maintenance Minder
Gauges
Inst rument s and Cont rols
69
�����—�����—�
�
�y�
����
��������y���
�(�+���������y���������y
Page 64 of 303

positio")
�´�µ
With the headlight switch of f or in
the position, the high beam
headlights and the high beam
indicator come on with reduced
brightness when you turn the
ignition switch to the ON (II)
position and release the parking
brake. They remain on until you turn
the ignition switch of f , even if you
set the parking brake.
The headlights revert to normal
operation when you turn them on
with the switch. The buttons under the lef t side vent
control the brightness of the
instrument panel. Push the or
button to adjust the brightness.
Separate adjustments can be made
when the headlights are on and of f .
There are six brightness levels.
When you push either button, the
inf ormation display indicates the
current level. You will hear a tonewhen you reach the maximum or
minimum brightness. The display
returns to the odometer 5 seconds
af ter you stop adjusting the
brightness.
To reduce glare at night, the
instrument panel illumination dims
when you turn the light switch to the
or position.
The center of each meter (upper and
lower) illuminates with reduced
brightness when you unlock and
open the driver’s door, and then goes
back to the selected brightness when
you turn the ignition switch to the
ON (II) position.
If you insert the key but do not turn
the ignition switch to the ON (II)
position, the illumination turns of f in
about 10 seconds.
Daytime Running L ights Instrument Panel Brightness
Headlights, Instrument Panel Brightness
Inst rument s and Cont rols
73
CONTROL BUTTONS
�����—�����—�
�
�y�
����
����
���y���
�(�+���������y���������y
Page 65 of 303

positio")
�´�µ
With the headlight switch of f or in
the position, the high beam
headlights and the high beam
indicator come on with reduced
brightness when you turn the
ignition switch to the ON (II)
position and release the parking
brake. They remain on until you turn
the ignition switch of f , even if you
set the parking brake.
The headlights revert to normal
operation when you turn them on
with the switch. The buttons under the lef t side vent
control the brightness of the
instrument panel. Push the or
button to adjust the brightness.
Separate adjustments can be made
when the headlights are on and of f .
There are six brightness levels.
When you push either button, the
inf ormation display indicates the
current level. You will hear a tonewhen you reach the maximum or
minimum brightness. The display
returns to the odometer 5 seconds
af ter you stop adjusting the
brightness.
To reduce glare at night, the
instrument panel illumination dims
when you turn the light switch to the
or position.
The center of each meter (upper and
lower) illuminates with reduced
brightness when you unlock and
open the driver’s door, and then goes
back to the selected brightness when
you turn the ignition switch to the
ON (II) position.
If you insert the key but do not turn
the ignition switch to the ON (II)
position, the illumination turns of f in
about 10 seconds.
Daytime Running L ights Instrument Panel Brightness
Headlights, Instrument Panel Brightness
Inst rument s and Cont rols
73
CONTROL BUTTONS
�����—�����—�
�
�y�
����
����
���y���
�(�+���������y���������y

 position. This
inf ormation helps to keep you")
 position. This
inf ormation helps to keep you")