2008 GMC SIERRA manual radio set
[x] Cancel search: manual radio setPage 261 of 578

Setting the Tone
(Bass/Midrange/Treble)
BASS/MID/TREB (Bass, Midrange, or Treble):To
adjust bass, midrange, or treble, press the
fknob until
the tone control labels display. Continue pressing to
highlight the desired label, or press the pushbutton
positioned under the desired label. Turn the
fknob
clockwise or counterclockwise to adjust the highlighted
setting. You can also adjust the highlighted setting
by pressing either SEEK arrow,
\FWD (forward), or
sREV (reverse) button until the desired levels
are obtained. If a station’s frequency is weak or if there
is static, decrease the treble.
To quickly adjust bass, midrange, or treble to the middle
position, press the pushbutton positioned under the
BASS, MID, or TREB label for more than two seconds.
A beep sounds and the level adjusts to the middle
position.
To quickly adjust all tone and speaker controls to the
middle position, press the
fknob for more than
two seconds until a beep sounds.
EQ (Equalization):Press this button to choose bass
and treble equalization settings designed for different
types of music. The choices are pop, rock, country, talk,
jazz, and classical. Selecting MANUAL or changingbass or treble, returns the EQ to the manual bass and
treble settings.
Unique EQ settings can be saved for each source.
If your radio has a Bose
®audio system, the EQ settings
are either MANUAL or TALK.
Adjusting the Speakers (Balance/Fade)
(AM-FM Radio)
`
(Balance/Fade):To adjust the balance or fade,
press this button or the tune knob until the desired
speaker control label displays. Turn the tune knob
clockwise or counterclockwise to adjust the setting.
The setting can also be adjusted by pressing the
seek arrows.
Adjusting the Speakers (Balance/Fade)
BAL/FADE (Balance/Fade):To adjust balance or
fade, press the
fknob until the speaker control labels
display. Continue pressing to highlight the desired
label, or press the pushbutton positioned under the
desired label. Turn the
fknob clockwise or
counterclockwise to adjust the highlighted setting. You
can also adjust the highlighted setting by pressing either
SEEK arrow,
\FWD, orsREV button until the
desired levels are obtained.
3-89
Page 269 of 578

Using the DVD Player
The DVD player is controlled by the buttons on the
remote control, or by the RSA system, or by the buttons
on the radio faceplate. See “Remote Control”, under
Rear Seat Entertainment (RSE) System on page 3-113
andRear Seat Audio (RSA) on page 3-122for more
information.
The DVD player is only compatible with DVDs of the
appropriate region code that is printed on the jacket of
most DVDs.
The DVD slot of the radio is compatible with most
audio CDs, CD-R, CD-RW, DVD-Video, DVD-Audio,
DVD-R/RW, DVD+R/RW media along with MP3
and WMA formats.
If an error message displays on the video screen or the
radio, see “DVD Display Error Messages” under,
Rear Seat Entertainment (RSE) System on page 3-113
and “DVD Radio Error Messages” in this section for
more information.
Playing a DVD
DVD/CD AUX (Auxiliary):Press this button to cycle
through DVD, CD, or Auxiliary when listening to
the radio. The DVD/CD text label and a message
showing track or chapter number displays when a disc
is in either slot. Press this button again and the
system automatically searches for an auxiliary inputdevice, such as a portable audio player. If a portable
audio player is not connected, “No Aux Input Device”
displays. If a disc is in both the DVD slot and the CD slot
the DVD/CD AUX button cycles between the two
sources and not indicate “No Aux Input Device”. If a
front auxiliary device is connected, the DVD/CD AUX
button cycles through all available options, such
as: DVD slot, CD slot, Front Auxiliary, and Rear Auxiliary
(if available). See “Using the Auxiliary Input Jack(s)”
later in this section, or “Audio/Video (A/V) Jacks” under,
Rear Seat Entertainment (RSE) System on page 3-113
for more information.
O(Power):Press to turn the radio on or off. Turn this
knob clockwise or counterclockwise to increase or
decrease the volume. Press and hold for more than
two seconds to turn off the entire radio and Rear Seat
Entertainment (RSE) system and to start the parental
control feature. Parental control prevents the rear
seat occupant from operating the Rear Seat Audio
(RSA) system or remote control.
A lock symbol displays next to the clock display. The
parental control feature remains on until you press and
hold this knob for more than two seconds again, or
until the driver turns the ignition off and exits the vehicle.
f(Tune):Turn to change tracks on a CD or DVD,
to manually tune a radio station, or to change clock or
date settings, while in the clock or date setting mode.
3-97
Page 284 of 578

Channel Off Air:This channel is not currently in
service. Tune to another channel.
Channel Unavail:This previously assigned channel is
no longer assigned. Tune to another station. If this
station was one of the presets, choose another station
for that preset button.
No Artist Info:No artist information is available at this
time on this channel. The system is working properly.
No Title Info:No song title information is available
at this time on this channel. The system is working
properly.
No CAT Info:No category information is available at
this time on this channel. The system is working
properly.
No Information:No text or informational messages are
available at this time on this channel. The system is
working properly.
CAT Not Found:There are no channels available for
the selected category. The system is working properly.
XM TheftLocked:The XM receiver in the vehicle
could have previously been in another vehicle. For
security purposes, XM™ receivers cannot be swapped
between vehicles. If this message appears after
having your vehicle serviced, check with your
dealer/retailer.XM Radio ID:If tuned to channel 0, this message
alternates with the XM Radio eight digit radio ID label.
This label is needed to activate the service.
Unknown:If this message is received when tuned to
channel 0, there could be a receiver fault. Consult
with your dealer/retailer.
Check XM Receivr:If this message does not clear
within a short period of time, the receiver could have a
fault. Consult with your dealer/retailer.
XM Not Available:If this message does not clear
within a short period of time, the receiver could have a
fault. Consult with your dealer/retailer.
Navigation/Radio System
Your vehicle may have a navigation radio system.
The navigation system has built-in features intended to
minimize driver distraction. Technology alone, no
matter how advanced, can never replace your own
judgment. See the Navigation System manual for some
tips to help you reduce distractions while driving.
3-112
Page 439 of 578

3. Get the vehicles close enough so the jumper cables
can reach, but be sure the vehicles are not touching
each other. If they are, it could cause an unwanted
ground connection. You would not be able to start
your vehicle, and the bad grounding could damage
the electrical systems.
To avoid the possibility of the vehicles rolling, set
the parking brake �rmly on both vehicles involved in
the jump start procedure. Put the automatic
transmission in PARK (P) or a manual transmission
in NEUTRAL before setting the parking brake.
If you have a four-wheel-drive vehicle, be sure the
transfer case is in a drive gear, not in NEUTRAL.
Notice:If you leave your radio or other accessories
on during the jump starting procedure, they could
be damaged. The repairs would not be covered
by your warranty. Always turn off your radio and
other accessories when jump starting your vehicle.
4. Turn off the ignition on both vehicles. Unplug
unnecessary accessories plugged into the cigarette
lighter or the accessory power outlets. Turn off the
radio and all the lamps that are not needed. This will
avoid sparks and help save both batteries. And it
could save the radio!5. Open the hood on the other vehicle and locate the
positive (+) and negative (−) terminal locations on
that vehicle.
The positive (+) terminal, is located under a red
plastic cover at the positive battery post. To uncover
the positive (+) terminal, open the red plastic cover.
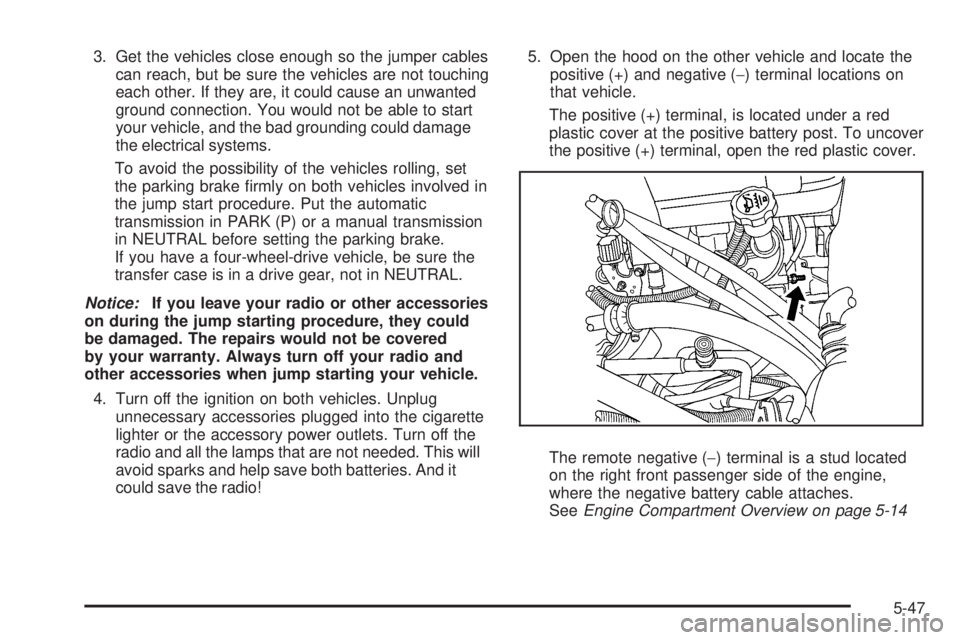
The remote negative (−) terminal is a stud located
on the right front passenger side of the engine,
where the negative battery cable attaches.
SeeEngine Compartment Overview on page 5-14
5-47
Page 562 of 578

Current and Past Model Order Forms
Technical Service Bulletins and Manuals are available
for current and past model GM vehicles. To request
an order form, specify year and model name of
the vehicle.
ORDER TOLL FREE: 1-800-551-4123
Monday-Friday 8:00 AM - 6:00 PM
Eastern Time
For Credit Card Orders Only
(VISA-MasterCard-Discover), visit Helm, Inc.
on the World Wide Web at: www.helminc.com
Or you can write to:
Helm, Incorporated
P.O. Box 07130
Detroit, MI 48207
Prices are subject to change without notice and without
incurring obligation. Allow ample time for delivery.
Note to Canadian Customers: All listed prices are
quoted in U.S. funds. Canadian residents are to make
checks payable in U.S. funds.
Vehicle Data Recording and
Privacy
Your GM vehicle has a number of sophisticated
computers that record information about the vehicle’s
performance and how it is driven. For example,
your vehicle uses computer modules to monitor and
control engine and transmission performance, to monitor
the conditions for airbag deployment and deploy
airbags in a crash and, if so equipped, to provide
antilock braking to help the driver control the vehicle.
These modules may store data to help your
dealer/retailer technician service your vehicle. Some
modules may also store data about how you operate the
vehicle, such as rate of fuel consumption or average
speed. These modules may also retain the owner’s
personal preferences, such as radio pre-sets, seat
positions, and temperature settings.
7-16
Page 566 of 578

Audio System (cont.)
Navigation/Radio System, see Navigation
Manual.................................................3-112
Radio Reception........................................3-125
Rear Seat Audio (RSA)...............................3-122
Setting the Clock.........................................3-81
Theft-Deterrent Feature...............................3-123
XM™ Satellite Radio Antenna System...........3-126
Audio System(s).............................................3-84
Automatic Headlamp System............................3-19
Automatic Transmission
Fluid..................................................5-22, 5-25
Operation...................................................2-28
Auxiliary Roof Mounted Lamp Switch.................3-20
B
Battery..........................................................5-45
Electric Power Management..........................3-22
Run-Down Protection...................................3-23
Brake
Emergencies................................................ 4-5
Brakes..........................................................5-42
System Warning Light..................................3-44
Braking........................................................... 4-3
Braking in Emergencies..................................... 4-5
Break-In, New Vehicle.....................................2-22
Bulb Replacement...........................................5-59Center High-Mounted Stoplamp (CHMSL) and
Cargo Lamp............................................5-61
Halogen Bulbs............................................5-59
Headlamp Aiming........................................5-56
Headlamps.................................................5-60
License Plate Lamps....................................5-64
Pickup Box Identi�cation and Fender
Marker Lamps.........................................5-62
Replacement Bulbs......................................5-65
Taillamps, Turn Signal, Stoplamps and
Back-up Lamps........................................5-62
Buying New Tires...........................................5-84
C
Calibration.............................................2-55, 2-57
California Fuel.................................................. 5-7
California Perchlorate Materials Requirements....... 5-5
California Proposition 65 Warning....................... 5-4
Canadian Owners................................................ ii
Capacities and Speci�cations..........................5-130
Carbon Monoxide...................2-14, 2-53, 4-31, 4-55
Care of
Safety Belts..............................................5-115
Cargo Lamp...................................................3-22
Cargo Management System.............................2-78
CD, MP3 ............................................3-102, 3-106
Center Console Storage Area...........................2-76
2
Page 574 of 578

P
Paint, Damage..............................................5-119
Park Aid........................................................2-63
Park Brake....................................................2-49
Park (P)
Shifting Into................................................2-50
Shifting Out of............................................2-52
Parking
Assist........................................................2-63
Over Things That Burn.................................2-53
Passenger Airbag Status Indicator.....................3-41
Passenger Sensing System..............................1-80
Passing.........................................................4-11
PASS-Key
®III+..............................................2-20
PASS-Key®III+ Operation................................2-20
Perchlorate Materials Requirements, California...... 5-5
Pickup Conversion to Chassis Cab....................4-50
Power
Door Locks.................................................2-10
Electrical System.......................................5-123
Lumbar Controls........................................... 1-5
Retained Accessory (RAP)............................2-23
Seat............................................................ 1-4
Sliding Rear Window....................................2-17
Steering Fluid.............................................5-39
Windows....................................................2-16
Privacy..........................................................7-16
Event Data Recorders..................................7-17
Navigation System.......................................7-18Privacy (cont.)
OnStar.......................................................7-18
Radio Frequency Identi�cation.......................7-18
Programmable Automatic Door Locks.................2-11
Puddle Lamps................................................3-20
R
Radio Frequency Identi�cation (RFID), Privacy....7-18
Radios..........................................................3-80
Radio(s)........................................................3-84
Radios
Navigation/Radio System, see Navigation
Manual.................................................3-112
Rear Seat Audio........................................3-122
Reception.................................................3-125
Setting the Clock.........................................3-81
Theft-Deterrent..........................................3-123
Rainsense™ II Wipers.....................................3-12
Reading Lamps..............................................3-22
Rear Axle......................................................5-51
Locking........................................................ 4-5
Rear Door Security Locks................................2-11
Rear Doors....................................................2-13
Rear Seat Armrest..........................................2-77
Rear Seat Audio (RSA)..................................3-122
Rear Seat Entertainment System.....................3-113
Rear Seat Operation...............................1-12, 1-13
10