2008 GMC SIERRA lighting
[x] Cancel search: lightingPage 98 of 578

SeeDIC Vehicle Customization (With DIC Buttons) on
page 3-72for additional information.
Pressing
Qwill arm the content theft-deterrent system.
SeeContent Theft-Deterrent on page 2-18.
"(Unlock):Press"to unlock the driver’s door. If"is
pressed again within three seconds, all remaining
doors will unlock.
If it is dark enough outside, your interior lamps will
come on and stay on for 20 seconds or until the ignition
is turned on. If enabled through the DIC, the turn
signal lamps will �ash twice to indicate unlocking has
occurred. SeeDIC Vehicle Customization (With
DIC Buttons) on page 3-72. If enabled through the DIC,
the exterior lights will turn on brie�y if it is dark
enough outside. See “APPROACH LIGHTING” under
DIC Vehicle Customization (With DIC Buttons) on
page 3-72.
Pressing
"on the RKE transmitter will disarm the
content theft-deterrent system. SeeContent
Theft-Deterrent on page 2-18.
L(Vehicle Locator/Panic Alarm):Press and
release
Lto locate your vehicle. The turn signal lamps
will �ash and the horn will sound three times.
Press and hold
Lfor more than two seconds to
activate the panic alarm. The turn signal lamps will �ash
and the horn will sound repeatedly for 30 seconds.
The alarm will turn off when the ignition is moved
to ON/RUN or
Lis pressed again. The ignition must
be in LOCK/OFF for the panic alarm to work.
Matching Transmitter(s) to Your
Vehicle
Each RKE transmitter is coded to prevent another
transmitter from unlocking your vehicle. If a transmitter
is lost or stolen, a replacement can be purchased
through your dealer/retailer. All transmitters need to be
re-coded to match the new transmitter. The lost
transmitter will no longer work after the new transmitters
are re-coded. The vehicle can have a maximum of
eight transmitters matched to it. See “Relearn Remote
Key” underDIC Operation and Displays (With DIC
Buttons) on page 3-55orDIC Operation and Displays
(Without DIC Buttons) on page 3-60for instructions
on how to match RKE transmitters to your vehicle.
2-6
Page 160 of 578

Location information about your vehicle is only available
if the GPS satellite signals are unobstructed and
available.
Your vehicle must have a working electrical system
(including adequate battery power) for the OnStar
equipment to operate. There are other problems OnStar
cannot control that may prevent OnStar from providing
OnStar service to you at any particular time or place.
Some examples are damage to important parts of your
vehicle in an accident, hills, tall buildings, tunnels,
weather or wireless phone network congestion.
Your Responsibility
Increase the radio volume if you cannot hear the OnStar
advisor. If the light next to the OnStar buttons is red,
this means that your system is not functioning properly
and should be checked by your dealer/retailer. If the
light appears clear (no light is appearing), your OnStar
subscription has expired. You can always press the
OnStar button to con�rm that your OnStar equipment
is active.
Universal Home Remote
System
Universal Home Remote System
The Universal Home Remote System provides a way to
replace up to three hand-held Radio-Frequency (RF)
transmitters used to activate devices such as garage
door openers, security systems, and home lighting.
This device complies with Part 15 of the FCC Rules.
Operation is subject to the following two conditions:
1. This device may not cause harmful interference.
2. This device must accept any interference received,
including interference that may cause undesired
operation.
This device complies with RSS-210 of Industry Canada.
Operation is subject to the following two conditions:
1. This device may not cause interference.
2. This device must accept any interference received,
including interference that may cause undesired
operation of the device.
Changes or modi�cations to this system by other than
an authorized service facility could void authorization to
use this equipment.
2-68
Page 173 of 578

Instrument Panel Overview...............................3-4
Instrument Panel Overview
(Base/Uplevel version).................................3-4
Instrument Panel Overview
(Premium version).......................................3-6
Hazard Warning Flashers................................3-8
Other Warning Devices...................................3-8
Horn.............................................................3-8
Tilt Wheel.....................................................3-9
Turn Signal/Multifunction Lever.........................3-9
Turn and Lane-Change Signals.......................3-10
Headlamp High/Low-Beam Changer.................3-11
Flash-to-Pass...............................................3-11
Windshield Wipers........................................3-12
Rainsense™ II Wipers...................................3-12
Windshield Washer.......................................3-13
Cruise Control..............................................3-14
Exterior Lamps.............................................3-17
Headlamps on Reminder................................3-18
Daytime Running Lamps (DRL).......................3-18
Automatic Headlamp System..........................3-19
Puddle Lamps..............................................3-20
Fog Lamps..................................................3-20
Auxiliary Roof Mounted Lamp.........................3-20Instrument Panel Brightness...........................3-21
Dome Lamps...............................................3-21
Dome Lamp Override....................................3-21
Entry Lighting...............................................3-21
Exit Lighting.................................................3-21
Reading Lamps............................................3-22
Cargo Lamp.................................................3-22
Electric Power Management...........................3-22
Battery Run-Down Protection..........................3-23
Accessory Power Outlet(s).............................3-23
Ashtray(s) and Cigarette Lighter......................3-24
Climate Controls............................................3-25
Climate Control System
(With Air Conditioning)...............................3-25
Climate Control System (Heater Only)..............3-27
Dual Automatic Climate Control System...........3-28
Outlet Adjustment.........................................3-33
Warning Lights, Gages, and Indicators............3-34
Instrument Panel Cluster................................3-35
Speedometer and Odometer...........................3-36
Trip Odometer..............................................3-36
Tachometer.................................................3-36
Safety Belt Reminders...................................3-37
Section 3 Instrument Panel
3-1
Page 191 of 578

When it begins to get dark, the automatic headlamp
system will switch from DRL to the headlamps.
To turn off the DRL lamps, turn the exterior lamps
control to the OFF position and then release. For
vehicles �rst sold in Canada, the transmission must be
in the PARK (P) position, before the DRL lamps can
be turned off.
Automatic Headlamp System
When it is dark enough outside, the automatic headlamp
system will turn on the headlamps at the normal
brightness, along with the taillamps, sidemarker, parking
lamps, and the instrument panel lights. The radio
lights will also be dim.
To turn off the automatic headlamp system, turn the
exterior lamps switch to the off position and then release
it. For vehicles �rst sold in Canada, the transmission
must be in the PARK (P) position, before the automatic
headlamp system can be turned off.
The vehicle has a light sensor located on the top of the
instrument panel in the defroster grille that regulates
when the automatic headlamps turn on. Be sure it is not
covered, or the headlamps will come on whenever
the ignition is on.
The system may also turn on the headlamps when
driving through a parking garage, heavy overcast
weather, or a tunnel. This is normal.There is a delay in the transition between the daytime
and nighttime operation of the Daytime Running
Lamps (DRL) and the automatic headlamp systems so
that driving under bridges or bright overhead street
lights does not affect the system. The DRL and
automatic headlamp system will only be affected when
the light sensor detects a change in lighting lasting
longer than the delay.
If the vehicle is started in a dark garage, the automatic
headlamp system will come on immediately. Once
the vehicle leaves the garage, it takes approximately
one minute for the automatic headlamp system to
change to DRL if it is bright enough outside. During that
delay, the instrument panel cluster may not be as
bright as usual. Make sure the instrument panel
brightness control is in the full bright position. See
Instrument Panel Brightness on page 3-21.
To idle the vehicle with the automatic headlamp system
off, turn the control to the off position.
The headlamps will also stay on after you exit the
vehicle. This feature can be programmed using the
Driver Information Center (DIC). SeeDIC Vehicle
Customization (With DIC Buttons) on page 3-72.
The regular headlamp system can be turned on
when needed.
3-19
Page 193 of 578

If your vehicle has this button, your vehicle may have
the snow plow prep package. For further information see
Adding a Snow Plow or Similar Equipment on
page 4-43.
Instrument Panel Brightness
D(Instrument Panel Brightness):This feature
controls the brightness of the instrument panel lights and
is located next to the exterior lamp control.
Push the knob to extend out and then it can be turned.
Turn the knob clockwise or counterclockwise to
brighten or dim the instrument panel lights. Turning the
knob to the farthest clockwise position turns on the
dome lamps.
Dome Lamps
The dome lamps come on when any door is opened.
They turn off after all the doors are closed.
The dome lamps can also be turned on by turning the
instrument panel brightness knob, located next to
the exterior lamps control, clockwise to the farthest
position. In this position, the dome lamps remain
on whether a door is opened or closed.
Dome Lamp Override
The dome lamp override button is located next to the
exterior lamps control.
k(Dome Off):Press the button in and the dome
lamps remain off when a door is opened. Press
the button again to return it to the extended position so
that the dome lamps come on when a door is opened.
Entry Lighting
Your vehicle has an illuminated entry feature.
When the doors are opened, the dome lamps will come
on if the dome override button is in the extended
position. If the dome override button is pressed in, the
lamps will not come on.
Exit Lighting
The interior lamps come on when the key is removed
from the ignition. They turn off automatically in
20 seconds. The lights do not come on if the dome
override button is pressed in.
3-21
Page 248 of 578

EXIT LIGHTING
This feature allows you to select the amount of time you
want the exterior lamps to remain on when it is dark
enough outside. This happens after the key is turned
from ON/RUN to LOCK/OFF.
Press the customization button until EXIT LIGHTING
appears on the DIC display. Press the set/reset button
once to access the settings for this feature. Then
press the customization button to scroll through the
following settings:
OFF:The exterior lamps will not turn on.
30 SECONDS (default):The exterior lamps will stay on
for 30 seconds.
1 MINUTE:The exterior lamps will stay on for
one minute.
2 MINUTES:The exterior lamps will stay on for
two minutes.
NO CHANGE:No change will be made to this feature.
The current setting will remain.
To select a setting, press the set/reset button while the
desired setting is displayed on the DIC.
APPROACH LIGHTING
This feature allows you to select whether or not to have
the exterior lights turn on brie�y during low light
periods after unlocking the vehicle using the Remote
Keyless Entry (RKE) transmitter.
Press the customization button until APPROACH
LIGHTING appears on the DIC display. Press the
set/reset button once to access the settings for
this feature. Then press the customization button to
scroll through the following settings:
OFF:The exterior lights will not turn on when you
unlock the vehicle with the RKE transmitter.
ON (default):If it is dark enough outside, the exterior
lights will turn on brie�y when you unlock the vehicle
with the RKE transmitter.
The lights will remain on for 20 seconds or until the lock
button on the RKE transmitter is pressed, or the
vehicle is no longer off. SeeRemote Keyless Entry
(RKE) System Operation on page 2-5for more
information.
NO CHANGE:No change will be made to this feature.
The current setting will remain.
To select a setting, press the set/reset button while the
desired setting is displayed on the DIC.
3-76
Page 516 of 578

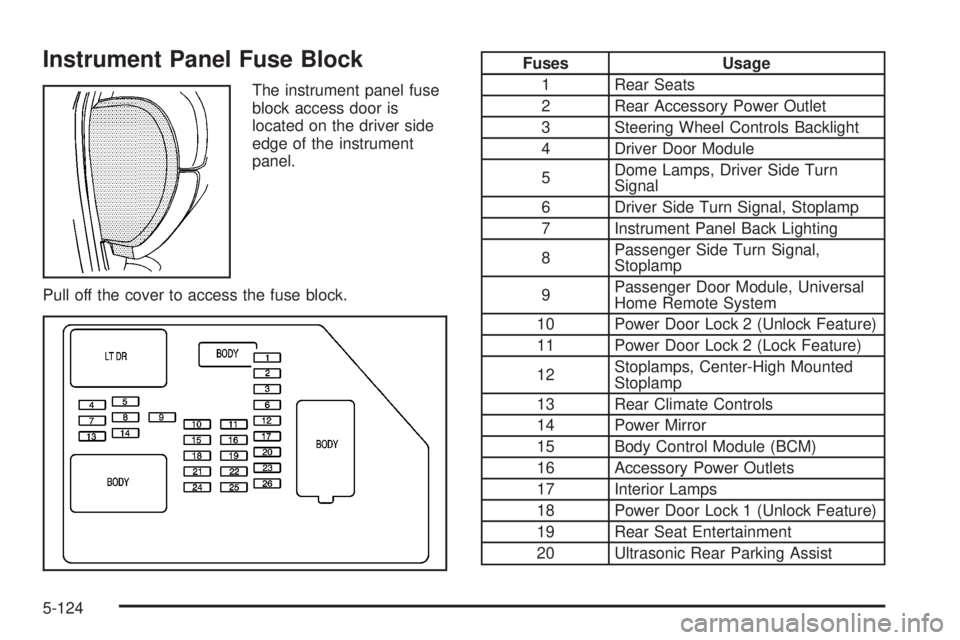
Instrument Panel Fuse Block
The instrument panel fuse
block access door is
located on the driver side
edge of the instrument
panel.
Pull off the cover to access the fuse block.
Fuses Usage
1 Rear Seats
2 Rear Accessory Power Outlet
3 Steering Wheel Controls Backlight
4 Driver Door Module
5Dome Lamps, Driver Side Turn
Signal
6 Driver Side Turn Signal, Stoplamp
7 Instrument Panel Back Lighting
8Passenger Side Turn Signal,
Stoplamp
9Passenger Door Module, Universal
Home Remote System
10 Power Door Lock 2 (Unlock Feature)
11 Power Door Lock 2 (Lock Feature)
12Stoplamps, Center-High Mounted
Stoplamp
13 Rear Climate Controls
14 Power Mirror
15 Body Control Module (BCM)
16 Accessory Power Outlets
17 Interior Lamps
18 Power Door Lock 1 (Unlock Feature)
19 Rear Seat Entertainment
20 Ultrasonic Rear Parking Assist
5-124
Page 553 of 578

Roadside Assistance Program
For vehicles purchased in the U.S. call,
1-800-GMC-8782 (1-800-462-8782); (Text
telephone (TTY): 1-888-889-2438).
For vehicles purchased in Canada, call1-800-268-6800.
Service is available 24 hours a day, 365 days a year.
As the owner of a new GMC vehicle, you are
automatically enrolled in the GMC Roadside
Assistance program.
Who is Covered?
Roadside Assistance coverage is for the vehicle
operator, regardless of ownership. In Canada,
a person driving the vehicle without the consent
of the owner is not eligible for coverage.
Services Provided
The following services are provided in the U.S. and
Canada up to 5 years/100,000 miles (160 000 km),
whichever occurs �rst, and, in Canada only, up
to a maximum coverage of $100.
Fuel Delivery:Delivery of enough fuel for the
vehicle to get to the nearest service station
(approximately $5 in Canada). In Canada, service
to provide diesel may be restricted. For safety
reasons, propane and other alternative fuels will
not be provided through this service.
Lock-out Service:Lock-out service will be covered
at no charge if you are unable to gain entry into
your vehicle. A remote unlock may be available if
you have an active OnStar
®subscription. To ensure
security, the driver must present personal
identi�cation before lock-out service is provided. In
Canada, the vehicle registration is also required.
Emergency Tow From a Public Roadway or
Highway:Tow to the nearest dealership for warranty
service or in the event of a vehicle-disabling crash.
Winch-out assistance is provided when the vehicle is
mired in sand, mud, or snow.
Flat Tire Change:Installation of a spare tire in good
condition, when equipped and properly in�ated, is
covered at no charge. The customer is responsible
for the repair or replacement of the tire if not covered
by a warrantable failure.
Jump Start:A battery jump start is covered at no
charge if the vehicle does not start.
Trip Routing Service:Upon request, Roadside
Assistance will send you detailed, computer
personalized maps, highlighting your choice of either
the most direct route or the most scenic route to your
destination, anywhere in North America, along with
helpful travel information pertaining to your trip.
Please allow three weeks before your planned
departure date. In Canada, trip routing requests will
be limited to six per calendar year.
7-7