Page 350 of 578

4. Securely attach the vehicle being towed to the tow
vehicle.
{CAUTION:
Shifting a four-wheel-drive vehicle’s transfer
case into NEUTRAL can cause your vehicle to
roll even if the transmission is in PARK (P).
You or others could be injured. Make sure the
parking brake is �rmly set before you shift the
transfer case to NEUTRAL.
5. Shift the transfer case to NEUTRAL. See
Four-Wheel Drive on page 2-36for the proper
procedure to select the neutral position for
your vehicle.
6. Release the parking brake only after the vehicle
being towed is �rmly attached to the towing
vehicle.
7. Turn the ignition to LOCK/OFF.
Dolly Towing
Front Towing (Front Wheels Off the
Ground)
Two-Wheel-Drive Vehicles
Notice:If you tow a two-wheel-drive vehicle with
the rear wheels on the ground, the transmission
could be damaged. The repairs would not be
covered by your warranty. Never tow your vehicle
with the rear wheels on the ground.
Two-wheel-drive vehicles should not be towed with the
rear wheels on the ground. Two-wheel-drive
transmissions have no provisions for internal lubrication
while being towed.
To dolly tow a two-wheel-drive vehicle, you must tow
the vehicle with the rear wheels on the dolly. See “Rear
Towing (Rear Wheels Off the Ground)” later in this
section for more information.
4-52
Page 351 of 578
Four-Wheel-Drive Vehicles
Use the following procedure to tow your vehicle:
1. Drive the vehicle up onto the tow dolly.
2. Shift the transmission to PARK (P).
3. Turn the engine off, but leave the ignition on.
4. Firmly set the parking brake.
5. Securely attach the vehicle being towed to the
tow dolly.
{CAUTION:
Shifting a four-wheel-drive vehicle’s transfer
case into NEUTRAL can cause your vehicle to
roll even if the transmission is in PARK (P).
You or others could be injured. Make sure the
parking brake is �rmly set before you shift the
transfer case to NEUTRAL.
6. Shift the transfer case to NEUTRAL. See
Four-Wheel Drive on page 2-36for the proper
procedure to select the neutral position for
your vehicle.
7. Release the parking brake only after the vehicle
being towed is �rmly attached to the towing
vehicle.
8. Turn the ignition to LOCK/OFF.
4-53
Page 352 of 578

Rear Towing (Rear Wheels Off the
Ground)
Two-Wheel-Drive Vehicles
Use the following procedure to tow your vehicle from
the rear:
1. Drive the vehicle onto the dolly.
2. Firmly set the parking brake. SeeParking Brake on
page 2-49.
3. Put the transmission in PARK (P).
4. Follow the dolly manufacturer’s instructions to attach
and secure the vehicle being towed to the dolly and
then the loaded dolly to the tow vehicle. Make sure
the wheels are straight before towing.
Use an adequate clamping device to ensure that
the front wheels are locked into the straight position.
5. Release the parking brake only after the vehicle
being towed is �rmly attached to the tow vehicle.
6. Turn the ignition to LOCK/OFF.
Four-Wheel-Drive Vehicles
Use the following procedure to tow your vehicle from
the rear:
1. Drive the vehicle onto the dolly.
2. Firmly set the parking brake. SeeParking Brake on
page 2-49.
3. Put the transmission in PARK (P).
4. Follow the dolly manufacturer’s instructions to attach
and secure the vehicle being towed to the dolly and
then the loaded dolly to the tow vehicle.
Use an adequate clamping device to ensure that
the front wheels are locked into the straight position.
{CAUTION:
Shifting a four-wheel-drive vehicle’s transfer
case into NEUTRAL can cause your vehicle to
roll even if the transmission is in PARK (P).
You or others could be injured. Make sure the
parking brake is �rmly set before you shift the
transfer case to NEUTRAL.
5. Shift the transfer case to NEUTRAL. See
Four-Wheel Drive on page 2-36.
4-54
Page 387 of 578

Parking on Hills
{CAUTION:
You really should not park your vehicle, with a
trailer attached, on a hill. If something goes
wrong, your rig could start to move. People
can be injured, and both your vehicle and the
trailer can be damaged.
But if you ever have to park your rig on a hill, here’s
how to do it:
1. Apply your regular brakes, but don’t shift into
PARK (P) yet.
2. Have someone place chocks under the trailer
wheels.
3. When the wheel chocks are in place, release the
regular brakes until the chocks absorb the load.
4. Reapply the regular brakes. Then apply your
parking brake and shift into PARK (P).
5. If you have a four-wheel-drive vehicle, be sure the
transfer case is in a drive gear and not in
NEUTRAL.
6. Release the regular brakes.
{CAUTION:
It can be dangerous to get out of your vehicle
if the shift lever is not fully in PARK (P) with
the parking brake �rmly set. Your vehicle
can roll.
If you have left the engine running, the vehicle
can move suddenly. You or others could be
injured. To be sure your vehicle will not move,
even when you are on fairly level ground, use
the steps that follow.
Always put the shift lever fully in PARK (P)
with the parking brake �rmly set.
If the transfer case on four-wheel-drive vehicles
is in NEUTRAL, your vehicle will be free to roll,
even if your shift lever is in PARK (P). So, be
sure the transfer case is in a drive gear — not in
NEUTRAL.
4-89
Page 439 of 578

3. Get the vehicles close enough so the jumper cables
can reach, but be sure the vehicles are not touching
each other. If they are, it could cause an unwanted
ground connection. You would not be able to start
your vehicle, and the bad grounding could damage
the electrical systems.
To avoid the possibility of the vehicles rolling, set
the parking brake �rmly on both vehicles involved in
the jump start procedure. Put the automatic
transmission in PARK (P) or a manual transmission
in NEUTRAL before setting the parking brake.
If you have a four-wheel-drive vehicle, be sure the
transfer case is in a drive gear, not in NEUTRAL.
Notice:If you leave your radio or other accessories
on during the jump starting procedure, they could
be damaged. The repairs would not be covered
by your warranty. Always turn off your radio and
other accessories when jump starting your vehicle.
4. Turn off the ignition on both vehicles. Unplug
unnecessary accessories plugged into the cigarette
lighter or the accessory power outlets. Turn off the
radio and all the lamps that are not needed. This will
avoid sparks and help save both batteries. And it
could save the radio!5. Open the hood on the other vehicle and locate the
positive (+) and negative (−) terminal locations on
that vehicle.
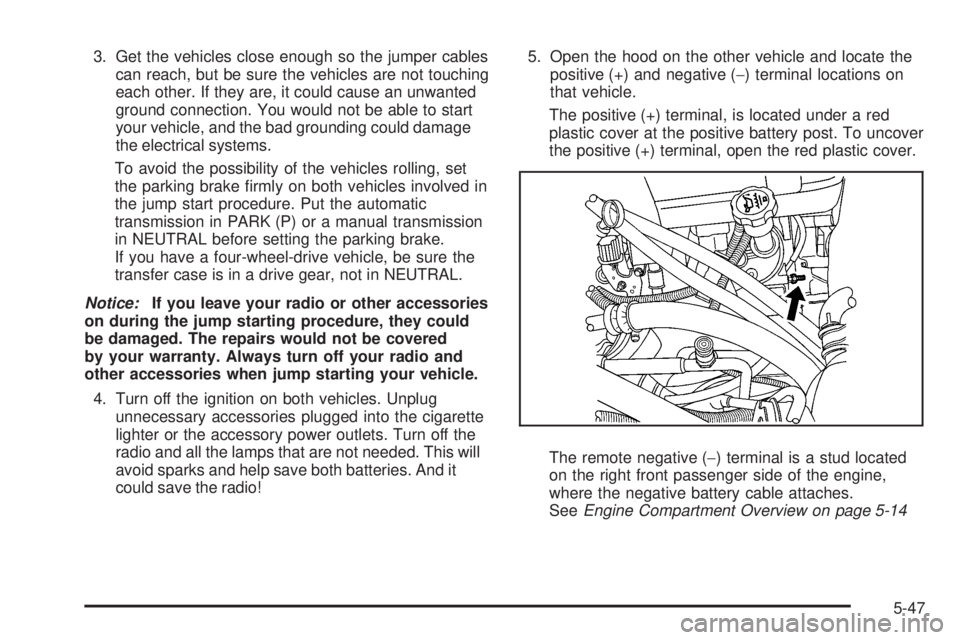
The positive (+) terminal, is located under a red
plastic cover at the positive battery post. To uncover
the positive (+) terminal, open the red plastic cover.
The remote negative (−) terminal is a stud located
on the right front passenger side of the engine,
where the negative battery cable attaches.
SeeEngine Compartment Overview on page 5-14
5-47
Page 444 of 578

To get an accurate reading, the vehicle should be on a
level surface.
For all 4.3L, 4.8L and 5.3L 1500 Series applications,
the proper level is 0.04 inches to 0.75 inches
(1.0mm to 19.0mm) below the bottom of the �ller
hole, located on the rear axle. Add only enough �uid
to reach the proper level.
For all 6.0L 1500 Series applications, the
proper level is from 0.6 inches to 1.6 inches
(15mm to 40mm) below the bottom of the �ller
plug hole, located on the rear axle. Add only
enough �uid to reach the proper level.
For all 6.0L 2500HD Series applications, the proper
level is from 0 to 0.5 inches (0mm to 13mm) below
the bottom of the �ller plug hole, located on the rear
axle. Add only enough �uid to reach the proper level.
For all 6.6L DURAMAX®Diesel 2500HD Series
applications and all 3500 Series applications, the
proper level is from 0.6 inches to 0.8 inches
(17mm to 21mm) below the bottom of the �ller plug
hole, located on the rear axle. Add only enough �uid
to reach the proper level.
What to Use
Refer to the Maintenance Schedule to determine what
kind of lubricant to use. SeeRecommended Fluids
and Lubricants on page 6-15.
Four-Wheel Drive
Lubricant checks in this section also apply to these
vehicles.
Transfer Case
When to Check Lubricant
It is not necessary to regularly check transfer case �uid
unless you suspect there is a leak, or you hear an
unusual noise. A �uid loss could indicate a problem.
Have it inspected and repaired. All Other Series and Engines
5-52
Page 445 of 578
How to Check Lubricant
A. Fill Plug
B. Drain PlugA. Fill Plug
B. Drain Plug Electric Shift Transfer Case
Manual Shift Transfer Case
5-53
Page 446 of 578
A. Fill Plug
B. Drain Plug
To get an accurate reading, the vehicle should be on a
level surface.
If the level is below the bottom of the �ller plug hole,
located on the transfer case, you will need to add some
lubricant. Add enough lubricant to raise the level to the
bottom of the �ller plug hole. Use care not to overtighten
the plug.
When to Change Lubricant
Refer to the Maintenance Schedule to determine how
often to change the lubricant. SeeScheduled
Maintenance (Gasoline Engine) on page 6-4.
What to Use
Refer to the Maintenance Schedule to determine what
kind of lubricant to use. SeeRecommended Fluids
and Lubricants on page 6-15.
Front Axle
When to Check and Change Lubricant
It is not necessary to regularly check front axle �uid
unless you suspect there is a leak or you hear an
unusual noise. A �uid loss could indicate a problem.
Have it inspected and repaired. Active Transfer Case
5-54