2008 GMC SAVANA clock
[x] Cancel search: clockPage 183 of 402

H(Clock) (AM-FM Radio and Radio with CD (Base)):
Your vehicle has a clock button for setting the time.
With this type of radio, the clock can be set with either
the radio turned on or off. SeeSetting the Clock on
page 3-65for more information.
Speed Compensated Volume (SCV):Radios with
Speed Compensated Volume (SCV) automatically
adjusts the radio volume to compensate for road and
wind noise as you speed up or slow down while driving.
That way, the volume level should sound about the
same as you drive.
To activate SCV:
1. Set the radio volume to the desired level.
2. Press the MENU button to display the radio
setup menu.
3. Press the pushbutton under the AUTO VOLUM
(automatic volume) label on the radio display.
4. Press the pushbutton under the desired Speed
Compensated Volume setting (OFF, Low, Med,
or High) to select the level of radio volume
compensation. The display times out after
approximately 10 seconds. Each higher setting
allows for more radio volume compensation at
faster vehicle speeds.Finding a Station
BAND:Press to switch between FM1 and FM2 and
AM. The selection displays.
f(Tune):Turn clockwise or counterclockwise to
increase or decrease the station frequency.
©SEEK¨:Press the arrows to go to the previous
or to the next station and stay there.
To scan stations, press and hold either arrow for
two seconds until a beep sounds. The radio goes to
a station, plays for a few seconds, then goes to the next
station. For AM-FM Radio and Radio with CD (Base),
the station frequency flashes while the radio is in
the scan mode. Press either arrow again to stop
scanning.
The radio seeks and scans stations only with a strong
signal that are in the selected band.
For AM-FM Radio and Radio with CD (Base), scan
presets within the current selected band by pressing and
holding either SEEK arrow for four seconds until a double
beep sounds. The radio goes to a stored preset, plays for
a few seconds if a strong signal is present, then goes to
the next stored preset. The station frequency flashes
while the radio is in the scan mode.
3-69
Page 185 of 402

The number of favorites pages can be setup using
the MENU button. To setup the number of favorites
pages, perform the following steps:
1. Press the MENU button to display the radio
setup menu.
2. Press the pushbutton located below the
FAV 1-6 label.
3. Select the desired number of favorites pages
by pressing the pushbutton located below the
displayed page numbers.
4. Press the FAV button, or let the menu time out,
to return to the original main radio screen showing
the radio station frequency labels and to begin
the process of programming your favorites for
the chosen amount of numbered pages.
Setting the Tone (Bass/Treble) (AM-FM
Radio and Radio with CD (Base))
BASS/TREB Bass/Treble:To adjust the bass or treble,
press the
fknob or the EQ button until the desired tone
control label displays. Turn the
fknob clockwise or
counterclockwise to increase or decrease the setting.
The display shows the current bass or treble level. If a
station’s frequency is weak, or if there is static, decrease
the treble.
Unique BASS/TREB settings can be saved for each
source.
Setting the Tone
(Bass/Midrange/Treble)
BASS/MID/TREB (Bass, Midrange, or Treble):
To adjust bass, midrange, or treble, press the
fknob
until the tone control labels display. Continue pressing
to highlight the desired label, or press the pushbutton
positioned under the desired label. Turn the
fknob
clockwise or counterclockwise to adjust the highlighted
setting. You can also adjust the highlighted setting by
pressing either SEEK arrow,
\FWD (forward),
or
sREV (reverse) button until the desired levels
are obtained. If a station’s frequency is weak or if there
is static, decrease the treble.
To quickly adjust bass, midrange, or treble to the middle
position, press the pushbutton positioned under the
BASS, MID, or TREB label for more than two seconds
and the level adjusts to the middle position.
To quickly adjust all tone and speaker controls to
the middle position, press the
fknob for more than
two seconds until a beep sounds.
3-71
Page 186 of 402

EQ (Equalization):Press this button to choose bass
and treble equalization settings designed for different
types of music. The choices are pop, rock, country, talk,
jazz, and classical. Selecting MANUAL or changing
bass or treble, returns the EQ to the manual bass and
treble settings.
Unique EQ settings can be saved for each source.
Adjusting the Speakers
(Balance/Fade) (AM-FM Radio
and Radio with CD (Base))
`
(Balance/Fade):To adjust the balance or fade,
press the
`button or thefknob until the desired
speaker control label displays. Turn the
fknob
clockwise or counterclockwise to adjust the setting.
Adjusting the Speakers (Balance/Fade)
BAL/FADE (Balance/Fade):To adjust balance or
fade, press the
fknob until the speaker control labels
display. Continue pressing to highlight the desired
label, or press the pushbutton positioned under
the desired label. Turn the
fknob clockwise or
counterclockwise to adjust the highlighted setting.
To quickly adjust balance or fade to the middle position,
press the pushbutton positioned under the BAL or
FADE label for more than two seconds. A beep sounds
and the level adjusts to the middle position.
To quickly adjust all speaker and tone controls to the
middle position, press the
fknob for more than
two seconds until a beep sounds.
3-72
Page 191 of 402

Using the Auxiliary Input Jack
Your radio system has an auxiliary input jack located
on the lower right side of the faceplate. This is not an
audio output; do not plug the headphone set into the front
auxiliary input jack. An external audio device such as an
iPod, laptop computer, MP3 player, CD changer, etc. can
be connected to the auxiliary input jack for use as another
source for audio listening.
Drivers are encouraged to set up any auxiliary device
while the vehicle is in PARK (P). SeeDefensive Driving
on page 4-2for more information on driver distraction.
To use a portable audio player, connect a 3.5 mm
(1/8 inch) cable to the radio’s front auxiliary input jack.
When a device is connected, press the radio CD/AUX
button to begin playing audio from the device over
the vehicle speakers.
O(Power/Volume):Turn clockwise or
counterclockwise to increase or decrease the volume of
the portable player. You might need to do additional
volume adjustments from the portable device if the
volume is not loud or soft enough.
BAND:Press to listen to the radio while a portable audio
device is playing. The portable audio device continues
playing, so you might want to stop it or turn it off.CD/AUX (CD/Auxiliary):Press to play a CD while a
portable audio device is playing. Press again and the
system begins playing audio from the connected portable
audio player. If a portable audio player is not connected,
the message No Aux Input Device displays.
Using an MP3
MP3 CD-R or CD-RW Disc
The radio plays MP3 files that were recorded on a
CD-R or CD-RW disc. The files can be recorded with
the following fixed bit rates: 32 kbps, 40 kbps, 56 kbps,
64 kbps, 80 kbps, 96 kbps, 112 kbps, 128 kbps,
160 kbps, 192 kbps, 224 kbps, 256 kbps, and 320 kbps or
a variable bit rate. Song title, artist name, and album are
available for display by the radio when recorded using
ID3 tags version 1 and 2.
Compressed Audio
The radio also plays discs that contain both
uncompressed CD audio (.CDA files) and MP3 files.
By default the radio shows the MP3 label on the left side
of the screen but plays both file formats in the order
in which they were recorded to the disc.
3-77
Page 207 of 402

Steering in Emergencies
There are times when steering can be more effective
than braking. For example, you come over a hill and find
a truck stopped in your lane, or a car suddenly pulls
out from nowhere, or a child darts out from between
parked cars and stops right in front of you. You
can avoid these problems by braking — if you can stop
in time. But sometimes you cannot; there is not room.
That is the time for evasive action — steering around the
problem.
Your vehicle can perform very well in emergencies like
these. First apply the brakes. SeeBraking on
page 4-3. It is better to remove as much speed as you
can from a possible collision. Then steer around the
problem, to the left or right depending on the space
available.An emergency like this requires close attention and a
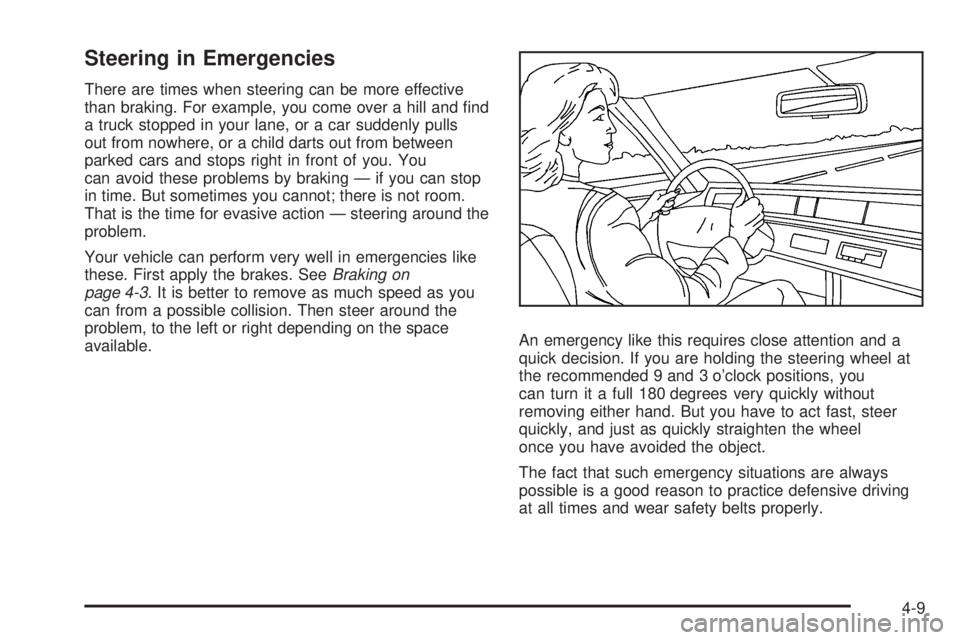
quick decision. If you are holding the steering wheel at
the recommended 9 and 3 o’clock positions, you
can turn it a full 180 degrees very quickly without
removing either hand. But you have to act fast, steer
quickly, and just as quickly straighten the wheel
once you have avoided the object.
The fact that such emergency situations are always
possible is a good reason to practice defensive driving
at all times and wear safety belts properly.
4-9
Page 250 of 402

Filling the Tank
{CAUTION:
Fuel vapor burns violently and a fuel �re can
cause bad injuries. To help avoid injuries to
you and others, read and follow all the
instructions on the pump island. Turn off your
engine when you are refueling. Do not smoke
if you are near fuel or refueling your vehicle.
Do not use cellular phones. Keep sparks,
�ames, and smoking materials away from fuel.
Do not leave the fuel pump unattended when
refueling your vehicle. This is against the law
in some places. Do not re-enter the vehicle
while pumping fuel. Keep children away from
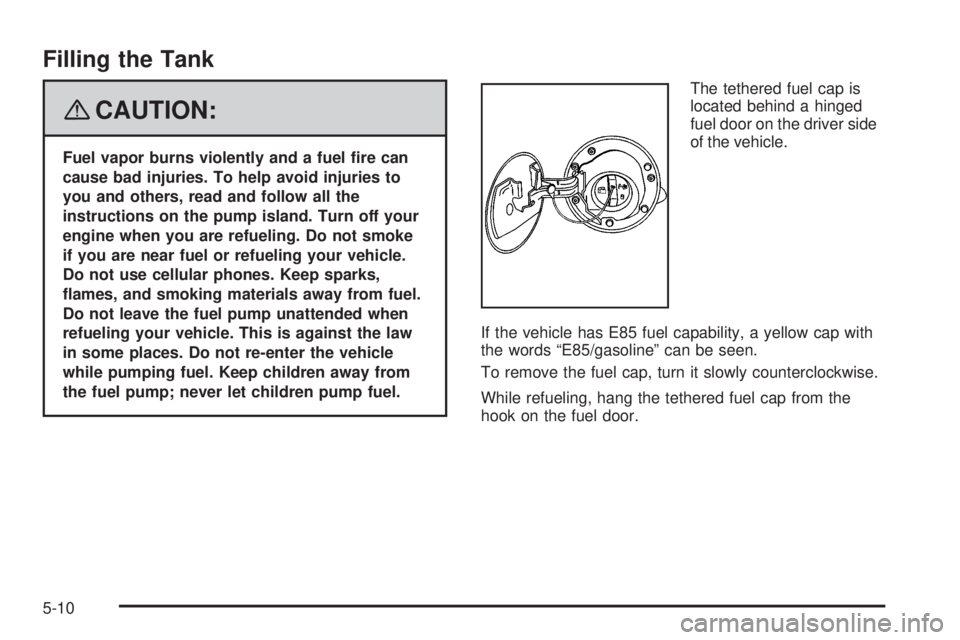
the fuel pump; never let children pump fuel.The tethered fuel cap is
located behind a hinged
fuel door on the driver side
of the vehicle.
If the vehicle has E85 fuel capability, a yellow cap with
the words “E85/gasoline” can be seen.
To remove the fuel cap, turn it slowly counterclockwise.
While refueling, hang the tethered fuel cap from the
hook on the fuel door.
5-10
Page 251 of 402

{CAUTION:
Fuel can spray out on you if you open the fuel
cap too quickly. If you spill fuel and then
something ignites it, you could be badly
burned. This spray can happen if your tank is
nearly full, and is more likely in hot weather.
Open the fuel cap slowly and wait for any hiss
noise to stop. Then unscrew the cap all the way.
Be careful not to spill fuel. Do not top off or overfill the
tank and wait a few seconds after you have finished
pumping before removing the nozzle. Clean fuel from
painted surfaces as soon as possible. SeeWashing Your
Vehicle on page 5-98.
When replacing the fuel cap, turn it clockwise until it
clicks. Make sure the cap is fully installed. The
diagnostic system can determine if the fuel cap has been
left off or improperly installed. This would allow fuel to
evaporate into the atmosphere. SeeMalfunction Indicator
Lamp on page 3-36.
{CAUTION:
If a �re starts while you are refueling, do not
remove the nozzle. Shut off the �ow of fuel by
shutting off the pump or by notifying the
station attendant. Leave the area immediately.
Notice:If you need a new fuel cap, be sure to get
the right type. Your dealer/retailer can get one for
you. If you get the wrong type, it may not �t properly.
This may cause your malfunction indicator lamp to
light and may damage your fuel tank and emissions
system. SeeMalfunction Indicator Lamp
on page 3-36.
5-11
Page 272 of 402

How to Add Coolant to the Radiator for
Gasoline Engines
If your vehicle has a diesel engine, see “How to Add
Coolant to the Radiator” under “Van Models” in the
Cooling System section of the DURAMAX
®Diesel
Supplement for the proper radiator fill procedure.
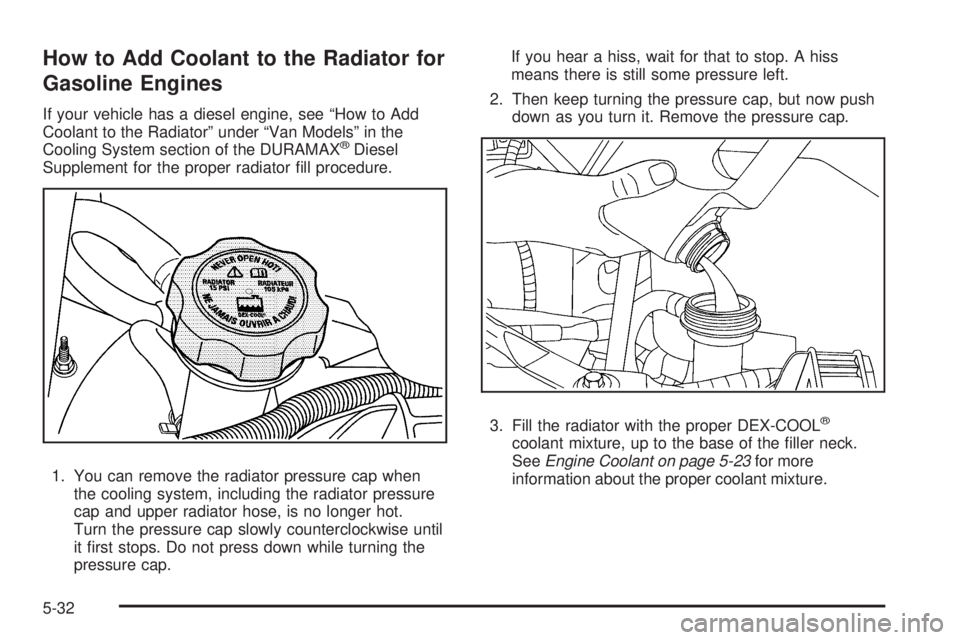
1. You can remove the radiator pressure cap when
the cooling system, including the radiator pressure
cap and upper radiator hose, is no longer hot.
Turn the pressure cap slowly counterclockwise until
it first stops. Do not press down while turning the
pressure cap.If you hear a hiss, wait for that to stop. A hiss
means there is still some pressure left.
2. Then keep turning the pressure cap, but now push
down as you turn it. Remove the pressure cap.
3. Fill the radiator with the proper DEX-COOL
®
coolant mixture, up to the base of the filler neck.
SeeEngine Coolant on page 5-23for more
information about the proper coolant mixture.
5-32