Page 330 of 402

Secondary Latch System
Your vehicle has an underbody-mounted tire hoist
assembly equipped with a secondary latch system.
It is designed to stop the spare tire from suddenly
falling off the vehicle if the cable holding the spare tire
is damaged. For the secondary latch to work, the
tire must be stowed with the valve stem pointing down.
SeeStoring a Flat or Spare Tire and Tools on
page 5-93for instructions on storing the spare tire
correctly.
{CAUTION:
Before beginning this procedure read all the
instructions. Failure to read and follow the
instructions could damage the hoist assembly
and you and others could get hurt. Read and
follow the instructions listed next.To release the spare tire from the secondary latch:
{CAUTION:
Someone standing too close during the
procedure could be injured by the jack.
If the spare tire does not slide off the jack
completely, make sure no one is behind you or
on either side of you as you pull the jack out
from the under spare.
1. Check under the
vehicle to see if the
cable end is visible.
If the cable is not
visible, start this
procedure at Step 6.
2. Turn the wrench counterclockwise until
approximately 6 inches (15 cm) of cable is exposed.
5-90
Page 332 of 402

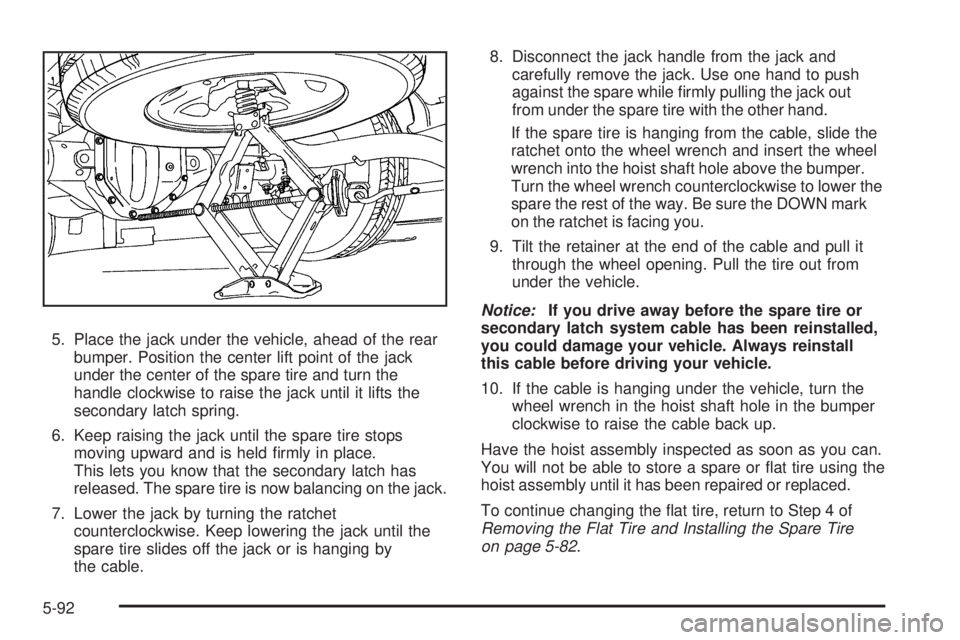
5. Place the jack under the vehicle, ahead of the rear
bumper. Position the center lift point of the jack
under the center of the spare tire and turn the
handle clockwise to raise the jack until it lifts the
secondary latch spring.
6. Keep raising the jack until the spare tire stops
moving upward and is held firmly in place.
This lets you know that the secondary latch has
released. The spare tire is now balancing on the jack.
7. Lower the jack by turning the ratchet
counterclockwise. Keep lowering the jack until the
spare tire slides off the jack or is hanging by
the cable.8. Disconnect the jack handle from the jack and
carefully remove the jack. Use one hand to push
against the spare while firmly pulling the jack out
from under the spare tire with the other hand.
If the spare tire is hanging from the cable, slide the
ratchet onto the wheel wrench and insert the wheel
wrench into the hoist shaft hole above the bumper.
Turn the wheel wrench counterclockwise to lower the
spare the rest of the way. Be sure the DOWN mark
on the ratchet is facing you.
9. Tilt the retainer at the end of the cable and pull it
through the wheel opening. Pull the tire out from
under the vehicle.
Notice:If you drive away before the spare tire or
secondary latch system cable has been reinstalled,
you could damage your vehicle. Always reinstall
this cable before driving your vehicle.
10. If the cable is hanging under the vehicle, turn the
wheel wrench in the hoist shaft hole in the bumper
clockwise to raise the cable back up.
Have the hoist assembly inspected as soon as you can.
You will not be able to store a spare or flat tire using the
hoist assembly until it has been repaired or replaced.
To continue changing the flat tire, return to Step 4 of
Removing the Flat Tire and Installing the Spare Tire
on page 5-82.
5-92
Page 344 of 402

Headlamp Wiring
The headlamp wiring is protected by fuses in the engine
compartment fuse block. An electrical overload will
cause the lamps to flicker on and off, or in some cases to
remain off. If this happens, have your headlamp wiring
checked right away.
Windshield Wiper Fuses
The windshield wiper motor is protected by a circuit
breaker and a fuse. If the motor overheats due to heavy
snow, etc., the wiper will stop until the motor cools.
Although the circuit is protected from electrical overload,
overload due to heavy snow, etc., may cause wiper
linkage damage. Always clear ice and heavy snow from
the windshield before using the windshield wipers. If the
overload is caused by some electrical problem and not
snow, etc., be sure to get it fixed.
Fuses and Circuit Breakers
The wiring circuits in your vehicle are protected from
short circuits by a combination of fuses and circuit
breakers. This greatly reduces the chance of fires
caused by electrical problems.
Look at the silver-colored band inside the fuse. If the
band is broken or melted, replace the fuse. Be sure you
replace a bad fuse with a new one of the identical size
and rating.
Floor Console Fuse Block
The floor console fuse block is located under the
driver seat.
5-104
Page 346 of 402
Fuse Usage
23 Empty
24 Empty
25 Cargo Door Unlock
26 Rear Door Lock
27 Front Door Lock
28 Rear Passenger Door Unlock
29 Upfitter Park Lamps
30 Front Passenger Door Unlock
31 Driver Door Unlock
32Airbag System, Automatic Occupant
Sensing (AOS) System
33 Right Rear Park Lamp
34 Left Rear Park Lamp
35 Upfitter Auxiliary 2 (J-Case)
36 Upfitter Auxiliary 1 (J-Case)
37 Rear Blower (J-Case)
38 Empty (J-Case)Relays Usage
39 Run (High Current Micro)
40 Park Lamps (High Current Micro)
41 Empty (Mini Micro)
42Upfitter Auxiliary 2 (High Current
ISO Relay)
43Retained Accessory Power (RAP)
(High Current Micro)
44 Rear Defogger (High Current Micro)
Circuit Breaker Usage
45 Power Window
46 Power Seats
Engine Compartment Fuse Block
The fuse block is located in the engine compartment on
the driver side of the vehicle.
Notice:Spilling liquid on any electrical components
on your vehicle may damage it. Always keep the
covers on any electrical component.
5-106
Page 349 of 402
Fuse Usage
51 Transmission
52 Even Ignition Injectors (Gas)
53 Glow Plug Module (Diesel)
54 Engine Control Module Battery
55 Odd Ignition Injectors (Gas)
56 Oxygen Sensor 2 (Gas)
57 Air Conditioning Compressor
58 Fan Clutch (Diesel)
59 V6 Fuel Injectors (Gas)
60Antilock Brake System Module
(J-Case)
61Antilock Brake System Motor
(J-Case)
62 Trailer Wiring (J-Case)
63 Empty
64 Starter Solenoid (J-Case)
65Engine Control Module (ECM),
Powertrain (Diesel) (J-Case)
66 Front Blower (J-Case)
67 Empty
77 Body BEC (Mega Fuse)Relays Usage
68 Empty
69 Run, Crank (High Current Micro)
70Windshield Wiper High
(High Current Micro)
71Windshield Wiper (High Current
Micro)
72 Fuel Pump (Mini Micro)
73 Crank (High Current Micro)
74Air Conditioning Compressor
(Mini Micro)
75 Fan Clutch (Diesel) (Solid State)
76 Powertrain (High Current Micro)
5-109
Page 361 of 402

(f)Lubricate all key lock cylinders, hood hinges, hood
prop rod pivot, hood latch assembly, secondary latch,
pivots, spring anchor, release pawl, rear compartment
hinges, latches, locks, fuel door hinge, and any moving
seat hardware. More frequent lubrication may be required
when exposed to a corrosive environment. Applying
silicone grease on weatherstrips with a clean cloth will
make them last longer, seal better, and not stick or
squeak.
(g)Vehicles with Gross Vehicle Weight Rating (GVWR)
above 10,000 lbs (4 536 kg) only: Inspect shields for
damage or looseness. Adjust or replace as required.
This is a Noise Emission Control Service. Applicable to
vehicles sold in the United States and recommended
for vehicles sold in Canada.
(h)Change automatic transmission fluid and filter if the
vehicle is mainly driven under one or more of these
conditions:
-In heavy city traffic where the outside temperature
regularly reaches 90°F (32°C) or higher.
-In hilly or mountainous terrain.
-When doing frequent trailer towing.
-Uses such as found in taxi, police, or delivery
service.(i)Drain, flush, and refill cooling system. This service can
be complex; you should have your dealer/retailer perform
this service. See Engine Coolant on page 5-23 for what to
use. Inspect hoses. Clean radiator, condenser, pressure
cap, and filler neck. Pressure test the cooling system and
pressure cap.
(j)A fluid loss in any vehicle system could indicate a
problem. Have the system inspected and repaired and
the fluid level checked. Add fluid if needed.
(k)Inspect system. Check all fuel and vapor lines and
hoses for proper hook-up, routing, and condition. Check
that the purge valve works properly, if equipped.
Replace as needed.
(l)If you drive regularly under dusty conditions, inspect
the filter at each engine oil change.
(m)Check system for interference or binding and for
damaged or missing parts. Replace parts as needed.
Replace any components that have high effort or
excessive wear. Do not lubricate accelerator or cruise
control cables.
(n)Visually inspect belt for fraying, excessive cracks, or
obvious damage. Replace belt if necessary.
6-9
Page 364 of 402

Automatic Transmission Shift Lock
Control System Check
{CAUTION:
When you are doing this inspection, the
vehicle could move suddenly. If the vehicle
moves, you or others could be injured.
1. Before you start, be sure you have enough room
around the vehicle. It should be parked on a level
surface.
2. Firmly apply the parking brake. SeeParking Brake
on page 2-26.
Be ready to apply the regular brake immediately if
the vehicle begins to move.3. With the engine off, turn the ignition to ON/RUN,
but do not start the engine. Without applying the
regular brake, try to move the shift lever out
of PARK (P) with normal effort. If the shift lever
moves out of PARK (P), contact your dealer/retailer
for service.Ignition Transmission Lock Check
While parked, and with the parking brake set, try to turn
the ignition to LOCK/OFF in each shift lever position.
•The ignition should turn to LOCK/OFF only
when the shift lever is in PARK (P).
•The ignition key should come out only in
LOCK/OFF.
Contact your dealer/retailer if service is required.
6-12
Page 366 of 402

Recommended Fluids and
Lubricants
This maintenance section applies to vehicles with a
gasoline engine. If your vehicle has a diesel engine, see
the maintenance schedule section in the DURAMAX
®
Diesel manual.
Fluids and lubricants identified below by name, part
number, or specification can be obtained from your
dealer/retailer.
Usage Fluid/Lubricant
Engine OilEngine oil which meets
GM Standard GM6094M and
displays the American Petroleum
Institute Certified for Gasoline
Engines starburst symbol. To
determine the proper viscosity for
your vehicle’s engine, seeEngine
Oil (Gasoline Engine) on page 5-15.
Engine Coolant50/50 mixture of clean, drinkable
water and use only DEX-COOL
®
Coolant. SeeEngine Coolant on
page 5-23.
Usage Fluid/Lubricant
Hydraulic Brake
SystemDelco®Supreme 11 Brake Fluid or
equivalent DOT-3 brake fluid.
Windshield
WasherOptikleen
®Washer Solvent.
Parking Brake
Cable GuidesChassis Lubricant
(GM Part No. U.S. 12377985, in
Canada 88901242) or lubricant
meeting requirements of NLGI #2,
Category LB or GC-LB.
Power Steering
SystemGM Power Steering Fluid
(GM Part No. U.S. 89021184, in
Canada 89021186).
Automatic
TransmissionDEXRON
®-VI Automatic
Transmission Fluid.
Key Lock
CylindersMulti-Purpose Lubricant, Superlube
(GM Part No. U.S. 12346241, in
Canada 10953474).
Chassis
LubricationChassis Lubricant
(GM Part No. U.S. 12377985, in
Canada 88901242) or lubricant
meeting requirements of NLGI #2,
Category LB or GC-LB.
6-14